Table of Contents
Advertisement
Advertisement
Table of Contents

Related Manuals for Bticino 308040


Summary of Contents for Bticino 308040
- Page 1 Vandal-resistant entrance panel 308040 Installer manual www.bticino.com...
- Page 2 Vandal-resistant entrance panel Installer manual...
-
Page 3: Table Of Contents
Vandal-resistant entrance panel Contents Installer manual Introduction Warnings and recommendations What’s in your box Description Front view Back view Installation General rules for installation Technical features Dimensional data Flush mounted installation Wall mounted installation Phisical configuration Connections Volume adjustment Completing the installation Installing the accessories Camera lens and display glass replacement Configuration using the keypad... - Page 4 Vandal-resistant entrance panel Contents Sorting of the list Contact setting Modifiy contact New contact Delete contact Delete address book Phonic module settings Access control settings FW versions Configuration using the software TiMonoblockEntrancePanel configuration software Connection to the PC Using the entrance panel Calling residents Searching using the arrow keys Through surname search...
-
Page 5: Introduction
The warranty will automatically become void in case of negligence, improper use, or tampering by unauthorised personnel. What’s in your box In your box you will find: • Vandal-resistant entrance panel 308040 • CD containing the Installer manual, as well as the configuration software with its user manual. -
Page 6: Description
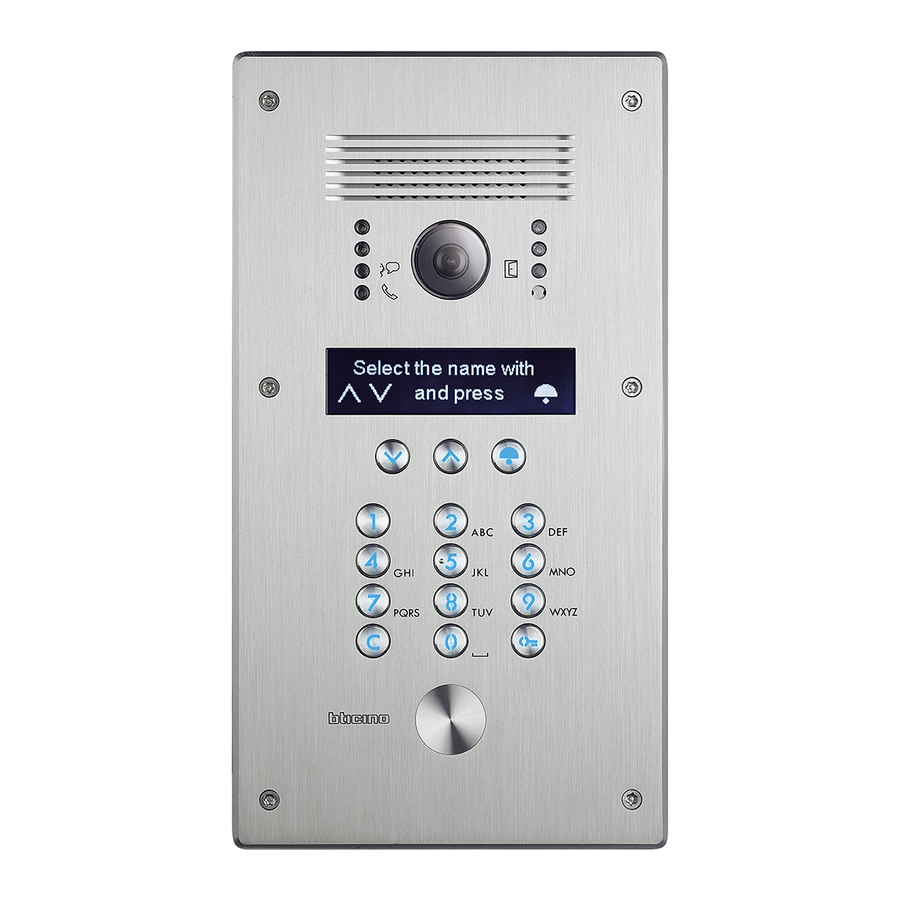
Vandal-resistant entrance panel Installer manual Description Front view 1. Loudspeaker 10. Resident search keys 2. Green LED: door open notification 11. Green LED: call forwarded Red LED: system busy 3. Microphone 12. Green LED: communication active 4. Display 13. 4 x lighting LED 5. -
Page 7: Back View
Vandal-resistant entrance panel Installer manual Back view 1. Loudspeaker volume adjustment 2. Jumpers (see table in the Programming section). 3. SCS/BUS connection 4. Connection of the door lock and door lock release pushbutton 5. Additional power supply 6. Configurator socket 7. -
Page 8: Installation
Vandal-resistant entrance panel Installer manual Installation General rules for installation The camera must not be installed facing strong light sources, or in locations where the area being shot is strongly backlit. In order to resolve these problems, we recommend that the camera is installed at a height of 180 cm, instead of the usual 160 –... -
Page 9: Dimensional Data
Vandal-resistant entrance panel Installer manual Dimensional data Flush mounted installation 128,2 35,2 259,6 Wall mounted installation 308026... -
Page 10: Flush Mounted Installation
Vandal-resistant entrance panel Installer manual Flush mounted installation Wall mounted installation 308026... -
Page 11: Phisical Configuration
Vandal-resistant entrance panel Installer manual Phisical configuration P = Entrance panel number N = Call number (Not used) T = Door lock time delay S = Type of call signal J1 - Jumper connected to J1 (default) = control speech synthesis enabled;... -
Page 12: Connections
BUS PL S+ S− Vandal-resistant entrance panel Installer manual Connections BUS PL S+ S− S+S- = 18 V - 4 A impulsive 250 mA holding current (30Ω max) Relay door lock 346250 S- S+ C NC NO S– 346250 8A cosφ = 1 24 Vac 4A cosφ... -
Page 13: Completing The Installation
Vandal-resistant entrance panel Installer manual Completing the installation Warning: before securing the entrance panel to the wall fit the protection caps in their housings, ensuring that they are positioned correctly Warning: when switched on for the first time, the entrance panel will ask the user to select the linguage;... -
Page 14: Installing The Accessories
Vandal-resistant entrance panel Installer manual Installing the accessories VIGIK® transponder reader CCT75NM key switch... -
Page 15: Camera Lens And Display Glass Replacement
Vandal-resistant entrance panel Installer manual Camera lens and display glass replacement To protect from acts vandalism, for the most delicate parts of the device we have included item 308034. This item makes it possible to replace the camera lens and the display glass in one operation. -
Page 16: Configuration Using The Keypad
Vandal-resistant entrance panel Installer manual Configuration using the keypad Access to the configuration menu Welcome Press and hold down simultaneously keys for more than 10 seconds > 10 s PASSWORD Enter the access code (default 12345) PASSWORD 1 2 3 4 5 CONFIGURATION If the correct code has been entered, direct Language... -
Page 17: If The Password Is Forgotten
Vandal-resistant entrance panel Installer manual If the password is forgotten If the password has been forgotten it’s possible to reset it in this way: Shut down the power supply Keeping pushed the keys turn on again the power supply. The display shows the current password PASSWORD 45678 Press... -
Page 18: Panel Settings
Vandal-resistant entrance panel Installer manual Panel settings CONFIGURATION Language Select the menu Panel settings Address book PANEL SETTINGS Device settings Confirm Password Home page Device settings DEVICE SETTINGS Brightness Contrast Keyboard light The DEVICE SETTINGS submenu can be used to set the following functions: Brightness: display brightness adjustment Contrast: contrast adjustment Keyboard light setting:... -
Page 19: Home Page
Vandal-resistant entrance panel Installer manual Home page The home page can be used to enter a customised welcome message, or any other message; the message can use a maximum of three rows of text of 15 characters (Template); to switch from upper case to lower case and vice versa use the arrow keys. -
Page 20: Acoustic Signalling
Vandal-resistant entrance panel Installer manual Acoustic signalling ACOUSTIC SIGNALLING Key sound Lock code change beep Voice msgs: volume The ACOUSTIC SIGNALLING submenu can be used to enable/disable the following functions: Key sound Audible signal emitted when the keys are pressed Lock code change beep Audible signal emitted when the door lock code is being changed •... -
Page 21: Restore Default Settings
Vandal-resistant entrance panel Installer manual Restore default settings PANEL SETTINGS Home page Select the function Acuostic signalling Restore default settings RESTORE DEFAULT SETTINGS? The request to confirm the restore appears Confirm Press EXIT The settings of the entrance panel revert to Default parameter the factory settings. -
Page 22: Address Book
Vandal-resistant entrance panel Installer manual Address book This menu can be used to enter residents’ data, including call codes and door lock release codes, as well as for performing any other functions described in the following paragraphs. CONFIGURATION Panel settings Address book Phonic module settings Building type... -
Page 23: Calling Mode - Type Of Code
Vandal-resistant entrance panel Installer manual Calling mode - Type of code CALLING MODE List of names Enter the type of code to use when calling Type of code ––> the residents ––> Function of bell button CODE TYPE Apartment Apartment address address SCS address of the handset Call code... -
Page 24: Sorting Of The List
Vandal-resistant entrance panel Installer manual Sorting of the list ADDRESS BOOK Building type The names can be sorted alphabetically by Calling mode surname or by identification code number. Sorting of the list SORTING LIST By surname The sorting order set is marked by an By ID number asterisk. -
Page 25: New Contact
Vandal-resistant entrance panel Installer manual New contact ADDRESS BOOK Contact setting This function can be used to enter new New contact residents in the address book Modify contact For each resident it will be possible to set the following data: •... -
Page 26: Delete Contact
Vandal-resistant entrance panel Installer manual Delete contact ADDRESS BOOK New contact This function gives the possibility of Modify contact deleting the contact selected Delete contact Select the contact to change Aaaa Aaaa Bbbb Bbbb Press Cccc Cccc DELETE THIS CONTACT? The request to confirm the elimination of Confirm the contact appears... -
Page 27: Phonic Module Settings
Vandal-resistant entrance panel Installer manual Phonic module settings The configurations of this menu are only possible if the phonic (speaker) module is not configured physically SCS SETTINGS P -Panel number T -Lock time S -Call tone P - Panel number Entrance panel SCS address (0 –... -
Page 28: Access Control Settings
Vandal-resistant entrance panel Installer manual Access control settings The configurations of this menu are only possible if the phonic (speaker) module is not configured physically ACCESS CONTROL SETTINGS Central address (A/B) Reader address (C) Operating mode (M) Central address Address of the access control central unit that manages the reader (A/B) (keypad built in the entrance panel, (keypad built in the entrance panel;... -
Page 29: Fw Versions
Vandal-resistant entrance panel Installer manual FW versions This menu shows the versions of the firmware installed on the device. FW VERSIONS LCD Module : 01.02.28 Phonic Module : 02.02.24 EXIT... -
Page 30: Configuration Using The Software
Vandal-resistant entrance panel Installer manual Configuration using the software TiMonoblockEntrancePanel configuration software The TiMonoblockEntrancePanel software supplied with the device gives the possibility of configuring the entrance panel for use with video door entry systems only; In this case it will be possible to manage also the residents address book using the software. -
Page 31: Using The Entrance Panel
Vandal-resistant entrance panel Installer manual Using the entrance panel Calling residents Residents may be called in three different ways: Searching using the arrow keys Select the name with Press one of the arrow keys to access the address book and press Use the arrow keys to scroll through the names until the name of the desired Aaaa... -
Page 32: Using The Numerical Code
Vandal-resistant entrance panel Installer manual Using the numerical code Select the name with If the resident’s call code is known, simply and press enter it on the keypad Enter the resident’s Insert the code code 1 2 3 4 Press to send the call and press Call to the switchboard (only in multifamily configuration) To call the switchboard... -
Page 33: Call The Only Resident (Only In Single Family Configuration)
Vandal-resistant entrance panel Installer manual Call the only resident (Only in single family configuration) To call press To call the only resident press this key the button Calling... -
Page 34: Door Lock Release Using A Numerical Code
Vandal-resistant entrance panel Installer manual Door lock release using a numerical code The procedure to follow for releasing the door lock associated to the entrance panel using the lock code changes depending on the length of the codes assigned to the residents, which can be up to the maximum length set. -
Page 35: Changing The Lock Code
Vandal-resistant entrance panel Installer manual Changing the lock code Each resident can change their lock code at any time using the following procedure. This procedure is not valid if the entrance panel is part of an access control system, and the operating mode is M= 2 Select the name with Press this key... - Page 36 BTicino SpA Viale Borri, 231 21100 Varese www.bticino.com BTicino SpA reserves at any time the right to modify the contents of this booklet and to communicate, in any form and modality, the changes brought to the same.
Need help?
Do you have a question about the 308040 and is the answer not in the manual?
Questions and answers