Table of Contents
Advertisement
Advertisement
Table of Contents

Subscribe to Our Youtube Channel
Related Manuals for Navien NaviLink


Summary of Contents for Navien NaviLink
- Page 1 ENG/FRE...
- Page 2 If your NaviLink requires service, you have several options for getting service, contact Technical Support at 1-800-519-8794 or on the website: www.navien.com. For warranty service, always contact Technical Support first. TEL: 1-800-519-8794 FAX: 1-949-420-0430 Add: 20 Goodyear lrvine, CA 92618...
- Page 3 FCC STATEMENT This equipment has been tested and found to comply with the limits Any changes or modifications in construction of this device which are for a Class B digital device, pursuant to part 15 of the FCC Rules. not expressly approved by the party responsible for compliance could These limits are designed to provide reasonable protection against void the user’s authority to operate the equipment.
- Page 4 Canadian Compliance Statement Industry Canada Statement This device complies with industry Canada license-exempt RSS Complies with the Canadian ICES-003 Class B specifications. standard(s). Operation is subject to the following two conditions: Cet appareil numérique de la classe B est conforme à la norme NMB- (1) This device may not cause interference.
- Page 5 _ Navien is not responsible for damage or injuries caused by third-party accessories, such as power adapters, cables, or antennas. CAUTION • When mounting the NaviLink on a wall, make sure that the wall is Indicates a potentially hazardous situation which, if not avoided, could strong enough to support the device.
-
Page 6: Table Of Contents
Member ..................... 29 Configuring the connection setting mode for NCB and NHB models Adding an Installer/Servicer NaviLink ..........30 Adding and Deleting NaviLink (Product Owner Accounts Only) ..32 Configuring the connection setting mode for NFB (residential) Setting/Changing NaviLink Router ..........36 models .................... -
Page 7: Overview
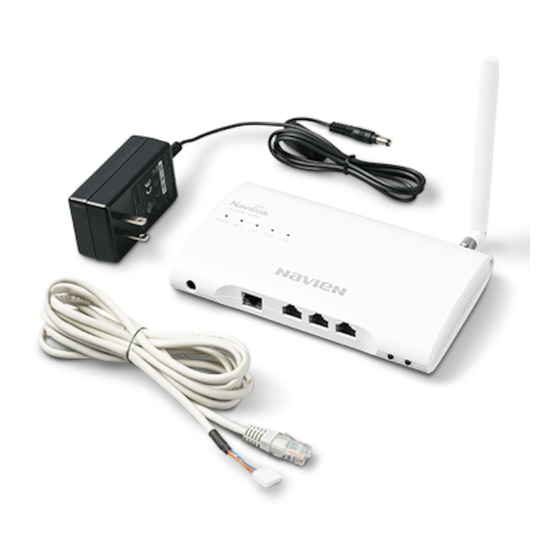
The NaviLink is an indoor converter for remotely controlling and monitoring boilers or water heaters via a smartphone app. A boiler, water heater, or a cascade system can be connected to a NaviLink. • Hardware or software specifications of the NaviLink or the contents of this manual may be changed without prior notice if the NaviLink’s... - Page 8 An antenna for Wi-Fi network is connected to the antenna port. Access Point (AP) mode button 5-pin connector Press and hold for more than 3 seconds to start NaviLink AP mode. LAN port A LAN cable is connected to the LAN port.
-
Page 9: Installing The Navilink
Installing the NaviLink Installing with a mounting plate You can place the NaviLink on stable, flat surface, such as a table, or install the NaviLink on a wall using the supplied mounting plate. The NaviLink can be installed on a wall using the supplied mounting plate. - Page 10 NaviLink in an area where there are no shadows and obstacles that can block the network signal. _ Do not place the NaviLink close to metallic objects and do not expose the NaviLink to direct sunlight.
-
Page 11: Connecting To Boilers/Water Heaters
Connect the RS-485 connector of the NaviLink cable to a communication channel port. Connect the 5 pin connector of the NaviLink cable to the J6 port on the right side of the boiler or water heater front panel or to the CNK1 port of the controller. - Page 12 NaviLink, the usage trend data may not be saved or can be deleted. • Only Navien boilers and water heaters can operate through NaviLink. • You can connect a single boiler or water heater unit to each NaviLink communication channel.
-
Page 13: Configuring The Connection Setting Mode For Npe Models
NaviLink connection setting mode. Adjusting this setting is required for single NPE units ONLY. Do not adjust In the NaviLink connection setting mode, use the Up (+) or Down (-) any of the following parameters for cascade systems. buttons to change the value and press the Info button to set to the desired mode. -
Page 14: Configuring The Connection Setting Mode For Ncb And Nhb Models
Press the Up (+) or Down (-) buttons to move to the X. parameter You can configure the NaviLink connection setting mode on the front setting for NCB models and the 9. parameter setting for NHB panel of NCB and NHB boilers connected to the NaviLink. -
Page 15: Configuring The Connection Setting Mode For Nfb (Residential) Models
To view and configure the external network connection, press the Back button ( ) and the Menu button ( ) simultaneously for 3 seconds, Verify that the NaviLink connection setting mode is disabled (OFF) for and then select “5. External Connection”. cascade systems. -
Page 16: Configuring The Connection Setting Mode For Nfb (Commercial) Models
To view and configure the external network connection, tap the Set Item Description button ( ) > Ext Connection on the screen. Turn on or turn off the remote control capabilities via the NaviLink connection. NaviLink Connect • Setting range: On/Off • Default: Off Item Description Turn on or turn off the remote control capabilities via the Navi-Link connection. -
Page 17: Connecting To A Cascade System
Connect the RS-485 connector of the NaviLink cable to a communication channel port. Connect the 5-pin connector of the NaviLink cable to connector A of the Navien Ready-Link cable. Connect the connector B of the Navien Ready-Link cable to the J6... - Page 18 RS-485 connectors is different although the appearance of the connectors is the same. • If the NaviLink cable length is too short, use CAT5 couplers, direct LAN cables, and Navien Ready-Link cables (optional) to extend the NaviLink cable.
-
Page 19: Connecting To A Network
• The NaviLink supports connection with up to 11 router channels. • In case you are using two or more NaviLink devices in one place, set • The NaviLink supports WEP, TKIP, and TKIP/AES authentication types. -
Page 20: Starting The Navilink App
Starting the NaviLink App Installing the App • You can register up to 4 accounts per one NaviLink. To register a NaviLink already registered with a Product Owner You can download the NaviLink app by searching NaviLink in the account, see Registering for Membership – Additional Member . - Page 21 Change NaviLink to AP mode. To register an installer member, see Registering for Membership – • Change to AP mode by holding the right button of NaviLink for at Installer/Servicer Member . least 3 seconds. The NaviLink APN (Access Point Name) is created at random if you run the AP mode in NaviLink.
- Page 22 Start the connection with the router. Tap Next or Done depending on the type of router connection. To select the router to connect with NaviLink for setting up a Wi-Fi network, select Next. • If you are setting up a network via a LAN connection, select Done.
- Page 23 Enter the device information → tap Next. password → tap OK. • Make sure to select the current time to set the NaviLink time. • If the router to connect does not appear on the list, refresh the • NaviLink must be connected with the server properly in order to router list.
-
Page 24: Registering For Membership - Installer/Servicer Member
Registering for Membership – Installer/Servicer Enter the user information → tap Done. You will be logged in automatically to use the NaviLink service when Member you finish signing up for membership. On the main screen of the app, tap Register Membership to sign up for Installer/Servicer membership. - Page 25 Additional User in Member Management after logging in with the Product Owner account. • Installer/Servicer Registration: Select in case of registering an installer account. After registering an installer account, you can check NaviLink information by registering an installer account to NaviLink while logged in from the Product Owner account.
-
Page 26: Registering For Membership - Additional Member
• After you finish signing up for Installer/Servicer membership, to use NaviLink properly. you must register Installer information in the Product Owner account to check NaviLink information from the Installer/Servicer member account. For more information, see Adding an Installer/ Servicer NaviLink . - Page 27 Tap Add an Additional User in the member management menu to Tap the user menu button ( ) → Manage Users. create a verification code. Send the created verification code to the user to register as an Additional User. • You may register up to 4 additional Users. •...
- Page 28 Enter additional user information → tap Done. Owner in the ID and PW fields, tap OK. You will be logged in automatically to use the NaviLink service when you finish signing up for membership. • Continue with the process in the smartphone of the user to be registered as an additional User.
-
Page 29: Deregistering/Delegating The Permissions Of A Product Owner Member
Deregistering/Delegating the Permissions of a Product Tap the user menu button ( ) → Deregistration to enter the Owner Member Product Owner Deregistration menu. On the main screen of the app, log in using Product Owner member account. • You can deregister Installer/Servicer accounts and Additional User accounts right away without delegating permissions. -
Page 30: Adding An Installer/Servicer Navilink
• You can set up an Installer/Servicer member permission to access user accounts connected to the Product Owner account will be NaviLink from the Product Owner account. deregistered at the same time. • The Additional User account that has delegated the permissions is able to use all functions of the Product Owner starting from the next login. - Page 31 Enter the Installer/Servicer account ID to register to NaviLink and Tap Settings on a NaviLink to register an Installer/Servicer member account and tap Registration and Change of Installer Information. tap Save to complete registration. After completing registration, you can view the corresponding NaviLink in the Installer/Servicer account.
-
Page 32: Adding And Deleting Navilink (Product Owner Accounts Only)
Adding and Deleting NaviLink (Product Owner Tap ADD NaviLink to start adding NaviLink. Accounts Only) • You may register up to 10 NaviLinks. • Additional Users have access to all NaviLinks of the Product On the main screen of the app, log in using Product Owner member Owner. - Page 33 Change NaviLink to AP mode. Tap Next after the connection is complete. • Change to AP mode by holding the right button of NaviLink for 3 seconds or longer. The NaviLink APN is created at random if you run the AP mode in NaviLink.
- Page 34 Tap Next or Done depending on the type of router connection. password → tap OK. • To select the router to connect with NaviLink for setting up a • If the router to connect does not appear on the list, refresh the Wi-Fi network, select Next.
- Page 35 Once NaviLink is added properly, the added NaviLink will be displayed on the device list screen. • Make sure to select the current time to set the NaviLink time. Select NaviLink to start controlling. • NaviLink must be connected with the server properly in order to •...
-
Page 36: Setting/Changing Navilink Router
Setting/Changing NaviLink Router Tap Settings to enter the NaviLink Settings menu and tap Setting Router to set up/change a router. On the main screen of the app, log in a using member account. • You can change NaviLink router from all accounts. - Page 37 Select a router to connect the NaviLink to → enter the router’s password → tap OK. • Change to AP mode by holding the right button of NaviLink for 3 seconds or longer. NaviLink APN is created at random if you run •...
- Page 38 • If the state of NaviLink cannot be updated, import the NaviLink status again by tapping the Refresh button. • If NaviLink does not change to an Online state, check the router settings of NaviLink or check the network state of the connected...
-
Page 39: Troubleshooting
_ Reset the WLAN settings by pressing the the NaviLink NaviLink and the router have connected. heaters when _ Connect the NaviLink to a router via a LAN SET/Reset button on the NaviLink for 5 to a router via the NaviLink is seconds. -
Page 40: Appendix
Adjustable output power but follow the 802.11b/g/n standard Input 100–240 VAC, 50–60 Hz Power adapter rating Output 12 VDC, 1 A Security WEP, WPA/WPA2, WPA2-PSK/WPA-PSK NaviLink power Ethernet 12 VDC, 0. 5 A rating Specification 10/100M Base-TX wired LAN Safety & FCC, IC... - Page 41 Environment Operating: 32 ℉–104 ℉ (0 ℃–40 ℃) Temperature Storage: -40 ℉–158 ℉ (-40 ℃–70 ℃) Operating: 10 %–90 % RH, Non-condensing Humidity Storage: 5 %–90 % RH, Non-condensing Physical specifications Dimensions 6.9 in X 1.17 in X 4.3 in (W X H X D) (175.8 mm X 29.9 mm X 109.8 mm) Weight...
- Page 42 Navien, and upon request, proof of the original installation date must use and service during the applicable warranty period identified also be provided to Navien. When the product is installed in a new above. The replacement component must be Navien original factory construction, the commencement date shall be dated upon which the component.
- Page 43 Warranty exclusions • Any damage, malfunction or failure caused by abuse, negligence, alteration, accident, fire, flood, freezing, wind, lightning and other Navien’s Limited Warranty shall be void in the event of an occurrence of acts of God. any of the following: •...
- Page 44 NLK-MN001-1903 ©2019 Navien Inc.
Need help?
Do you have a question about the NaviLink and is the answer not in the manual?
Questions and answers