
Related Manuals for Navien NR-20DU


Summary of Contents for Navien NR-20DU
- Page 1 Manual del Control Remoto Mantenga este manual cerca del control remoto para futuras consultas sobre su reparación o mantenimiento.
-
Page 2: Table Of Contents
Instrucciones de seguridad Elementos que se incluyen Conexión del cable de extensión Fijación del soporte para el montaje mural Control remoto Íconos de la pantalla LCD Encendido y Apagado del control remoto Ajuste de la temperatura del agua Modo de alta temperatura(Modo Comercial) Modo de bloqueo Ajuste del reloj Ajuste del temporizador de recirculación... -
Page 3: Instrucciones De Seguridad
Instrucciones de seguridad Lea y siga todas las instrucciones de seguridad para evitar condiciones inseguras de funcionamiento, incendios, explosiones, daños a la propiedad o lesiones personales. Conserve este manual para futuras consultas. En este manual se utilizan los siguientes símbolos de seguridad: Indica una situación de peligro inminente que, si no se evita, podría causar lesiones graves... -
Page 4: Elementos Que Se Incluyen
Elementos que se incluyen Al abrir la caja, encontrará los siguientes elementos junto con el control remoto. Confirme que la caja contenga todos estos elementos antes de instalar el control remoto. Manual de Usuario Cable de extensión 2 tornillos de rosca Soporte montaje pared... -
Page 5: Conexión Del Cable De Extensión
Conexión del Cable de Extensión 1. Conecte uno de los extremos del cable de 3. Conecte el extremo del cable de extensión al cable del control remoto. extensión al puerto del panel frontal del calefont. 2. Pase el otro extremo del cable de extensión por el agujero del soporte. -
Page 6: Fijación Del Soporte Para El Montaje Mural
Fijación del soporte para el montaje mural 1. Fije de manera segura el soporte a la pared. Puede fijarlo con dos tornillos directamente a la pared o a los dos agujeros del receptáculo de pared. Tornillos en la pared Tornillos en el receptáculo de la pared 2. -
Page 7: Control Remoto
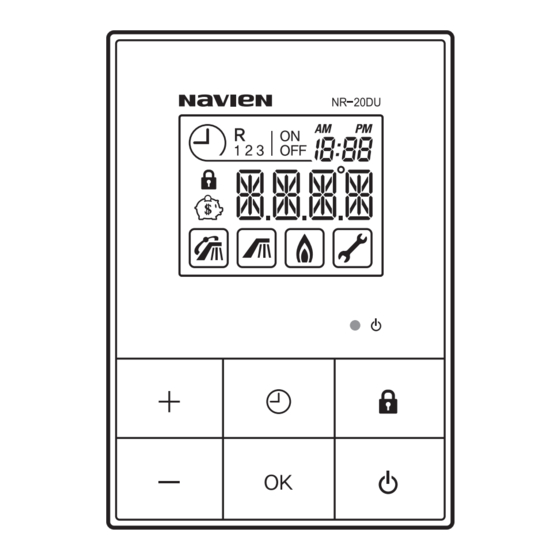
Control remoto Pantalla LCD Indicador LED Indica el estado del Indica las funciones y el estado actual. calefont. - Verde: modo Normal. - Rojo: error. Bloqueo Temporizador Acceso a la con guración Bloquea el funcionamiento del temporizador. de los otros botones. Botón (+) Encendido/Apagado Aumenta los valores... -
Page 8: Íconos De La Pantalla Lcd
Íconos de la pantalla LCD Temporizador establecido. Modo de recirculación. Indica hora actual. Agua caliente en uso. Indica la temperatura El calefont está en establecida. funcionamiento. Aparecerá un código de error Bloqueo activado. en la pantalla. Funcionamiento en modo de ahorro de energía. -
Page 9: Encendido Y Apagado Del Control Remoto
Encendido/Apagado del control remoto Para encender o apagar el control remoto, presione el botón de encendido/apagado. Cuando está encendido, La pantalla LCD se enciende. El indicador LED brilla de color verde. Aparece la temperatura del agua caliente. Cuando se produce un error, el Nota indicador LED brilla de color rojo y parpadea (excepto en el modo en... -
Page 10: Ajuste De La Temperatura Del Agua
Ajuste de la temperatura del agua Existen dos niveles para configurar la temperatura en función de los ajustes del interruptor DIP. Nivel 1: 36~50°C Presione el botón (+) o (-) para ajustar el valor de la temperatura.La temperatura varía en 0,5°C. Nivel 2: 50~60°C Presione por 2 segundos el botón (+) para aumentar la temperatura en 2°C. -
Page 11: Modo De Alta Temperatura(Modo Comercial)
Modo de Alta Temperatura (Modo Comercial) Mantenga presionado los botones (+) y (-) Presione el botón (+) por 5 segundos para aumentar simultáneamente por 10 segundos. la temperatura en 5°C, y presione el botón (-) para disminuirla en 5°C. Cuando se active este modo, aparecerá "HIGH"... -
Page 12: Modo De Bloqueo
Modo de Bloqueo El modo de bloqueo sirve para evitar presionar botones de manera accidental y para prevenir que los niños ajusten el control remoto. Para activar o desactivar este modo, presione el botón de Bloqueo durante 2 segundos. Cuando el modo de Bloqueo está activado, Aparece el ícono del candado en la pantalla. -
Page 13: Ajuste Del Reloj
Ajuste del reloj Presione el botón (+) o (-) para ajustar los Presione el botón del temporizador. minutos. Para guardar la configuración, presione OK. - Page 14 Luego, presione el botón (+) o (-) para ajustar Para finalizar y guardar, presione OK. la hora.
-
Page 15: Ajuste Del Temporizador De Recirculación
Ajuste del temporizador de recirculación Presione dos veces el botón del Presione el botón (+) o (-) para ajustar la hora Temporizador para configurar el temporizador de activación de la recirculación. de recirculación. Presione OK para establecer la hora de desactivación. - Page 16 Para establecer la hora de desactivación, Para guardar la configuración, presione OK. presione el botón (+) o (-). Repita estos pasos para la Programación #2 y...
- Page 17 Durante la programación, el ícono de calefacción previa se enciende y el área de Programación comienza a parpadear. Esta función es válida solo en los Nota modelos A con la función de calefacción previa.
-
Page 18: Eliminación De La Configuración Del Temporizador
Eliminación de la configuración del temporizador Presione durante 2 segundos el botón del Temporizador y el botón OK simultáneamente. Aparecerá "CLR" por 3 segundos y se cancelarán todas las configuraciones del temporizador. -
Page 19: Ajuste Del Número De Unidades Parael Sistema En Cascada
Ajuste del número deunidades para el sistema en Cascada Presione simultáneamente por 2 segundos los Presione el botón (+) o (-) para establecer el botones del Temporizador y Bloqueo con la número de unidades. unidad apagada. Presione OK para guardar los cambios. Aparecerá... -
Page 20: Ajuste De La Temperatura Del Modo Del Depósito De Acs
Ajuste de la temperatura del modo del depósito de ACS Presione simultáneamente el botón del Temporizado Presione el botón (+) o (-) para establecer el valor. y el botón OK durante 2 segundos con la unidad Presione OK para cambiar al modo de apagada para acceder al modo de Depósito de ACS. - Page 21 Aparecerá "S FU" y el valor correspondiente en l Aparecerá "S Ot" y el valor correspondiente en la pantalla. pantalla.Presione el botón (+) o (-) para establecer Presione el botón (+) o (-) para establecer el valor. el valor.Presione OK para cambiar al modo de (Se recomienda el valor 0).
- Page 22 Aparecerá “S Ft” y el valor correspondiente en la Presione el botón (+) o (-) para establecer pantalla. el valor. Presione OK para finalizar y para guardar la “SFt” establece el diferencial por encima de la configuración. Tº establecida para que una unidad específica del sistema en cascada deje de proporcionar agua El rango de valores varía entre 0 y la Nota...
-
Page 23: Ajuste Del Valor De Activación De La Unidad Esclava Del Sistema En Cascada
Ajuste del valor de activación de la unidad esclava del sistema en Cascada Con la unidad apagada, presione el botón de Bloqueo y Presione el botón (+) o (-) para establecer el Valor del OK simultáneamente por 2 segundos. Aparecerá en la Punto de Activación. -
Page 24: Ajuste Del Valor De Desactivación De La Unidad Esclava Del Sistema En Cascada
Ajuste del valor de desactivación de la unidad esclava del sistema en Cascada Con la unidad apagada, presione el botón de Presione el botón (+) o (-) para establecer el Valor Bloqueo y OK simultáneamente por 2 segundos. de Desactivación. Aparecerá... -
Page 25: Otras Funciones Del Sistema En Cascada
Otras funciones del sistema en Cascada En espera Información del sistema en el panel de la unidad esclava Permite al sistema permanecer en espera hasta que la unidad se encienda o se apague. Cuando el control remoto esté conectado al Aparecerá... -
Page 26: Errores E Íconos
Errores e íconos Dependiendo de la gravedad del problema, Reinicio el calefont puede dejar de funcionar o solo realizar Una vez solucionado el problema, presione OK las funciones básicas. una vez y aparecerá “RST” en la pantalla. Aparecerá un ícono de error en la pantalla y la luz LED se pondrá... -
Page 27: Alarma
Alar Alarma Deactivating the scale alarm La alarma se activa cuando el calefont necesita Presione por 2 segundos el botón OK. limpieza. Aparecerá “RST” en la pantalla por 3 segundos. Aparecerá en la pantalla, el estado actual y el código de la alarma. Es posible modificar los intervalos de las alarmas. -
Page 28: Solución De Problemas Básicos Y Preguntas Frecuentes
Solución de problemas básicos y preguntas frecuentes Si el calefont presenta algún problema, consulte la tabla a continuación para obtener posibles soluciones. Los códigos de error que aparecen en la pantalla del panel frontal se detallan en la siguiente sección. En el caso de problemas menores, reiniciar el calefont puede ser una solución. - Page 29 Problema Causa posible Solución El agua de la llave de agua ¿Está limpio el filtro de entrada del Limpie el filtro de entrada de agua fría. caliente sale fría o se enfría y agua fría? Consulte la sección “4.4 Limpieza del permanece fría.
-
Page 30: Códigos De Error
Códigos de error Código Motivo Diagnóstico/Acción E003 Falla de encendido Asegúrese de que la válvula de gas está abierta. E004 Detección de llama falsa Asegúrese de que el cable de alimentación está conectado a tierra de manera correcta. E012 Pérdida de llama Limpie el filtro de entrada de aire. - Page 31 Código Motivo Diagnóstico/Acción E060 Funcionamiento anormal: Llame al Servicio Técnico. interruptor dual Venturi E109 Funcionamiento anormal: Limpie el filtro de entrada de aire. Ver Manual del Usuario. motor del ventilador E110 Presión delaire anormal Asegúrese de que la tubería de extracción no está obstruida. Limpie el filtro de entrada de aire.
- Page 32 Código Motivo Diagnóstico/Acción E441 Salida agua caliente 2: Llameal Servicio Técnico. termostato abierto o cortocircuito E515 Funcionamiento anormal: control Revise los ajustes del panel frontal. E517 Funcionamiento anormal: Revise los ajustes del interruptor DIP de la Placa de ajuste interruptor DIP Circuito (Ver Manual del Usuario).
- Page 33 Memo...
- Page 35 Safety Instructions Included Items Connecting the Extension Cable Attaching the Wall Mounting Bracket Remote Controller LCD Display Icons Turning the Controller On or Off Setting the water temperature Entering High Temperature Mode (Commercial Mode) Entering Lock Mode Setting the clock Setting the Recirculation timer Canceling all timer settings Setting the initial number of activating units for Cascade systems...
-
Page 36: Safety Instructions
Safety Instructions The following safety symbols are used in this manual. Read and follow all safety instructions in this manual precisely to avoid unsafe operating conditions, fire, explosion, property damage, personal injury, or death. Keep this manual for future reference. Indicates an imminently hazardous situation which, if not avoided, could result in severe... -
Page 37: Included Items
Included Items When you open the box, you will find the following items with the remote controller. Check the box for each of the following items before installing the remote controller. User Manual Extension Cable 2 Tapping Screws Wall Mounting Bracket... -
Page 38: Connecting The Extension Cable
Connecting the Extension Cable 1. Connect one end of the extension cable to the 3. Connect the end of the extension cable to the port on the front panel of the water heater. cable connected to the remote controller. 2. Pass the other end of the extension cable through the hole in the bracket. -
Page 39: Attaching The Wall Mounting Bracket
Attaching the Wall Mounting Bracket 1. Affix the bracket securely to the wall by fastening 2 screws to the wall or to the 2 holes in the wall receptacle. On the wall In the wall receptacle 2. Hang the remote controller on the bracket by aligning the hooks. -
Page 40: Remote Controller
Remote Controller LCD display LED indicator Indicates functions and Indicates the status of water current status. heater. - Green: Normal Mode. - Red: Error occurred. Timer button Lock button Access the timer settings. Locks the other button operations. Up button Power button Increase the temperature Turns the remote controller... -
Page 41: Lcd Display Icons
LCD Display Icons Timer is set. Recirculation Mode. Displays the current time. Hot water is in use. Displays the current set Water heater operation is in temperature. progress. An error code will appear on the Operations are locked. display. Operating in energy saving mode. -
Page 42: Turning The Controller On Or Off
Turning the Controller On or Off To turn the controller on or off, press the Power button. When the power is on, The LCD display turns on. The LED indicator turns green. Hot water temperature is displayed. When an error occurs, the LED Note indicator turns RED and blinks (except for Cascade mode). -
Page 43: Setting The Water Temperature
Setting the water temperature Two levels of temperature settings are available depending on the DIP switch settings. Level 1: 98~120°F (36~50°C) Press the Up or Down button to adjust the temperature. The temperature changes by 1°F (0.5°C). Level 2: 120~140°F (50~60°C) Press and hold the Up button for 2 seconds to increase the temperature by 5°F (2°C). -
Page 44: Entering High Temperature Mode (Commercial Mode)
Entering High Temperature Mode (Commercial Mode) Press and hold the Up and Down button Press the Up button for 5 seconds to increase the simultaneously for 10 seconds. temperature by 10°F (5°C), and press the Down button to decrease the temperature by 10°F (5°C). When this mode is available, "HIGH"... -
Page 45: Entering Lock Mode
Entering Lock Mode To prevent accidental pressing of the buttons and to prevent children from adjusting the controller, you can activate the Temperature Lock Mode. To activate or deactivate Lock Mode, press the Lock button for 2 seconds. When Lock Mode is activated, The Lock icon appears on the display. -
Page 46: Setting The Clock
Setting the clock Press the Timer button. Adjust the minutes by pressing the Up or Down Button. Press the OK button to set the minutes. - Page 47 Once the minutes are set, adjust the hour by Press the OK button to finish and save the updated pressing the Up or Down button. time.
-
Page 48: Setting The Recirculation Timer
Setting the Recirculation timer Press the Timer button twice to set the Set the recirculation activation time by pressing Recirculation timer. the Up or Down button. Reservation Schedule #1 is ready to be set. Press the OK button to set the deactivation time. The recirculation timer settings are Note divided in 30 minute increments. - Page 49 Set the deactivation time by pressing the Up or Press the OK button to save the timer setting. Down button. Repeat these procedures for Reservation Schedule Settings #2 and #3.
- Page 50 During the reservation schedule, the preheating icon turns on and the Reservation area starts flashing. This is applied to A models with the Note preheating function only.
-
Page 51: Canceling All Timer Settings
Canceling all timer settings Press and hold the Timer and OK button simultaneously for 2 seconds. "CLR" appears for 3 seconds and all timer settings are canceled. -
Page 52: Setting The Initial Number Of Activating Units For Cascade Systems
Setting the initial number of activating units for Cascade systems Press the Timer and Lock button simultaneously Press the Up or Down button to adjust the number for 2 seconds with the Power off. of units. The number of initial activating water heaters is Press the OK button to save the changes. -
Page 53: Setting The Temperature Of Dhw Storage Tank Usage Mode
Setting the temperature of DHW storage tank usage mode Press the Timer and OK button simultaneously for Press the Up or Down button to adjust the value by 1. Storage Tank mode. Cascade On-unit (S OU) value is displayed on the (S FU) temperature settings mode. - Page 54 "S FU" and the corresponding value are shown on "S Ot" and the corresponding value are shown on the LCD display. the LCD display. Press the Up or Down button to adjust the value Press the Up or Down button to adjust the value by 1.
- Page 55 "S Ft" and the corresponding value are shown on Press the Up or Down button to adjust the value the LCD display. by 1. S Ft will set the differential above the set Press the OK button to finish the settings and exit temperature for the designated unit in cascade the settings.
-
Page 56: Setting The Slave Unit Activation Value For Cascade Systems
Setting the Slave Unit Activation Value for Cascade systems Press the Lock and OK button simultaneously Press the UP or DOWN button to adjust the Activation for 2 seconds with the Power off. Point Value. The diagnostics mode is displayed. Value of - 15.0 will activate the Slave unit(s) when the Select “0”... -
Page 57: Setting The Slave Unit Shutdown Value For Cascade Systems
Setting the Slave Unit Shutdown Value for Cascade systems Press the Lock and OK button simultaneously Press the UP or DOWN button to adjust the for 2 seconds with the Power off. Shutdown Value. The diagnostics mode is displayed. Value of - 5.0 will shutdown the Slave unit(s) when Select “1”... -
Page 58: Additional Features For Cascade Systems
Additional features for Cascade systems Standby feature before On/Off System info on the Slave panel This feature allows the system to stand by until the When the remote controller is connected to the Power is switched to On or Off. wrong panel, its ID is displayed on the LCD display as an error. -
Page 59: About Errors And Icons
About errors and icons Depending on the severity of the issue that is Reset errors causing the error, the water heater will either stop After the problems that are causing the errors are its operation or will only be able to perform basic resolved, press the OK button once and "RST"... -
Page 60: About Scale Warning
About scale warning Scale warning Deactivating the scale alarm When the water heater needs to be cleaned, the Press and hold the OK button for 2 seconds. scale alarm is activated. "RST" is displayed for 3 seconds. Current status and scale alarm code is displayed. You can change the scale warning intervals if desired. -
Page 61: Basic Troubleshooting And Frequently Asked Questions
Reset button on the front panel. If resetting the water heater and attempting the remedies suggested in the following do not resolve the problem, contact an authorized technician, a licensed professional, or Navien Technical Support at 1-800-519-8794 for service instructions. Problem Possible Cause(s) - Page 62 Problem Possible Cause(s) What to do The water from the hot Is the cold water inlet filter clean? Clean the cold water inlet filter. See water faucet is cold or “4.4 Cleaning the Inlet Water Filter and Is the hot water faucet open wide turns cold and stays cold.
-
Page 63: Error Code Guide
Error Code Guide Error Code Reason Self-diagnostic / Action E003 Ignition failure Ensure that the main gas supply valve is open. E004 False flame detection Ensure that the electrical cord is properly grounded. E012 Flame loss Clean the intake air filter. See the Operation manual. Ensure that the electrical cord is properly grounded. - Page 64 Error Code Reason Self-diagnostic / Action E060 Abnormal operation: dual venturi Contact Technical Support at 0844-332-2323 E109 Abnormal operation: fan motor Clean the intake air filter. See the Operation manual. E110 Abnormal air pressure Ensure that the exhaust pipe is free of obstructions. Clean the intake air filter.
- Page 65 Error Code Reason Self-diagnostic / Action E441 Hot water inlet2: thermistor open Contact Technical Support at 0844-332-2323 or short. E515 Abnormal operation: controller Check the front panel settings. E517 Abnormal operation: DIP switch Check the settings for Circuit Board DIP Switch (See the setting Installation manual).
- Page 66 Memo...
Need help?
Do you have a question about the NR-20DU and is the answer not in the manual?
Questions and answers