
Related Manuals for Navien NaviLink Lite


Summary of Contents for Navien NaviLink Lite
- Page 1 Wi-Fi Remote Control System W I - T H E L E A D E R C O N D E N S I N G T E C H N O L O G Y...
- Page 2 If your NaviLink requires service, you have several options for getting service, contact Technical Support at 1-800-519-8794 or on the website: www.navieninc.com. For warranty service, always contact Technical Support first. TEL: 1-800-519-8794 FAX: 1-949-420-0430 Add: 20 Goodyear lrvine, CA 92618 This product can be used in the following countries: USA, Canada...
- Page 3 FCC STATEMENT This equipment has been tested and found to comply with the limits for a Class B digital device, pursuant to part 15 of the FCC Rules. These limits are designed to provide reasonable protection against harmful interference in a residential installation. This equipment generates, uses and can radiate radio frequency energy and, if not installed and used in accordance with the instructions, may cause harmful interference to radio communications.
- Page 4 This device complies with part 15 of the FCC Rules. Operation is subject to the following two conditions: (1) This device may not cause harmful interference. (2) This device must accept any interference received, including interference that may cause undesired operation. Any changes or modifications in construction of this device which are not expressly approved by the party responsible for compliance could void the user’s authority to operate the equipment.
- Page 5 Canadian Compliance Statement This device complies with industry Canada license-exempt RSS standard(s). Operation is subject to the following two conditions: (1) This device may not cause interference. (2) This device must accept any interference, including interference that may cause undesired operation of the device. Cet appareil est conforme aux normes CNR exemptes de licence d’Inustrie Canada.
- Page 6 Industry Canada Statement Complies with the Canadian ICES-003 Class B specifications. Cet appareil numérique de la classe B est conforme à la norme NMB-003 du Canada. This device complies with RSS 210 of Industry Canada. This Class B device meets all the requirements of the Canadian interference-causing equipment regulations.
- Page 7 Important Safety Information The following Safety Alert Symbols are used in this manual. They are used to alert you to potential personal injury hazards. Obey all safety messages that follow this symbol to avoid possible serious injury or death. This Safety Alert Symbol precedes any safety message about risk of personal injury.
- Page 8 ‒ You can damage the device and expose yourself to the risk of an electric shock. ‒ Any attempt to disassemble or repair the device voids Navien’s Limited Warranty. Navien is not responsible for damage or injuries caused by voiding the Navien’s Limited Warranty.
- Page 9 ‒ Navien is not responsible for damage or injuries caused by third-party accessories, such as power adapters, cables, or antennas. • When mounting the NaviLink Lite on a wall, make sure that the wall is strong enough to support the device.
-
Page 10: Table Of Contents
Changing NaviLink router (product mode for NPE-2 models ......22 owner accounts only) ......49 Configuring the Connection Settings for Navien NCB and NHB Models ... 23 Troubleshooting ......53 Configuring the Connection Settings for Navien NFB, NFB-H, NFC, NFC-H, Appendix ........ -
Page 11: Overview
A boiler or water heater can be connected to a NaviLink Lite. • Hardware or software specifications of the NaviLink Lite or the contents of this Note manual may be changed without prior notice if the NaviLink Lite’s functions are upgraded. -
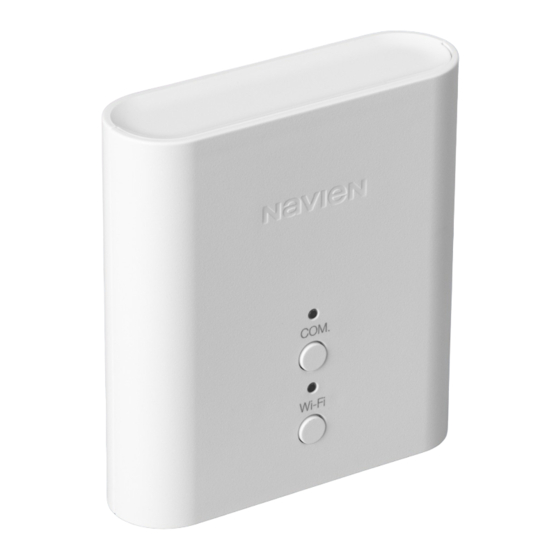
Page 12: Device Features
Device Features COM. Wi-Fi Depending on the latest specifications, the actual appearance of the NaviLink Lite Note may differ from the illustration. - Page 13 Part name Description • The green light blinks when a NaviLink Lite cable is connected to the communication port and the NaviLink Lite and boilers/ water heaters normally communicate. • The red light is turned on when the communication stops for COM LED 10 seconds or more.
- Page 14 Press and hold the button for more than 3 seconds to start Wi-Fi Wi-Fi button pairing mode. A NaviLink Lite cable is connected to the port for communication with boilers or water heaters. • The NaviLink Lite cable’s RS-485 connector should be connected to the communication port.
-
Page 15: Installing The Navilink Lite
This device is designed for indoor use only. Please install and use this device indoors. Installing on a Navien Boiler/Water Heater With the magnet plates on the rear, you can attach the NaviLink Lite to the boiler or water heater case. -
Page 16: Installing On A Wall
Installing on a wall You can install the NaviLink Lite on a wall using the supplied screws and anchors. Drill holes which fit the keyhole of the NaviLink Lite into the selected wall, and then insert the plastic anchor into the hole. - Page 17 NaviLink Lite in an area where there are no shadows and obstacles that can block the network signal. ‒ Do not place the NaviLink Lite close to metallic objects and do not expose the NaviLink Lite to direct sunlight.
-
Page 18: Connecting To Navien Boilers/Water Heaters
NaviLink Lite communication port and setting parameters on the front panel of boilers or water heaters. Connecting to a single boiler/water heater You can connect the NaviLink Lite and a boiler or water heater via the NaviLink Lite cable. Connect the RS-485 connector of the NaviLink Lite cable to a communication channel port. - Page 19 • Only Navien boilers and water heaters can operate through NaviLink Lite. Note • You can connect a single boiler or water heater unit to the NaviLink Lite communication port. • The maximum communication range between the NaviLink Lite and a connected boiler’s or water heater’s front panel is 164 ft (50 m).
-
Page 20: Configuring The Connection Settings For Navien Npe And Npn Models
NaviLink. Do not adjust the following parameters for cascade systems. You can configure the NaviLink connection setting mode from the front panel of Navien NPE and NPN water heaters connected to the NaviLink. On the front panel, press the Power button to turn off the water heater. - Page 21 In the Parameter information time mode, use the Up (+) or Down (-) buttons to select “P.18.” Then, press the Info button to enter the NaviLink connection setting mode. In the NaviLink connection setting mode, use the Up (+) or Down (-) buttons to change the value and press the Info button to set to the desired mode.
-
Page 22: Configuring The Connection Setting Mode For Npe-2 Models
Configuring the connection setting mode for NPE-2 models Adjusting this setting is required for single NPE-2 units ONLY. Cascade systems Note cannot be linked with NaviLink. Do not adjust the following parameters for cascade systems. Press the Menu button ( ) and the Back button ( ) simultaneously for 3 seconds, and then select “3. -
Page 23: Configuring The Connection Settings For Navien Ncb And Nhb Models
Configuring the Connection Settings for Navien NCB and NHB Models Adjusting this setting is required for single NCB or NHB units ONLY. Cascade Note systems cannot be linked with NaviLink. Do not adjust the following parameters for cascade systems. You can configure the NaviLink connection setting mode on the front panel of NCB and NHB boilers connected to the NaviLink. - Page 24 Press the Mode button and enter your 4-digit password. Use the Up (+) or Down (-) buttons to increase or decrease numbers and the Diagnostic button to move between digits. When you are done, press the Mode button. Press the Up (+) or Down (-) buttons to move to the X. parameter setting for NCB models and the 9.
- Page 25 When you are done, press the Mode button to save the settings. To exit the Special Parameter mode, press the Reset button twice. CAUTION Parameters must be set by a qualified professional with an extensive understanding of the boiler system. Setting parameters improperly may lead to property damage or injury.
-
Page 26: Configuring The Connection Settings For Navien Nfb, Nfb-H, Nfc, Nfc-H, And Ncb-H Models
Configuring the Connection Settings for Navien NFB, NFB-H, NFC, NFC-H, and NCB-H models Adjusting this setting is required for single NFB, NFB-H, NFC, NFC-H, and NCB-H Note units ONLY. Cascade systems cannot be linked with NaviLink. Do not adjust the following parameters for cascade systems. - Page 27 Rotate the Command dial ( ) to switch between the parameters or to increase/ decrease setting values. Press the Command dial ( ) to select a parameter or to confirm after making changes. Press the Back button ( ) to return to the previous screen or menu. Item Description Turn on or turn off the remote control capabilities via...
-
Page 28: Connecting To A Network
Supply power to the NaviLink Lite by connecting it to a boiler or water heater via a NaviLink Lite cable. (If power is not supplied to the NaviLink Lite via the NaviLink Lite cable, you have to use a power adapter sold separately.) Then, the NaviLink Lite is ready to be connected to a network. -
Page 29: Starting The Navilink App
Starting the NaviLink App Installing the app Registering for membership – create account You can download the NaviLink app by searching “NaviLink” in the Google Play On the main screen of the app, tap Store or Apple App Store. Sign up to create an account. Once the download is complete, start •... - Page 30 NaviLink/NaviLink Lite devices account via email. per Product Owner account. To • Verify your email to complete the add a new NaviLink/NaviLink Lite, email verification, and return to see Adding and deleting NaviLink the app and press Done. (product owner accounts only) on •...
-
Page 31: Registering For Membership - Owner
NaviLink/NaviLink Lite owner accounts only) on page device. If you are already registered 32 to complete your product as a NaviLink/NaviLink Lite Owner, registration. You can use the see Registering for membership - NaviLink app when the product Member on page 35 . -
Page 32: Registering Product (Product Owner Accounts Only)
• This user guide only describes status. To register a product, it registration for the NaviLink Lite. must be set to the allowed status during product registration. - Page 33 Select the searched NaviLink from the Select a router to connect the NaviLink list. NaviLink Lite → enter the router’s password → tap Done. • If there is only one NaviLink found, it will automatically • If the router does not appear on connect and move to the Router the list, refresh the router list.
- Page 34 When the router setting for the Enter the NaviLink/NaviLink Lite NaviLink Lite is completed, it moves information, then tap Done. to the Product Location screen. Move • State and City information the pin on the map to specify the cannot be edited, only Address location where the Navilink Lite is information can be edited.
-
Page 35: Registering For Membership - Member
Registering for membership You will be taken to the Sign-up complete screen after you finish - Member entering the device information. Tap Start to control the NaviLink device [Using your Owner Account] from the NaviLink app. Proceed after completing the steps in Registering for membership ‒... - Page 36 Select Manage Members. Tap + Invite Members to move to the Invite Members screen. • Manage Members can only be viewed with the Owner account. • In Manage Members, you can view the current member status, add members, or delete members. •...
- Page 37 Enter the account email address to be [Member Side] added and tap Confirmation. Check the invitation email in your • After adding the account, you member account. can check the current member’s • If you do not receive the mail, account addition status in check your trash or spam folder.
- Page 38 • The Member is someone who verification code expires, the will share the NaviLink/NaviLink verification will not be completed. Lite with the Owner. To register a new NaviLink/NaviLink Lite, see Adding and deleting NaviLink (product owner accounts only) on page 44 .
-
Page 39: Registering For Membership - Installer
Installer on the Member Type screen of the app. • The Installer member account is an account only for NaviLink/ NaviLink Lite installers. After signing up for an account, you can check the device by adding an Installer account to the Owner account. -
Page 40: Deregistering/Delegating The Permission Of A Product Owner Member
Deregistering/delegating Enter the user information and tap Done to complete the registration of the permission of a product the Installer account. Then, tap Start owner member to launch the NaviLink app. On the main screen of the app, tap the Menu button ( ) after logging in to the Product Owner member account. - Page 41 Select Manage Account → Select the member account to receive the permissions of the Product Owner Deregistration. member, and tap Confirmation. • If the account is not registered, a pop-up window will appear • Members/Installer members asking whether to deregister will be deregistered without without transferring permissions.
-
Page 42: Adding An Installer/Servicer Navilink
Adding an installer/servicer Select the Menu button ( ) → NaviLink Manage Product. On the main screen of the app, log in using the Product Owner member account. • You can set up an Installer/ Servicer member permission to access NaviLink from the Product Owner account. - Page 43 Select a device to register an Installer/ In the installer settings menu, tap Servicer account from the registered + Register the installer to move to product list and select Installer the Installer registration screen. Settings. • To deregister an Installer account, •...
-
Page 44: Adding And Deleting Navilink
Adding and deleting Tap + to start adding NaviLink Lite. NaviLink (product owner • You may register up to 10 NaviLink Lite devices. accounts only) • You can view the registered devices in the Member or Installer On the main screen of the app, log... - Page 45 Select the type of Navilink to register. Change NaviLink Lite to pairing mode. Tap Product Search after • This user guide only describes the entering pairing mode. NaviLink Lite registration. • If access to your smartphone's Bluetooth and location information access is not granted, set it to the allowed status.
- Page 46 Select the NaviLink from the NaviLink Select a router to connect the list. NaviLink Lite → enter the router’s password → tap Done. • If only one NaviLink is found, it will automatically connect • If the router does not appear on and move to the Router Setting the list, refresh the router list.
- Page 47 Product Location screen. Move the • State and City information cannot pin on the map to specify the location be edited, only the Address where the Navilink Lite is currently (Street) information can be installed. edited. • If access to your smartphone's •...
- Page 48 To delete a device, select the + button Select the deleted NaviLink/NaviLink → Delete Product. Lite and tap Save. • You cannot delete a device if only • When finished deleting a device, one device is registered. you can verify if the device has •...
-
Page 49: Changing Navilink Router (Product Owner Accounts Only)
Changing NaviLink router Select the Menu button ( ) → (product owner accounts Manage Product. only) Log in using an Owner account. • You can change the NaviLink/ NaviLink Lite router only from the Product Owner account. - Page 50 Tap the desired device from the Enter pairing mode on the NaviLink registered product list and tap Lite by pressing the Wi-Fi button Network Settings to start connecting (shown below) down for 3 seconds. to a router. The LED light will blink BLUE once the pairing is completed.
- Page 51 Select a router to connect the When the NaviLink Lite is successfully NaviLink Lite → enter the router’s connected to a router, you will be password → tap Done. taken to the main screen. • If the router does not appear on the list, refresh the router list.
- Page 52 The NaviLink Lite and app is now ready for use. The user can adjust temperature settings, monitor the system status and energy usage, and also receive error code push notifications.
-
Page 53: Troubleshooting
Cannot detect an • Ensure that the SSID and password of the router are set available router correctly. The green light of the COM LED blinks when the NaviLink Lite and boilers/water heaters are communicating normally. Cannot connect with boilers or water •... -
Page 54: Appendix
Appendix Specifications Wi-Fi Specification 2.4 GHz, IEEE Std. 802.11b/g/n (20 MHz) & 802.11n (40 MHz) 2,412 MHz‒2,462MHz for 802.11b/g/n (20 MHz) Frequency range 2,422 MHz‒2,452MHz for 802.11n (40 MHz) 11 channels for 802.11b/g/n (20 MHz) Channel 7 channels for 802.11n (40 MHz) 802.11b: DSSS/CCK Modulation type 802.11g/n: OFDM... - Page 55 (W X H X D) (82 mm X 89.5 mm X 25 mm) Whole package: 7.9 oz (224 g) Weight NaviLink Lite unit: 2.82 oz (80 g) Smartphone Android OS 4.0 or later OS version iOS 8.0 or later (iPhone 5S or later)
- Page 56 Navien, and upon request, proof of the original installation date must also be provided to Navien. When the product is installed in a new construction, the commencement date shall be dated upon which the end-user takes title to the property.
- Page 57 Navien’s prior written approval and shall be subject to Navien’s schedule of approved labor allowances. Warranty exclusions Navien’s Limited Warranty shall be void in the event of an occurrence of any of the following: • Improper installation, failure to install in strict compliance with the Installation &...
- Page 58 Navien’s website. Such policies include but are not limited to the installer’s failure to first contact Navien Technical Support while in front of the product for purposes of trouble shooting the identified problem or issue.
- Page 62 NLK-MN001-1602 ©2016-2021 Navien Inc. T H E L E A D E R C O N D E N S I N G T E C H N O L O G Y...
Need help?
Do you have a question about the NaviLink Lite and is the answer not in the manual?
Questions and answers