Panasonic CZ-256ESMC3 Technical Data Manual
Intelligent controller & communication adaptor
Hide thumbs
Also See for CZ-256ESMC3:
- Quick reference (36 pages) ,
- Operating instructions manual (230 pages)
Table of Contents
Advertisement
TECHNICAL DATA
■
Intelligent Controller
■
Communication Adaptor
★ The appearance and specifi cations of this unit and the contents of this Technical Data may be changed
without notice due to performance improvement or other reasons.
Commercial Air-Conditioner Business Unit
Issued March 2017
Panasonic Corporation
Order No. SBPAC1703004CE
Intelligent Controller
CZ-256ESMC3
Communication Adaptor
CZ-CFUNC2
REFERENCE NO. TD831198-00
Advertisement
Table of Contents

Related Manuals for Panasonic CZ-256ESMC3


Summary of Contents for Panasonic CZ-256ESMC3
- Page 1 TECHNICAL DATA Intelligent Controller ■ Intelligent Controller Intelligent Controller CZ-256ESMC3 Communication Adaptor ■ Communication Adaptor CZ-CFUNC2 ★ The appearance and specifi cations of this unit and the contents of this Technical Data may be changed without notice due to performance improvement or other reasons.
-
Page 2: Table Of Contents
Table of Contents Page Safety Precautions ■ ■ Note ■ Fault diagnosis ■ Various procedures ― Display and settings for the communication adaptor board ― Communication adaptor microcomputer rewrite procedure ― Intelligent Controller software update procedure ― Replacement of SD card, and operation procedure at time of failure ―... -
Page 3: Safety Precautions
2. Notes on products after repair Safety Precautions WARNING Before repair work, please read this “Safety ● Precautions” carefully and use the unit correctly. ● The notes shown here are categorized as “ Warning” and “ Caution”, but since they all describe Be sure to repair the unit with parts that important contents on safety, be sure to observe are described in the service parts list of the... -
Page 4: Note
N o t e 1. About noise malfunction Since communication control is performed by pulse signal, it has the property that it is easily affected by external noise. In normal use, there is no problem since this is taken into consideration on the circuit, but please note that an influence may occur depending on the installation state. -
Page 5: Table Of Contents
Fault diagnosis Fault Diagnosis Table of Contents 1. Communication error related 1-1. [C06] error appears on [Alarm list] screen· · · · · · · · · · · · · · · · · · · · · · · · · · · · · · · · · · · · ·4 1-2. - Page 6 Fault diagnosis 1. Communication error related 《Note》 The meaning of the symbols below are as follows. · Adaptor Communication adaptor · MAIN board MAIN board of communication adaptor 1. Communication error related 1-1. [C06] error appears on [Alarm list] screen 1 Detection method If the Intelligent Controller cannot receive data from the communication adaptor board for a certain period of time or longer, or if in an error is detected in the received data.
-
Page 7: C17] Or [Outdoor C17] Error Appears On [Alarm List] Screen
Fault diagnosis 1. Communication error related 1-2. [C17] or [Outdoor C17] error appears on [Alarm list] screen 1 Detection method If the communication adaptor cannot receive data from the indoor or O/D unit for a certain period of time or longer, or if an error is detected in the received data. - Page 8 Fault diagnosis 2. Screen display related 2. Screen display related 2-1. Touch panel LCD does not work (Screen operation is not possible) 1. Intelligent Controller 1-1 Is [InitCom...] displayed? Wait till it disappears Is the following displayed? Wait till it ·...
-
Page 9: No Indoor Unit Is Displayed On The Screen, Or The Number Of Units Is Too Small
Fault diagnosis 2. Screen display related 2-3. No indoor unit is displayed on the screen, or the number of units is too small 1. Intelligent Can you perform the basic settings for the indoor unit? Controller Register * For the basic settings of an indoor unit, select [I/D unit settings] from [Settings] →... -
Page 10: Pulse Count Does Not Enter Properly
Fault diagnosis 2. Screen display related 2-6. Pulse count does not enter properly 1. Intelligent Controller 1-1 Is the distribution group correctly set on the [Settings] → [System Settings] → [Distribution group settings] screen? Apply settings 1-2 Are you looking at the Cut off data display on the [Oper./ Look at the Status] →... -
Page 11: Cumulative Operation Time (Or Distribution Ratio) Is Counted Even Though The Unit Has Not Been Operating
Fault diagnosis 2. Screen display related 2-7. Cumulative operation time (or distribution ratio) is counted even though the unit has not been operating 1. Intelligent Controller 1-1 Is the cumulative time zero? (Distribution ratio is counted) 1-2 Did you not operate the unit but “forgot to stop it”? (END) 1-3 Did the schedule timer or event control work? (END) -
Page 12: Intelligent Controller Does Not Start
Fault diagnosis 2. Screen display related 2-9. Intelligent Controller does not start 1. Intelligent Controller does not start If “now loading ...” is displayed or the screen remains black even with the power turned on, turn the power OFF once and then turn it back ON again. If the device does not start up even after turning on the power again, replace the SD card. -
Page 13: Config. Change] Appears On [Alarm List] Screen
Fault diagnosis 2. Screen display related 2-10. [Config. change] appears on [Alarm list] screen 1 Detection method This alarm is issued when the system configuration (such as number of adaptors, number of indoor units, and addresses) has changed or may have been changed, and unlike other alarm messages it does not indicate an error. -
Page 14: Schedule Timer Does Not Work Properly
Fault diagnosis 3. Unit operation related 3. Unit operation related 3-1. The Schedule Timer does not work properly 1. Intelligent Have you definitely set [Oper./Status] → [Set schedule]? Controller Apply settings Is the timer selected for the indoor unit? Select Is that day set as an area holiday or timer special day for that (END) indoor unit? -
Page 15: External Alarm (Operation) Output Does Not Turn On Even Though Unit Alarm Is Detected
Fault diagnosis 3. Unit operation related 3-3 External alarm (operation) output does not turn ON even though unit alarm is detected 1. Intelligent Controller Have you definitely set [System Settings] → [Event Control]? Yes Modify settings Communication Is the external output wiring properly connected? Adaptor Correct wiring Intelligent Controller... -
Page 16: Various Procedures
Various procedures Display and settings for the communication adaptor board Display and settings for the communication adaptor board 1. Overview 1 Communication adaptor board • It is possible to display/set using the four keys (HOME/UP/DOWN/SET), 6-digit 7-segment and 2 LEDs (red/green). - Page 17 Various procedures Display and settings for the communication adaptor board 2. Display immediately after power on • Immediately after turning on the power of the communication adaptor, all the segments light for 3 seconds, then the microcomputer software version is displayed for 3 seconds, then the normal display is displayed. Power on (All segments lit: 3 seconds) (Microcomputer software version display:...
- Page 18 Various procedures Display and settings for the communication adaptor board 4. Indication for air conditioner configuration • While the indication for air conditioner configuration is displayed, information on the configurations of the indoor unit linked system 1 and linked system 2 are alternately displayed for 10 seconds each. • If the touch switch on the adaptor board is not operated, the indication for air conditioner configuration is normally displayed.
- Page 19 Various procedures Display and settings for the communication adaptor board 6. How to display the microcomputer version There are two ways to display the microcomputer version. 1 Restart power supply of communication adaptor board • Restart the power switch of the communication adaptor (if it is built in to the Intelligent Controller, restart the switch of the Intelligent Controller).
- Page 20 Various procedures Display and settings for the communication adaptor board 7. Advanced settings It is possible to refer to and set detailed data using the four keys on the communication adaptor board. Main menu Sub menu 00: Adaptor data display (* 1) 01: Indoor unit data display (* 1)
- Page 21 Various procedures Display and settings for the communication adaptor board ■ Main menu display • Press and hold the HOME key for 2 seconds or longer to display the menu display (level 0) screen. In this status, the UP key or DOWN key can be pressed to select an item from the main menu. On the main menu, 00 to 07 in the table below can be selected.
- Page 22 Various procedures Display and settings for the communication adaptor board ■ (02) Outdoor unit data display • This screen is not used normally; it is used when you want to add special specifications to a particular outdoor unit model. • On the main menu screen, select (02: outdoor unit data display) and press the SET key to display the data of the currently connected outdoor unit.
- Page 23 Various procedures Display and settings for the communication adaptor board ■ (04) Adaptor data settings • This screen is for browsing and changing the internal data of the communication adaptor and is not normally used. • If (04: Adaptor settings) is selected on the main menu and the SET key is pressed, a screen with current detailed information on the communication adaptor is displayed.
- Page 24 Various procedures Display and settings for the communication adaptor board (04–01) Pulse count 1 (04–02) Pulse count 2 (04–03) Pulse count 3 • Displays the current pulse count (P1, P2, P3). • If the pulse count value is changed, the distribution function of the Intelligent Controller will not operate properly. [How to change] 1 Press and hold the SET key for at least 1 second and the pulse count value blinks.
- Page 25 Various procedures Display and settings for the communication adaptor board (04–06) Communication speed • Displays the communication speed of the communication adaptor control wiring. • The factory setting is 19,200 BPS. • The following BPS can be selected. 1 19200 BPS ... Intelligent Controller (Do not change from this setting) 2 9600 BPS ...
- Page 26 Various procedures Display and settings for the communication adaptor board (04–08) EEPROM initialisation • Use this to restore the EEPROM to the factory settings. • EEPROM initial values list Pulse count 1 Pulse count 2 Pulse count 3 Address on air conditioner linked system 1 0x150 Address on air conditioner linked system 2 0x151...
- Page 27 Various procedures Display and settings for the communication adaptor board (04–09) Software reset [Reset method] 1 Press and hold the SET key for at least 1 second. 2 Reset is completed if all segments of the 7-segment numerical display light up. (04–10) No response settings • Sets whether to respond to request data from the communication adaptor control wiring.
- Page 28 Various procedures Display and settings for the communication adaptor board (04–12) Outdoor unit maintenance data not required • Use to reduce communication load by not acquiring outdoor unit data. • At factory shipment, it is set to acquire outdoor unit data. [How to change] 1 Press and hold the SET key for at least 1 second and the rightmost digit '0' flashes.
- Page 29 Various procedures Display and settings for the communication adaptor board ■ (05) Communication adaptor initial settings Press the UP or DOWN key to select a function from the following options. Display Function Adaptor number Address valid Centralised equipment main-sub ↑ Communication adaptor number of air DOWN conditioner linked system 1...
- Page 30 Various procedures Display and settings for the communication adaptor board (05–02) Address valid • Set whether the air conditioner is connected to air conditioner linked systems 1 or 2. Address valid Air conditioner linked systems 1 Air conditioner linked systems 2 0 (factory default) Air conditioner connected Air conditioner connected...
- Page 31 Various procedures Display and settings for the communication adaptor board (05–04) Communication adaptor number of air conditioner linked system 1 • When there are two or more communication adaptors on the air conditioner linked system, set the communication adaptor number so as to avoid address duplication. Communication adaptor Contents number...
- Page 32 Various procedures Display and settings for the communication adaptor board (05–06) Chattering cancel time • Set the chattering cancel time. Communication adaptor Described in manual Capability number 30 msec 24 msec 10 (factory default) 100 msec 80 msec [How to change] 1 Press and hold the SET key for at least 1 second and the chattering cancel time blinks. ...
- Page 33 Various procedures Display and settings for the communication adaptor board (05–07) Local adaptor • In systems without a local adaptor, it is possible to delete the local adaptor detection during configuration check. Local adaptor detection Air conditioner linked system 1 Air conditioner linked system 2 during configuration check 0 (factory default) [How to change]...
- Page 34 Various procedures Display and settings for the communication adaptor board ■ (06) Physical address settings and check Normally, it is not necessary to check/set the physical address. Display Function Physical address check / individual setting of air conditioner linked system 1 Physical address check / individual setting of air conditioner ↑...
- Page 35 Various procedures Display and settings for the communication adaptor board (06–03) Clear the physical address of all indoor units of air conditioner linked system 1 (06–04) Clear the physical address of all indoor units of air conditioner linked system 2 • Press and hold the SET key for at least 1 second on the Physical Address Clear screen and the physical address of all connected indoor units is cleared.
- Page 36 Various procedures Communication adaptor microcomputer rewrite procedure Communication adaptor microcomputer rewrite procedure 1. Things to prepare 1 Communication adaptor [CZ-CFUNC2] 2 Flash Writer 3 (software written) Factory procurement 3 12 V power supply Factory procurement 4 Dedicated wiring Factory procurement 2.
- Page 37 Various procedures Communication adaptor microcomputer rewrite procedure 3. How to check the version of the communication adaptor microcomputer 7-segment numerical display LED HOME key UP, DOWN and SET keys Terminating resistance plug for communication adaptor control wire CN32 Power supply Power switch Signal terminal terminal strip...
- Page 38 Various procedures Intelligent Controller software update procedure Intelligent Controller software update procedure The software is updated from the USB memory device. A service engineer should perform this operation. 1. Open the storage door and insert the USB memory device into the USB terminal. 2.
-
Page 39: Replacement Of Sd Card, And Operation Procedure At Time Of Failure
Various procedures Replacement of SD card, and operation procedure at time of failure Replacement of SD card, and operation procedure at time of failure The operation procedure is different depending on the type of SD device and SD card. Always replace the SD card according to the replacement procedure of the SD card you want to replace. - Page 40 Various procedures Replacement of SD card, and operation procedure at time of failure ● Definition of terms Two SD devices are built-in to the Intelligent Controller. Since SD cards of different types (SLC/MLC) are inserted into each device, we will explain based on the following definition of terms.
- Page 41 Various procedures Replacement of SD card, and operation procedure at time of failure ● Description of operation procedure After inserting the media correctly in SD device 1 and SD device 2, follow the procedure described below, and execute by pressing the 1 “Database switch” or 2 “Copy SD card” button. After pressing the button, execute the process according to the screen message.
- Page 42 Various procedures Replacement of SD card, and operation procedure at time of failure Properly execute the procedure according to the SD card you want to replace, based on the operation procedure of 1 to 2 in the operating procedure description. 【Power ON/OFF】...
- Page 43 Various procedures Procedure for replacing touch panel LCD Procedure for replacing touch panel LCD Procedure manual for replacing the LCD panel with touch panel of the Intelligent Controller. * Remove the power cable, etc., and do the work with the main unit removed from the incorporated control board, etc.
- Page 44 Various procedures Procedure for replacing touch panel LCD 3 Remove the LCD and touch panel connectors. (Three places) Cables for Cables for Cables for LCD touch panel LCD backlight 4 Temporarily mount the sheet metal on the back of the main unit (screw fastening not required), remove the screws on the sides of the LCD with the LCD facing up.
- Page 45 Various procedures Procedure for replacing touch panel LCD 6 Remove the following cables and replace the LCD. Cables for Cables for Cables for LCD LCD backlight touch panel 7 Assembly is done by reversing the above procedure. * Pass the cable through the hole in the original sheet metal. * Be careful that the cable does not get caught during assembly.
- Page 46 Various procedures Procedure when adding/removing a unit Procedure when adding/removing a unit When adding, removing or relocating units managed by the Intelligent Controller (indoor units, outdoor units, and local adaptors), problems may occur such as with centralised control and air conditioning distribution calculation unless the settings and registration are changed for the Intelligent Controller.
- Page 47 Various procedures Procedure when entering or leaving an area mid-period Procedure when entering or leaving an area mid-period If occupants move into or move out from an area while doing air conditioning distribution or charge distribution, unless the work for that is performed, note that it will affect the distribution of the other areas.
-
Page 48: Operating Instructions
Operating Instructions Intelligent Controller ● Intelligent Controller (CZ-256ESMC3) ー 46 ー... - Page 49 Operating Instructions Intelligent Controller ー 47 ー...
- Page 50 Operating Instructions Intelligent Controller ー 48 ー...
- Page 51 Operating Instructions Intelligent Controller ー 49 ー...
- Page 52 Operating Instructions Intelligent Controller ー 50 ー...
- Page 53 Operating Instructions Intelligent Controller ー 51 ー...
- Page 54 Operating Instructions Intelligent Controller Preparation Preparations before changing settings Preparation Preparations before changing settings ー 52 ー...
- Page 55 Operating Instructions Intelligent Controller Preparation Preparations before changing settings Preparation Preparations before changing settings ー 53 ー...
- Page 56 Operating Instructions Intelligent Controller Preparation Preparations before changing settings Preparation Preparations before changing settings ー 54 ー...
- Page 57 Operating Instructions Intelligent Controller Preparation Preparations before changing settings Preparation Preparations before changing settings ー 55 ー...
- Page 58 Operating Instructions Intelligent Controller Preparation Preparations before changing settings Preparation Preparations before changing settings ー 56 ー...
- Page 59 Operating Instructions Intelligent Controller Operation/Status Check the status of air conditioning units Preparation Preparations before changing settings ー 57 ー...
- Page 60 Operating Instructions Intelligent Controller Operation/Status Check the status of air conditioning units Operation/Status Check the status of air conditioning units ー 58 ー...
- Page 61 Operating Instructions Intelligent Controller Operation/Status Check the status of air conditioning units Operation/Status Check the status of air conditioning units ー 59 ー...
- Page 62 Operating Instructions Intelligent Controller Operation/Status Check the status of air conditioning units Operation/Status Check the status of air conditioning units ー 60 ー...
- Page 63 Operating Instructions Intelligent Controller Operation/Status Check the status of air conditioning units Operation/Status Check the status of air conditioning units ー 61 ー...
- Page 64 Operating Instructions Intelligent Controller Operation/Status Check the status of air conditioning units Operation/Status Check the status of air conditioning units ー 62 ー...
- Page 65 Operating Instructions Intelligent Controller Operation/Status Check the status of air conditioning units Operation/Status Check the status of air conditioning units ー 63 ー...
- Page 66 Operating Instructions Intelligent Controller Operation/Status Check the status of air conditioning units Operation/Status Check the status of air conditioning units ー 64 ー...
- Page 67 Operating Instructions Intelligent Controller Operation/Status Setting a schedule Operation/Status Check the status of air conditioning units ー 65 ー...
- Page 68 Operating Instructions Intelligent Controller Operation/Status Setting a schedule Operation/Status Setting a schedule ー 66 ー...
- Page 69 Operating Instructions Intelligent Controller Operation/Status Setting a schedule Operation/Status Setting a schedule ー 67 ー...
- Page 70 Operating Instructions Intelligent Controller Operation/Status Setting a schedule Operation/Status Setting a schedule ー 68 ー...
- Page 71 Operating Instructions Intelligent Controller Operation/Status Setting a schedule Operation/Status Setting a schedule ー 69 ー...
- Page 72 Operating Instructions Intelligent Controller Operation/Status Setting a schedule Operation/Status Setting a schedule ー 70 ー...
- Page 73 Operating Instructions Intelligent Controller Operation/Status Setting a schedule Operation/Status Setting a schedule ー 71 ー...
- Page 74 Operating Instructions Intelligent Controller Operation/Status Setting a schedule Operation/Status Setting a schedule ー 72 ー...
- Page 75 Operating Instructions Intelligent Controller Operation/Status Setting a schedule Operation/Status Setting a schedule ー 73 ー...
- Page 76 Operating Instructions Intelligent Controller Operation/Status Checking the alarm logs and operation/status change logs Operation/Status Setting a schedule ー 74 ー...
- Page 77 Operating Instructions Intelligent Controller Operation/Status Checking the alarm logs and operation/status change logs Operation/Status Checking the alarm logs and operation/status change logs ー 75 ー...
- Page 78 Operating Instructions Intelligent Controller Operation/Status Checking the alarm logs and operation/status change logs Operation/Status Checking the alarm logs and operation/status change logs ー 76 ー...
- Page 79 Operating Instructions Intelligent Controller Operation/Status Checking the alarm logs and operation/status change logs Operation/Status Checking the alarm logs and operation/status change logs ー 77 ー...
- Page 80 Operating Instructions Intelligent Controller Operation/Status Check accumulated values Operation/Status Check accumulated values ー 78 ー...
- Page 81 Operating Instructions Intelligent Controller Operation/Status Check accumulated values Operation/Status Check accumulated values ー 79 ー...
- Page 82 Operating Instructions Intelligent Controller Operation/Status Check accumulated values Operation/Status Check accumulated values ー 80 ー...
- Page 83 Operating Instructions Intelligent Controller Operation/Status Checking distribution data Operation/Status Check accumulated values ー 81 ー...
- Page 84 Operating Instructions Intelligent Controller Operation/Status Checking distribution data Operation/Status Checking distribution data ー 82 ー...
- Page 85 Operating Instructions Intelligent Controller Operation/Status Checking distribution data Operation/Status Checking distribution data ー 83 ー...
- Page 86 Operating Instructions Intelligent Controller Energy saving Settings for energy saving Energy saving Settings for energy saving ー 84 ー...
- Page 87 Operating Instructions Intelligent Controller Energy saving Settings for energy saving Energy saving Settings for energy saving ー 85 ー...
- Page 88 Operating Instructions Intelligent Controller Energy saving Settings for energy saving Energy saving Settings for energy saving ー 86 ー...
- Page 89 Operating Instructions Intelligent Controller Energy saving Settings for energy saving Energy saving Settings for energy saving ー 87 ー...
- Page 90 Operating Instructions Intelligent Controller Energy saving Settings for energy saving Energy saving Settings for energy saving ー 88 ー...
- Page 91 Operating Instructions Intelligent Controller Energy saving Settings for energy saving Energy saving Settings for energy saving ー 89 ー...
- Page 92 Operating Instructions Intelligent Controller Energy saving Settings for energy saving Energy saving Settings for energy saving ー 90 ー...
- Page 93 Operating Instructions Intelligent Controller Energy saving Settings for energy saving Energy saving Settings for energy saving ー 91 ー...
- Page 94 Operating Instructions Intelligent Controller Energy saving Settings for energy saving Energy saving Settings for energy saving ー 92 ー...
- Page 95 Operating Instructions Intelligent Controller Energy saving Settings for energy saving Energy saving Settings for energy saving ー 93 ー...
- Page 96 Operating Instructions Intelligent Controller Energy saving Settings for energy saving Energy saving Settings for energy saving ー 94 ー...
- Page 97 Operating Instructions Intelligent Controller Energy saving Settings for energy saving Energy saving Settings for energy saving ー 95 ー...
- Page 98 Operating Instructions Intelligent Controller Energy saving Settings for energy saving Energy saving Settings for energy saving ー 96 ー...
- Page 99 Operating Instructions Intelligent Controller Energy saving Settings for energy saving Energy saving Settings for energy saving ー 97 ー...
- Page 100 Operating Instructions Intelligent Controller Energy saving Displaying data in graphs Energy saving Settings for energy saving ー 98 ー...
- Page 101 Operating Instructions Intelligent Controller Energy saving Displaying data in graphs Graph Data Energy saving Displaying data in graphs ー 99 ー...
- Page 102 Operating Instructions Intelligent Controller Energy saving Displaying data in graphs Energy saving Displaying data in graphs ー 100 ー...
- Page 103 Operating Instructions Intelligent Controller Energy saving Displaying data in graphs Energy saving Displaying data in graphs ー 101 ー...
- Page 104 Operating Instructions Intelligent Controller Energy saving Displaying data in graphs Energy saving Displaying data in graphs ー 102 ー...
- Page 105 Operating Instructions Intelligent Controller Energy saving Displaying data in graphs Energy saving Displaying data in graphs ー 103 ー...
- Page 106 Operating Instructions Intelligent Controller Energy saving Displaying data in graphs Energy saving Displaying data in graphs ー 104 ー...
- Page 107 Operating Instructions Intelligent Controller Energy saving Displaying data in graphs Energy saving Displaying data in graphs ー 105 ー...
- Page 108 Operating Instructions Intelligent Controller Energy saving Displaying data in graphs Energy saving Displaying data in graphs ー 106 ー...
- Page 109 Operating Instructions Intelligent Controller Perform remote operation of the unit over a network Setting Perform remote operation of the unit over a network Setting ー 107 ー...
- Page 110 Operating Instructions Intelligent Controller Perform remote operation of the unit over a network Setting Perform remote operation of the unit over a network Setting ー 108 ー...
- Page 111 Operating Instructions Intelligent Controller Perform remote operation of the unit over a network Setting Perform remote operation of the unit over a network Setting ー 109 ー...
- Page 112 Operating Instructions Intelligent Controller Backing up/restoring data Setting Perform remote operation of the unit over a network Setting ー 110 ー...
- Page 113 Operating Instructions Intelligent Controller Backing up/restoring data Setting Backing up/restoring data Setting ー 111 ー...
- Page 114 Operating Instructions Intelligent Controller Backing up/restoring data Setting Backing up/restoring data Setting ー 112 ー...
- Page 115 Operating Instructions Intelligent Controller Backing up/restoring data Setting Backing up/restoring data Setting ー 113 ー...
- Page 116 Operating Instructions Intelligent Controller Backing up/restoring data Setting Backing up/restoring data Setting ー 114 ー...
- Page 117 Operating Instructions Intelligent Controller Backing up/restoring data Setting Backing up/restoring data Setting ー 115 ー...
- Page 118 Operating Instructions Intelligent Controller Configuring the system Setting Configuring the system Setting ー 116 ー...
- Page 119 Operating Instructions Intelligent Controller Configuring the system Setting Configuring the system Setting ー 117 ー...
- Page 120 Operating Instructions Intelligent Controller Configuring the system Setting Configuring the system Setting ー 118 ー...
- Page 121 Operating Instructions Intelligent Controller Configuring the system Setting Configuring the system Setting ー 119 ー...
- Page 122 Operating Instructions Intelligent Controller Configuring the system Setting Configuring the system Setting ー 120 ー...
- Page 123 Operating Instructions Intelligent Controller Configuring the system Setting Configuring the system Setting ー 121 ー...
- Page 124 Operating Instructions Intelligent Controller Configuring the system Setting Configuring the system Setting ー 122 ー...
- Page 125 Operating Instructions Intelligent Controller Configuring the system Setting Configuring the system Setting ー 123 ー...
- Page 126 Operating Instructions Intelligent Controller Configuring the system Setting Configuring the system Setting ー 124 ー...
- Page 127 Operating Instructions Intelligent Controller Configuring the system Setting Configuring the system Setting ー 125 ー...
- Page 128 Operating Instructions Intelligent Controller Configuring the system Setting Configuring the system Setting ー 126 ー...
- Page 129 Operating Instructions Intelligent Controller Configuring the system Setting Configuring the system Setting ー 127 ー...
- Page 130 Operating Instructions Intelligent Controller Configuring the system Setting Configuring the system Setting ー 128 ー...
- Page 131 Operating Instructions Intelligent Controller Configuring the system Setting Configuring the system Setting ー 129 ー...
- Page 132 Operating Instructions Intelligent Controller Configuring the system Setting Configuring the system Setting ー 130 ー...
- Page 133 Operating Instructions Intelligent Controller Configuring the system Setting Configuring the system Setting ー 131 ー...
- Page 134 Operating Instructions Intelligent Controller Maintenance settings Setting Maintenance settings Setting ー 132 ー...
- Page 135 Operating Instructions Intelligent Controller Maintenance settings Setting Maintenance settings Setting ー 133 ー...
- Page 136 Operating Instructions Intelligent Controller Maintenance settings Setting Maintenance settings Setting ー 134 ー...
- Page 137 Operating Instructions Intelligent Controller Maintenance settings Setting Maintenance settings Setting ー 135 ー...
- Page 138 Operating Instructions Intelligent Controller Maintenance settings Setting Maintenance settings Setting ー 136 ー...
- Page 139 Operating Instructions Intelligent Controller Maintenance settings Setting Maintenance settings Setting ー 137 ー...
- Page 140 Operating Instructions Intelligent Controller Maintenance settings Setting Maintenance settings Setting ー 138 ー...
- Page 141 Operating Instructions Intelligent Controller Appendix Appendix Maintenance settings Setting ー 139 ー...
- Page 142 Operating Instructions Intelligent Controller Appendix Appendix Appendix Appendix ー 140 ー...
- Page 143 Operating Instructions Intelligent Controller Appendix Appendix Appendix Appendix ー 141 ー...
- Page 144 Operating Instructions Intelligent Controller Appendix Appendix Appendix Appendix ー 142 ー...
- Page 145 Operating Instructions Intelligent Controller Appendix Appendix Appendix Appendix ー 143 ー...
- Page 146 Operating Instructions Intelligent Controller Appendix Appendix Appendix Appendix ー 144 ー...
- Page 147 Operating Instructions Intelligent Controller Appendix Appendix Appendix Appendix ー 145 ー...
- Page 148 Operating Instructions Intelligent Controller Appendix Appendix Appendix Appendix ー 146 ー...
- Page 149 Operating Instructions Intelligent Controller Appendix Appendix Appendix Appendix ー 147 ー...
- Page 150 Operating Instructions Intelligent Controller ー 148 ー...
-
Page 151: Installation Instructions
Installation Instructions Intelligent Controller ● Intelligent Controller (CZ-256ESMC3) Installation Instructions Intelligent Controller CZ-256ESMC3 Model No. English Read through the Installation Instructions before you proceed with the installation. In particular, you will need to read under the “Safety Precautions” on page 2. - Page 152 The English text is the original instructions. Other languages are translation of the original instructions. Circuit Breaker (ELCB) must be an approved Specifications Model No. CZ-256ESMC3 ± 30 seconds/month (at normal temperature 25 ˚C) Precision * Adjust periodically. Dimensions 240 × 280 × (20 + 65) mm Clock [H ×...
- Page 153 Installation Instructions Intelligent Controller Installation Precautions Supplied accessories < >: Number of pieces Screw <4> Washer <4> „ Installation Location (M4×10) z Avoid the following locations for installation. Nut <4> Clamper <4> • Under direct sunlight (M4) • Location near heat source •...
- Page 154 Installation Instructions Intelligent Controller Preparations for Wiring „ Power Supply Wiring „ Communication Adaptor Control Wiring • Be sure to use a dedicated line for power source. (When connecting a Communication Adaptor) • Be sure to earth this controller. z Polarity (+/-) present •...
- Page 155 Installation Instructions Intelligent Controller Wiring (continued) *4: Functional Ground Use these screws when connecting the shield Pass wiring to ground (FG through the power-in port. Inter-unit Power supply terminal board (TB1) control Power switch wiring Power supply wiring Communication ...
- Page 156 Installation Instructions Communication adaptor ● Communication adaptor (CZ-CFUNC2) Instructions for the Electrical Installer (CZ-CFUNC2) For your safety Read the following instructions carefully, and carry out secure installation and electrical work. The precautions given in this manual consist of specific “Warnings” and “Cautions”. They provide important safety-related information. Be sure to strictly observe all safety procedures.
- Page 157 Installation Instructions Communication adaptor Wiring Always shut off the power supply (breaker) before installing or uninstalling the Communication Adaptor. Remove the two screws at the front of the unit and remove the upper case. Arrangement of the terminal board and switches Detailed terminal Detailed board assembly illustration...
- Page 158 Installation Instructions Communication adaptor Basic wiring diagram Wiring procedure (Example using an Intelligent Controller ) Wire up the Communication Adaptor control wire and Inter-unit control wiring as shown in the Inter-unit control wiring figure below. Use the shielded wire for inter-unit Outdoor unit Intelligent controller control wiring.
- Page 159 Installation Instructions Communication adaptor Setting the Communication Adaptor board The switches on the board control the adaptor numbers, turn the inter-unit control wiring connection on and off, and control other settings. 7-segment LED HOME UP DOWN SET Set key Home key Down key Monitor LED D1: red...
- Page 160 Installation Instructions Communication adaptor (3) Setting the inter-unit control wiring connection on/off Repeat steps in section (2) “Adaptor number setting procedure” above. The following will display: (1.Ano.03) (When the adaptor number is 3) Press the key once so the following display appears: (2.Adyu.0) (Factory setting) Hold down the key for at least 1 second so the “0”...
- Page 161 Installation Instructions Communication adaptor Table 1 Communication Adaptor setting items Display Setting item ( grayed in areas indicate factory setting) [1] Adaptor number setting xx = 00 to 15: adaptor number Sets the Communication Adaptor number. (1.Ano.xx) Set 1 to 7 for the Intelligent Controller, making sure the same number is not used twice. When actually communicating from a master system, the link system address LINK1 is 2n and LINK2 is 2n + 1, where n is the Communication Adaptor number.
- Page 162 Installation Instructions Communication adaptor Connecting to external equipment (1) External all input (No-voltage a-contact (3) Pulse meter input (No-voltage a-contact static) pulse) Equipment DI–COMMON P–COMMON Gas flow meter (*) DI 1 All stop input (*) (fuel flow meter) DI 2 All operation input (*) Power flow meter 1 (*) (Reserved)
- Page 163 Installation Instructions Communication adaptor Appendix A. Connecting to an Intelligent Controller Before making the initial settings for the Communication Adaptor, check to ensure the below operations are complete. (1) Is the air conditioner test operation complete? (2) Is the wiring for the air conditioner and the Communication Adaptor complete? To set, follow steps 1 to 5 below in sequence.
-
Page 164: Intelligent Controller Web Settings
Intelligent Controller web settings Advance check sheet Intelligent Controller web settings — Advance check sheet Dear Client Thank you for choosing the Intelligent Controller. This system is fundamentally designed to be connected to an existing intranet or LAN. Before setting up, there are details to confirm in advance about the client’s PC (network) environment. - Page 165 Intelligent Controller web settings Advance check sheet 4 When using a DHCP server [Use DHCP server] Router with built-in DHCP, etc. ・ ・ ・・ ⇒ Go to 7 5 When using a fixed IP address [Use fixed IP address] Hub, etc. ・...
- Page 166 Intelligent Controller web settings Advance check sheet 7 Would you like to use the function to send an email when an alarm occurs? □ Yes ⇒ Go to 3 □ No ⇒ Go to 8 8 Do you want the NTP server to automatically adjust the current time? □...
- Page 167 Intelligent Controller web settings Advance check sheet [Explanation of terms] ◎ Intranet An intra-company (in-house) network constructed using Internet standard technology including TCP/IP communication protocol. ◎ LAN A LAN (Local Area Network) refers to a local area network, a network that connects computers and printers in the same building and exchanges data using twisted pair wires, coaxial cables, optical fibres, etc.
- Page 168 Intelligent Controller web settings Advance check sheet ◎ Net mask A net mask is a numerical value for identifying network addresses and a host addresses among IP addresses. ◎ SMTP (Simple Mail Transfer Protocol) Protocol for sending emails. Protocol specifications are defined in RFC821 and others. ◎...
- Page 169 Intelligent Controller web settings Web setting Web setting of Intelligent Controller [1] 1-to-1 connection About connection Connect the Intelligent Controller and the PC 1-to-1. Required items: LAN cable (Local procurement) About settings for the Intelligent Controller Select [System Settings] under [Settings], and display [Network Settings]. ...
- Page 170 Intelligent Controller web settings Web setting PC settings 4 Do not automatically obtain IP address. Uncheck the check box for “○ Obtain an IP address automatically”. 5 Set the IP address of the PC. 192. 168. 1. 1 6 Set the net mask of the PC. 255.
- Page 171 Intelligent Controller web settings Web setting [2] Connecting to an existing network using a fi xed IP address (without using a DHCP server) About connection □ Connect the Intelligent Controller to the existing network. Hub, etc. Required items: □ LAN cable (arrange locally) Please obtain the following information from the client (network administrator, etc.).
- Page 172 Intelligent Controller web settings Web setting [Network settings] screen XXX.XXX.XXX.XXX XXX.XXX.XXX.X 1 DHCP is set to Off. □ of DHCP On is left blank (unchecked) 2 Set the following IP address for the Intelligent Controller. IP address obtained for Intelligent Controller 3 Set the following net mask for the Intelligent Controller.
- Page 173 Intelligent Controller web settings Web setting [3] Connecting to an existing network using a DHCP server (setting the IP address automatically) About connection Connect the Intelligent Controller to the existing network. Router with built-in DHCP, etc. Required items: LAN cable (Field procurement) About settings for the Intelligent Controller Select [System Settings] under [Settings], and display [Network Settings].
- Page 174 Intelligent Controller web settings Web setting [4] Checking connection to the Web On your PC, start Internet Explorer 11 or later, or Google Chrome. Input “https:// IP address obtained for Intelligent Controller /intelicon/index.php” in the address field. * The “IP address obtained for Intelligent Controller” in this address is the same as the “IP address” set for the Intelligent Controller.
-
Page 175: Outgoing Email Settings
Intelligent Controller web settings Outgoing email settings Configuring outgoing email When an alarm occurs, this unit can automatically send alarm emails. Set the outgoing e-mail server and the email destination. 1. Touch [System Settings] in “Settings”. 2. Touch [Email settings]. The [System settings] screen is displayed. - Page 176 Intelligent Controller web settings Outgoing email settings Set the recipient Set the destination in the “Email Alarm recipient settings” dialogue. 1. Change the settings. Item Explanation Mail address Set the email address to send alarms emails. The touchscreen keyboard appears when you touch this and you can change the email address. Valid Users with a check mark in this column will be sent alarm emails.
-
Page 177: Input Of The Admin Number (Password)
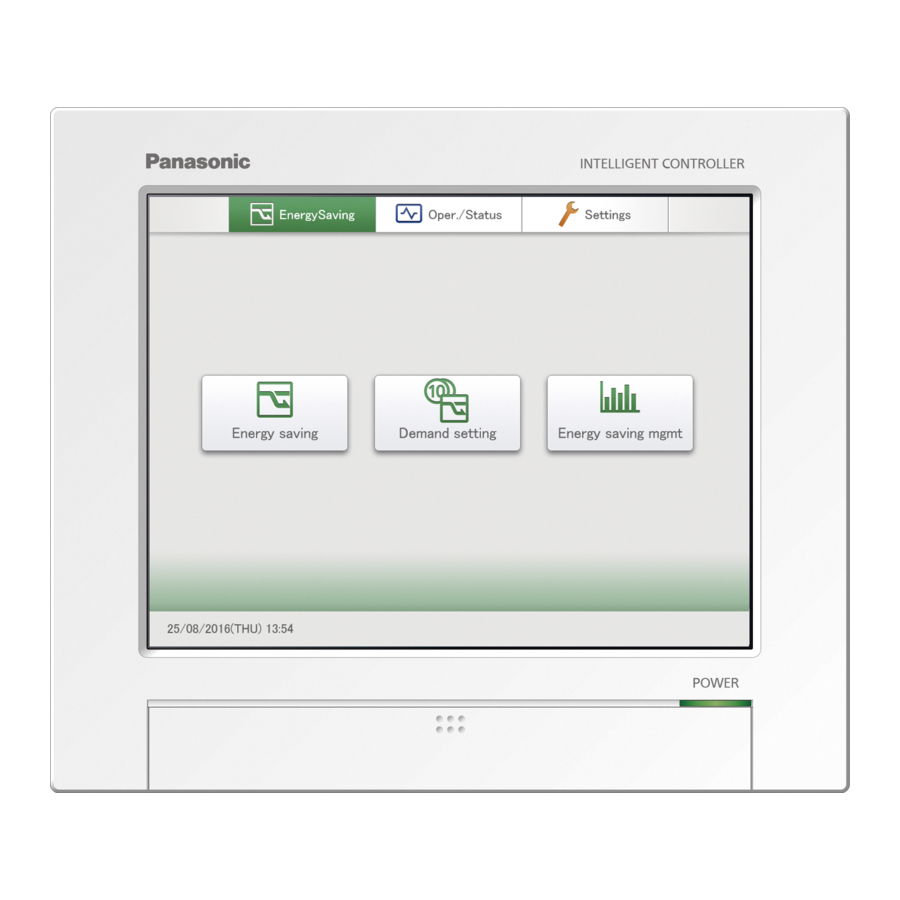
Input of the admin number (password) About input of the admin number (password) On screen menus marked ★☆ , for security reasons, it is necessary to input the admin number for use. 1. Touch the screen menu to display the admin number entry screen. 2. - Page 178 Menu list showing the level of the admin number (password) EnergySaving Other miscellaneous settings 1. Select the top menu y Touch the “EnergySaving” “Oper./ Status” “Settings” tab. 2. Select the sub menu EnergySaving (Settings related to energy saving) Operating Sub menu Screen menu Overview...
- Page 179 Settings (Other miscellaneous settings) Operating Sub menu Screen menu Overview Instructions page ★ Calendr sttgs for distr calc Set specified days, cutoff days, and target time slots 148 (120) (regular hour ranges) of each day of the week for distribution calculation. ☆...
Need help?
Do you have a question about the CZ-256ESMC3 and is the answer not in the manual?
Questions and answers