Table of Contents
Advertisement
Advertisement
Table of Contents

Related Manuals for Launch X-431 Diagun


Summary of Contents for Launch X-431 Diagun
- Page 2 LAUNCH is not responsible for any use of this information as applied to other units. Neither LAUNCH nor its affiliates shall be liable to the purchaser of this unit or third parties for damages, losses, costs, or expenses incurred by...
- Page 3 Do not hesitate to contact LAUNCH if you come across such questions. We are to help you solve the problem as soon as possible Precautions on Operating Vehicle’s ECU...
- Page 4 LAUNCH X-431Diagun User's Manual Do connect ECU harness connector firmly, otherwise electro elements, such as IC inside ECU, will be damaged. Precautions on Operation The appliance is a sophisticated electronic device, never have it clashed when in use. Make sure the appliance is properly connected to the DIAGNOSTIC CONNECTOR to avoid communication interruptions.
-
Page 5: Table Of Contents
LAUNCH X-431Diagun User's Manual Contents 1 Introduction ................1 2 X-431Diagun ................ 2 2.1 X-431Diagun Component Descriptions ...... 2 2.2 Port and Indicator Descriptions ........2 2.3 X-431Diagun General Components ......3 2.4 X-431Diagun Specifications ........5 2.5 X-431Diagun Start............5 2.5.1 Power on............ - Page 6 LAUNCH X-431Diagun User's Manual 3.5.3 Comparison and Analysis of Datastream ....33 4 Update of Diagnostic Software ........... 34 4.1 User Registration ............. 34 4.2 Member Login ............37 4.3 Software Download ..........38 4.4 Software Update ............41 4.5 Purchase and Update Software ....... 44...
-
Page 7: Introduction
"Portable Vehicle Fault Diagnosis Technology" is an advanced vehicle diagnosis technology first created and advocated by LAUNCH and represents the highest level of vehicle diagnosis technology in the world, it leads the development trend and offers the best solutions. X-431Diagun can test almost all the domestic cars and the imported ones from Asia, Europe and America. -
Page 8: 431Diagun
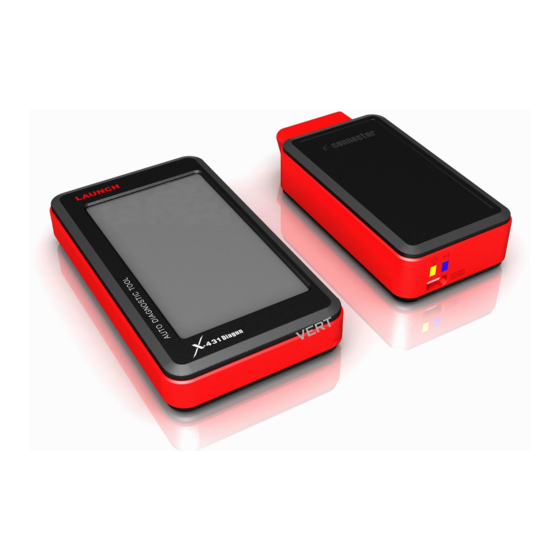
LAUNCH X-431Diagun User's Manual 2 X-431Diagun 2.1 X-431Diagun Component Descriptions X-431Diagun includes: X-431Diagun main unit(right) and X-431Diagun connector(left)-see fig.2-1. X-431Diagun main unit communicates with X-431Diagun connector via wireless Blue Tooth (also supports wire connection). Figure 2-1X-431Diagun External View 2.2 Port and Indicator Descriptions... -
Page 9: X-431Diagun General Components
LAUNCH X-431Diagun User's Manual Figure 2-2 X-431Diagun main unit ports and indicators Diagram 2-1 X-431Diagun ports and indicators Diagnostic Connector Diagun Connector Blue Tooth LED (blue) D Power LED (red) 12PIN Port Lanyard Eyelet Diagnostic Interface H Earphone Hole & TF Card Slot... - Page 10 LAUNCH X-431Diagun User's Manual X-431Diagun Main unit screen contains main unit operation buttons, test result and help. X-431Diagun Diagnostic box with connector OBDⅡ-16 pin connector X-431Diagun to connect X-431Diagun main unit main unit and diagnostic cable X-431Diagun connector Diagnostic 16 PIN extension cable...
-
Page 11: X-431Diagun Specifications
CPU: 400 MHz ARM9 Memory Card: 1G TF Card Main Unit: Universal Serial Bus/USB Main Unit Power: DC5V X-431 Diagun Connector: DC12V/24V Printer Interface: USB Display Screen: 480X272, 4.3-inch LCD with touch screen Rechargeable Battery: 1530 mAh Bluetooth: theoretically 100m, suggest 20-50m... -
Page 12: Calibrate Touch Screen
LAUNCH X-431Diagun User's Manual Operate following the tips on the screen after the progress bar was read, as shown on the left. 2.5.2 Calibrate Touch Screen Click the touch screen in the above figure to enter into ‘Calibrate Touch Screen’... -
Page 13: Taskbar
LAUNCH X-431Diagun User's Manual The screen will display interface as shown on the left after the touch screen was calibrated. You can click to enter the system desktop, or wait for 30 seconds to enter automatically. Note: You can also calibrate the touch screen by clicking “Start Menu... -
Page 14: Battery And Charger
LAUNCH X-431Diagun User's Manual 2.6 Battery and Charger 2.6.1 Battery Your appliance is powered by a rechargeable lithium battery. The followings, such as crush the battery, short-circuit the battery, dispose of the battery in a fire or in the high temperature environment and dispose as household waste etc, are prohibited. - Page 15 LAUNCH X-431Diagun User's Manual Note: Click the start menu " "at the bottom left of the interface to find "control panel". With a new window pops up, double click "Power", and the power properties interface appears. You can also double click the icon for ‘battery’...
-
Page 16: Settings
LAUNCH X-431Diagun User's Manual 2.7 Settings Here we will introduce how to set "Language" and "Bluetooth match". 2.7.1 Language Click the icon "Wireless Link" or "Wire Link" on the desktop. The screen of model selection will appear, as shown on the left. -
Page 17: Bluetooth Match
LAUNCH X-431Diagun User's Manual 2.7.2 Bluetooth match Connect Connect the diagnostic connector of X-431Diagun to the vehicle DLC through "Wireless Link" (Refer to chapter 3.1.3 for details). Note: Only when the indicator lamp (red) of power on the diagnostic connector is... -
Page 18: Use X-431Diagun To Diagnose Vehicles
LAUNCH X-431Diagun User's Manual 3 Use X-431Diagun to diagnose vehicles 3.1 Automotive Diagnosis Preparation and Connection 3.1.1 X-431Diagun preparations General Test Condition Ignition switch on. Battery voltage of the vehicle should be 11-14V or 18-30V, and the rated working voltage of X-431Diagun Connector is 12V or 24V. -
Page 19: Connect X-431Diagun
LAUNCH X-431Diagun User's Manual Close the leather cover. The installation finished, shown in 3-1d. Note: You can hear a clicking sound if you insert the TF card in the right place. Press the card slightly, it will be ejected automatically. -
Page 20: Begin To Diagnose Vehicle
LAUNCH X-431Diagun User's Manual Figure 3-2 cable (wire connection)/ blue tooth (wireless) 1 – 2. Diagnose Target 3 – 4. X-431Diagun Diagnostic connector 5. X-431Diagun main unit 6-7. DLC Note: If battery power of X-431Diagun main unit is running low, follow... -
Page 21: Diagnostic Program
LAUNCH X-431Diagun User's Manual 3.2.1 Diagnostic Program After connecting X-431Diagun (see chapter 3.1.3 for details), turn it on and press ‘ ’ button at the top right corner of the main unit to enter into calibration interface (see chapter 2.5.2). After that, with the Wince interface displayed, double click the icon "Blue Tooth... - Page 22 LAUNCH X-431Diagun User's Manual Here we will take the blue tooth (wireless) and Benz demo program for example to introduce how to actuate automotive diagnosis. Click [SETING] at the bottom right of the interface as shown in the above figure.
-
Page 23: How To Diagnose
LAUNCH X-431Diagun User's Manual 3.3 How to Diagnose Select version "V10.01", and click [Download] to enter the diagnosis screen, as shown on the left. Note: The diagnosis screen of different makes contains the tested models, systems, diagnosis connector and DLC location. -
Page 24: Read Fault Code
LAUNCH X-431Diagun User's Manual After successful communication, the screen enter the function menu of the diagnostic system automatically, as shown on the left: Read fault code Erase fault code Read data stream Actuation test 3.3.1 Read Fault Code Click [Read fault code] to perform this function. -
Page 25: Print
LAUNCH X-431Diagun User's Manual After clicking, it starts to erase fault code, "clear fault code succeed" will appear if succeed, or "No fault code" will appear on the screen if all the fault codes have been cleared or no fault code in the tested system. - Page 26 LAUNCH X-431Diagun User's Manual In this screen, select "Hewlett-Packard Laser Jet" in the drop-down menu of Printer. Then select "LPT1:" in the drop-down menu of Port, as shown on the left. Notes: Only with the successful connection between the main unit and the printer, the...
-
Page 27: Read Datastream
LAUNCH X-431Diagun User's Manual After setting, click [OK], as shown on the left. Then the printer operates. 3.3.3 Read Datastream Click [Read datastream] on the function menu to read the datastream from ECU, as shown on the left. - Page 28 LAUNCH X-431Diagun User's Manual The selected datastream items display with blue, as shown on the left. Button Descriptions: [NEXTPAGE]: display the datastream item on the next page. [OK]: display the dynamic data of the selected datastream. [RETURN]: return back to the previous interface.
-
Page 29: Actuation Test
LAUNCH X-431Diagun User's Manual With the datastream screen displayed, click to select the datastream, and click [GRAPH] view datastream waveform (not more than two in a screen) as shown on the left. 3.3.4 Actuation Test The purpose of this function is to control the operation of an on-board system, test or component. - Page 30 LAUNCH X-431Diagun User's Manual Click [1# injector] as shown on the left. Note: Click [1# injector] to check if it works normally by the sound from it. Perform completed, as shown on the left. Note: If perform fails and [1# injector] cannot work normally, it indicates malfunction in the related components.
-
Page 31: Driving Record Administration
LAUNCH X-431Diagun User's Manual 3.3.5 Driving Record Administration View the saved datastream and waveform. In vehicle make interface as shown on the left., click [HISTORY]. After clicking, the screen displays a document list of datastream recorded in specific durations for the tested vehicle make, as shown on the left. -
Page 32: Flow Chart For Diagnose Procedure
LAUNCH X-431Diagun User's Manual Click in the box to select parameters in which you want to view the datastream, the selected items will be marked with ‘ √ ’. You could select "CHAR" or "GRAPH" to view datastream in different form as you want, as shown on the left. - Page 33 LAUNCH X-431Diagun User's Manual Power on Calibrate touch screen Double click X-431Diagun diagnose program X-431Diagun vehicle maker menu Select logo of the make,X-431Diagun could diagnose vehicles of different makes and its function are varied, here we only take Benz demo program for example.
-
Page 34: How To Diagnose Two Cars At A Time
LAUNCH X-431Diagun User's Manual 3.5 How to diagnose two cars at a time Compare and analyze the datastream of two cars by "Cable (wire connection)" and "Blue Tooth (wireless)" with X-431Diagun. One is connected by "Cable (wire connection)" and the other is connected by "Blue Tooth (wireless)". - Page 35 LAUNCH X-431Diagun User's Manual Then, the screen shift to "Diagnostic program version" select menu interface, select version "10.01" and click [OK]. Note: The operations of other makes, models and systems are the same as Benz. See relevant system operation introduction for details, and here we only take Benz demo program for example.
- Page 36 LAUNCH X-431Diagun User's Manual selected datastream will highlighted with blue, as shown on the left. Click [OK] and the dynamic data of the selected datastream items will be displayed on the screen, as shown on the left. Until now, reading the datastream of the...
-
Page 37: Read The Datastream Of The Sencod Car
LAUNCH X-431Diagun User's Manual 3.5.2 Read the datastream of the sencod car Click "switch" icon at the bottom right of the screen(shown on the left) to switch to desktop. As shown on the left after clicking the ‘switch’ icon. - Page 38 LAUNCH X-431Diagun User's Manual Connect the second car by Cable (wire connection) and then double click "Cable Diagnosis" on the desktop. Screen will display ‘make menu’ interface, as shown on the left. The following procedure is the same as reading the datastream of the first car (see 3.5.1 for details).
-
Page 39: Comparison And Analysis Of Datastream
LAUNCH X-431Diagun User's Manual 3.5.3 Comparison and Analysis of Datastream This function is to compare and analyze the datastream from a faulty car with that from a good one. The two cars must be of the same vehicle make and the same model. -
Page 40: Update Of Diagnostic Software
LAUNCH X-431Diagun User's Manual 4 Update of Diagnostic Software 4.1 User Registration Registration on www.x431.com provides users with a convenient and quick way to purchase or download software and update online. First visit www.x431.com. Click ‘Other Area’ at the lower position of the screen to enter into the homepage, as show below. - Page 41 LAUNCH X-431Diagun User's Manual Note: The registered user could log onto the member area, and click "product control" to register the newly purchased product. See chapter “Member login”. The terms of service are shown on the screen. After reading and fully understanding, click “I accept”...
- Page 42 LAUNCH X-431Diagun User's Manual The dealer is required to record the sold products in the “Dealer administration” area on www.x431.com so that the user can do effective registration later. User should contact the dealer if registration can not be done effectively.
-
Page 43: Member Login
LAUNCH X-431Diagun User's Manual Click "OK", the registration is completed, and the registered username and password are valid. 4.2 Member Login The user becomes the registered member after registration. Member can log in the website after filled in username, password and user type (customer) in the interface as shown below. -
Page 44: Software Download
[Order Management]: Check or cancel the unpaid order. [Renew Password]: Input the old password correctly before renewing. [Awarded for complaint]: Users could complain their troubles and feedback to LAUNCH. Effective complaint will be awarded by LAUNCH [Logout]: Exit the registration. 4.3 Software Download The screen will enter the [download center] interface after logging in successfully. - Page 45 All the software listed in the download center could be downloaded for free. The name of software, the latest version released by LAUNCH currently and the issue date, as well as the latest version which could be downloaded for the product serial No.
- Page 46 LAUNCH X-431Diagun User's Manual Update Tool Download Users are required to download the update tools before updating. Select language in the drop-down menu, click [download]. The screen will display the interface as shown below. Click [Save], and save the update tool in the folder “X-431 update”.
-
Page 47: Software Update
LAUNCH X-431Diagun User's Manual save it in the folder [X-431 update]. Click [view] to learn the detailed information of the version. Users could download the other diagnostic program into the folder [X-431 update]. Up to now, the software that is for update is downloaded completely. - Page 48 LAUNCH X-431Diagun User's Manual Install TF Card Reader Drive Program You don't need to install the drive program if the operating system of your computer is Windows Me/2000/XP, Mac OS 9.x/Mac OS X or Linux 2.4.x, but have to install if the operating system is Windows98. You can download the installation software from www.x431.com...
- Page 49 LAUNCH X-431Diagun User's Manual Select the update program version on the right, and click [UPDATE]. When update completed, an indication box will pop up. If the update program version doesn't exist on the right, clicking the icon " " to open the downloaded update program.
-
Page 50: Purchase And Update Software
LAUNCH X-431Diagun User's Manual 4.5 Purchase and Update Software If users can’t find the software they needed in download center, they should buy the software in the purchase center or updated in the update center. Log www.x431.com to enter the interface as shown in the figure below. - Page 51 LAUNCH X-431Diagun User's Manual Click [order] to add the selected software to your shopping cart. Click [Pay] to buy the software. The bought software will be automatically added to the user’s download center. Click [clear] to empty the shopping cart.
-
Page 52: Faq
LAUNCH X-431Diagun User's Manual 5 FAQ X-431Diagun is a hi-tech product. But nowadays, automotive technology are making daily advance, and there may be questions during operation. Read the user’s manual carefully to get answers whenever you have any question, or contact our Customer Service Center for help. - Page 53 LAUNCH X-431Diagun User's Manual it and then plug it again for power supply, one second later, try to turn on the machine. Question: Why X-431Diagun fails in communication with ECU? Answer: Please check and make sure that the diagnostic connector and diagnostic program are matching the vehicle make.
- Page 54 LAUNCH X-431Diagun User's Manual Answer: The system is calibrating the touch screen. The machine will work after the calibration completed. Please see chapter 2.5.2 “Calibrate Touch Screen” for details. Question: The screen does not respond or responds incorrectly when click with stylus.
- Page 55 LAUNCH X-431Diagun User's Manual water is in proper temperature. Question: The systems equipped with the vehicle can not be diagnosed. Answer: DLC of some early models is separated; refer to User’s Manual for details. Question: The fault code storage is blank.
- Page 56 The exclusive remedy for any automotive meter found to be defective is repair or replacement, and LAUNCH shall not be liable for any consequential or incidental damages. Final determination of defects shall be made by LAUNCH in accordance with procedures established by LAUNCH.
- Page 57 If the unit is determined to be out of warranty, it will be repaired for a nominal service charge plus return freight. Send the unit pre-paid to: Attn: Customer Service Department LAUNCH TECH. CO., LTD. Launch Industrial Park, North of Wuhe Avenue,...
- Page 58 We have tried our best to make the descriptions and illustrations in the manual as accurate as possible, and defects are inevitable, if you have any question, please contact local dealer or after-sale service center of LAUNCH, LAUNCH does not bear any responsibility arising from misunderstandings.
- Page 59 LAUNCH X-431Diagun User's Manual FCC WARNING This device complies with Part 15 of the FCC Rules. Operation subject to the following two conditions: (1) this device may not cause harmful interference, and (2) this device must accept any interference received, including interference that may cause undesired operation.
Need help?
Do you have a question about the X-431 Diagun and is the answer not in the manual?
Questions and answers