Table of Contents
Advertisement
Quick Links
Advertisement
Table of Contents

Related Manuals for Jet JRT-2-M


Summary of Contents for Jet JRT-2-M
- Page 1 JRT‐2‐M ROUTER TABLE Original: GB Operating Instructions Translations: D Gebrauchsanleitung F Mode d´emploi ...
- Page 2 CE‐Conformity Declaration CE‐Konformitätserklärung Déclaration de Conformité CE Product / Produkt / Produit: Router table / Oberfrästisch / table de défonceuse JRT‐2‐M Stock No.: 1000‐022‐564 Brand / Marke / Marque: JET Manufacturer / Hersteller / Fabricant: JPW (Tool) AG, Tämperlistrasse 5, CH‐8117 Fällanden Schweiz / Suisse / Switzerland We hereby declare that this product complies with the regulations Wir erklären hiermit, dass dieses Produkt der folgenden Richtlinie entspricht Par la présente, nous déclarons que ce produit correspond aux directives suivantes 2006/42/EC Machinery Directive / Maschinenrichtlinie / Directive Machines 2014/30/EU electromagnetic compatibility / elektromagnetische Verträglichkeit / compatibilité électromagnétique designed in consideration of the standards und entsprechend folgender zusätzlicher Normen entwickelt wurde et été développé dans le respect des normes complémentaires suivantes EN ISO 12100:2010 EN 60745‐1:2009 EN 60745‐2‐17:2010 Responsible for the Documentation / Dokumentations‐Verantwortung / Résponsabilité de Documentation: Hansjörg Meier Head Product‐Mgmt. / Leiter Produkt‐Mgmt. / Resp. Gestion des Produits JPW (Tool) AG 2017‐11‐28 Jan Dätwyler, General Manager ...
-
Page 3: Table Of Contents
GB ‐ ENGLISH Operating Instructions Dear Customer, Many thanks for the confidence you have shown in us with the purchase of your new JET‐machine. This manual has been prepared for the owner and operators of a JET JRT‐2‐M router table to promote safety during installation, operation and maintenance procedures. Please read and understand the information contained in these operating instructions and the accompanying documents. To obtain maximum life and efficiency from your machine, and to use the machine safely, read this manual thoroughly and follow instructions carefully. …Table of Contents Further details on warranty (e.g. warranty period) can be found in the General Terms and Conditions (GTC) that are an 1. Declaration of conformity integral part of the contract. 2. Warranty These GTC may be viewed on the website of your dealer or sent to you upon request. 3. Safety Authorized use JPW (Tool) AG reserves the right to make changes to the General safety notes product and accessories at any time. Remaining hazards ... -
Page 4: General Safety Notes
3.2 General safety notes Never reach into the machine while it is operating or running Woodworking machines can be dangerous if not used properly. down. Therefore the appropriate general technical rules as well as the Keep children and visitors a safe distance from the work area. following notes must be observed. Never leave a running machine unattended. Before you leave Read and understand the entire instruction manual before the workplace switch off the machine. attempting assembly or operation. Do not operate the electric tool near inflammable liquids or gases. Observe the fire fighting and fire alert options, for example the fire extinguisher operation and place. Keep this operating instruction close by the machine, protected Do not use the machine in a dump environment and do not from dirt and humidity, and pass it over to the new owner if you expose it to rain. part with the tool. Wood dust is explosive and can also represent a risk to health. No changes to the machine may be made. Dust form some tropical woods in particular, and from Daily inspect the function and existence of the safety appliances hardwoods like beach and oak, is classified as a carcinogenic before you start the machine. substance. Do not attempt operation in this case, protect the machine by Always use a suitable dust extraction device unplugging the mains cord. Before machining, remove any nails and other foreign bodies Remove all loose clothing and confine long hair. from the workpiece. Before operating the machine, remove tie, rings, watches, other Never operate with the guards not in place – serious risk of jewellery, and roll up sleeves above the elbows. injury! Wear safety shoes; never wear leisure shoes or sandals. Depending on the job use suitable safety devices, which prevent accidental contact with the rotating cutter. Adapt these ... -
Page 5: Remaining Hazards
Tenoning and slotting work is not allowed – serious risk of 3.3 Remaining hazards injury! When using the machine according to regulations some remaining hazards may still exist Specifications regarding the maximum or minimum size of the workpiece must be observed. Touching the cutting tool in the machining area can cause injury. For effective protection, the router bit, the fence, the Specifications regarding the maximum size of the router bit workpiece hold‐down and the lateral workpiece guide must diameter must be observed. always be adapted to the workpiece and to the machining operation. Do not remove chips and workpiece parts until the machine is at a complete standstill. Risk of kickback. The workpiece is caught by the rotating cutter and thrown back to the operator. Always use sharp cutting tools. Thrown workpiece parts can lead to injury. Keep the table surface clean, in particular remove resin residue. Sawdust and noise can be health hazards. Do not stand on the machine. Be sure to wear personal protection gear such as safety goggles and ear protection. Use a suitable dust exhaust system. Make all machine adjustments or maintenance with the machine unplugged from the power source. Wood chips and sawdust can be health hazards. Be sure to The router could start accidentally. wear personal protection gear such as safety goggles ear‐ and dust protection. Do not use or plug in your router table until it is completely Use a suitable dust exhaust system. assembled and installed according to the instructions. The use of incorrect mains supply or a damaged power cord can Make sure the router is fully and securely attached to the lead to injuries caused by electricity. router table. Periodically check, the router could vibrate loose and fall from table. ... -
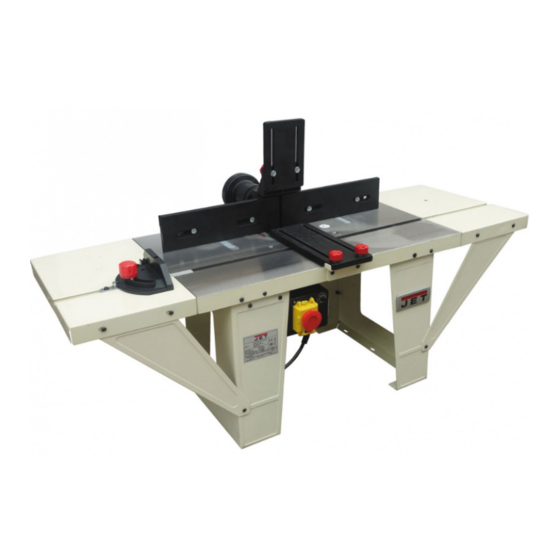
Page 6: Contents Of Delivery
4.3 Content of delivery 2 Legs 2 Table extensions 4 Supports 4 Table inserts Mitre gauge Lateral workpiece guide Workpiece hold down Adjustable fence Router mounting plate Dust port adapter Ø 57/ Ø 100 mm Operating manual Spare parts list 4.4 Unit description Fig 2 5. Transport and start up 5.1 Transport and installation The tool is designed to operate in closed rooms and must be placed stable on firm and levelled surface. The tool can be bolted down. 5.2 Assembly If you notice any transport damage while unpacking, notify your supplier immediately. Do not operate the machine! Dispose of the packing in an environmentally friendly manner. Attach the Legs (Fig 3): Attach the legs (H) to the table (I) with the supplied pan head Fig 1 screws and nuts (L). A .. Mitre gauge B .. Adjustable fence C .. Lateral workpiece guide D .. Workpiece hold down E .. Dust port F ... - Page 7 Attach the table extensions (G, Fig 1) and supports (K) with pan head screws and nuts. Fig 4 Attach the Router (Fig 5, Fig 6): Attach the router to the mounting plate (T, Fig 5) by use of supplied screws (U). Fig 6 Attach the router with mounting plate to the table by use of supplied screws (Fig 7‐1, Fig 7‐2). Fig 7‐1 Fig 5 Holes may need to be drilled according to your router´s hole pattern (Fig 6). Fig 7‐2 Attach the Lateral Workpiece Guide (Fig 8): Attach the support bracket (M) with 2screws. Attach the lateral workpiece guide (C) with 2 carriage bolts, washers and knobs. ...
-
Page 8: Mains Connection
Fig 8 Attach the Fence to the Table (Fig 9): Attach the fence to the table, with 2 carriage bolts, washers and knobs. Fig 11 Attach the Table Inserts: Always use the smallest table insert possible. Assemble the Mitre Gauge (Fig 12): Fig 9 Attach the Fence Boards and Dust Port (Fig 10): Attach the fence boards to the fence, with 4 carriage bolts, washers and knobs. Attach the dust port (D). Fig 12 5.3 Dust connection Before initial operation, the machine must be connected to a dust extractor. The suction should switch on automatically Fig 10 when the router is switched on. Attach the Workpiece Hold Down (Fig 11): 5.4 Mains connection Attach the hold down support (N) with two screws and nuts (P). For safety reasons the router must be connected to the Attach the workpiece hold down (D) with two carriage bolts, magnetic switch (J, Fig 13‐1). washers and knobs (O). This assures a safe On/Off‐operation and avoids auto‐restarting after power failures. Make sure the router switch is in the OFF‐position before you plug in. ... -
Page 9: Starting Operation
6. Machine operation Workpiece handling: Feed the workpiece straight across the machine table, holding your fingers close together, guiding the workpiece with the palm of your hands. Never put your hands under or behind the shaper guard. Always keep your hands well clear of the rotating cutter. Always feed the workpiece against the cutter rotation (Fig 14). Adjust the workpiece hold down (D), to guide the workpiece and to avoid workpiece lifting. Adjust the lateral workpiece guide (C), to guide the workpiece Fig 13‐1 and to press the workpiece against the fence. Fig 13‐2 Fig 14 The power (motor input power P1) connected to the switch box sockets may not exceed 2700W in total. Use a push block when working the ends of narrow stock. In case of switch overload the overload cut‐off (R) will react. Workpieces shorter than 200mm require special feeding aids After approximately 5 minutes of cooling the overload cut‐off (e.g. feeding template). can be reset. Always machine the workpiece over its entire length. Make sure that the power cord does not impede work and Recess machining may only be carried out with the aid of cause people to trip. suitable longitudinal workpiece stops (X, Fig 15), to reduce risk Mains connection and any extension cords used must comply of workpiece kickback. with applicable regulations. The mains voltage must comply with the information on the machine licence plate. Only use connection cables marked H07RN‐F The mains connection must have a 16A surge‐proof fuse. Connections and repairs to the electrical equipment may only be carried out by qualified electricians. ... -
Page 10: Setup And Adjustments
*Defective switch, motor or cord‐ consult an electrician. *Switch overload cut‐off has reacted‐ wait for 5 minutes and reset (push button). 10. Environmental protection Protect the environment. Your appliance contains valuable materials which can be recovered or recycled. Please leave it at a specialized Fig 16 institution. Attention: Install the router bit according to the instructions in the router manual. Make sure the bit is securely seated in the collet chuck 11. Available accessories before making any cuts. Refer to the JET‐Pricelist Always use sharp cutting tools. Always use the protective covers supplied. Ensure that the protective cover is in the correct position before you start machining. The router must first reach the maximum rpm before cutting may begin. Remove cut and jammed work pieces only when motor is turned off and the machine is at a complete standstill. Pay particular attention on reducing the risk of kickback. Ensure that the router bit, the fence, the workpiece hold down and the lateral workpiece guide are in the correct position before you start machining. Always use the smallest table insert possible. Replace worn table inserts. 7. Setup and adjustments ...
Need help?
Do you have a question about the JRT-2-M and is the answer not in the manual?
Questions and answers