Table of Contents
Advertisement
Quick Links
Instruction manual
HEIGHT GAUGES
for MICRO-HITE (MH)
for MICRO-HITE+M (MH+M)
This document is confidential and only to be used internally by the company that has purchased one of the height gauges
mentioned above. Before duplicating or transmitting it to third parties without any connection to the use of these instruments,
an official request has to be sent to TESA SA.
V15 – 03.10.2017
1
Advertisement
Table of Contents

Related Manuals for TESA MICRO-HITE


Summary of Contents for TESA MICRO-HITE
- Page 1 This document is confidential and only to be used internally by the company that has purchased one of the height gauges mentioned above. Before duplicating or transmitting it to third parties without any connection to the use of these instruments, an official request has to be sent to TESA SA. V15 – 03.10.2017...
-
Page 2: Table Of Contents
Instruction manual for MH & MH+M TABLE OF CONTENTS If you are using the PDF version of this document, you can directly access the required chapter by clicking on the respective line of the table of contents. INTRODUCTION ................................7 Acknowledge-ments .............................. - Page 3 Instruction manual for MH & MH+M CONTROL PANEL ................................ 40 General description ............................... 40 Touchscreen ................................. 40 Measurement zone ............................... 41 Calculation zone..............................42 Software navigation .............................. 42 Context-based actions ............................43 MEASUREMENT INTERFACE ............................. 44 Status bar ................................44 Main zone ................................
- Page 4 18 PERPENDICULARITY & STRAIGHTNESS MEASUREMENT .................. 107 18.1 Generality ................................107 18.2 Mounting an IG13 .............................. 108 18.3 Mounting a TESA USB probe ..........................109 18.4 Adaptor for IG13 connection ..........................110 18.5 IG13 positioning ..............................111 18.6 Measurement principle ............................111 18.7...
- Page 5 Instruction manual for MH & MH+M 19.3 Two measurement possibilities ......................... 118 19.4 Application examples ............................119 19.5 Step by step example ............................120 19.6 Results analysis ..............................123 19.7 To define a datum .............................. 124 19.8 Where is the current datum? ..........................125 19.9 Change the coordinate system .........................
- Page 6 Actions regarding Perpendicularity mode ......................158 24.4 Actions regarding Angle mode .......................... 158 Actions regarding Min, max, Δ mode ........................ 159 24.5 24.6 Actions regarding 2D mode ..........................159 24.7 Actions regarding Calculator mode ........................159 OPTIONAL ACCESSORIES: ............................. 160 EXAMPLE, TESA WORKPIECE ............................163...
-
Page 7: Introduction
1.1 Acknowledge- Dear user, ments We would like to thank you for having chosen TESA as your metrology partner. We thank you for your confidence in purchasing one of our high-end height gauges of our MICRO-HITE or MICRO- HITE+M range. -
Page 8: Symbols
Instruction manual for MH & MH+M Apart from particular features for each type of displacement and measurement process, the software provided with all height gauges is the same, which allows an experienced user of manual height gauges to easily use an automatic height gauge (and vice versa). 1.6 Symbols Several different types of symbols are used in this manual. -
Page 9: Presentation
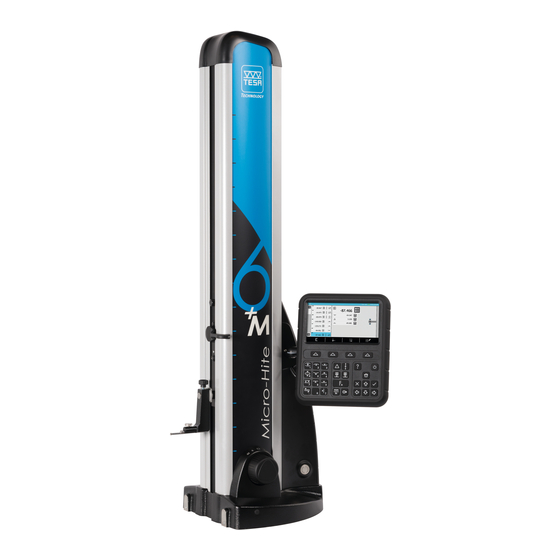
PRESENTATION 2.1 General description The MICRO-HITE 2016 height gauge range is different from any other height gauge as it offers an exceptional performance as well as intuitive and easy use. This autonomous measuring instrument is designed for measuring lengths such as external, internal, step, height or depth dimensions as well as distances. - Page 10 Instruction manual for MH & MH+M Fig. Description of the constitutive elements of the TESA MICRO-HITE+M...
-
Page 11: Instrument Base
Instruction manual for MH & MH+M 2.2 Instrument base The base is chemically nickel-plated in order to make it very resistant to corrosion. Its lower face, which has been machined to ensure that is rigorously flat, includes three finely-machined support lugs (air bearings) that guarantee the stability of the height gauge. These lugs form a large surface so that any grooves or other similar irregularities on the granite table can be easily cleared. -
Page 12: Vertical Column
The perpendicularity of each instrument is adjusted mechanically in the factory using a patented TESA system, which makes it possible to use it for a reliable and quick control of perpendicularity. The height gauge is adjusted for frontal as well as lateral perpendicularity... -
Page 13: Rotary Control Handle
Instruction manual for MH & MH+M 2.5 Rotary control On the MICRO-HITE+M models, a rotary control handle (FEEL&MOOVE patented system) is handle located close to the instrument base. It serves for guiding the instrument when it is moved on the air cushion and for starting the fast displacement of the probe as well as for triggering all main measuring functions (up or down probing, bore or shaft measurement). - Page 14 Instruction manual for MH & MH+M In general, the following measuring functions can be executed directly via this rotary control handle, without the need to select the key on the keyboard of the control panel: Definition of actions Moving up Turning the rotary control handle clockwise will move the probe up.
-
Page 15: Handwheel
Instruction manual for MH & MH+M Probing down Same as for probing up. Bore measurement Activating the rotary control handle twice in the same direction allows bore measurement with detection of the culmination point. • When rotating clockwise, the measurement will start with probing the upper point of the bore. -
Page 16: Electric Power Supply
The height gauge features an optoelectronic measuring system digitally capturing the system measured length, which is also called measurand (TESA patent). The glass scale with both incremental graduations and a reference mark serve as material measure. According to a principle of reflection, the scale is scanned by a sensor with no mechanical contact. The measuring signal is then transmitted to the control panel. - Page 17 Instruction manual for MH & MH+M On the manual MICRO-HITE, the probing force (and therefore the position of the probe on the measuring carriage) is visible through a coloured bar on the right side of the screen. At any moment, when the probe comes in contact with the workpiece to be measured, this bar is activated and changes its colour according to the applied pressure.
-
Page 18: Control Panel
Instruction manual for MH & MH+M 2.10 Control panel The control panel has been developed as ergonomic and intuitive as possible. Its keyboard is separated in 4 different zones each focusing on particular actions. For further details, see this chapter. 2.11 Fixing arm As all environments the instrument is used in are different, your system includes a flexible control panel support, which offers you two degrees of freedom through adjustable screws. -
Page 19: Information Led
An USB matrix printer especially designed for your height gauge is available as an optional accessory. Its installation does not require any special intervention. Each MICRO-HITE or MICRO- HITE+M is directly compatible with this printer, which can be connected to an USB port on the... -
Page 20: Connectors
The control panel features several connectors allowing to manage the obtained data. Besides three USB connectors on the top of the back, there is also a TLC (TESA Link Connector) IP65 connector, which enables you to send data to an external device. -
Page 21: Technical Specifications
TECHNICAL SPECIFICATIONS Series MICRO-HITE MICRO-HITE+M Reference 00730073 00730074 00730075 00730079 00730080 00730081 00730076 00730077 00730078 Displacement manual manual manual motorised motorised motorised Model Application range 1075 1075 [mm] Dimensions [mm] • Height 1032 1332 1032 1332 • Width • Depth... -
Page 22: Delivery Contents
DELIVERY CONTENTS 4.1 System Each configuration is composed of the following elements: components Description TESA reference Height gauge Control panel 00760233 (MICRO-HITE) 00760234 (MICRO-HITE+M) Articulated arm 061784 Standard probe support 00760243 Hardprobe, Ø 5 mm 00760227 Master piece 00760236 Rechargeable battery... -
Page 23: Fine Adjustment System
The documented measuring results of the calibration certificate refer to the condition of the instrument during its final inspection in the factory of TESA. The results obtained and the technical specifications indicated depend on the environmental factors. If the instrument is not... - Page 24 Ø5mm (TESA reference 00760227) and a standard probe support (TESA reference 00760243) Master piece Belonging to the instrument itself, therefore same number on it as indicated on gauge label. Measurements • The measuring face of the step gauge block, which is approximately at the same height as the reference surface of the granite plate, is the reference point for measurements.
- Page 25 Instruction manual for MH & MH+M Interpreting the results Interpreting the results according to the standard ISO 13225 your height gauge refers to, requires a definition of the following parameters. Error of indication of the height gauge for surfaces measured in opposite directions.
- Page 26 A and B are replaced by C and D. It is also possible that the technical specifications of certain products indicate A = C and B = D. The MICRO-HITE and MICRO-HITE+M are instruments with a “fixed zero”. This means that in order to have measuring results in accordance with the...
-
Page 27: Installation, Security & Maintenance
Instruction manual for MH & MH+M INSTALLATION, SECURITY & MAINTENANCE 5.1 Location The instrument has to be installed in a location satisfying the general required conditions, but also the specific and very precise conditions regarding the environment, power supply, etc. It is essential to be able to identify important factors and to correctly prepare the zone the instrument is installed and used in. -
Page 28: Batteries
Recharging the batteries The batteries are only to be recharged with the charger provided with the height gauge (TESA reference: 00760251). Not adhering to this rule can cause irreversible damage to the instrument or its instability. -
Page 29: Final Use
In case you are using two (or more) batteries, the battery which is not in use can be recharged with a recharging station (TESA reference: 00760245). During this use, the height gauge power supply is not connected to the column itself but directly to the recharging station. -
Page 30: Installation
Each MICRO-HITE or MICRO-HITE+M instrument is delivered in packaging developed to protect it from shocks and corrosion. Only transport the height gauge in this packaging. Any other transport using unofficial packaging is not recommended and will not be covered by TESA in case of dispute. 6.2 Unpacking &... - Page 31 Instruction manual for MH & MH+M 5. Remove the probe and its support from the box. Mount the probe on the support. Do not forget to tighten the assembly with the tightening wheel. 6. Accessories are now ready to be used. 7.
- Page 32 Because of the weight of the instrument, it is not recommended to lift the unit on your own. 9. Carefully place the height gauge on the measuring surface keeping it in a horizontal position. The MICRO-HITE+M are equipped with a handle directly fixed on the carriage system.
- Page 33 Instruction manual for MH & MH+M This handle is used for manual fast displacement of the probe between two measurement zones. It is very fragile and no force whatsoever must be applied on it, except for the force applied for normal displacement during a measurement.
- Page 34 Instruction manual for MH & MH+M 13. Install the instrument vertically on the clean granite plate (or any other support). 14. Remove the protective plastic cover 15. Remove carefully the panel arm protection 16. Remove carefully the protective tape from the base, the handle and the gauge top’s cap.
- Page 35 Instruction manual for MH & MH+M 17. Remove the two screws from the front shipping bracket 18. Pull carefully the plate 19. Remove carefully the shaft protection (where the probe holder is going to be mounted). 20. Mount the probe support and its probe on the shaft.
- Page 36 Instruction manual for MH & MH+M 21. Screw the reference half-spheres to the base of the instrument 22. Unscrew the double carriage locking screw (positioned above the probe support) 23. Remove the panel from its box...
- Page 37 Instruction manual for MH & MH+M 24. Screw the control panel on the articulated support. Any cable connections have to be established while the instrument is turned off. Make sure that the instrument is turned off each time the control panel/height gauge cable is connected or disconnected.
-
Page 38: Installation Of The Printer
Instruction manual for MH & MH+M 6.3 Installation of the 1. If necessary, remove the MICRO-HITE or MICRO-HITE+M control panel by unscrewing the printer 4 screws. 2. Hold the printer in position and screw the same 4 screws. 3. As soon as the printer is correctly fixed, it is necessary to connect it to the panel via the USB cable provided with it. -
Page 39: Installation Of The Foot Switch
Instruction manual for MH & MH+M Your printer is now ready to be used by activating the process in the system settings. For further information, see this chapter or the printer user manual. 6.4 Installation of the You can use your height gauge together with two different types of switches: operable with the foot switch hand or the foot. -
Page 40: Control Panel
Its keyboard is separated in four zones of keys that are easily distinguishable by the functions accessible through them. The panel below is defined for the motorized MICRO-HITE+M height gauges. The panel provided with the manual models has fewer features in zone No. 1. -
Page 41: Measurement Zone
Instruction manual for MH & MH+M The control panel is touchscreen only technology. Swiping the screen is not possible. 7.3 Measurement zone There are two different types of actions possible using the keys of this zone: • Numerical keyboard • Measurement function The numerical keyboard can be used at any moment, when the user has to enter a value manually. -
Page 42: Calculation Zone
Instruction manual for MH & MH+M Start automatic measurement of lower point (MH+M) Insert value 9 Start automatic measurement of a rib (MH+M) Insert a point or comma Insert value 0 Save the position of the measuring probe in the memory Change the sign of the active value 7.4 Calculation zone This zone features different functions:... -
Page 43: Context-Based Actions
Instruction manual for MH & MH+M Move the selection to the left Move the selection up Move the selection to the right Move the selection down Cancel Validate 7.6 Context-based At any moment of the software use, context-based actions will be displayed in the black bar actions positioned at the bottom of the screen. -
Page 44: Measurement Interface
Instruction manual for MH & MH+M MEASUREMENT INTERFACE 8.1 Status bar The status bar on top of the screen gives you access to the state of the system at any time. This bar provides the following information: Calculator The title of the active page/mode If the height gauge is connected to its power supply. -
Page 45: Measuring Force
Instruction manual for MH & MH+M 8.3 Measuring force The zone dedicated to the measuring force is displayed on the right of the screen. When capturing a point, this bar will change its colour according to the force applied on the probe and thus measuring carriage. -
Page 46: Location
Instruction manual for MH & MH+M The measurement blocks are defined by: Description Number of the measurement block Editable name of the measurement block Measurement result Reference linked to the measurement result Feature of the measured element Measurement action or measured element Our example above shows that the third measurement of the sequence has been carried out in datum A on a groove with a dimension of 39.63 mm. - Page 47 Instruction manual for MH & MH+M If the number of displayed blocks in the history exceeds the size of the screen, this tool allows • navigate through the measurement programme via the keys • to see the instant location in the programme at any moment via a When recalling a measurement sequence, a will give information about the step of the measurement or the measurement block which the software is in and has to be carried out.
-
Page 48: System Options
Instruction manual for MH & MH+M SYSTEM OPTIONS 9.1 Access The system options are accessible at any moment from the main menu by pressing the key It is possible to go back to main menu from any page of the software by pressing the key 9.2 System configuration... -
Page 49: Measurement Parameters
Instruction manual for MH & MH+M Managing the air cushion Managing the keyboard’s backlight 9.3 Measurement parameters Definition of options Definition of the resolution • Metric: 0.00, 0.000, 0.0000 • Imperial: .000, .0000, .00000 Managing the unit • Metric • Imperial Definition of the angle unit •... -
Page 50: Bore/Axis, Groove/Rib Measurement
Instruction manual for MH & MH+M 9.4 Bore/axis, groove/rib measurement Definition of options Managing the information LED when taking a point: • enabled • disabled Definition of a culmination point detection process • Static a. Positioning the probe at the culmination point by moving the workpiece Then the workpiece is no longer moved and: b. - Page 51 Instruction manual for MH & MH+M • Midpoint & size/width The main value is the midpoint of the measured element (for further details, see this chapter). However, two independent blocks will be created automatically at the end of the measurement history. These two blocks will store the midpoint value as well as the size/width of the element.
-
Page 52: Input/Outputs
Instruction manual for MH & MH+M • Diameter The main value is the diameter of the element (for further details, see this chapter). • Midpoint & diameter The main value is the midpoint of the centre of the element (for further details, see this chapter). -
Page 53: Tolerances
Instruction manual for MH & MH+M Each time a new bloc of values is created in the measurement history, the corresponding value(s) is (are) automatically sent in real time to the activated device(s). • Manual, sending of a value The last value of the history is sent to the activated device(s) when the user is pressing the key on the keyboard •... -
Page 54: Temperature
Instruction manual for MH & MH+M Examples of nominal value calculations: Measured value Rate Automatically calculated nominal value 1.2345 0.01 1.23 1.2345 0.02 1.24 1.2345 0.001 1.235 9.7 Temperature The gauge integrates a temperature compensation system that can be enabled or disabled when desired. -
Page 55: Languages
You can easily change the language by selecting your desired option. The language of the control panel will immediately change. 9.10 Customised In addition to the basic languages, it is possible to personalise the language of your height language gauge. To do so, please contact the TESA team or your local reseller. -
Page 56: Initialisation
Instruction manual for MH & MH+M 10 INITIALISATION 10.1 Concept In general, the initialisation process is the first step after turning on the instrument. Description Height gauge frame Probe support Probe Cast-iron base Granite table Reference mark Sensor Increments Glass scale The probe support (2) is directly linked to a carriage system with an opto-electronic sensor (7) on it. - Page 57 Instruction manual for MH & MH+M The concept is the same for manual height gauges. However, the user has to move the probe (and also the sensor integrated in the instrument) himself in order to detect the reference mark on the glass scale.
-
Page 58: Determination Of The Probe Constant
3 standards of which it is constituted, it represents an internal or external dimension of 12.7 mm / .50000 in. It is important to only use the master piece provided with the height gauge. TESA do not guarantee correct functioning of the instrument if it is used with another master piece than the one provided by default. - Page 59 Instruction manual for MH & MH+M The probe constant is a permanent correction factor. It is calculated by the control panel after master piece measurements, then saved and automatically taken into account during the next measurements. The probe constant considers and compensates the main influencing factors such as: •...
-
Page 60: Procedure
11.3 Procedure There are several processes to determine the probe constant. The TESA master piece design has been thought to minimise the determination time and avoid any errors that could occur when moving the master piece during a sequence. - Page 61 Instruction manual for MH & MH+M This example shows a page presenting a procedure defined for a motorised MICRO-HITE+M height gauge. When using a manual instrument, the points have to be measured using the handwheel and moving the probe from top to bottom.
- Page 62 Instruction manual for MH & MH+M Definition of keys Change the process for a definition of the probe constant using the rib of the master piece. Change the process for a definition of the probe constant using the groove of the master piece.
-
Page 63: Principles Of Measurement
12 PRINCIPLES OF MEASUREMENT 12.1 Generality Before using the MICRO-HITE or MICRO-HITE+M height gauge, it is important to remember that the way in which the values are measured is determined by the measurement problem. It is essential, that the user can define the nature of the measurement process according to the application, in order to quickly get reliable results. -
Page 64: St1 & St2 Philosophy
Instruction manual for MH & MH+M Detection parallelism errors PERPENDICULARITY Measurement of perpendicularity and straightness errors ANGLE Angle measurement CALCULATOR Allows you to calculate by manually entering the values or using the results of previous measurements. 12.4 ST1 & ST2 The two main modes integrated in the height gauge range are defined by the names ST1 philosophy and ST2... -
Page 65: Measurement Functions
Instruction manual for MH & MH+M Measurement without inversion of probing direction In the above examples, all heights are measured by down hits. All measurements therefore have a similar probing direction. Measurement with inversion of probing direction The above examples show that the measured elements require two hits, one by pushing upward and one downward. - Page 66 Instruction manual for MH & MH+M Measurement of a lower internal culmination point Axis measurement Measurement of a lower external culmination point Measurement of an upper external culmination point Groove measurement Upper point measurement...
-
Page 67: Manual Single Probing (Mh)
Instruction manual for MH & MH+M Lower point measurement Rib measurement Calculation key Measurement example Difference between two values Average between two values (H) 12.6 Manual single Manual probing with one hit corresponds to the measurement of a height by establishing probing (MH) contact between a probe and a flat surface. - Page 68 Instruction manual for MH & MH+M Process 1. Move the probe using the handwheel. Make sure you do not hit anything (probe, probe support etc.) during the movement. 2. Position the probe close to the point to be measured. 3. Once the location of the measurement is clearly defined, put the probe in contact with the surface.
-
Page 69: Automatic Single Probing (Mh+M)
Instruction manual for MH & MH+M Note that a single probing block is created with the icon 6. Proceed the same way for the next measurements, regardless of the probing direction. 12.7 Automatic single The automatic single probing process is completely automatic, once the user has chosen probing (MH+M) an action from the control panel keyboard or via the displacement handle. -
Page 70: Static Culmination Point (Mh), Bar Graph
Instruction manual for MH & MH+M 5. As soon as the measurement is finished, the probe will automatically retract. The retract distance is defined in the system parameters. 6. Proceed the same way for the next measurements. 12.8 Static culmination The concept of the static detection of the culmination point is defined by its way of point (MH), determining the max. - Page 71 Instruction manual for MH & MH+M 4. Once the contact is established, continue to apply pressure in order to place the strain gauge (see this chapter or this chapter) in the green zone. Ideally place the strain gauge in the centre of the green zone in order to allow the measuring carriage to move correctly from one side of the culmination point to the other (maintaining the strain gauge always in this green zone).
- Page 72 Instruction manual for MH & MH+M • The software requires to move the probe inside the bore • The software activates the information LED in the probe’s zone • The software displays a graph helping with positioning One of the graphs helping with positioning is displayed as follows: This graph allows to display the minimum/maximum position in memory as well as the difference between the current probe position and this maximum/minimum value.
- Page 73 Instruction manual for MH & MH+M Note that the value of the culmination point in our example increases from 19.485 to 114.966. The probe is now at a distance of 0.02968 of the culmination height currently in memory (114.966). 7. The next step consists in moving the probe back in order to obtain the smallest difference possible of delta, which means that the probe is at the minimum value or very close to it.
-
Page 74: Static Culmination Point (Mh), Galvanometer
Instruction manual for MH & MH+M 10. The next step consists of unlocking the locking ring and probing down, as the insert has been positioned at the culmination point. 12.9 Static culmination The first steps of this procedure are equivalent to the ones defined in the previous chapter point (MH), (determination of the culmination point, static mode, bar graph). - Page 75 Instruction manual for MH & MH+M 7. Displace the workpiece in order to move the probe in the direction of the culmination point to be detected. As the workpiece (and therefore the probe) is displaced, the pointer of the galvanometer will also move. If the probe has still not moved to the inflection point (which means that the pointer will turn and move in the opposite direction) and the pointer reaches the end of the display, you have to press the context-based action key...
-
Page 76: Static Culmination Point (Mh), Help Led
Instruction manual for MH & MH+M Continue to use the key as long as you do not see any change of direction of the pointer as you are moving the workpiece. 8. When the insert passes the culmination point, the pointer of the galvanometer will change its direction of rotation and move in the opposite direction. - Page 77 Instruction manual for MH & MH+M For the explanation below, we consider that the LED option has been previously activated in the menu System options , which is available from the main page of the software that can be accessed at any time via the key There are four different colours that the LED will display.
-
Page 78: Bore Measurement, Static Mode (Mh)
12.12 Dynamic On the manual MICRO-HITE, a culmination point can be measured in dynamic mode culmination point meaning by moving the workpiece back and forth, so that the probe passes the maximum (MH) or minimum culmination point to be detected. - Page 79 Instruction manual for MH & MH+M 2. Displace the probe slightly to one side of the culmination point (visually). 3. Move the probe up or down in order to establish contact with the workpiece. 4. Once the contact established, continue to apply pressure in order to place the strain gauge in the green zone.
-
Page 80: Bore Measurement, Dynamic Mode (Mh)
12.14 Culmination On the MICRO-HITE+M, the type of measurement of the culmination point is intrinsically point (MH+M) defined by the selected keyboard action. The software knows the nature of the point to be... - Page 81 Instruction manual for MH & MH+M that will move and the inflection point is determined on the fly. Thus, the static mode is not available for this type of model. Process 1. Place the probe inside the bore. 2. Displace the probe slightly to one side of the culmination point (visually). 3.
-
Page 82: Bore Measurement (Mh+M)
Instruction manual for MH & MH+M 12.15 Bore The first steps of measuring a bore or axis are the same as the steps described here. The measurement only difference is the keyboard action selected. Now you have to either activate (MH+M) axis measurement, or for bore measurement. - Page 83 Instruction manual for MH & MH+M...
-
Page 84: St1 Mode
Instruction manual for MH & MH+M 13 ST1 MODE 13.1 Generality The access to ST1 mode does not require the determination of the probe constant. This has a direct impact on carrying out a measurement sequence. All measurements regarding the same reference have to be carried out by probing in a direction similar to the one chosen when the active reference has been captured. -
Page 85: Capturing The Reference Value
Instruction manual for MH & MH+M The ST1 mode can accept several different references. This means that the measurements stored in the memory may not have been taken in the same direction if they are depending on two different references. In this example, measurements M2 and M4 are probed in two opposite directions. -
Page 86: Reference Value Management
Instruction manual for MH & MH+M 13.3 Reference value In ST1 mode, the reference values are managed the same way as in ST2 mode. management For further details, see this chapter. 13.4 Secondary In ST1 mode, secondary functions are accessible via key functions FX •... -
Page 87: St2 Mode
Instruction manual for MH & MH+M 14 ST2 MODE 14.1 Generality Each time when entering ST2 mode, it is necessary to calibrate the probe . Once this has been carried out, you can either probe up or down for any measurement sequence. Examples of a measurement sequence in ST2 mode This mode is accessible from the main menu by activating the key at any moment. -
Page 88: Single & Double Probing
Instruction manual for MH & MH+M Once this reference value has been captured, the measurements can be carried out with single or double probing. 14.4 Single & double The concept of single and double probing has been developed in order to allow the direct probing measurement of certain elements and quick access to their features. - Page 89 On the other hand, the manual MICRO-HITE height gauges behave differently. Their ST2 mode allows to choose the number of probe contacts after which a measured element will be calculated: one or two hits.
-
Page 90: Secondary Results
Instruction manual for MH & MH+M One probe hit One probe hit The point is measured. You can change from one probe hit to two (and vice versa) by pressing the key on the main result bar. 14.5 Secondary When measuring an element by double probing, several results are displayed on the screen. results In addition to the main value, 3 secondary values can also be available (in green below). -
Page 91: Secondary Functions Fx
Instruction manual for MH & MH+M The image above shows that the result corresponding to a down probing has been stored in the measurement list. 14.6 Secondary In ST2 mode, secondary functions are accessible via key functions FX • Angle measurement (for further details, see this chapter) •... -
Page 92: A&B References Management
For further details, see this chapter. 14.8 A&B references The MICRO-HITE and MICRO-HITE+M offer the possibility to work with two measurement management references called A and B at any moment. You will automatically be asked to define a reference in the following situations:... -
Page 93: To Run A Probe Calibration
Instruction manual for MH & MH+M with the button When calculating, it happens that the name of the newly created block is automatically defined according to the previously selected blocks for calculation (example “M3-M5”). This name is informative and can also be modified via the editing key. -
Page 94: Selection Of A Measurement Block
Instruction manual for MH & MH+M – M last block second last block Two blocks of the list are The distance is calculated as follows: selected – M selection 1 selection 2 For further details, see this chapter. 14.14 Selection of a In each measurement mode, it is possible to select one of the measurement blocks from measurement the measurements list. -
Page 95: Max, Min, Δ Mode
Instruction manual for MH & MH+M 15 MAX, MIN, Δ MODE This measurement mode is also called “continued display”. It can be defined as a mode that 15.1 Introduction enables scanning a surface in order to detect parallelism errors in regards to a reference surface. - Page 96 Instruction manual for MH & MH+M If Min, Max, Δ mode has been activated from ST1 mode, one of the two keys will be disabled (the one that does not correspond to the probing direction of the active reference). 3. Once the pressure on the probe is sufficient to start the measurement, the software will ask you to move the workpiece back and forth, so that the probe is displaced along the whole measurement zone.
-
Page 97: Measurement Principle (Mh)
Instruction manual for MH & MH+M 6. Press again in order to start a new measurement process, press to go back to ST1 mode (respectively ST2) or to go back to the main page. 15.4 Measurement 1. Once the measurement mode is activated, position the probe above the surface to be principle (MH) measured. -
Page 98: Graph
Instruction manual for MH & MH+M 4. Validate and finish the measurement using the key 5. Save one or several results in the measurement program/list by clicking on . For example, the delta value below has been stored in the measurement memory. 6. - Page 99 Instruction manual for MH & MH+M...
-
Page 100: Angle Measurement
Instruction manual for MH & MH+M 16 ANGLE MEASUREMENT 16.1 Introduction This mode allows you to measure an angle very easily and in only a few steps. It requires the use of a standard in order to be able to determine the distance X below (the use of an intermediate piece between the standard and the instrument is often required). - Page 101 Instruction manual for MH & MH+M 3. Place a gauge block (+ intermediate piece) between the workpiece to be measured and the . You will capture the “lower” point of instrument. Measure the second point by pressing the measurement. 4. At this step of the procedure, ΔZ (or Z) has been calculated (for further details, see this chapter).
-
Page 102: Measurement Principle (Mh)
Instruction manual for MH & MH+M 6. The measurement results are displayed on the screen. The angle value is automatically saved in the measurement programme. The values of the secondary results can also be stored in the memory by clicking on 7. -
Page 103: Cone Angle Measurement Principle
Instruction manual for MH & MH+M → Continue the procedure and measure the standard by capturing point No. 3. As the standard has been turned by 90° in order to be measured, the software uses an option mentioning the Z-coordinate: . -
Page 104: Calculator
As it is important to be able to work with the measured values without the need to save them on a device or to write them down on paper, a Calculator mode has been integrated into the MICRO-HITE or MICRO-HITE+M for more ease of use during the measurement process. -
Page 105: Use Of The Measurement Blocks
Instruction manual for MH & MH+M 17.3 Use of the The advantage of this integrated calculator is that the results of previous measurements can measurement be reused for calculation of more complex functions that cannot be defined directly via the blocks control panel. - Page 106 Instruction manual for MH & MH+M The first line corresponds to the function chosen by the user but only includes the labels of the selected blocks. The second line corresponds to the same function but shows the measurement values of the selected blocks. It is possible to create a customised function block saved it into the measurement list by clicking on the context-based action key (e.g.
-
Page 107: Perpendicularity & Straightness Measurement
This mode is accessible from the main menu by activating the key at any moment. There are several types of accessories that, together with the MICRO-HITE or MICRO-HITE+M, allow this determination. Below several possible configurations (non-exhaustive list): TESA IG13... -
Page 108: Mounting An Ig13
(6). The cable of the probe has to be connected to the plug (5). 1. Before starting to remove the probe and its support on a MICRO-HITE, it is highly recommended to use the locking ring in order to avoid that the measuring carriage will be displaced upwards by the internal counterweight of the instrument. -
Page 109: Mounting A Tesa Usb Probe
(TESA reference: 00760222) specifically adapted to the diameter of the accessory. Before starting to remove the probe and its support on a MICRO-HITE, it is highly recommended to use the locking ring in order to avoid that the measuring carriage will be displaced upwards... -
Page 110: Adaptor For Ig13 Connection
USB port. The three ports can be used without any distinction. 18.4 Adaptor for If you already had an IG13 before purchasing your MICRO-HITE 2016 or MICRO-HITE+M 2016, IG13 it is possible that your accessory cannot be directly connected to the instrument, as the male connection connector of your IG13 is different from the female connector of your new height gauge. -
Page 111: Ig13 Positioning
Instruction manual for MH & MH+M 18.5 IG13 positioning When you are determining perpendicularity and straightness errors, you can measure in the following directions: • Frontal • Lateral left • Lateral right As a result, the instrument includes the automatic compensation of accuracy errors. The automatic correction of measured values is only active when the IG13 is connected and positioned in one of the three directions determined above. - Page 112 Instruction manual for MH & MH+M 3. Initialise the IG13 by gently pressing its probe until the detection process validates that the probe is correctly recognised. 4. Once the IG13 is initialized or the 1D probe detected, the instrument is ready to measure. Instrument ready to measure, MH+M, 1D probe Instrument ready to measure, MH, IG13 For the further process, illustration images comprising of a IG13 will be used.
-
Page 113: Displacement Speed And Direction (Mh)
“with pressure” on the surface to be measured. If possible, maintain enough pressure, so that the probe is positioned in the middle of its measuring range. 6. When using a MICRO-HITE, the measurement can only start once the context-based action has been selected. For a MICRO-HITE+M, simply activating the probing up or down options will start the measurement. -
Page 114: Zero Setting
Instruction manual for MH & MH+M The graph above is an example of the result obtained by using a IG13. The distance between the red points is not the same, which means that the measurement speed had varied. The smaller this distance is, the more precise the (blue) result curve will be. In addition, it is important not to change abruptly the direction of the probe displacement during the measurement. -
Page 115: To Pause The Measurement
Instruction manual for MH & MH+M This distance can be set by pressing on the following context-based action: . If a value is inserted, it is displayed on the screen as shown in the above picture (10mm). The schema above symbolically represents a measurement upwards with the IG13. Once the measurement automatically stopped, the results will be displayed. - Page 116 Instruction manual for MH & MH+M • Perpendicularity • Straightness • Angle • The Z height representing the measurement range • Maximum positive value • Maximum negative value...
-
Page 117: Mode
19.1 Introduction The MICRO-HITE or MICRO-HITE+M is a height gauge that is basically used to measure only when being positioned on a reference plane (granite table) (3) or any other similar surface. The measures are then performed in one coordinate direction only (2), orientated perpendicularily to the reference plane (1). -
Page 118: Two Measurement Possibilities
Without looking for the culmination point On MICRO-HITE+M this way of doing corresponds to the button of the panel keyboard. This process is the mean to determine quickly the centre coordinate without getting the diameter of the measured element. Indeed, the below graph shows a H coordinate research through measuring option. -
Page 119: Application Examples
The software will then display only the measured coordinate in the corresponding block (Z in our case). Looking for the culmination point On MICRO-HITE+M, this way of doing corresponds to button of the panel keyboard. On the contrary, using one of the methods for checking the culmination point, P1 and P2 are really the maximum and minimum locations of the bore. -
Page 120: Step By Step Example
Instruction manual for MH & MH+M 19.5 Step by step In this chapter we will show an example in order to clarify the needed steps to determine and example get the right raw data. If you want to have more information about how we can the analyse the data, please refer to the next chapters. - Page 121 Instruction manual for MH & MH+M 4. Take the reference on the table on which the part to be measured will be placed. Please note that if the reference is not measured, you will not have the possibility to enter the 2D mode.
- Page 122 Instruction manual for MH & MH+M 8. Measure each bore following the official processes described before in this document (up/down or with culmination points). 9. Rotate the part in order to position it in an optimal way for the measurement of the second coordinates (in our example it is 90°).
-
Page 123: Results Analysis
Instruction manual for MH & MH+M 11. Start the measurement of the second coordinates in a similar sequence as the one followed to measure Z coordinates. 12. Raw data are now measured It is always possible to continue to add raw data going from a coordinate to another via the actions. -
Page 124: To Define A Datum
Instruction manual for MH & MH+M Description Measurements list • Raw data blocks • Calculation blocks Current datum • Block used as origin • Block used as Y- or Z-axis reference • Origin translation value • Datum rotation value Graph that represents the coordinate system as well as all calculated and measured elements 19.7 To define a... -
Page 125: Where Is The Current Datum
Instruction manual for MH & MH+M We consider now that we want to define the line going through C1 and C2 as Y axis reference. 3. Select C1 and C2 blocks. 4. Press A C4 line is automatically created in the list and set as Y axis reference (visible as well in the current datum status bar). -
Page 126: To Define An Origin
Instruction manual for MH & MH+M 19.10 To define an An origin can be defined when only one block is selected and then using the action. The origin block can either be a single point or a circle represented by its centre. 19.11 To defined a A reference axis can be defined with actions selecting:... -
Page 127: Line Through 2 Points
Instruction manual for MH & MH+M 19.14 Line through 2 It is possible to construct a perfect line using action if the following two blocks as points selected: • Two points • Two circles • A point and a circle 19.15 Bestfit line A bestfit line is a line being calculated from three blocks (or more) being either points or circles (or a mix of both). -
Page 128: Distance Between 2 Points
Instruction manual for MH & MH+M A bestfit circle can be calculated with action. 19.18 Distance It is possible to get the distance between two points, two circles (or a mix between them) between 2 using the action or the keyboard button. -
Page 129: Perpendicular Distance
Instruction manual for MH & MH+M 19.22 Perpendicular The perpendicular distance between a line and a point/circle can be calculated with option. distance 19.23 To create a It is possible to create a virtual point from the options given in menu. -
Page 130: Origin Translation
Instruction manual for MH & MH+M Once entered in the menu and having the option selected, the coordinated of the centre and the diameter of the circle should be inserted and confirmed in order to create a new block in measurements list. -
Page 131: Datum Rotation
Instruction manual for MH & MH+M 19.26 Datum rotation The orientation of the current datum can be modified from the options given in menu. Once entered in the menu and having the option selected, the angle of the rotation can be inserted and validated. -
Page 132: How To Integrate A Result From The 2D Mode Into A Measurement Program
Instruction manual for MH & MH+M 19.27 How to As you have seen earlier in this chapter, the 2D mode can exclusively be accessed via the integrate a ST2 mode. That means, that the 2D mode is included in the ST2 mode, as well as in the Angle result from the or Min, Max, Delta mode. - Page 133 Instruction manual for MH & MH+M Now that the two circles are measured, calculate the distance between their two centres. A new C3 block is created in the memory. Now you have to transfer it to the ST2 mode memory by pressing the button.
-
Page 134: Zz Mode
Instruction manual for MH & MH+M 20 ZZ MODE 20.1 Generality ZZ mode (or continued display) is often selected when a measurement requires a lower probing force than that proposed by the column in a standard configuration. This is the reason why this mode is mainly used with an external measurement unit (for example a lever-type indicator). - Page 135 Instruction manual for MH & MH+M It is not possible to save a program from the ZZ mode. It is not possible to use the calculator starting from the ZZ mode values. You can quickly calculate differences or averages by pressing the keys on the control panel.
-
Page 136: Data Management
Instruction manual for MH & MH+M 21 DATA MANAGEMENT 21.1 Generality Your control panel offers the possibility to manage measurement data by sending it to several different peripherals. Each one of these processes is independent from the others. Therefore, each one of the possibilities can be enabled and used at the same time as the others. -
Page 137: Transmission Format
Instruction manual for MH & MH+M Option Description Manual No value will be sent to the selected device unless the user presses the of the control panel. Automatic All measured values entered into the measurement list are automatically sent to the device. When the manual data management option has been selected, it is possible to choose either to send the last block value or, in one batch, all values stored in the measurements list. -
Page 138: Transmission Via Tlc (Cable)
Once the cable is correctly connected at the back of your panel and to your computer, there are several ways to manage the data: by using additional software such as TESA STAT- EXPRESS or TESA DATA-DIRECT or simply by sending the data to your computer via an application type HyperTerminal. -
Page 139: Transmission Via Tlc (Wireless)
It is also possible to send the data to a computer via the wireless TLC connection. TLC (wireless) Therefore, it is necessary to use a TLC plug (TESA reference: 04760180) as well as the TWIN-Station receiver box (TESA reference: 05030012) -
Page 140: Pdf Report
97.193 21.7 *.Pdf report With the MICRO-HITE or MICRO-HITE+M height gauge, reports in *.pdf format can be created on the USB key connected to its panel. The creation can be done: • automatically after the execution of a measurement programme •... -
Page 141: Annotate A Measurement Program
Instruction manual for MH & MH+M 21.8 Annotate a When running a measurement program created by a third person, it is often convenient to measurement be able to rely on explanations or notes made by this person. To do so, it is possible to program create on the USB key, a document in *.pdf format describing the program currently stored on the panel and giving the possibility to annotate each of the measurement blocks of that... -
Page 142: Screenshot
Instruction manual for MH & MH+M 21.9 Screenshot In order to simplify the creation of personalised procedures, sharing knowledge and training employees, it is possible to take a screenshot at any time. It is necessary to connect a USB key at the rear of the control panel and to maintain the key pressed for approximately 3 seconds until a validation beep is generated. -
Page 143: Program Management
Because beyond the simple measurement of a unique part there is often the need to control a batch of pieces that could be either small or big, TESA developed a learning mode that gives the mean to manage in a simple way measuring sequences. Once the program has been run, general information of the piece status is automatically displayed on the panel screen. - Page 144 Instruction manual for MH & MH+M You have now the possibility to choose the option concerning programs management. The displayed page corresponds to a blocks’ list equivalent to the one in memory. With this sequence global view it is now possible to proceed to the tolerancing for all dimensions to be controlled.
-
Page 145: Tolerancing With Iso Table
Instruction manual for MH & MH+M 22.4 Tolerancing with In order to use the ISO table to set tolerances it is mandatory to be located in the page ISO table dedicated to tolerances insertion. Once a nominal value for a diameter has been confirmed, the button is automatically displayed at the bottom of the screen. -
Page 146: Sequence Loading
Instruction manual for MH & MH+M This page will be displayed. It is now possible to insert tolerances (but not mandatory) then to save the sequence pressing .the next step is to enter the program name and confirm it to end the process and save the data in the USB stick. A sequence that has been done in ST1 mode will be saved with *.st1 format. -
Page 147: To Run A Sequence
Instruction manual for MH & MH+M Once this page is being displayed, press , select the wanted program from the list and confirm your selection. When recalling a program, you will have access to a programs’ list corresponding to the sequences saved into your USB stick. If you want to recall a program from ST1 mode, the list will only show programs with *.st1 format. -
Page 148: Pause A Sequence Run
When using a MICRO-HITE+M, a time countdown is also displayed (the time is editable from system options menu). It is the mean to know the remaining time before the next probe displacement and let the user avoid any crash of the probe with the part to be measured. -
Page 149: Remeasure A Block
22.10 Waiting time When running a measurement sequence with a motorized MICRO-HITE+M, it is important (timer) to give the operator time to position the probe, so that it does not strike the workpiece when moving to the next measurement zone. -
Page 150: Results
Instruction manual for MH & MH+M The probe is inserted into A probe hit has the effect of During the countdown, the the groove manually by starting a countdown until operator has time to moving the part or the the probe will be moved to withdraw the probe from instrument the next measurement... -
Page 151: To Run A Sequence In Loop
Instruction manual for MH & MH+M You’ll find on the page : • Part status - Good - Not good - Program end (if the sequence does not include any tolerances) • The number of Measurements in black (measurements whose tolerances have not been entered) Values in tolerances in green Values to be reworked in yellow Values out of tolerances in red... - Page 152 Instruction manual for MH & MH+M...
-
Page 153: Control And Updates
Instruction manual for MH & MH+M 23 CONTROL AND UPDATES 23.1 Generality As a user, you have the possibility to access certain options that enable a quick control of analysis of your system. The control options are available in the service menu via the context-based action available on the main page of the software that you can access at any time by pressing the of your control panel. -
Page 154: Sensor Control
Instruction manual for MH & MH+M This page of the software enables the visualisation of certain crucial parameters of the system in order to quickly determine the status of the instrument. 23.4 Sensor control In order to verify the sensor and its positioning regarding the measurement scale, make sure to activate the option “Lissajous”... - Page 155 Instruction manual for MH & MH+M 2. Enter the service mode by clicking on the context-based option 3. Make sure to be on the first page of the mode and to have access to the following option at the bottom of the screen .
- Page 156 Instruction manual for MH & MH+M 7. Once you have chosen your version, click on the button “Update”. The software will be installed (this can take several minutes) and then warn you that the control panel will automatically shut down. 8.
-
Page 157: Context-Based Actions
Instruction manual for MH & MH+M 24 CONTEXT-BASED ACTIONS 24.1 General actions Definition Cancel Allows you to cancel the current process or to leave a mode without saving any changes. Delete Allows you to delete the selected value. Return Allow to come back to the previous page Cartesian coordinates Allows to work in Cartesian coordinates. -
Page 158: Actions Regarding St1 & St2 Modes
Instruction manual for MH & MH+M Change resolution 1 Allows you to increase the resolution regarding the active display. Change resolution 2 Allows you to decrease the resolution regarding the active display. Modify angle unit Allow to modify the angle unit. The current active angle unit is degree. Modify angle unit Allow to modify the angle unit. -
Page 159: Actions Regarding Min, Max, Δ Mode
Instruction manual for MH & MH+M 24.5 Actions Definition regarding Reference Min, max, Δ mode Allows you to take the reference into account in your measurement results or not. 24.6 Actions Definition regarding Angle between two lines 2D mode Allows to calculate the angle between two selected lines. Angle by three points Allows to calculate the angle that make three elements represented either by simple points or circles. -
Page 160: Optional Accessories
Instruction manual for MH & MH+M OPTIONAL ACCESSORIES: Battery Loading station for battery block Power supply 00760244 00760245 00760251 IG13 adapter cable Fine adjustment Master piece 00760247 00760246 00760236 MH panel Printer 4 paper rolls for printer 00760233 00760235 00760250 MH+M panel 00760234 TLC-USB cable, 2m... - Page 161 Instruction manual for MH & MH+M IG13 probe Practice part Standard probe support 00760140 00760124 00760243 Dust cover 350mm Foot switch Hand switch 00760151 04768001 04768000 Dust cover 600mm 00760152 Dust cover 900mm 00760153...
- Page 162 CH – 1020 Renens Declares under its sole responsibility The product Height gauge: TESA MICRO-HITE TESA MICRO-HITE+M Type 00730073 MICRO-HITE 350 00730074 MICRO-HITE 600 00730075 MICRO-HITE 900 00730076 MICRO-HITE 350F 00730077 MICRO-HITE 600F 00730078 MICRO-HITE 900F 00730079 MICRO-HITE+M 350 00730080 MICRO-HITE+M 600 00730081 MICRO-HITE+M 900 •...
-
Page 163: Example, Tesa Workpiece
Instruction manual for MH & MH+M EXAMPLE, TESA WORKPIECE...
Need help?
Do you have a question about the MICRO-HITE and is the answer not in the manual?
Questions and answers