Table of Contents
Advertisement
2
INDEX
OWNER'S INFORMATION .......................... 4
GENERAL .................................................... 8
SPECIFIC MARZOCCHI TOOLS ............... 10
OVERHAULING AND MAINTENANCE ..... 12
FAILURES, CAUSES AND REMEDIES .... 14
MAINTENANCE ......................................... 16
INSTALLATION .......................................... 16
ADJUSTMENT ........................................... 20
DISASSEMBLY .......................................... 22
DISASSEMBLY DIAGRAM ........................ 22
REASSEMBLY ........................................... 32
FORK EXPLODED VIEW .......................... 40
The figures and descriptions in this pamphlet are
provided as a guide.
We reserve the right to make changes to the
products without notice in line with our policy of
continuous improvement.
Always respect Nature when riding !
INDICE
Page
PROPRIETARIO DELLA BICICLETTA ........ 5
GENERALITÀ .............................................. 8
MARZOCCHI ............................................. 10
REGOLE GENERALI ................................. 12
INCONVENIENTI, CAUSE E RIMEDI ........ 14
RACCOMANDAZIONI PER L'USO ............ 16
INSTALLAZIONE ....................................... 16
REGOLAZIONE ......................................... 20
SCOMPOSIZIONE ..................................... 23
RICOMPOSIZIONE .................................... 32
ESPLOSO FORCELLA .............................. 40
Le illustrazioni e descrizioni del presente opusco-
lo si intendono fornite a titolo indicativo.
La Casa si riserva pertanto il diritto di apportare ai
prodotti in qualsiasi momento e senza avviso
quelle modifiche che ritenesse utili per migliorarli
o per qualsiasi esigenza di carattere costruttivo e
commerciale.
In ogni Vostro spostamento rispettate
sempre la Natura!
Pagina
Advertisement
Table of Contents

Related Manuals for Marzocchi Z3


Summary of Contents for Marzocchi Z3
-
Page 1: Table Of Contents
Page Pagina OWNER’S INFORMATION ......4 INFORMAZIONI PER IL GENERAL ............ 8 PROPRIETARIO DELLA BICICLETTA ..5 SPECIFIC MARZOCCHI TOOLS ....10 GENERALITÀ ..........8 GENERAL RULES FOR A CORRECT ATTREZZATURA SPECIFICA OVERHAULING AND MAINTENANCE ..12 MARZOCCHI ..........10 FAILURES, CAUSES AND REMEDIES .. - Page 2 FAHRRADBESITZER ........7 PROPRIETAIRE DE LA BICYCLETTE ..6 ALLGEMEINES ..........9 INFORMATIONS GENERALES ....9 MARZOCCHI SPEZIFISCHE OUTILLAGE SPECIFIQUE MARZOCCHI . 11 AUSRÜSTUNG .......... 11 RÈGLES GÉNÉRALES ......13 ALLGEMEINE NORMEN ......13 INCONVÉNIENTS, CAUSES ET MÄNGEL, URSACHEN UND ABHILFEN .. 15 REMÈDES ..........
-
Page 3: Owner's Information
The responsibility of the owner 1) The Marzocchi suspension system is designed to absorb the shocks of an uneven road surface in order to give the rider more control over this bicycle. It is not designed to absorb the forces generated by jumps or other acrobatic maneuvers. -
Page 4: Informazioni Per Il Proprietario Della Bicicletta
La responsabilità del proprietario della bicicletta 1) Il sistema di sospensione Marzocchi è progettato in maniera tale da ammortizzare gli urti o gli effetti di un fondo stradale non uniforme, al fine di assicurare al ciclista un maggiore controllo della propria bicicletta. -
Page 5: Informations Pour Le Proprietaire De La Bicyclette
La responsabilité du propriétaire du vélo 1) Le système de suspension Marzocchi a été conçu de façon qu'il puisse amortir les chocs ou les effets d’une chaussée pas uniforme, afin de garantir au cycliste le contrôle optimal de son vélo. -
Page 6: Informationen Für Den Fahrradbesitzer
Verletzungen des Radfahres führen kann. Fahrrad-Eigentümerverantwortung 1. Das Marzocchi-Aufhängesystem wurde in einer Art und Weise entworfen, die es ermöglicht, Stöße oder die Auswirkungen einer unebenen Straßenauflage abzudämpfen, um dadurch dem Radfahrer eine bessere Kontrolle über sein Fahrrad zu sichern. -
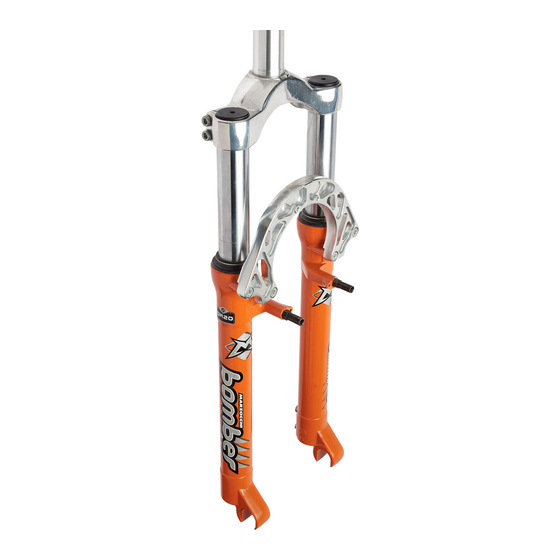
Page 7: General
GENERAL GENERALITÀ • The Z3 fork is designed for both cross country . • Forcella ammortizzata a molla ed elastomeri. • The Z3 fork damped by a mechanical spring • Possibilità di regolazione del precarico molla system and elastomer shims. -
Page 8: Informations Generales
INFORMATIONS GENERALES ALLGEMEINES • Fourche amortie par ressort et élastomères. • Durch Federn und Elastomer-Gummis gefederte Gabel. • Possibilité de réglage de precharge ressort à • Einstellungsmöglichkeiten der Vorspannung der Feder l’aide d’un bouton extérieur, placé sur le sommet durch einen außenliegenden Einstellknopf, der auf dem du fourreau complet. -
Page 9: Specific Marzocchi Tools
– lunghezza boccole di guida: 92 mm – slider bushing length: 92 mm – peso (con cannotto 1 1/8" da 160 mm): 1750 gr. – weight (with 1 1/8" x 160 mm long): 1750 g SPECIFIC MARZOCCHI TOOLS ATTREZZATURA SPECIFICA MARZOCCHI Ref. Item./Art. -
Page 10: Outillage Specifique Marzocchi
– poids (avec pivot 1 1/8" de 160 mm): 1750 g. – Achsenabstand zwischen den Cantileverbolzen: 80 mm – Länge der Führungsbuchsen: 92 mm – Gewicht (mit Gabelschaft 1 1/8" - 160 mm): 1750 g. OUTILLAGE SPECIFIQUE MARZOCCHI MARZOCCHI SPEZIFISCHE AUSRÜSTUNG Réf./Bez. Art. Description et utilisation Beschreibung und Anwendung... -
Page 11: General Rules For A Correct Overhauling And Maintenance
1. Laddove specificato, assemblare e smontare il sistema di sospensione usando soltanto gli 1. Where specified, assemble and disassemble speciali attrezzi MARZOCCHI o LARM di cui the shock absorption system only using the viene fornita una descrizione nella tabella ripor- LARM or MARZOCCHI special tools, as shown tata di seguito. -
Page 12: Règles Générales
Spezialwerkzeugen MARZOCCHI utiliser uniquement les outils spéciaux oder LARM, von denen hier in der folgenden MARZOCCHI ou LARM, dont la description est Tabelle eine Beschreibung gegeben wird donnée sur le tableau ci-après. zusammen und auseinanderbauen. -
Page 13: Failures, Causes And Remedies
FAILURES, CAUSES AND REMEDIES This paragraph reports some troubles that may occur when using the fork. It also indicates possible causes and suggests a remedy. Always refer to this table before doing any repair work. FAILURE CAUSE REMEDY Fork has not been used for some Oil seals and dust seals tend to Raise dust seal and lubricate stan- time and is locked out. -
Page 14: Inconvénients, Causes Et Remèdes
INCONVÉNIENTS, CAUSES ET REMÈDES Ce paragraphe indique quelques inconvénients qui peuvent se vérifier lors de l’utilisation de la fourche. Il précise les causes qui peuvent les avoir provoqués et il suggère le remède éventuel. Veuillez consulter toujours ce tableau avant d’intervenir sur la fourche. INCONVENIENTS REMEDES CAUSES... -
Page 15: Recommendations For Maintenance
INSTALLATION INSTALLAZIONE Installing the Z3 fork on a frame is a very delicate L’installazione della Z3 sul telaio rappresenta una operation that should be carried out with extreme operazione molto delicata che deve essere ese- care. -
Page 16: Conseils Pour L'utilisation
Sicherheit und die Gesundheit des La fixation du tube de direction sur la base de la Fahrers auswirken. Z3, a lieu au moyen d’un jonc serré avec deux vis. Die Befestigung des Gabelschaftes auf der Cette solution permet l’utilisation de pivots de Gabelbrücke der Z3 erfolgt über ein mit zwei... - Page 17 Check the torque of the bolts fastening the stan- Controllate il serraggio delle viti di fissaggio del chions to the crown and attaching the brake arch cannotto e dei tubi portanti sulla base di sterzo e to the sliders. quelle dell’archetto di irrigidimento sui foderi. For recommended torque settings, see the table Determinate consultando la tabella sotto riportata below:...
- Page 18 Contrôler le serrage des vis de fixation du tube de Den Anzug der Befestigungsschrauben der direction et des plongeurs sur la base et des vis de Tauchrohre auf der Gabelbrücke und den der l’arceau sur les fourreaux. Befestigungsschrauben des Verstärkungsbügels Déterminer, en se reportant aux tableau ci- an den Standrohren überprüfen.
-
Page 19: Adjustment
(2) on the top of the fork legs. When steli potrete variare il precarico della molla preposta supplied, Z3 is preloaded at its minimum level, i.e. allo smorzamento delle forze generate nella fase di adjustment knob completely unscrewed clock- COMPRESSIONE. -
Page 20: Reglage
à une compression du ressort de Sie den Vorspannungswert bis zum maximal 15 mm. Ce réglage est primordial pour ajuster la réponse de Z3 aux erreichbaren Wert, der einer Einfederung der Feder von sollicitations en raison de votre poids et de votre style de conduite. -
Page 21: Disassembly
DISASSEMBLY GENERAL – The reference numbers given in this section relate to the components shown in the fork exploded view on page 40. – Operations refer to the fork legs already removed from the crown and disassembled from the brake arch. -
Page 22: Scomposizione
SCOMPOSIZIONE NOTE GENERALI – I numeri di riferimento di questo capitolo si riferiscono ai componenti dell’esploso forcella raffigurato a pagina 40. – Le operazioni si riferiscono agli steli già sfilati dalla base di sterzo e separati dall’archetto di irrigidimento. – Prima di iniziare le operazioni consultate lo schema sottoriportato che Vi indicherà la procedura più veloce e la corretta sequenza di smontaggio dei componenti per operare l’intervento necessario. -
Page 23: Schéma Suite De Demontage
DECOMPOSITION NOTES GENERALES – Les numéros de référence de ce chapitre se rapportent aux composants du plan éclaté fourche illustré à la page 40. – Les actions concernent les fourreaux complets déjà sortis de la base et séparés de l’arceau de raidissement. -
Page 24: Décomposition
AUSBAU ALLGEMEINE ANMERKUNGEN – Die in diesem Kapitel angegebenen Bezugsnummern beziehen sich auf Komponenten der auf der Seite 40 dargestellten Aufbauzeichnung. – Die Arbeitsgänge beziehen sich auf die bereits aus der Gabelbrücke herausgezogenen und vom Verstärkungsbügel getrennten Gabelholme. – Bevor Sie mit den Arbeiten beginnen, konsultieren Sie bitte erst das unten angeführte Schema. Es zeigt Ihnen die schnellste Vorgangsweise und die richtige Ausbausequenz der Komponenten im Bezug auf den notwendigen Eingriff an. - Page 25 SPRING CHANGE SOSTITUZIONE MOLLA FIG. 1 FIG. 1 Hold the stanchion tube (13) and unscrew the plug Bloccate con le mani il tubo portante (13) e con una (5) with a 26 mm wrench. chiave esagonale da 26 mm svitate il tappo (5). Remove the plug complete with the O-ring (6) from Sfilate il tappo completo di anello OR (6) dal tubo the stanchion tube.
- Page 26 REMPLACEMENT DU RESSORT AUSTAUSCH DER FEDER FIG. 1 ABB. 1 Bloquer d’une main le plongeur (13) et à l’aide Das Tauchrohr (13) mit einer Hand festhalten, d’une clé hexagonale de 26 mm, desserrer le dann mit Hilfe eines 26 mm-Sechskantschlüssels bouchon (5).
- Page 27 FIG. 5 FIG. 5 Remove the dust seal (14) from the top of slider Con l’aiuto di un piccolo cacciavite sfilate il ra- using a small screwdriver. schiapolvere (14) dalla sommità del fodero. FIG. 6 FIG. 6 Remove the stop ring (15) from the slider by Inserite la punta del cacciavite tra sede e anello di placing the screwdriver bit in one of the openings fermo (15), in una delle tre aperture ricavate su...
- Page 28 FIG. 5 ABB. 5 A l’aide d’un petit tournevis sortir le cache-pous- Mit Hilfe eines kleinen Schraubenziehers den sière (14) du haut du fourreau. Staubstreifer (14) oben vom Gleitrohr abnehmen. FIG. 6 ABB. 6 Insérer la pointe du tournevis entre le logement et Die Spitze des Schraubenziehers nun zwischen le joint d’arrêt (15), dans l’un des trois renfonce- den Sprengring (15) und dessen Sitz einführen,...
- Page 29 FIG. 9 FIG. 9 Fit the bit of a small screwdriver into upper edge Introducete la punta di un piccolo cacciavite nella slot of the pilot bushing (18) and lift gently. Pull the fessura del bordo superiore della boccola di guida bushing out of the slider and make all necessary (18) e sollevatelo delicatamente.
- Page 30 FIG. 9 ABB. 9 Führen Sie die Spitze eines kleinen Schraubenziehers Introduire la pointe d’un petit tournevis dans la fente du in den Schlitz des oberen Randes der Führungsbuchse rebord supérieur de la bague de glissement (18) et la (18) ein und heben Sie diesen dann vorsichtig an. Nun soulever délicatement.
-
Page 31: Reassembly
REASSEMBLY RICOMPOSIZIONE CAUTION: before reassembling, all components AVVERTENZA: tutti i componenti metallici, prima should be washed carefully with inflammable, del rimontaggio, vanno lavati accuratamente con preferably biodegradable, solvent and dried with solvente infiammabile e preferibilmente biodegra- compressed air. dabile ed asciugati con aria compressa. PILOT BUSHING AND SEAL ASSEMBLY RIMONTAGGIO BOCCOLA DI GUIDA E FIG. -
Page 32: Récomposition
RECOMPOSITION WIEDERZUSAMMENBAU AVERTISSEMENT: avant le remontage, tous les WARNUNG: Vor einem Wiederzusammenbau composants métalliques doivent être soigneuse- müssen alle Metallkomponenten ordentlich mit ment lavés avec du solvant inflammable, de pré- einem entflammbaren und vorzugsweise umwelt- férence biodégradable, et séchés à l’air com- freundlichen Lösungsmittel gesäubert, dann mit primé. - Page 33 FIG. 5 FIG. 5 Lubricate the dust seal (14) and fit it onto the top Lubrificate il raschiapolvere (14) ed introducetelo of the slider. sulla sommità del fodero. DAMPING ASSEMBLY RIMONTAGGIO GRUPPO DI SMORZAMENTO FIG. 6 FIG. 6 Before assembling the elastomer shims, lubricate Prima di rimontare il pacco di elastomeri è...
- Page 34 FIG. 5 ABB. 5 Graisser le cache-poussière (14) et l'introduire du Den Staubstreifer (14) schmieren und auf den haut du fourreau. Gleitrohrscheitel legen. REMONTAGE ENSEMBLE WIEDEREINBAU DER DÄMPFGRUPPE D’AMORTISSEMENT ABB. 6 FIG. 6 Bevor Sie das Elastomerpaket wieder einbauen, Avant de remonter le bloc d’élastomères, il y a lieu müssen Sie diese Gummis mit Schmieröl de les graisser avec de l’huile;...
- Page 35 STANCHION TUBE RIMONTAGGIO TUBO PORTANTE FIG. 8 FIG. 8 Fit the rebound stop rubber (12) into the outer tube Installate il gommino (12) di fine corsa del ritorno (38) and then fit the damping assembly by pushing nel tubetto esterno (38) quindi introducete il grup- it up to the stanchion tube end.
- Page 36 REMONTAGE PLONGEUR WIEDERZUSAMMENBAU DES TAUCHROHRS FIG. 8 ABB. 8 Monter l’élément en caoutchouc (12) de fin course Den Gummi (12) für den Rücklaufanschlag in die en extension dans le tube extérieur (38) et intro- äußere Hülse (38) einbauen, dann durch Nieder- duire l'ensemble d’amortissement, en le poussant drücken bis zum Boden des Tauchrohrs, in die jusqu’au fond du plongeur.
- Page 37 SPRING AND PRELOAD CAP RIMONTAGGIO MOLLA E TAPPO FIG. 11 FIG. 11 Fit the lower elastomer shim (36) after it is properly Introducete l’elastomero inferiore (36), opportu- lubricated into the stanchion tube and then install namente lubrificato, all’interno del tubo portante, the dividing washer (8) and the spring (9).
- Page 38 REMONTAGE DU RESSORT ET DU BOUCHON WIEDEREINBAU VON FEDER UND VERSCHLUSS FIG. 11 ABB. 11 Introduire l’élastomère inférieur (36), dûment Den unteren, gut geschmierten Elastomergummi graissé, à l’intérieur du plongeur, puis monter la (36) in das Tauchrohr einlegen, dann die Zwischen- rondelle (8) et le ressort (9).
-
Page 39: Fork Exploded View
FORK EXPLODED VIEW ESPLOSO FORCELLA PLAN ECLATE FOURCHE AUFBAUZEICHNUNG DER GABEL... - Page 40 Ref. Description Ref. Descrizione Safety ring Anello di sicurezza Preload knob Pomello di precarico Allen bolt Grano Stop ring Anello di fermo Plug Tappo O-ring Anello OR External preload adjuster Spintore esterno Lower washer Rondella inferiore Spring Molla O-ring Anello OR Inner rod Asta interna Rebound stop rubber...
- Page 41 Cod. 900420 MARZOCCHI S.p.A. - Via Grazia, 2 40069 Lavino di Zola Predosa (Bologna) Italy Telefono 051 - 61 68 711 Telefax 051 - 75 88 57...
Need help?
Do you have a question about the Z3 and is the answer not in the manual?
Questions and answers