Bosch FR 10 Installation And Operating Instructions Manual
Hide thumbs
Also See for FR 10:
- Installation & user's instructions (32 pages) ,
- Installation and operating instructions manual (164 pages)
Table of Contents

Related Manuals for Bosch FR 10


Summary of Contents for Bosch FR 10
- Page 1 FR 10 Instrucţiuni de instalar e şi utilizare Upute za instaliranje i rukovanje Uputstvo za instalaciju i upotrebu Üzembe helyezési és kezelési utasítás Installation and operating instructions 胞缄肤爸璧讨...
-
Page 2: Table Of Contents
Contents Contents Key to symbols and safety instructions ... . 112 Key to symbols ......112 Safety instructions . - Page 3 Appendix 159 | 111 Troubleshooting ......131 Energy saving tips ......134 Environmental protection .
-
Page 4: Key To Symbols And Safety Instructions
Key to symbols and safety instructions Key to symbols and safety instructions Key to symbols Warnings Warnings in this document are framed and identified by a warning triangle printed against a grey background. If there is a danger due to electricity, the exclamation mark in the warning triangle is replaced by a lightning flash. - Page 5 Key to symbols and safety instructions | 113 Important information Important information where there is no risk to people or property is indicated with the adjacent symbol. It is bordered by lines above and below the text. Additional symbols Symbol Explanation Action Cross-reference to other parts of this...
-
Page 6: Safety Instructions
Key to symbols and safety instructions Safety instructions B These instructions must be observed to ensure correct operation. B Install and commission the heating appliance and all accessories in accordance with the instructions provided. B Accessories must only be installed by suitably qualified installers. -
Page 7: Technical Data For The Accessory Item
The FR 10 can only be connected to a heating appliance with BUS-enabled Heatronic 3. The FR 10 enables the room temperature control of a single • heating circuit. According to paragraph 12 of the EnEV (Order governing the •... -
Page 8: Specification
Technical data for the accessory item Specification Dimensions Fig. 3, Page 160 Rated voltage 10 ... 24 V DC Rated current ≤ 3.5 mA Controller output 2-wire BUS Control range 5 ... 30 °C in steps of 0.5 K permiss. ambient temperature 0 ... +50 °C Protection class IP rating IP20... -
Page 9: Sample System
Technical data for the accessory item | 117 Sample system Sample systems for systems with several heating circuits (not permissible in Germany) are contained in the documentation of the room temperature controller FR 100/FR 110. 6 720 645 356 (2010/09) -
Page 10: Installation (For Contractors Only)
BUS subscribers. Installation The quality of control of the FR 10 is influenced by the installation location. The installation location (= lead room) must be suitable for controlling the heating system or heating circuit. -
Page 11: Disposal
Installation (for contractors only) | 119 Disposal B Dispose of packaging in an environmentally responsible manner. B When replacing components, dispose of the old components in an environmentally responsible manner. Electrical connections B BUS connection from controller to other BUS subscribers: Use cables that comply with local regulations and guidelines. - Page 12 Installation (for contractors only) B FR 10 e.g. connect to BUS-enabled Heatronic 3 ( Fig. 6 on page 162). If the BUS cables feature different cross-sections: B Connect the BUS cables via a junction box (A). ( Fig. 7 on page 162).
-
Page 13: Commissioning (Installers Only)
Germany): Select corresponding code 2 HC to 10 HC by turning confirm by pressing Only one FR 10 can be assigned per heating circuit and per code. System configuration starts automatically, and after approx. 60 seconds AC will be displayed. -
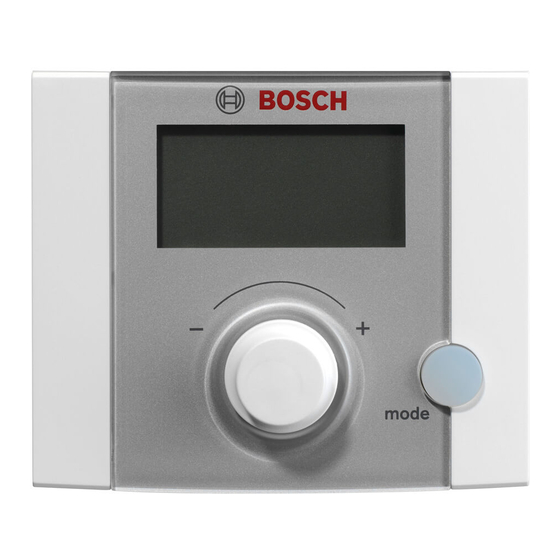
Page 14: Operation
Set the flow temperature controller at the boiler to the maximum required flow temperature. The FR 10 can only regulate the heating system if an operating mode is enabled. In conjunction with a time switch (accessory), the time program automatically changes between the currently... -
Page 15: Changing The Operating Mode
Operation | 123 Changing the operating mode B Briefly press mode until the required operating mode is displayed. = constant High = constant Low = constant Frost The set operating mode is only active if heating operation is not blocked Changing the required room temperature Use this function if you want to change the required room temperature by way of an exception, e.g. -
Page 16: Changing The Standard Setting Of The Required
Operation Changing the standard setting of the required room temperature Use this function if you want to permanently change the required room temperature away from the standard setting. B Accessing user level: Hold down mode for approx. 3 seconds until – – is displayed. B Release the mode key and turn until the required parameter is shown:... - Page 17 Operation | 125 Frost = minimum required temperature (e.g. if everyone – is away or asleep and the house should not cool down excessively). Consider any pets and plants. Setting range is lower than Low down to a minimum of 5 °C. B Briefly press to save the value.
-
Page 18: Adjusting The Contractor Level (Contractors Only) . 126
Operation Adjusting the contractor level (contractors only) The contractor level is the exclusive domain of contractors. B Accessing contractor level: Hold down mode for approx. 6 seconds until – – – is displayed. B Release the mode key and turn until the required parameter is shown: –... - Page 19 B If the controller is to regulate a heating circuit HK (not 2...10 permissible in Germany): Set the corresponding code 2 to 10. Only one FR 10 can be assigned per heating circuit and per code. 5.4.2 Changing the heating circuit configuration (parameter: 5b p) Setting range: 1 to 3...
- Page 20 Use this parameter if you want to correct the displayed room temperature. B Position a precision instrument near FR 10. The precision instrument must not transfer any heat to the FR 10. B Keep away heat sources such as sunlight, body heat, etc. for 1 hour.
- Page 21 Operation | 129 5.4.5 Setting the amplification factor V (parameter: 6C p) Setting range: 40 % to 100 % The amplification factor V influences the heat demand, subject to changes in room temperature. B Selecting amplification factor V: – ≤ 50 %: Set a lower factor to reduce the influence on the heat demand.
-
Page 22: Adjusting A Heating Program
Operation 5.4.8 Resetting all adjustments This function returns all controller settings and adjustments to their standard settings! Following such a reset, your contractor will need to re- commission the controller. B Hold down and mode simultaneously for 15 seconds until the countdown has finished. - Page 23 E means error (= fault). If the FR 10 develops a fault, the display shows 03 E for example. Here, (03) stands for the fault number on the FR 10 and (E) for error (= fault): B Contact your installer.
- Page 24 Air lock in the heating Bleed radiators and system. vent the heating system. Required room Installation site of FR 10 Select a more temperature is unfavourable, e.g. suitable installation greatly external wall, close to location exceeded.
- Page 25 Troubleshooting | 133 Problem Cause Remedy Temperature Time incorrectly set at Check time setting. rises instead of the time switch falling. (accessory). Room The building retains a lot Select an earlier stop temperature of heat. time on the time excessively switch (accessory).
- Page 26 Energy saving tips Energy saving tips The temperature in the lead room (where the controller is • fitted) acts as lead size for the heating circuit to which the controller is assigned. Therefore, set the output of the radiators inside the lead room as low as possible: –...
- Page 27 Energy saving tips | 135 a constant extraction of heat from the room without noticeably improving the ambient air in the room. Vent briefly but intensively (open window fully). • While venting, close thermostatic valve or switch to Frost • mode.
- Page 28 Environmental protection Environmental protection Environmental protection is a fundamental corporate strategy of the Bosch Group. The quality of our products, their economy and environmental safety are all of equal importance to us and all environmental protection legislation and regulations are strictly observed.
- Page 29 Anexă/Prilog/Dodatek/Függelék/Appendix/ 附录 | 159 Anexă/Prilog/Dodatek/Függelék/Appendix/ 附录 mode 6 720 645 356 (2010/09)
- Page 30 Anexă/Prilog/Dodatek/Függelék/Appendix/ 附录 25 mm 100 mm 0,6 m 1,0 m 85 mm 0,75 m 1,2 m 35 mm 6 720 612 218-02.1J 6 720 645 356 (2010/09)
- Page 31 Anexă/Prilog/Dodatek/Függelék/Appendix/ 附录 | 161 6 720 612 218-04.1R 3,5 mm 6 mm 6 mm 3,5 mm 6 720 612 218-05.1R 6 720 645 356 (2010/09)
- Page 32 Anexă/Prilog/Dodatek/Függelék/Appendix/ 附录 Heatronic 3 FR 10 ST 19 A F 1 6 720 613 554-01.1R 100 mm 100 mm 6 720 645 356 (2010/09)
- Page 33 Anexă/Prilog/Dodatek/Függelék/Appendix/ 附录 | 163 6 720 645 356 (2010/09)
- Page 34 Bosch Thermotechnik GmbH Sophienstrasse 30-32 D-35576 Wetzlar www.bosch-thermotechnology.com 067206453566...
Need help?
Do you have a question about the FR 10 and is the answer not in the manual?
Questions and answers