Advertisement
IN-DASH STEREO INSTALLATION KIT FOR
2010-14 CHEVROLET CAMARO
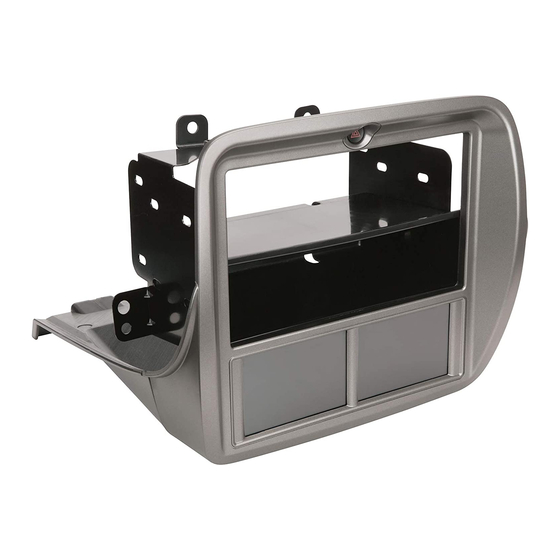
1. Main panel with built-in touch screen ( * )
2. Hazard Warning Flasher
3. Stereo mounting bracket (left)
4. Stereo mounting bracket (right)
5. Dash pocket for single din mount
6. Power harness (not shown-see page 3)
SOLD SEPARATELY:
GMOSM1 OnStar Retention Interface
2
1
*
This premium installation kit is for 2010-14 Chevrolet Camaro vehicles. Included are all the parts
you need to mount your car stereo or CD player into your vehicle's dash. Refer to the individual
instruction in this manual to remove your vehicle's factory radio and assemble the kit. *Dash
modification required see page
CAUTION
DISCONNECT YOUR VEHICLE'S NEGATIVE BATTERY TERMINAL BEFORE THE INSTALLATION
TO HELP PREVENT ELECTRICAL DAMAGE. WE RECOMMEND THE USE OF A VOLT/OHM
METER OVER A TEST LIGHT TO CHECK WIRING. A TEST LIGHT OR GROUNDED WIRE PROBE
CAN CAUSE DAMAGE TO THE VEHICLE'S COMPUTER AND/OR DIAGNOSTIC SYSTEMS. AVOID
ALL FACTORY AIRBAG WIRING - AIRBAGS CAN ACCIDENTALLY DEPLOY CAUSING SERIOUS
INJURY OR DEATH.
NOTES
• See your vehicle's instructions for any special tools your installation might require.
• Read all instructions accompanying your car stereo for proper wiring and mounting instructions.
This instruction booklet is based on carefully documented data and research of automobile dash disassembly, wire harness/
codes and information pertaining to installation of this kit (ITCGM01B) in 2010-14 Chevrolet Camaro vehicles. Scosche Industries,
Inc. cannot be held responsible for discrepancies/inconsistencies that may occur due to the automobile manufacturing changes
or options, or damage that may occur in the automobile during the installation of components while using this booklet.
If you have any further questions, call our toll free technical help line at:
©2017 SCOSCHE INDUSTRIES, INC.
WITH TOUCH-SCREEN INTERFACE
*Dash modification required*
INTRODUCTION/PRELIMINARY
2.
LIABILITY DISCLAIMER
3
5
1-800-621-3695x3
ITCGM01B
4
ITCGM01B
05/17
Advertisement
Table of Contents

Related Manuals for Scosche ITCGM01B


Summary of Contents for Scosche ITCGM01B
- Page 1 This instruction booklet is based on carefully documented data and research of automobile dash disassembly, wire harness/ codes and information pertaining to installation of this kit (ITCGM01B) in 2010-14 Chevrolet Camaro vehicles. Scosche Industries, Inc. cannot be held responsible for discrepancies/inconsistencies that may occur due to the automobile manufacturing changes or options, or damage that may occur in the automobile during the installation of components while using this booklet.
-
Page 2: Factory Stereo Removal
AFTER. AFTER Proceed to either the single DIN assembly instruction on the next page(3) or double DIN on page 4 after completing the dash modification for the kit. ITCGM01B 05/17 ©2017 SCOSCHE INDUSTRIES, INC. - Page 3 Press the Hazard button (page 1, #2) to activate flashing signal lamps (flash on and off). This warns others that you are having trouble. Press again to turn the flashers off. (Located top center of face panel). ITCGM01B 05/17 ©2017 SCOSCHE INDUSTRIES, INC.
-
Page 4: Hazard Warning Flashers
Steering Wheel Control layout 7. Volume UP NOTE: When the optional GMOSM1 module is installed, Volume UP/ Volume Down buttons can be used in order to adjust the volume level of the On-Star call. ITCGM01B 05/17 ©2017 SCOSCHE INDUSTRIES, INC. -
Page 5: Wire Color Codes
20-Way Connector (Female) Non-OnStar Bypass Plug 20-Way Connector (Male) GMOSM1 Camaro OnStar Retention Module (Sold Separately) WIRE COLOR CODES ITCGM01B WIRE COLOR CODES White = Left Front Positive (LF+) Blue/White = +12V Amp remote White/Black = Left Front Negative (LF-) Red = +12V Accessory / R.A.P... -
Page 6: Vehicle Startup
3. Connect factory HVAC connector to Scosche harness. 4. Move radio connector, and HVAC connector to the left of the radio cavity. 5. Route the 4 and 24 pin connectors of Scosche harness to original location of HVAC connector. 6. Connect the Scosche harness along with antenna and all other accessories to the aftermarket radio and insert into radio cavity (Make connections to vehicle last). -
Page 7: Air Conditioning
See page 8 for front windshield detail vent outlets. side vent outlets. option (Defog / Defrost Control). ITCGM01B 05/17 ©2017 SCOSCHE INDUSTRIES, INC. - Page 8 VEHICLE UNTIL WINDOWS ARE CLEAR! SETTINGS /MENU ACCESS MENU Press the MENU button (Fig.3, #8) to access: Vehicle / Interface / Language / Version Settings CLIMATE & CONVENIENCE CONTROLS (Home Screens) Sample Image of both home screen layouts. ITCGM01B 05/17 ©2017 SCOSCHE INDUSTRIES, INC.
-
Page 9: Menu Navigation
2. Setting highlighted when selected. 3. Setting Scrollbar (Use to customize setting) 4. Options not selected (Press to select) 5. Close menu 6. Set setting (Use slidebar to customize setting) 7. Scrollbar (when available) ITCGM01B 05/17 ©2017 SCOSCHE INDUSTRIES, INC. - Page 10 Door Unlock Options: Selectable unlocking when using remote: Driver’s door first or Both doors at once. Remote Vehicle Starting: Enable or Disable Remote Vehicle Starting • Restore Factory Settings Restores all customized settings to Factory default: Yes or No ITCGM01B 05/17 ©2017 SCOSCHE INDUSTRIES, INC.
- Page 11 Should be set to “YES” if the vehicle does not have lock/unlock switched in the door panel. (i.e. if the switches have to be removed when installing the new H/U as they are in the center console) ITCGM01B 05/17 ©2017 SCOSCHE INDUSTRIES, INC.
- Page 12 English / Français / Español (See page 9 for navigation inquiry) VERSION SETTING CHART VERSION Displays module device version description. To return to previous menu simply touch the screen one more time. For questions call us at: (800) 363-4490 Ext 3 ITCGM01B 05/17 ©2017 SCOSCHE INDUSTRIES, INC.
Need help?
Do you have a question about the ITCGM01B and is the answer not in the manual?
Questions and answers