
Related Manuals for Motorola solutions PMLN6621


Summary of Contents for Motorola solutions PMLN6621
- Page 1 MN000217A01.book Page 1 Thursday, October 29, 2015 12:41 PM Multi-Unit Charger PMLN6621 User Guide zh-TW zh-CN...
- Page 2 MN000217A01.book Page 2 Thursday, October 29, 2015 12:41 PM...
-
Page 3: Important Safety Instructions
MN000217A01.book Page 1 Thursday, October 29, 2015 12:41 PM IMPORTANT SAFETY INSTRUCTIONS SAVE THESE INSTRUCTIONS This document contains important safety and operating instructions. Please read these instructions carefully and save them for future reference. Before using the battery charger, read all the instructions and cautionary markings on (1) the charger, (2) the battery, and (3) on the radio using the battery. -
Page 4: Operational Safety Guidelines
MN000217A01.book Page 2 Thursday, October 29, 2015 12:41 PM Multi-Unit Charger Spare Parts Description Part Number Wall mount bracket NNTN6844 Charging Pocket NNTN8462 Power Cords Plug Type Part Number Taiwan 3004209T04 China 3004209T14 Hong Kong 3004209T02 Australia/New Zealand 3004209T07 Korea 3004209T13 OPERATIONAL SAFETY GUIDELINES •... -
Page 5: Motorola Authorized Batteries
This charger is designed for use in 100 VAC to 240 VAC, 50/60 Hz applications and uses the following Motorola power cords. Table 2: Authorized Power Cords Plug Type Charger Kit Power Cord No power cord / plug PMLN6621 –... -
Page 6: Charging Procedure
MN000217A01.book Page 4 Thursday, October 29, 2015 12:41 PM Table 2: Authorized Power Cords Plug Type Charger Kit Power Cord Taiwan PMLN6613 3004209T04 China PMLN6622 3004209T14 Hong Kong PMLN6618 3004209T02 Australia / New Zealand PMLN6619 3004209T07 Korea PMLN6615 3004209T13 Japan PMLN6620 3004209T15 DESCRIPTION... -
Page 7: Troubleshooting
MN000217A01.book Page 5 Thursday, October 29, 2015 12:41 PM When the battery is properly seated in the pocket, the charger indicator will illuminate STEADY RED to indicate that the battery is charging rapidly. When battery charging is ramping down (typically when the battery is charged approximately 90% or greater), the charger indicator changes to BLINKING GREEN. -
Page 8: No Charger Indication
MN000217A01.book Page 6 Thursday, October 29, 2015 12:41 PM Table 3: Battery Charging Indicators Charger Indicator Description Blinking Orange Battery is recognized by charger but is waiting to rapid charge. (Either the battery voltage is too low, due to over- discharge, or the battery temperature is too low or too high to allow rapid charging. -
Page 9: Charging Pocket Installation
MN000217A01.book Page 7 Thursday, October 29, 2015 12:41 PM drastically reduce the life expectancy of the battery. When this condition is corrected, the battery will begin charging automatically (STEADY RED indication). CHARGING POCKET INSTALLATION To reduce risk of electric shock, unplug the charger from the AC outlet before removing or replacing Charging Pocket. -
Page 10: Optional Equipment
MN000217A01.book Page 8 Thursday, October 29, 2015 12:41 PM Screw Charging Pocket Figure 2: Removing Charging Pocket Receptacle (on Multi-Unit Charger) Connector (on charging pocket) Figure 3: Securing Charging Pocket to Multi-Unit Charger OPTIONAL EQUIPMENT A wall mount bracket (part number: NNTN6844) is available for the Multi-Unit Charger. - Page 11 MN000217A01.book Page 9 Thursday, October 29, 2015 12:41 PM M4x25 screw – two locations (provided) Attach to wall in four locations (fasteners not provided) Figure 4: Mounting Multi-Unit Charger to Wall Bracket Mount bracket to wall using appropriate fasteners in 4 locations (fasteners not included in kit).
- Page 12 MN000217A01.book Page 10 Thursday, October 29, 2015 12:41 PM MOTOROLA, MOTO, MOTOROLA SOLUTIONS and the Stylized M logo are trademarks or registered trademarks of Motorola Trademark Holdings, LLC and are used under license. All other trademarks are the property of their respective owners.
- Page 13 MN000217A01.book Page 9 Thursday, October 29, 2015 12:41 PM 重要安全說明 請保存這些指示 本文件內含重要的安全及操作指示。請仔細閱讀這些指示並妥善保存,以供日 後參考。 使用電池充電器之前,請閱讀這些指示及 (1) 充電器、(2) 電池及 (3) 對講機上 的警示標記來使用電池。 警告 為了降低受傷的風險,請僅為表 1 中列出的充電式 Motorola 授權電池充電。其他電池可能會爆炸,導致人員受傷及物品 繁 受損。 體 中 使用非 Motorola 建議之配件可能有火災、觸電或受傷的風險。 文 若要降低損壞電源插頭和電源線的風險,與充電器中斷連線時,請拉 住插頭而非電源線。 除非必要,否則請勿使用延長線。使用不合適的延長線可能有火災與觸 電的風險。如果必須使用延長線,請確保延長線尺寸符合下列規格:長 達 100 英呎 (30.48 公尺 ) 者需為 18 AWG,長達 150 英呎 (45.72 公尺 ) 者則為...
- Page 14 MN000217A01.book Page 10 Thursday, October 29, 2015 12:41 PM 多座充電器備用零件 描述 零件編號 NNTN6844 壁掛托架 NNTN8462 充電插槽 電源線 插頭類型 零件編號 3004209T04 台灣 3004209T14 中國 繁 3004209T02 香港 體 3004209T07 澳洲/紐西蘭 中 3004209T13 韓國 文 3004209T15 日本 操作安全準則 • 為電池充電時,請關閉對講機。 • 此設備不適合於室外使用。請僅在乾燥的地點/狀態下使用。 •...
-
Page 15: Motorola 授權電池
PMNN4491 IMPRES 輕薄型 IP68 鋰電池,2100 mAh PMNN4493 IMPRES 高容量 IP68 鋰電池,3000 mAh NNTN8560 IMPRES TIA4950 HazLoc 高容量鋰電池,2500mAh 授權電源線 此充電器的設計適用於 100 VAC 至 240 VAC、50/60 Hz 的設備,並使用下列 Motorola 電源線。 表 2: 授權電源線 插頭類型 充電套件 電源線 PMLN6621 – 無電源線/插頭 PMLN6613 3004209T04 台灣... - Page 16 MN000217A01.book Page 12 Thursday, October 29, 2015 12:41 PM 表 2: 授權電源線 插頭類型 充電套件 電源線 PMLN6622 3004209T14 中國 PMLN6618 3004209T02 香港 PMLN6619 3004209T07 澳洲 / 紐西蘭 PMLN6615 3004209T13 韓國 PMLN6620 3004209T15 日本 說明 多座充電器包含可容納六個充電位置的底座。每個充電位置均搭配一個充電插 槽。套件包含: • 1 個多座充電器底座 繁 體 •...
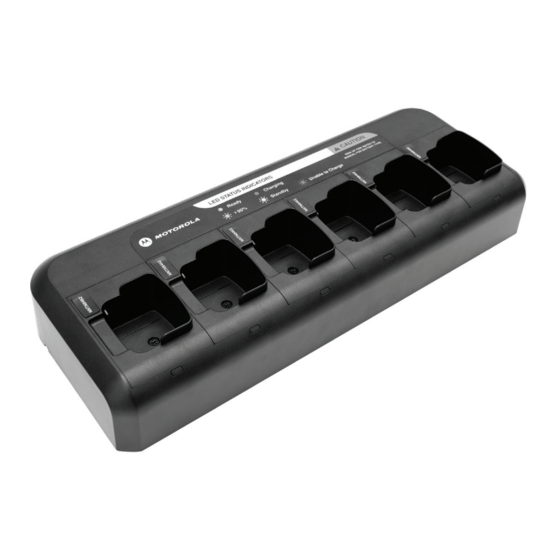
- Page 17 MN000217A01.book Page 13 Thursday, October 29, 2015 12:41 PM 電源插座 ( 位於此處 ) 充電接點 充電指示燈 充電插槽 繁 圖 1: 多座充電器 體 中 故障排除 文 進行故障排除時,請隨時觀察表 3 中所列的充電指示燈。 表 3: 電池充電指示燈 充電指示燈 描述 無指示燈 電池插入錯誤。 單次閃爍綠燈 成功啟動充電器。 閃爍紅色燈 電池無法充電或是接觸不良。 一直亮紅燈 電池處於快速充電模式。 閃爍橘燈...
- Page 18 MN000217A01.book Page 14 Thursday, October 29, 2015 12:41 PM 無充電器指示? 檢查是否已正確插入裝有電池的對講機或是電池 (請參閱 「充電程序」的 步驟 3)。 確認已將電源線穩固地插入充電器及適當的 AC 插座中,且插座已通電。 閃爍紅色指示燈? 從充電器取下電池,然後: a.確認電池是表 1 中所列的 Motorola 授權電池。其他電池可能無法充電。 b.拔除電池充電器的電源,並使用乾淨的乾布清潔電池和充電器的金屬充 電接點。 閃爍紅色 啟動充電器並將電池放回充電器插槽。如果充電器指示燈持續 燈 ,請更換電池。 閃爍橘色指示燈? 繁 電池溫度可能低於 5 °C (41 °F) 或高於 40 °C (104 °F)。 體...
- Page 19 MN000217A01.book Page 15 Thursday, October 29, 2015 12:41 PM 將充電插槽固定到多座充電器 將接頭插入多座充電器上的插座以連接插槽接線 (請參閱圖 3)。 將充電插槽插入底座,並確定充電插槽完全插入多座充電器。旋入充電 插槽螺絲。 螺絲 充電插槽 繁 體 中 文 圖 2: 取下充電插槽 插座 ( 位於多座充電器上 ) 接頭 ( 位於充電 插槽上 ) 圖 3: 將充電插槽固定到多座充電器...
- Page 20 在 4 個位置使用適當的扣件將托架裝到牆上 (扣件未隨附於套件中)。 將兩個 M4x25 螺絲 (隨附於套件中) 穿過托架固定至充電器底座,如圖所 示。請勿將螺絲鎖得太緊。 服務 多座充電器無法由使用者自行修理。您應該向當地的經銷商訂購替換零件。 電話: 1-800-422-4210 (美國與加拿大) 電話: 1-847-538-8023 (國際) MOTOROLA、MOTO、MOTOROLA SOLUTIONS 以 及 特 殊 格 式 之 M 標 誌 為 Motorola Trademark Holdings, LLC 的商標或註冊商標,並依授權使用。所有其他商標為其個別所有人之財產。 © 2014, 2015 Motorola Solutions, Inc. 所有權利均予保留。...
- Page 21 MN000217A01.book Page 17 Thursday, October 29, 2015 12:41 PM 重要安全注意事项 妥善保存这些说明 本文档包含重要的安全和操作说明。 请仔细阅读这些说明, 并妥善保管以供日后 参考。 在使用电池充电器之前, 请仔细阅读 (1) 充电器、 (2) 电池和 (3) 使用电池的对讲 机上的所有说明和警告。 警告 为了减少受伤风险, 请仅对表 1 中列出的摩托罗拉认可的充 电电池进行充电。 其他类型的电池可能会发生爆炸, 导致人 身伤害和损失。 使用非摩托罗拉推荐的附件可能会导致火灾、 触电或人身伤害。 为了减少损坏电插座和电源线的风险, 断开充电器时请拉拔插头而不是 电源线。 除非绝对必要, 否则请勿使用电源延长线。 使用不合适的延长线可能会 导致火灾或触电发生。...
- Page 22 MN000217A01.book Page 18 Thursday, October 29, 2015 12:41 PM 多座充电器备件 说明 部件号 NNTN6844 墙壁安装支架 NNTN8462 充电座 电源线 插头类型 部件号 3004209T04 中国台湾 3004209T14 中国 3004209T02 中国香港 3004209T07 澳大利亚/新西兰 3004209T13 韩国 3004209T15 日本 安全操作指南 • 在电池充电时请关闭对讲机。 • 该设备不适合在室外使用。 请仅在干燥的场所/环境下使用。 简 • 此设备只能与配有保险丝且电压匹配 (产品上指定的电压) 的电源连接。 体...
- Page 23 IMPRES 锂离子超薄电池 IP68, 2100 mAh 体 PMNN4493 IMPRES 锂离子大容量 IP68 电池, 3000 mAh 中 NNTN8560 IMPRES 2500mAh TIA4950 HazLoc 高容量锂离子电池 文 认可的电源线 此充电器专为 100VAC - 240VAC、 50/60Hz 的应用而设计, 并且使用以下摩托 罗拉电源线。 表2: 认可的电源线 插头类型 充电器套件 电源线 PMLN6621 – 无电源线/插头 PMLN6613 3004209T04 中国台湾...
- Page 24 MN000217A01.book Page 20 Thursday, October 29, 2015 12:41 PM 表2: 认可的电源线 插头类型 充电器套件 电源线 PMLN6622 3004209T14 中国 PMLN6618 3004209T02 中国香港 PMLN6619 3004209T07 澳大利亚/新西兰 PMLN6615 3004209T13 韩国 PMLN6620 3004209T15 日本 介绍 此多座充电器由包含六个充电位置的基座构成。 每个充电位置都配备了一个充 电座。 该套件包括 : • 1 个多座充电器基座 • 6 个充电座 •...
- Page 25 MN000217A01.book Page 21 Thursday, October 29, 2015 12:41 PM 使用双手从充电座上取下对讲机或电池。 一只手拿住充电器, 另一只手取 下对讲机或电池。 电源插座 (位于此处) 充电触点 充电指示灯 充电座 图 1: 多座充电器 故障排除 排除故障时, 请务必观察表 3 中充电指示灯的颜色。 表 3: 电池充电指示灯 充电器指示灯 说明 简 体 无指示灯指示 电池插入不正确。 中 绿灯闪烁一次 充电器加电成功。 文 红灯闪烁 电池无法充电或接触不良。...
- Page 26 MN000217A01.book Page 22 Thursday, October 29, 2015 12:41 PM 充电器无指示? 请检查是否正确插入带电池的对讲机或电池本身 (请参阅“充电步骤” 中的第 3 步) 。 请确保将电源线牢固插入充电器并将充电器插入合适的交流电源插座, 而且确保电源插座可以正常供电。 红灯闪烁? 从充电器上取下电池, 然后做如下操作 : a. 请确认电池是表 1 中列出的摩托罗拉认可的电池。 其他类型的电池不 能使用此充电器进行充电。 b. 断开电池充电器的电源连接, 使用洁净的干布清洁电池和充电器的金 属充电触点。 红灯闪 给充电器加电, 将电池放回充电座中。 如果充电器指示灯依然为 烁 , 请更换电池。 黄灯闪烁? 电池温度可能低于...
- Page 27 MN000217A01.book Page 23 Thursday, October 29, 2015 12:41 PM 将充电座固定至多座充电器 将接头插入多座充电器上的电源插座以连接线束 (请参阅图 3) 。 将充电座插入基座, 并确保充电座与多座充电器齐平。 固定充电座螺丝。 螺丝 充电座 图 2: 取下充电座 简 电源插座 体 (在多座充电器上) 中 文 接头 (在充 电座上) 图 3: 将充电座固定至多座充电器...
- Page 28 将两个 M4x25 螺丝 (包含在套件中) 穿过支架固定到充电器基座上, 如图 所示。 不要将这两个螺丝拧得太紧。 服务 多座充电器不可维修。 应从当地经销商订购替换件。 电话 : 1-800-422-4210 (美国和加拿大) 电话 : 1-847-538-8023 (国际) MOTOROLA、 MOTO、 MOTOROLA SOLUTIONS 和标志性的 M 徽标是 Motorola Trademark Holdings, LLC 的商标或注册商标, 必须获得授权才可使用。 所有其他商标均为其各自所有者的财产。 © 2014, 2015 Motorola Solutions, Inc. 保留所有权利。...
- Page 29 MN000217A01.book Page 25 Thursday, October 29, 2015 12:41 PM 安全に関する重要な説明 以下の説明は保管してください このドキュメントには安全と取扱いに関する重要な説明が含まれています。 以 下の説明を注意深く読み、今後も参照できるように保管しておいてください。 バッテリ充電器を使用する前に、(1) 充電器、(2) バッテリ、および (3) バッテ リを使用する無線機に書かれているすべての説明と警告を読んでください。 警告 傷害の危険を減らすために、表 1 に記載された充電式の Motorola 承認バッテリのみを充電してください。他のバッ テリは爆発するおそれがあり、身体的損傷や障害の原因と なります。 Motorola 推奨以外のアクセサリを使用すると、火事、感電、または傷 害のおそれがあります。 差し込みプラグおよびコードへの損傷のリスクを軽減するために、充 電器を取り外すときはコードではなくプラグを持って引き抜いてく ださい。 どうしても必要な場合を除き、延長コードは使用しないでください。 不適切な延長コードを使用すると、火事や感電が生じるおそれがあり ます。延長コードを使用する必要がある場合は、長さ 100 フィート (30.48m) までは 18AWG、 長さ 150 フィート (45.72m) までは 16AWG のサイズのコードを使用してください。...
- Page 30 MN000217A01.book Page 26 Thursday, October 29, 2015 12:41 PM マルチユニット充電器の交換部品 説明 部品番号 NNTN6844 壁面取り付けブラケット NNTN8462 充電ポケット 電源コード プラグ タイプ 部品番号 3004209T04 台湾 3004209T14 中国 3004209T02 香港 3004209T07 オーストラリア / ニュージーランド 3004209T13 韓国 3004209T15 日本 操作の安全に関するガイドライン • バッテリを充電するときは、無線機の電源を切ってください。 • この機器は、屋外での使用に適していません。乾燥した場所および条件 でのみ使用してください。 •...
-
Page 31: Motorola 承認バッテリ
IMPRES Li-Ion 大容量 IP68 バッテリ、3000mAh NNTN8560 IMPRES Li-Ion TIA4950 HazLoc 大容量バッテリ、 2500mAh 承認電源コード この充電器は、50/60Hz の 100VAC ~ 240VAC で使用するように設計されて おり、以下の Motorola 電源コードを使用します。 表 2: 承認電源コード プラグ タイプ 充電器キット 電源コード PMLN6621 – 電源コード / プラグなし PMLN6613 3004209T04 日 台湾 PMLN6622 3004209T14 本 中国... - Page 32 MN000217A01.book Page 28 Thursday, October 29, 2015 12:41 PM 説明 マルチユニット充電器は、 6 つの充電場所を提供するベース ユニットからなり ます。それぞれの充電場所には充電ポケットを取り付けます。キットには次の ものが含まれています。 • マルチユニット充電器ベース ユニット 1 台 • 充電ポケット 6 個 • その地域の電源コード 1 本 取り扱い説明 マルチユニット充電器で充電できるのは、表 1 に記載された Motorola 承認 バッテリに限られます。他のバッテリは充電できません。充電器を操作する前 に、 すべての無線機およびバッテリの挿入部が正しく適切に取り付けられてい ることを確認してください。 マルチユニット充電器では、表 1 に記載された無線機またはバッテリを最大 6 台...
- Page 33 MN000217A01.book Page 29 Thursday, October 29, 2015 12:41 PM 電源ソケット ( ここにあります ) 充電端子 充電イン ジケータ 充電ポ ケット 図 1: マルチユニット充電器 トラブルシューティング トラブルシューティングを行うときは、 必ず表 3 で充電インジケータが表す状 況を確認してください。 表 3: バッテリの充電インジケータ 充電器のインジケータ 説明 消灯 バッテリが正しく差し込まれていません。 緑色の点滅 1 回 充電器が正常に起動しました。 赤色の点滅 バッテリを充電できないか、接続端子が正しく接触していません。 赤色の点灯...
- Page 34 MN000217A01.book Page 30 Thursday, October 29, 2015 12:41 PM 充電器のインジケータがつかない バッテリ付き無線機またはバッテリ単体が正しく差し込まれているこ とを確認してください (「充電の手順」のステップ 3 を参照 )。 電源コードが充電器および適切な AC コンセントにしっかり差し込まれ ていることと、コンセントが通電していることを確認してください。 赤色のインジケータが点滅する バッテリを充電器から取り外します。 a. そのバッテリが、表 1 に記載された Motorola 承認バッテリであるこ とを確認します。他のバッテリは充電できません。 b.バッテリ充電器を電源から取り外し、 乾いた柔らかい布を使って、 バッ テリと充電器の両方の充電端子の金属部分をきれいにします。 充電器の電源を入れ、バッテリを充電器ポケットに戻します。それでも 充電器のインジケータが赤色で点滅する場合は、バッテリを交換してく ださい。 オレンジ色のインジケータが点滅する バッテリ温度が 5°C (41°F) を下回っているか、 40°C (104°F) を上回って いる可能性があります。...
- Page 35 MN000217A01.book Page 31 Thursday, October 29, 2015 12:41 PM マルチユニット充電器への充電ポケットの固定 コネクタをマルチユニット充電器側のレセプタクルに差し込み、ポケッ ト ハーネスを接続します ( 図 3 を参照してください )。 充電ポケットをベースのスロットに押し込み、充電ポケットがマルチユ ニット充電器と同じ高さになるようにします。充電ポケットのネジを取 り付けます。 ネジ 充電ポケット 図 2: 充電ポケットの取り外し レセプタクル ( マルチ ユニット充電器側 ) コネクタ ( 充電 ポケット側 ) 日 本 語 図 3: マルチユニット充電器への充電ポケットの固定...
- Page 36 図に示されているように、2 本の M4x25 ネジ ( キットに含まれています ) でブラケットと充電器ベースを固定します。 ネジは締め付けすぎないよう にしてください。 修理 マルチユニット充電器は、ユーザーが修理することはできません。交換品を最 寄りの販売店に注文してください。 電話 : 1-800-422-4210 ( 米国およびカナダ ) 日 本 電話 : 1-847-538-8023 ( その他の国 ) 語 MOTOROLA、MOTO、MOTOROLA SOLUTIONS、Stylized M のロゴマークは、Motorola Trademark Holdings, LLC の商標または登録商標であり、ライセンスの下に使用されています。その他のすべて の商標は、該当する各所有者が権利を有しています。 © 2014, 2015 Motorola Solutions, Inc. All rights reserved.
- Page 37 MN000217A01.book Page 1 Thursday, October 29, 2015 12:41 PM...
- Page 38 MN000217A01.book Page 2 Thursday, October 29, 2015 12:41 PM *MN000217A01* MN000217A01-BB...
Need help?
Do you have a question about the PMLN6621 and is the answer not in the manual?
Questions and answers