
Related Manuals for Senix CSX5-M


Summary of Contents for Senix CSX5-M
- Page 1 58V MAX LITHIUM ION CORDLESS CHAINSAW Operator’s manual Model: CSX5-M For customer support, please call 1-800-261-3981 or send email to: support@senixtools.com SAVE THIS MANUAL FOR FUTURE REFERENCE.
-
Page 2: Table Of Contents
TECHNICAL DATA TABLE OF CONTENTS TECHNICAL DATA TECHNICAL DATA ���������������������������������������������������������������������������������������������1 Model Number: CSX5-M SAFETY Motor: 40V Brushless Motor SPECIFIC RULES FOR CHAINSAWS ��������������������������������������������������������������3 Max. Motor Speed: 8200 RPM (No Load) SAWING TECHNIQUES Max. Chain Speed: 49 FPS (Feet Per Second) FELLING A TREE ����������������������������������������������������������������������������������������������4... -
Page 3: Safety
SAFETY SAFETY 12. NEVER LEAVE A RUNNING TOOL UNATTENDED. Turn the power switch OFF. Do not leave the tool until it Safety is a combination of common sense, staying alert has come to a complete stop. and knowing how your item works. SAVE THESE SAFETY INSTRUCTIONS. -
Page 4: Specific Rules For Chainsaws
3. Only use replacement bars and chains specified by unpredictable ways, possibly resulting in kickback and Senix. Replace dull blades as necessary. injury to the user. 4. Do not let the tip of the guide bar contact any surfaces. -
Page 5: Sawing Techniques
SAWING TECHNIQUES 6. Cuts should only take place while the chain is moving An escape path should be planned and cleared as at full speed. Do not turn the saw ON or OFF in the necessary before cuts are started. The escape path should middle of a cut. -
Page 6: Felling Back A Cut
SAWING TECHNIQUES FELLING BACK A CUT BUCKING A LOG Make the felling back cut at least 50 mm higher than the Bucking is cutting a log into lengths. It is important to horizontal notching cut (Figure 2). Keep the felling back cut make sure your footing is firm and your weight is evenly parallel to the horizontal notching cut. - Page 7 SAWING TECHNIQUES When the log is supported on both ends, cut 1/3 the diameter from the top (overbuck) (Figure 6). Then make the finished cut by underbucking the lower 2/3 to meet the first cut. Log supported both ends 1st cut overbuck (1/3 diameter) to avoid splintering 2nd cut underbuck (2/3 diameter) to meet 1st cut (to avoid pinching)
-
Page 8: Component Location
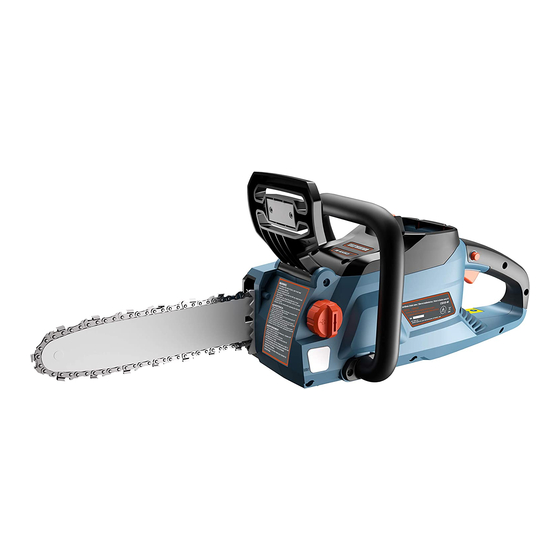
COMPONENT LOCATION COMPONENT LOCATION KNOW YOUR CHAINSAW 1 — Trigger 7 — Guide bar 2 — Safety Switch 8 — Chain 3 — Battery 9 — Side cover lock 4 — Front handle 10 — Side cover 5 — Hand guard/Chain break 11 —... -
Page 9: Assembly
ASSEMBLY ASSEMBLY 4. Place the saw chain around the sprocket while lining up the slot in the guide bar with the internal bolt at the base ASSEMBLY OF GUIDE BAR AND SAW CHAIN of the saw and the chain tensioning pin in the guide bar’s pin hole (Figure 10). -
Page 10: Adjustments
ADJUSTMENTS FILLING THE OIL TANK 1. Place the saw on a level surface. Clean the area around the oil tank cap and then open it. CAUTION: Make sure that no dirt gets into the oil tank to prevent clogging in the oil nozzle. 2. -
Page 11: Operation
ATTACH /REMOVE THE BATTERY WARNING — Remove the battery before adjusting the chain tension. CAUTION: Only use a Senix-approved battery and charger. CHAIN TENSION: Check the saw chain tension every 10 minutes of operation to maximize safety. New saw chains... -
Page 12: On/Off Switch
MAINTENANCE MAINTENANCE ON/OFF SWITCH To turn the tool ON: Push the safety button (Figure 15) WARNING — Remove the battery before inspecting, and then squeeze the trigger. After the tool has started, adjusting, performing maintenance, or you can release the safety switch without turning the tool cleaning the unit. -
Page 13: Filling The Auto Oil System
STORAGE Examine the unit thoroughly for worn, loose or damaged parts. If you need to repair or replace a part, contact Senix customer service at 1-800-261-3981. • Clean the unit before storing or transporting. Be sure to secure the unit while transporting. -
Page 14: Parts
PARTS PARTS EXPLODED VIEW WWW.SENIXTOOLS.COM... - Page 15 WARRANTY Part # Description Qty. Part # Description Qty. Blade Tension Cap Assembly Bake Spring Tension Lock Knob Clamp Spindle Cover Motor Bar Cover Shaft Cover Seal Spring Chain Screw Guide Bar Torsion Spring Sheath Trigger Oil Feed Seal Safety Button Screw Safety Spring Screw...
-
Page 16: Warranty
WARRANTY LIMITED TWO-YEAR WARRANTY WWW.SENIXTOOLS.COM...
Need help?
Do you have a question about the CSX5-M and is the answer not in the manual?
Questions and answers