MSA GasGard XL Operating Manual
Wall mount controller
Hide thumbs
Also See for GasGard XL:
- User instructions (118 pages) ,
- Operating manual (58 pages) ,
- Quick start manuals (2 pages)

Related Manuals for MSA GasGard XL


Summary of Contents for MSA GasGard XL
- Page 1 Installation & Maintenance Instructions GASGARD XL WALL MOUNT CONTROLLER Supplied by .com Call us on +44 (0)118 916 9420 | Email info@247able.com...
- Page 2 Operating Manual GasGard XL Wall Mount Controller Order no.: 10081908/02...
- Page 3 MSA AUER GmbH D-12059 Berlin Thiemannstrasse 1 Germany © MSA AUER GmbH. All rights reserved.
- Page 4 1000 Cranberry Woods Drive Cranberry Township, PA 16066 USA The manufacturer or his in the community established authorized representative MSA AUER GmbH, Thiemannstrasse 1, D-12059 Berlin declares that the product GasGard XL based on the EC-Type Examination Certificate: FTZU 07 ATEX 0066 X Complies with the ATEX directive 94/9/EC, Annex III.
-
Page 5: Table Of Contents
Technical Specifications................54 8.2. Marking, Certificates and Approvals............56 8.3. Special conditions for safe use according to SIL 2........57 Ordering Information..................58 9.1. Controller....................58 9.2. Accessories/Spares ................. 58 9.3. Spare Parts ....................59 GasGard XL Wall Mount Controller... - Page 6 CONTENTS Appendix A – Sensor List .................... 60 List of sensors compatible with GasGard XL..........60 Appendix B – Wiring Diagrams ................... 61 Sensor type D-7100 ................. 61 Sensor type D-7010 ................. 61 Sensor Type D-715 K................62 Sensor Type D-7152 K................62 Sensor Type D-7711 K................
-
Page 7: Safety Regulations
1.1. Correct Use GasGard XL Wall Mount Controller (hereinafter referred to as Control Unit) is a compact Control Unit in wall housing for connection of up to 8 EX, TOX and/or OX sensors. The Control Unit is suitable for a large number of applications in many industrial areas. -
Page 8: Description
It is approved in accordance with Directive 94/9/EC [ATEX]. TOX-monitoring for protecting individuals by continuously monitoring the atmosphere toxic gas concentrations. GasGard XL Wall Mount Controller... -
Page 9: Control Unit
The Control Unit consist of the following basic modules: Enclosure with mounting holes (7) and cable entries (5) Power Supply (1) Backup Battery (6) Sensor Extension Board (4) Channel Board (3) Channel Relay Board (2) GasGard XL Wall Mount Controller... - Page 10 The communication shall not interfere with the operation of the Control Unit. For SCADA visualization software all three interfaces can be used. For service access only both of ModBus RTU communications can be used (safety precaution). GasGard XL Wall Mount Controller...
- Page 11 4 channels) are configurable for individual alarms: Normally open/close Normally energized/de-energized Latching/non latching Increasing/decreasing N out of m voting New re-invoked alarms (common horn relays only) Grouping Contacts are resistive load. GasGard XL Wall Mount Controller...
-
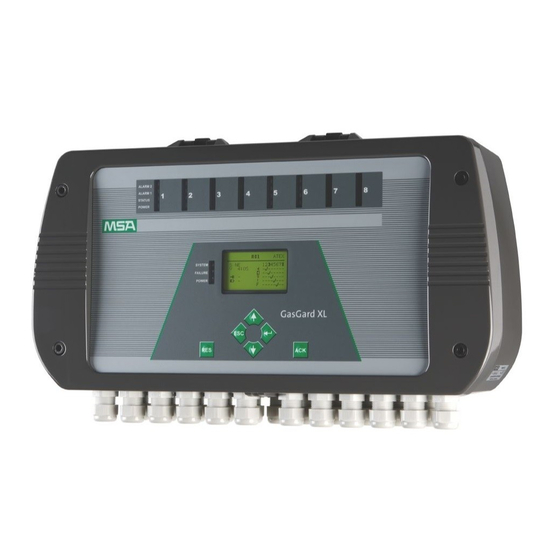
Page 12: Front Panel
Alarm Acknowledgement button (4) Alarm Reset button (2) Four Control push buttons (3) Fig. 3 Operator Panel Common LEDs Alarm Acknowledgement Alarm Reset Graphic Display Control Push Buttons Channel Status Info LEDs GasGard XL Wall Mount Controller... - Page 13 Using the control push buttons you can operate the menu prompt as shown below. For more information please refer to Section 4. Right button [ Up Button [ Left button [ ESC ] Down button [ Alarm Acknowledgement Alarm Reset GasGard XL Wall Mount Controller...
- Page 14 4 Hz blinking : 2nd alarm level has been reached (not acknowledged yet) Steady: 2nd alarm is acknowledged but is still inside alarm range. 0.5 Hz blinking: 2nd alarm is configured as latching. Measured value is out of alarm level (not reset yet). GasGard XL Wall Mount Controller...
- Page 15 A blinking LED indicates power supply from battery. The Failure LED (yellow) indicates that some sensor is in fault condition. The System LED (yellow) indicates that the Control Unit has a system fault. GasGard XL Wall Mount Controller...
-
Page 16: Installation
Sensors for use in the Ex area must have the appropriate Ex approval and must be installed in accordance with all relevant local and national regulations. MSA configures and calibrates all control systems with a checklist and all systems are supplied with a data sheet for each measuring point. -
Page 17: Electrical Installation
In addition to the above, if the GasGard XL is supplied by a direct voltage (DC) source, the supply cable must be properly shielded GasGard XL Wall Mount Controller... - Page 18 The wiring diagrams for different sensors are shown in Appendix B. The sensors must be connected to the terminals using shielded cables. For the maximum cable length of sensors refer to the technical specification. GasGard XL Wall Mount Controller...
-
Page 19: Operation
: Position of the channel board counted from the left to the right on the Main Board (1 … 4) and the Sensor Extension Board (5 … 8). Status Information : Information about the channel status (alarm, fault, in service etc.; see symbols) GasGard XL Wall Mount Controller... - Page 20 Displayed if the STEL alarm is reached TWA Alarm Displayed if the TWA alarm is reached Battery is included and is under charging. Battery is included but discharged (The symbol starts blinking if the battery cable is disconnected Battery not included GasGard XL Wall Mount Controller...
-
Page 21: Controls
DOWN Pressing this button will replace the cursor to the next position. ESCAPE Pressing this button will escape the upper menu or cancel the change. ACKNOWLEDGEMENT In case of alarm pressing will disable audible signal. GasGard XL Wall Mount Controller... - Page 22 Pressing this button for 5 seconds will change the language from English to the local one. ESCAPE Pressing this button for 5 seconds will start the GasGard XL Selftest Process: a test of the LCD display a test of all LEDs ...
-
Page 23: Viewing Channel Information
On the next screen will be shown the channel information as: - Channel number - Measured gas - Active/Passive Channel Symbol - Measured gas value and unit or channel state - Preset alarm levels GasGard XL Wall Mount Controller... -
Page 24: Viewing Events Archive
On the next screen will be shown the information as: - Event Date - Event Time - Channel Identification - Event Description (4) Scroll the Events Archive by pressing [ or [UP]. DOWN] GasGard XL Wall Mount Controller... - Page 25 Sensor FAULT ROM Check FAULT System FAULT System Password entered Start of Calibration Calibration Password entered ZG accepted Read FAULT SG accepted Write FAULT FAULT of ZG result Master Calibration Saved FAULT of SG result GasGard XL Wall Mount Controller...
- Page 26 Channel Board 2 Channel Board 3 Channel Board 4 Channel Board 5 Channel Board 6 Channel Board 7 Channel Board 8 Channel Relay Board 1 Channel Relay Board 2 Display Board Main Board Real Time Clock GasGard XL Wall Mount Controller...
-
Page 27: Configuration
CONFIGURATION Configuration All parameters of the GasGard XL Control Unit can be configured by pressing control pushbuttons on the front panel, or using configuration software tool ( Section 6). There are two menus that allow changing unit parameters: System Menu The operator can change any parameter needed according to application requirements. - Page 28 (left mark for the 1st board (connected to the Main Board) counting from the left, right mark for the 2nd board (connected to the Sensor Extension Board) counting from the left). GasGard XL Wall Mount Controller...
- Page 29 5.1.1. Description of Channel Parameters (1) Enter into System Menu ( Section 5.1). (2) Use control push buttons to select a channel number to modify. (3) Press to confirm. [ENTER] First of two configuration screens appears. GasGard XL Wall Mount Controller...
- Page 30 Alarm 1 Parameters group are affected by ATEX option. Alarm 1 value threshold. - Rising value will activate alarm. - Falling value will activate alarm. - Alarm is deactivated automatically. - Alarm is latched until acknow- ledgement by [RESET] GasGard XL Wall Mount Controller...
- Page 31 Zero gas to be used for calibration. Span gas to be used for calibration. SG value Span gas value Sensor I Defines current sensor required for the selected type of sensor head (only for passive sensors). GasGard XL Wall Mount Controller...
- Page 32 Second screen will contain only "Delay" parameter. (4) Use control push buttons the set: – Accept changes and leave menu. – Do not accept changes and leave menu. – Return to the system menu. GasGard XL Wall Mount Controller...
- Page 33 (4) Press [ to confirm the ENTER] selected parameter. (5) Use control push buttons change parameter value. (6) Press [ to accept the ENTER] changes. Pressing [ will return ESCAPE] to the upper menu. GasGard XL Wall Mount Controller...
- Page 34 (7) Use control push buttons to set: – Accept changes and leave menu. – Do not accept changes and leave menu. – Return to the menu. GasGard XL Wall Mount Controller...
-
Page 35: Relay Setting Menu
Some relay parameters are limited (for example normally energized status S: NE is only allowed to be set) - Channel Number Relates the relay to the selected channel (bold number indicates channel is configured according ATEX regulation). GasGard XL Wall Mount Controller... - Page 36 The main power is off and the Control Unit is powered from battery. The battery voltage is low. Relay is set using these symbols: - Not selected - Selected to toggle [DOWN] between the two screens. GasGard XL Wall Mount Controller...
- Page 37 “Relay Setting Menu” and press to confirm [ENTER] ( Section 5.1). First (left figure) of the configuration screens appears. to toggle [DOWN] between the two screens. (3) Use control push buttons to select and to change required parameter. GasGard XL Wall Mount Controller...
- Page 38 Alarm 2 on any channel will de-energise common Alarm 2 relay on Main Board. Fault on any channel will de-energise Fault relay on Main Board. System fault will de-energise Fault relay on Main Board. GasGard XL Wall Mount Controller...
-
Page 39: General Setting Menu
Setting the calibration password. Factory preset password is: 321 - RESET Psw: Setting password for alarm reset. Factory preset password is: 0 Setting any above password to “Zero” (0) will disable the password itself. GasGard XL Wall Mount Controller... - Page 40 (3) Use control push buttons to select and to change required parameter. (4) Press [ to accept the ENTER] parameter changes. Pressing [ will return ESCAPE] to the upper menu. GasGard XL Wall Mount Controller...
-
Page 41: Calibration
There is a certain delay set for „One man“ calibration to allow the operator to apply zero and span gas himself on the site. After returning from the site he can accept or cancel obtained values. GasGard XL Wall Mount Controller... - Page 42 [ [UP] [DOWN] ENTER] to enter number of channel calibrating. You are entering the calibration start screen of the selected channel ( next figure). Only channels allowed in the system are displayed. GasGard XL Wall Mount Controller...
- Page 43 (4) Then push [Apply ZG] (apply zero gas). If the value is within a defined limit a [OK] symbol is displayed. If the value is outside a defined limit an [E] symbol is displayed. GasGard XL Wall Mount Controller...
- Page 44 Calibration values are stored as the initial values. Any further calibration values will be compa- red with the initial to define conditions of the sensor head. Expected sensor lifetime is calculated from the initial values. GasGard XL Wall Mount Controller...
- Page 45 5.4.2. Manual Calibration (4 – 20 mA) If the Channel board is configured to accept 4–20 mA input signals from either 2-wire or 3-wire remote transmitters it does not require any additional calibration. GasGard XL Wall Mount Controller...
- Page 46 After finishing One man calibration it is necessary to confirm zero and span gas values on the Control Unit. If the span signal is not received within 8 hours the channel will go automatically into the measuring mode. Fig. 10 Principle of “One man” Calibration GasGard XL Wall Mount Controller...
- Page 47 If the password is valid the calibration menu screen appears. (3) Use and [ [UP] [DOWN] ENTER] to enter number of channel calibrating. You are entering the calibration start screen of the selected channel ( next figure). GasGard XL Wall Mount Controller...
- Page 48 (5) Apply zero gas for a minimum one minute and then span gas on the sensor location typically for 2 minutes. Different time may be required depending on the specific T90 of sensor on use. GasGard XL Wall Mount Controller...
- Page 49 ] to return to upper menu. [ESCAPE (8) Use control push buttons to set values or return to the menu. – To save all changes. – To cancel all changes and return back to the calibration menu. GasGard XL Wall Mount Controller...
-
Page 50: Configuration Software
: Java 6 SE or higher 6.2. Using of Application Fig. 11 Applications Main Screen The applications main screen contains 4 basic parts: Menu Bar (1) Toolbar (2) Main Screen (3) Status Bar (4) GasGard XL Wall Mount Controller... - Page 51 The option “Service Function” offers to set language, device address, IP address and mask. Dialog window also show information about firmware version. Help In the help menu you can find some help for using the application. GasGard XL Wall Mount Controller...
-
Page 52: Multilingual System
The window displays all eight channels status and allows for their configuration Upload Button - Allows to upload the configuration from GasGard XL. Download Button - Allows to download the configuration to the GasGard XL. Open - Press to open GasGard XL configuration saved on the hard disc. -
Page 53: Setting Up Output Relays
For each channel and each of the output relays you can select Alarm 1, Alarm 2, STEL, TWA or Fault. For each selected channel the drop-down-menue allows for voting selection. Voting can be from 1:1 up to 42:42. GasGard XL Wall Mount Controller... -
Page 54: Channel Calibration
Use the appropriate span gas as specified in the Calibration Data Sheet. Clean the housing with soft clothes only. Do not use any solvent or other cleaning agents that may damage the integrity of the housing GasGard XL Wall Mount Controller... -
Page 55: Technical Specifications And Certifications
Input Signal mV bridge signal Cable length limit max. cable resistance is 18 [Ohm] / 1 Wire. (It is equal to copper cable 1.5km length with conductor cross section = 1.5mm²) Connection Modes 3 wires GasGard XL Wall Mount Controller... - Page 56 Cable length limit Depend on sensor technical specification. Internal board resistance is 230 [Ohm]. Connection Modes 2, 3 wires Fig. 15 Max. relay DC load (except fault relay) Fig. 16 Max. relay DC load (fault relay) GasGard XL Wall Mount Controller...
-
Page 57: Marking, Certificates And Approvals
EN 61779-5:2001-07 EN 50104:2002-10 EN 50271:2002-05 EN 50 402:2005 II (1)G Remote sensor has to be connected Marking with intrinsic safe supply to the GasGard XL II (1)G (2) EC-Type Examination : FTZU 07 ATEX 0066 X Certificate Quality Assurance... -
Page 58: Special Conditions For Safe Use According To Sil 2
Only modules with the HW, SW versions specified in the table below may be used An inside temperature of GasGard XL above 50°C has to be avoided External power supplies must fulfil, as a minimum, the requirements according to directive 2006/95/EC... -
Page 59: Ordering Information
Channel Board 4 - 20 mA 10081674 Channel Board mV (passive pellistors) 10081675 Power Supply 100 Watt 10081678 GasGard XL, manual 10081908 EMC Filter (to be used with ext. 24 VDC supply) 10081680 Back-up battery pack (2.2 Ah) 10081772 GasGard XL Wall Mount Controller... -
Page 60: Spare Parts
10085393 Power Supply Holder 10085394 Set of mounting screws 10081777 Set of fuses (10 pcs of T4 A/250 V, 10 pcs of T250 mA/250 V) 10089912 Spacers for relay channel board [set of 6] 10089913 GasGard XL Wall Mount Controller... -
Page 61: Appendix A - Sensor List
APPENDIX A – SENSOR LIST Appendix A – Sensor List List of sensors compatible with GasGard XL Passive sensors 4 – 20 mA Transmitters D-7010 DF-7010 D-7100 DF-7100 D-715 K DF-8250 D-7152 K DF-8510 D-7711 K DF-9200 D-7711 K-PR DF-9500... -
Page 62: Appendix B - Wiring Diagrams
APPENDIX B – WIRING DIAGRAMS Appendix B – Wiring Diagrams Sensor type D-7100 Sensor type D-7010 GasGard XL Wall Mount Controller... -
Page 63: Sensor Type D-715 K
APPENDIX B – WIRING DIAGRAMS Sensor Type D-715 K Sensor Type D-7152 K GasGard XL Wall Mount Controller... -
Page 64: Sensor Type D-7711 K
APPENDIX B – WIRING DIAGRAMS Sensor Type D-7711 K Sensor Type D-7711 K-PR GasGard XL Wall Mount Controller... -
Page 65: Series 47 K Standard & Prp
APPENDIX B – WIRING DIAGRAMS Series 47 K Standard & PRP Series 47 K-HT GasGard XL Wall Mount Controller... -
Page 66: Sensor Type Df-7010
APPENDIX B – WIRING DIAGRAMS Sensor Type DF-7010 B-10 Sensor Type DF-7100 GasGard XL Wall Mount Controller... -
Page 67: Sensor Type Df-9200
APPENDIX B – WIRING DIAGRAMS B-11 Sensor Type DF-9200 B-12 Sensor Type DF-9500 GasGard XL Wall Mount Controller... -
Page 68: Sensor Type Df-9500 With Safety Barrier
APPENDIX B – WIRING DIAGRAMS B-13 Sensor Type DF-9500 with Safety Barrier B-14 Sensor Type DF-9500 with Current Separator GasGard XL Wall Mount Controller... -
Page 69: Sensor Gd10
APPENDIX B – WIRING DIAGRAMS B-15 Sensor GD10 B-16 ULTIMA X (2-wire) GasGard XL Wall Mount Controller... -
Page 70: Ultima X (3-Wire)
APPENDIX B – WIRING DIAGRAMS B-17 ULTIMA X (3-wire) B-18 Sensor Type DF-8603 GasGard XL Wall Mount Controller... -
Page 71: Sensor Type Df-8201
APPENDIX B – WIRING DIAGRAMS B-19 Sensor Type DF-8201 B-20 Sensor Type DF-8250 GasGard XL Wall Mount Controller... -
Page 72: Sensor Type Df-8510
APPENDIX B – WIRING DIAGRAMS B-21 Sensor Type DF-8510 B-22 Sensor Type FlameGard GasGard XL Wall Mount Controller... -
Page 73: Sensor Type Safeeye 4Xx/Uv
APPENDIX B – WIRING DIAGRAMS B-23 Sensor Type SafeEye 4xx/UV B-24 Sensor Type ULTIMA X IR GasGard XL Wall Mount Controller... -
Page 74: Transmitter Rg3 Lcd
APPENDIX B – WIRING DIAGRAMS B-25 Transmitter RG3 LCD B-26 Sensor Type DF-7500 GasGard XL Wall Mount Controller... -
Page 75: Sensor Type Df-9500C
APPENDIX B – WIRING DIAGRAMS B-27 Sensor Type DF-9500C B-28 Sensor Type DF-9500C GasGard XL Wall Mount Controller... -
Page 76: Sensor Type D500S
APPENDIX B – WIRING DIAGRAMS B-29 Sensor Type D500S B-30 Sensor Type Chillgard M100 GasGard XL Wall Mount Controller... -
Page 77: Appendix C - Individual Relays Connection
APPENDIX C – INDIVIDUAL RELAYS CONNECTION Appendix C – Individual Relays Connection Fig. 17 Individual Relays Connection GasGard XL Wall Mount Controller... -
Page 78: Appendix D - Terminal Connectors
APPENDIX D – TERMINAL CONNECTORS Appendix D – Terminal Connectors GasGard XL GasGard XL Wall Mount Controller... -
Page 79: Main Board
APPENDIX D – TERMINAL CONNECTORS Main Board GasGard XL Wall Mount Controller... -
Page 80: Sensor Extention Board
APPENDIX D – TERMINAL CONNECTORS Sensor Extention Board GasGard XL Wall Mount Controller... -
Page 81: Channel Relay Board
APPENDIX D – TERMINAL CONNECTORS Channel Relay Board GasGard XL Wall Mount Controller... - Page 82 MSA in Europe www.msa-europe.com & www.msa-gasdetection.com Northern Europe Southern Europe Eastern Europe Central Europe Netherlands France Poland Germany MSA Nederland MSA GALLET MSA Safety Poland MSA AUER Kernweg 20 Zone Industrielle Sud ul. Wschodnia 5A Thiemannstrasse 1 1627 LH Hoorn 01400 Châtillon sur...
Need help?
Do you have a question about the GasGard XL and is the answer not in the manual?
Questions and answers