
Related Manuals for Ocean Digital WR-202


Summary of Contents for Ocean Digital WR-202
- Page 1 User Manual Internet Radio WR-202 Please read this user manual carefully before using the receiver.
-
Page 2: Table Of Contents
Contents Location of Controls ........1 Remote control..........2 Enter encryption code of the Wi-Fi router ..3 Connect the radio with your Wi-Fi Router ..5 Start using internet radio ........6 My Favorite ...........6 Internet Radio..........7 Media Centre ..........8 Alarm Setting........... 9 Sleep Timer..........9 Configuration..........9 Add your favorite URL........13... -
Page 3: Location Of Controls
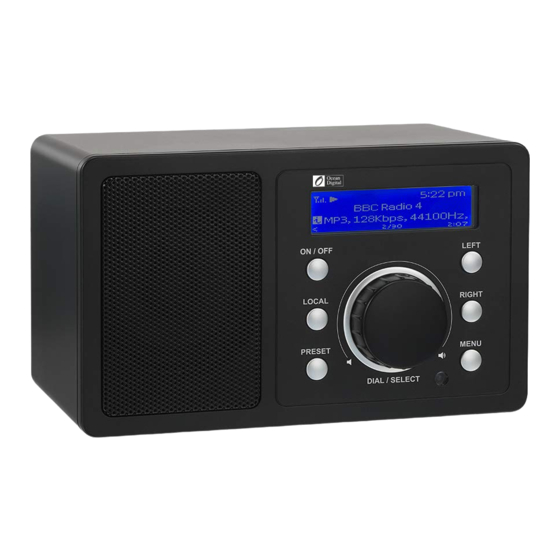
Location of Controls Front 1. LCD Display 2. Dial/Select/Volume - Rotate the dial to adjust volume level Adjust LCD backlight level under Standby - Push the dial to confirm / select menu options - Push to stop/resume playback of the radio 3. -
Page 4: Remote Control
Remote Control : Mute 2. 0-9: Input index number on the list / input letters and numbers for WiFi Encryption code : Preset the current playing station to Favorite 4. ▲: Cursor up 5. t : Cursor left / back to previous menu : Alarm button : Sleep Timer 8. -
Page 5: Enter Encryption Code Of The Wi-Fi Router
Enter encryption code of the Wi-Fi router Using remote control When you want to enter the letters, numbers or symbols for the encryption code, using remote control would be easy to complete the job. Here is the definition of each key and press the same button to cycling through different letters / symbol available After each entry, press the right key to input the next. - Page 6 Before you start Please ensure the following is ready: ž You have a broadband internet connection. ž A wireless broadband router is connected to the internet successfully. The radio supports Wireless B, G and N connection (Wireless N router can also be used with the setting on B or G). ž...
-
Page 7: Connect The Radio With Your Wi-Fi Router
Connect the radio with your Wi-Fi Router 1. Insert the adaptor plug into the DC socket located at the rear side of the radio. Plug the adaptor into a wall socket outlet. Caution: Use only the adaptor supplied with the radio. Connecting a power supply with a different rating will cause permanent damage to the radio and may be hazardous. -
Page 8: Start Using Internet Radio
Start using internet radio Press <MENU> to return to the main menu or the key on the remote controller. You will see the item list below: My Favorite Internet Radio Media Centre Alarm Sleep Timer Configuration <My Favorite>- To show the list of favorite stations which have been assigned to the presets. -
Page 9: Internet Radio
¢ Recall a station Press the button on the remote controller or press the <PRESET> button briefly on the unit to recall the Favorite list. You can enter the Index number to quickly scroll to the radio station you want to listen. e.g., On the remote controller, press 2 8 and Enter, it will scroll to the station no. -
Page 10: Media Centre
Media Centre The device supports UPnP and is DLNA-compatible. This provides the opportunity to stream music from your network. However, this requires you to have a compatible device in your network that can function as a server. This can be e.g., a network hard drive or a conventional PC with e.g., Windows 8 via which access to the shared folder or media sharing is permitted. -
Page 11: Alarm Setting
Alarm Setting 1. Choose <Alarm> from the main menu or press the <Alarm> button on the remote controller. 2. Select either Alarm 1 or Alarm 2, and choose <Turn on> to activate the Alarm. 3. Follow the alarm wizard instructions to set the alarm. The wizard will guide you through the settings below: Time –... - Page 12 ¢ AP: [ ] If you have added more than one routers on the radio and want to switch to another one, select this option to change. ¢ Signal This is to show the strength of the Wi-Fi Signal of the Wi-Fi router as received by the radio.
- Page 13 Resume when Power on This function is ON by default. The radio will resume to the last state of mode when the radio is power on next time, e.g. if it was playing radio station before power off, it will resume playing the last listened station when it is power on the next time.
- Page 14 Check the update regularly to keep your radio up to date with the latest software. Reset to Default You can do the reset to clear all the settings and return to default settings. ** Please note all the Station presets, Settings and configuration will be lost after you have performed the Reset.
-
Page 15: Add Your Favorite Url
Add your favorite URL You can add your favorite radio station if you know the published audio streaming URL of the radio. We provide an embedded server for your radio and you can manage your favorite stations anytime to add or edit the list. Follow the steps below to access the embedded server: 1. -
Page 16: Trouble Shooting
Trouble Shooting Cause Solutions Problem • Confirm that a Wi-Fi or Ethernet Network down Wired connected PC can access the internet (i.e. can browse the web) using the same network. • Check that a DHCP server is available, or that you have configured a static IP address on the radio. -
Page 17: Helpful Tips
1. If the Internet Radio keeps re-buffering radio station: The Internet Radio is streaming the data from the radio station via your broadband connection, if there is a high error rate on your broadband connection, or the connection is intermittent, then it will cause the Internet Radio to pause until the connection is re-established and it has received enough data to start playing again. -
Page 18: Technical Specification
This system is financed by the industry and ensures environmentally responsible disposal and the recycling of valuable raw materials. Ocean Digital Technology Ltd. Flat B, 12/F., Yeung Yiu Chung (No.8) Ind. Bldg., 20 Wang Hoi Road, Kowloon Bay, Hong Kong...
Need help?
Do you have a question about the WR-202 and is the answer not in the manual?
Questions and answers