
Related Manuals for Kohler 14RES


Summary of Contents for Kohler 14RES
- Page 1 Installation Residential/Commercial Generator Sets Models: 14/20RES 14/20RESL Controller: RDC Residential Digital Controller DC Digital Controller TP-6733 8/11a...
-
Page 2: Product Identification Information
California Proposition 65 WARNING Engine exhaust from this product contains chemicals known to the State of California to cause cancer, birth defects, or other reproductive harm. Product Identification Information Generator Set Identification Numbers Engine Identification Record the product identification numbers from the Record the product identification information from the generator set nameplate(s). -
Page 3: Table Of Contents
............1.7.1 Fuel Conversion, 14RES/RESL ....... . . - Page 4 Notes TP-6733 8/11...
-
Page 5: Safety Precautions And Instructions
Safety Precautions and Instructions IMPORTANT SAFETY INSTRUCTIONS. Accidental Starting WARNING Electromechanical equipment, including generator sets, transfer WARNING switches, switchgear, and accessories, can cause bodily harm and pose life-threatening danger when improperly installed, operated, or maintained. To prevent accidents be Explosion. aware of potential dangers and act Can cause severe injury or death. - Page 6 Battery gases. Explosion can cause Servicing the air cleaner. A sudden Generator set operation. Carbon severe injury or death. Battery gases backfire can cause severe injury or monoxide can cause severe nausea, can cause an explosion. Do not smoke death. Do not operate the generator fainting, or death.
- Page 7 Fuel System Hazardous Noise CAUTION CAUTION WARNING Welding the generator set. cause severe electrical equipment damage. Hazardous noise. Explosive fuel vapors. Can cause hearing loss. Can cause severe injury or death. Never weld components of the generator without first Never operate the generator set Use extreme care when handling, disconnecting the battery, controller without a muffler or with a faulty...
- Page 8 Short circuits. Hazardous Hot Parts Notice voltage/current can cause severe injury or death. Short circuits can NOTICE WARNING cause bodily injury and/or equipment Canadian installations only. damage. Do not contact electrical standby service connect the output of connections with tools or jewelry while the generator set to a suitably rated making adjustments...
-
Page 9: Introduction
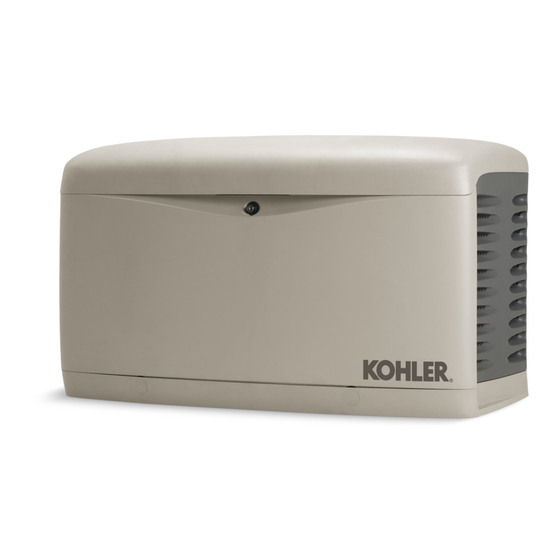
Do not install this generator set indoors. Figure 1 14/20RES/RESL Generator Set Information in this publication represents data available at the time of print. Kohler Co. reserves the right to Startup and Registration change this publication and the products represented... -
Page 10: Service Assistance
Visit the Kohler Power Systems website at Phone: (86) 21 6288 0500 KohlerPower.com. Fax: (86) 21 6288 0550 Look at the labels and stickers on your Kohler product India, Bangladesh, Sri Lanka or review the appropriate literature or documents India Regional Office included with the product. -
Page 11: Section 1 Installation
Do not install the the skid. generator set where exhaust gas could accumulate and seep inside or be drawn into a potentially occupied Model Weight, kg (lb.) building. 14RES/RESL 186 (410) 20RES/RESL 227 (500) 1.4.1 Exhaust Requirements Figure 1-1 Approximate Weights... -
Page 12: Mounting Area
The exhaust system is complete for generator sets installed outdoors. Do not install this generator set indoors. Figure 1-2 gives the exhaust temperature at rated load. The engine exhaust mixes with the generator set cooling air at the exhaust end of the enclosure. Mount the generator set so that the hot exhaust does not blow on plants or other combustible materials. - Page 13 Figure 1-4 Dimension Drawing ADV-8423, Sheet 1 TP-6733 8/11 Section 1 Installation...
- Page 14 Figure 1-5 Dimension Drawing ADV-8423, Sheet 2 Section 1 Installation TP-6733 8/11...
- Page 15 Figure 1-6 Dimension Drawing ADV-8423, Sheet 3 TP-6733 8/11 Section 1 Installation...
- Page 16 Figure 1-7 Dimension Drawing ADV-8423, Sheet 4 Section 1 Installation TP-6733 8/11...
-
Page 17: Fuel Requirements
Fuel supply pressure, 1.3--2.7 1.7--2.7 kPa (in. H (5--11) (7--11) Contact local LP provider for LP installation information. Fuel flow rate, maximum, Btu/hr.: Minimum Gas Pipe Size Recommendation, in. NPT 14RES/RESL 193,000 203,000 14RES/RESL 20RES/RESL 20RES/RESL 281,000 340,000 Natural Natural Nominal Fuel Rating, Btu/ft. -
Page 18: Fuel Conversion
1.7 Fuel Conversion Disabling the generator set. Accidental starting can cause severe injury or death. Before working on the generator set or connected equipment, disable the generator The multi-fuel system allows conversion from natural set as follows: (1) Move the generator set master switch to the gas to LP vapor (or vice-versa) in the field while OFF position. - Page 19 (Enlarged to show detail) DSAI Lead Connection GM66563 1. Regulator 4. Fuel solenoid valve and digital spark advance ignition (DSAI) 2. Fuel block (not shown; see Figure 1-13) or LP orifice location leads (see Figure 1-15) 5. Fuel inlet, 1/2 in. NPT female 3.
-
Page 20: Fuel Conversion, 14Res/Resl
1. Fuel block 2. Fuel metering valves—factory-sealed, do not adjust 3. Fuel inlet, 1/2 in. NPT Procedure to convert from NG to LP, 14RES/RESL 4. Hose fitting 5. Plug 1. Press the OFF button on the generator set... -
Page 21: Fuel Conversion, 20Res/Resl
1.7.2 Fuel Conversion, 20RES/RESL Note: LP setup shown For LP vapor fuel, an orifice is used in the fuel line. The unit is typically shipped set up for natural gas, with the loose orifice tied near the fuel solenoid valve. To convert to LP vapor, install the orifice and disconnect the spark advance leads as described below. -
Page 22: Electrical Connections
1.8 Electrical Connections 1.8.1 Electrical Lead Entry Drill or punch holes in the enclosure for the electrical WARNING conduit in the locations shown in Figure 1-17. full-scale dimensioned template for the hole locations is printed in Appendix B. See page 43. Hazardous voltage. -
Page 23: Field-Connection Terminal Block
1.8.3 Field-Connection Terminal Block Procedure 1. Drill holes for the conduit fittings. See the The generator set is equipped with a field-connection Figure 1-17 and Appendix B for the recommended terminal block located in the air inlet area near the electrical inlet locations. - Page 24 4. Connect the ATS or remote start/stop switch. b. For a remote start/stop switch or Model RDT Route low-voltage communication leads through or RSB transfer switch: Connect the engine separate conduit. start leads from the transfer switch or remote start switch to terminals 3 and 4 on the terminal a.
-
Page 25: Grounding
1.8.4 Grounding 1.9 Controller Fuse F3 Ground the generator set. The grounding method must To prevent controller reset during installation, remove comply with NEC and local codes. Connect the controller fuse F3 before connecting or disconnecting grounding strap to the generator set ground lug, the battery cables. -
Page 26: Battery
1.10 Battery Battery acid cleanup. Battery acid can cause severe injury or death. Battery acid is electrically conductive and corrosive. Add 500 g (1 lb.) of bicarbonate of soda (baking soda) to a container with 4 L (1 gal.) of water and mix the WARNING neutralizing solution. - Page 27 Use a 12-volt group 51 battery with a minimum rating of Use the following procedure to install and connect the 500 cold cranking amps at 0_F. The generator set uses battery. a negative ground with a 12-volt engine electrical system. See Figure 1-23 for battery connections. Make Battery Installation Procedure sure that the battery is correctly connected and the 1.
-
Page 28: Accessories
1.11 Accessories Have accessories installed by an authorized distributor/ dealer or a licensed electrician. Follow the installation instructions provided with each kit. Use separate conduit for AC and DC leads to reduce the possibility of electrical interference. Verify that the leads and conduit do not interfere with the operation of the generator set or obstruct the service areas. -
Page 29: Carburetor Heater
Note: Do not place the heater thermostat inside the 2. Carburetor heater power cord generator set engine compartment. Figure 1-27 14RES/RESL Carburetor Heater thermostat must be exposed to the ambient air. The heater requires a continuous source of power. Plug the carburetor heater into one of the 120 VAC receptacles provided. -
Page 30: Prestart Installation Check
1.12 Prestart Installation Check 1.13 Set Exerciser Review the entire installation section. Inspect all wiring Set the exerciser to automatically run the generator set and connections to verify that the generator set is ready on the desired day and time every week. See TP-6734, for operation. -
Page 31: Controller Configuration
5 seconds, until the firmware version number changes. appears on the display. See Figure 1-31. On the DC An authorized Kohler distributor/dealer can adjust the controller, the firmware version number is displayed RDC controller configuration and generator set during the first 2 seconds of the engine start cycle. -
Page 32: Rdc Controller Configuration
Note: The DC controller cannot be adjusted from the controller keypad. An authorized Kohler distributor/dealer can adjust the voltage and frequency on both the RDC and DC controllers using Kohlerr SiteTecht software and a personal computer. - Page 33 Hold select and up buttons for 5 seconds Software version Software version number displayed number displayed S A U E u 1 . 0 u 2 . 0 Enter pass code OFF mode Generator Set Running? RUN mode System Voltage Setting Coarse Voltage Adjust Adjust Adjust...
-
Page 34: Voltage Adjustment
1.15.1 Voltage Adjustment 1.15.2 Frequency Adjustment Note: Refer to the flowchart in Figure 1-31 during the The engine speed determines the generator output following procedure. frequency; 60 Hz units operate at 3600 rpm and 50 Hz units run at 3000 rpm. Adjust the engine governor speed and gain to set the output frequency and stability Voltage Adjustment Procedure using the following procedure. -
Page 35: Section 2 Wiring Diagrams
Section 2 Wiring Diagrams Figure 2-1 lists the wiring diagram numbers and page Note: The revised design uses the revised fuel system numbers. and the revised field-connection terminal block layout shown in Figure 1-20. Original Design Revised Design (see Figure 1-19) (see Figure 1-20) Drawing Number Page... - Page 36 Figure 2-2 Schematic Diagram, ADV-7697 (original) Section 2 Wiring Diagrams TP-6733 8/11...
- Page 37 Figure 2-3 Schematic Diagram, ADV-8033 (revised) TP-6733 8/11 Section 2 Wiring Diagrams...
- Page 38 Figure 2-4 Point-to-Point Wiring Diagram, GM69754 (original) Section 2 Wiring Diagrams TP-6733 8/11...
- Page 39 Figure 2-5 Point-to-Point Wiring Diagram, GM79591 (revised) TP-6733 8/11 Section 2 Wiring Diagrams...
- Page 40 Notes Section 2 Wiring Diagrams TP-6733 8/11...
-
Page 41: Appendix A Abbreviations
(2 bytes) est. estimated Canadian Electrical Code KBus Kohler communication protocol E-Stop emergency stop cert. certificate, certification, certified kilogram etc. et cetera (and so forth) cubic feet per hour TP-6733 8/11 Appendix 41... - Page 42 kg/cm kilograms per square National Bureau of Standards remote terminal unit centimeter normally closed room temperature vulcanization kilogram-meter National Electrical Code read/write kg/m kilograms per cubic meter NEMA National Electrical Society of Automotive kilohertz Manufacturers Association Engineers kilojoule NFPA National Fire Protection scfm standard cubic feet per minute Association...
-
Page 43: Appendix B Electrical Lead Entry Template
Appendix B Electrical Lead Entry Template Use the full-scale drawing in Figure 2 to mark the openings for the electrical conduit, if desired. See Section 1.8.1 for more information. SCALE: FULL Note: Dimensions are in mm. GM78090 Figure 2 Template, Electrical TP-6733 8/11 Appendix 43... - Page 44 Notes 44 Appendix TP-6733 8/11...
- Page 45 Notes TP-6733 8/11...
- Page 46 Notes TP-6733 8/11...
- Page 48 For the nearest sales/service outlet in the US and Canada, phone 1-800-544-2444 KohlerPower.com Kohler Power Systems Asia Pacific Headquarters TP-6733 8/11a 7 Jurong Pier Road Singapore 619159 E 2010, 2011 by Kohler Co. All rights reserved. Phone (65) 6264-6422, Fax (65) 6264-6455...
Need help?
Do you have a question about the 14RES and is the answer not in the manual?
Questions and answers