Table of Contents
Advertisement
Quick Links
Advertisement
Table of Contents

Related Manuals for IKA C 1


Summary of Contents for IKA C 1
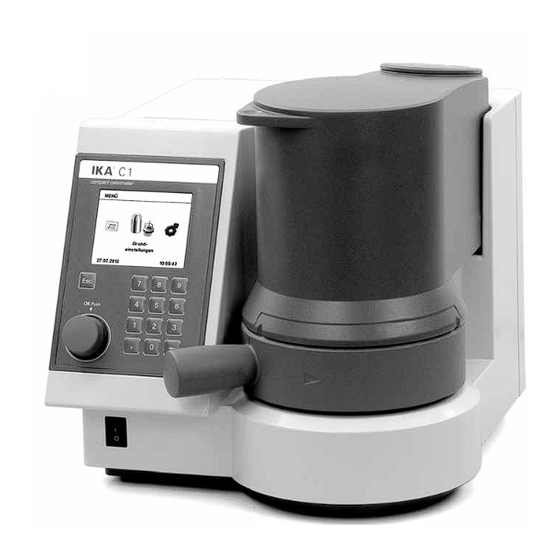
- Page 1 20000004724 C 1_042016 Calorimeter C 1 ® Operating instructions...
-
Page 2: Declaration Of Conformity
Ensure that only trained staff work with the appliance. Please read these operating instructions carefully. IKA only ® Follow the safety instructions, guidelines, occupational health and consider themselves to be responsible for the safety, reliability safety and accident prevention regulations. -
Page 3: Table Of Contents
Contents Page Page Declaration of Conformity Measurements Explication of warning symbols New measurements User notes Last result System test Contents Measurement archive Safety instructions Measurement archive: Edit Correct use Measurement archive: Print System properties Measurement archive: Delete Transportation, Storage Measurement archive: Delete all Transport and Storage conditions Calibration archive Unpacking... -
Page 4: Safety Instructions
Ensure that only trained staff work with the appliance. Caution! In case of failure Error 04 DANGER The calorimeter C 1 may only be used for the determination of ”Min.Temp.Diff.“ the combustion calorific value of solid and liquid materials according to national... -
Page 5: Correct Use
2014/68/EC. Comply with the safety instructions accordingly. stat is contained in the corresponding delivery. For adaptation to individual laboratory tasks, use original IKA Requirements for the operation of the C 1 with the C 1.20 heating ® consumables and accessories. -
Page 6: Transportation, Storage
• Technical information C 1 • Connection tube • 5 O-ring FPM 8.0 x 2.5 • C 723 Benzoic acid • Insert sheet C 1 (4 steps to use) • Warranty card • Venting hose • 5 O-ring FPM 4.0 x 1.5 •... -
Page 7: Hoses
“Safety instructions“. Please read these operating instructions • The (constant) room temperature should be around carefully. IKA consider themselves responsible for the safety, ® 20 °C ... 25 °C. reliability and performance of the appliance only when •... -
Page 8: Cooler Connection
1. Insert the connection tube fully into the coupling (“O in“; on the calorimeter) and connect the free end on the pressure reducer IKA C 29 (possibly ® with the C 29 adapter, included with). C 29 Pressure reducer ®... -
Page 9: Power Supply Unit Connection
Programming (Prog) Installation: After the C 1 was connected with the supplied interface data cable to the PC, the C 1 tells the Windows operating system, which device driver is required. 24 V = Handling the unit 1. Opening the unit... -
Page 10: Control Unit With Display
2. Removing the inner vessel 3. Removing the inner vessel base Inserting the inner vessel takes place in the reverse order 4. Switch on the device Open the device and switch the device on and off with the front power switch. Control unit with display Display: View system information, test data, as well as... -
Page 11: Dialog Box
Dialog box The dialog boxes are equipped with the following elements: Editable input field Menu-heading Selected menu item Scrollbar (yellow) (blue) Status field Menu options resp. user notification Menu-heading: • ‚Back‘: The name of the currently displayed window Closing a info window without information input values and return to the parent menu. -
Page 12: System Start
System start Switching on the system (in the open state) After switching on the calorimeter, first the initial screen with the logo, the calorimeter-type and the software and firmware ® version. INFO: Upon initial system start, the menu language must be selected. -
Page 13: Pressure Test
Observe the safety instructions! service@ika.de Oxygen pressure Information screen: oxygen pressure is too low. NOTE: The calorimeter C 1 required for functionality an oxygen pressure of at least 20 bar. Reproducible measurements for a working pressure of 30 bar is required. System check System start when the device is closed. -
Page 14: Heating Detected
Heating detected If the use of heating selected C 1.20 (accessories) in the Setting menu, but this is not recognized, the following user information is displayed. NOTE: Check that the heater is correctly connected and turned on. Factory settings As delivered, the C 1 calorimeter system is configured as follows: Settings: •... -
Page 15: Corrections
The combustion aid is first weighed and then added to the crucible with the sample. From the weight of the combustion aid and its When calculating the energy value in C 1 external energies are known specific gross calorific value, it is then possible to determine taken into account from kiln furniture, however, there is no the quantity of heat that is introduced thereby. -
Page 16: Complete Combustion
• Under the conditions that prevail during calorimetric mea- These correction values can not be entered in C 1. For this, use the surements, sulfur and nitrogen un-dergo combustion and form calorimeter software CalWin ® ® , SO and NO . -
Page 17: Overview Main Menu
Overview Main menu The user has two display modes are available. Animated view List view Measurements The following submenus are available: • New measurement • Last result • System test • Measurement archive • Calibration archive • Memory overview Default settings The following submenus are available: •... -
Page 18: Maintenance
Maintenance The following submenus are available: • Change seal • Test stirrer • System blow • Servo up • Servo down INFO: When performing maintenance programs, the system must be open ! Information The following informations are available: • Software •... -
Page 19: Placing The Sample
Fill in the sample weight. Calibration off. When you are ready with your input, press “OK” button. Don’t close the C 1 before you have pressed “OK“ button! Placing the sample During the prerequisite checking, the cotton thread can be... -
Page 20: Preparing A Measurement
Preparing a measurement The inner container base remains in the control of sample prepara- 1. Attach with a loop a cotton thread centered on the ignition tion in the calorimeter. But you can also use it by pulling it out wire (at the open calorimeter). -
Page 21: Prerequisite Checking For A Measurement
Phase 1: Filling the calorimeter with water NOTE: After switching on the calorimeter C 1 or after a break of 2 hours during the filling of the calorimeter C 1 is still carried out an intermediate emptying (H O - purge). Once the water sensor detects water, the stirrer is switched on. - Page 22 • Phase 3: Filling with oxygen • Phase 4: Stabilizing the temperature and preliminary • Phase 5: The system ignites and thereby starts the main test INFO: An ongoing measurement can be stopped by selecting “Cancel“ at any stage • Phase 6: Post test •...
-
Page 23: Cleaning The Inner Vessel
NOTE: Because the calorimeter C 1 (all internal parts) still not in a first measurement at operating temperature, the result of the first measurement can differ significantly from the subsequent measurements of a test series. -
Page 24: Using A Scale
Using a scale About Settings " accessories can be selected using a scale. If this option is selected, the displayed on the scale weight is automatically transmitted to the selected weight input field. Depending on type of balance this function may need to be be activated on the scale or the Transfer button must be pressed. -
Page 25: Cancel A Measurement
Cancel a measurement An ongoing measurement can be canceld at any time. After ignition, the system waits for 1 minute with the emptying, as otherwise there is a risk that the sample is not completely burned. After confirm the cancellation, the system automatically emptied and bring it to a safe state. -
Page 26: System Test
System test Functional testing of the system Use for the system test one or two benzoic acid tablets. Alternatively, however, for example, an appropriate amount of sugar or an alternative fuel to be used. The system test is used to test the functionality of the overall system. -
Page 27: Measurement Archive: Edit
Measurement archive: Edit By clicking on the “EDIT“ button in the list view another screen for selecting the edit mode. Print: • Measurements can be selected and printed Delete: • Measurements can be selected and deleted Delete all: • All measurements are deleted By selecting one of these menu items to the list view is displayed again. -
Page 28: Measurement Archive: Delete All
Measurement archive: Delete all By clicking the “OK“ button, the following dialog appears: By confirming with “OK“, all measurements will be deleted. Calibration archive After selecting the appropriate archive is displayed. INFO: In each calibration archive up to 15 calibrations can be stored. -
Page 29: Calibration Archive: C-Value Selectin
Calibration archive: C-Value selection Click on the individual calibrations they are selected and marked with a green tick. By clicking again the selection is canceled and the new C-value (mean value) is displayed below the list view directly. By clicking the “OK“ button, the following user message appears: By clicking the “OK“... -
Page 30: Default Settings
Default settings • C-value IB1; C-value IB2: C value for the corresponding inner vessel • ID IB1; ID IB2: Identification number of the inner vessel • Ref Energy: Calorific reference value of benzoic acid • Combustible crucible: Calorific value of the combustible crucible •... -
Page 31: Display / Keypad
Display / Keypad The user can access this menu • select and change the background color of the display. The background color can be selected either white or black • the key tones on or off • the appearance of the menus between animated view and list view move Inverted menu view Colour range black... -
Page 32: Accessories
Accessories Selection of accessories • Heating: Use of heating during the measurement C 1.2 • Combustible crucible: yes / no Weight input of the combustible crucible in the submenu “New measurement“ can be done manually or by data transfer from the balance. -
Page 33: Change Seal
Change seal: In the Menu Maintenance press “change seal“ button. This requires oxygen pressure be present at C 1. Unscrew the piston (Pos. 38 III) with screwdriver VI ( counterclockwise 8,0 x 2,5) Remove the O-ring (Pos. 38 VI) Put new O-ring on piston (Pos. 38 VI) -
Page 34: User Information: Memory
However, it can also switch on the button “Archive“ to the appropriate archive and then delete old or unused measurements or calibrations. Exchanging of wear parts -Valve seal change Use only original IKA spare parts! ® (10,0x 2,5) 1 Bushing (Pos. 33) with the enclosed tool SW11... -
Page 35: Change Ignition Wire
Now it can be removed with your fingers. Note: Rub the new O-ring before inserting it into the groove with O-ring grease (O-ring grease supplied). This facilitates the closing of the C 1 considerably! Inner vessel Pos. 15 O-ring (48,0 x 2,0) 1x X-ring ... -
Page 36: Change Ground Electrode
Follow the instructions of the calorimeter! Fault and troubleshoot The calorimeter C 1 is subjected during the manufacture to stringent quality controls. Should any malfunctions occur, refer to the following section for a series of fault and error situations, the suitable remedial measures. -
Page 37: E02 Communication
E02 COMMUNICATION If no internal communication between the software and firmware are prepared COMMUNICATION ALARM appears.. E03 DRIFT ALARM Drift Alarm In preliminary experiment or or post-experiment the temperature drift criterion is not met. Check the stirring function. E04 MINTEMPDIFF If 30 seconds is no temperature increase of 0.5 °C takes place after ignition, the alarm is displayed. -
Page 38: E06 Emptywater
E06 EMPTYWATER Occurs when the lower water sensor during the emptying of system after 60 seconds still detects water. Possible causes for this problem are: • the drain hose for sucking the air is in the water. Check the hose laying on the cooler (see page 8). •... -
Page 39: E13 Heater
E13 HEATER When using the heater C 1.20 this is not detected. The most common cause for this problem is a switched off or unplugged heating during measurement. Check the contact of the heating C 1.20 E16 MAXTEMPDIFF Temperature increase > = 10 °C detected. -
Page 40: Maintenance
- Software Version (second displayed value when the device is on) The device is subject only to the natural wear and tear of com- - Item and designation of the spare part please see www.ika.com. ponents and their statistical failure rate. According to the IKA ®... -
Page 41: Technical Data
Technical data Power supply unit (external) Design voltage /-frequency 100–240 V AC 50/60 Hz Power consumption max. 120 W Calorimeter: Design voltage 24 V DC 5A Power consumption max. 120 W Permissible duration of operation 100 % Protection type acc. DIN EN 60529 IP 20 Protection class Overvoltage category... - Page 44 -Werke GmbH & Co.KG ® Janke & Kunkel-Str. 10 D-79219 Staufen Tel. +49 7633 831-0 Fax +49 7633 831-98 sales@ika.de www.ika.com 20005032d...
Need help?
Do you have a question about the C 1 and is the answer not in the manual?
Questions and answers