Advertisement
MLA100
HF & 6m Linear Amplifier
Specifications:
Operation Frequency:
Modulation Types:
Transistor:
Max I/P Current:
Power Supply:
Input Fuse
Input RF Power:
Output RF Power:
Maximum bypass power (Amplifier off): 50W max
Input VSWR:
Output VSWR Maximum:
Harmonic Output:
WARNING:
Before using this product please read carefully all of
the information in this manual or at least the quick start guide!!! To avoid dam-
age or incorrect operation this is extremely important!!!
Ver 1.0 May 2018
1.8—30 MHz & 50—54 MHz
SSB,CW,AM, FM, data etc (All narrowband modes)
2x Mitsubishi RD100HHF1
16A
13VDC+/- 1V 25A
1x20A
1-10W max (All modes)
100W max HF 80W 6m
1.1—1.8:1
2.5:1
>-50dBc 1.8-30MHz & >-60dBc 50-54 MHz
Quick Start Guide:
A more complete guide to the installation is featured later
1.
Connect the RTX input connector e to transceiver
with 50 Ohm patch cable
2.
Connect the ANT Output f of the Amplifier to ATU /
VSWR Bridge, (If required), and then the Antenna (50
Ohm load Impedance)
3.
Connect the PTT cable from the transceiver to the
amplifier. PTT is Active low. (The MLA100 will work
without the PTT connected but it is recommend to
use it for CW and SSB modes).
4.
Connect the DC power Cable to the amplifier c to a
suitable 13VDC (± 1V) Power Supply or Auto Battery.
Pay attention to the correct polarity
5.
Make sure that the amplifier is switched off [
6.
Adjust the Transceivers RF output power to 5W, if it
is capable of more than 5W output.
7.
Test that the antenna connected is suitable for the
band required, if not use an ATU to match the an-
tenna with the amplifier switched off.
8.
Switch on the Amplifier, press and hold [ 2 secs.
9.
The amplifier will automatically select the correct
band filter on the first transmission.
2
Advertisement
Table of Contents

Related Manuals for RM Italy MLA100


Summary of Contents for RM Italy MLA100
-
Page 1: Quick Start Guide
VSWR Bridge, (If required), and then the Antenna (50 Ohm load Impedance) Connect the PTT cable from the transceiver to the amplifier. PTT is Active low. (The MLA100 will work without the PTT connected but it is recommend to use it for CW and SSB modes). -
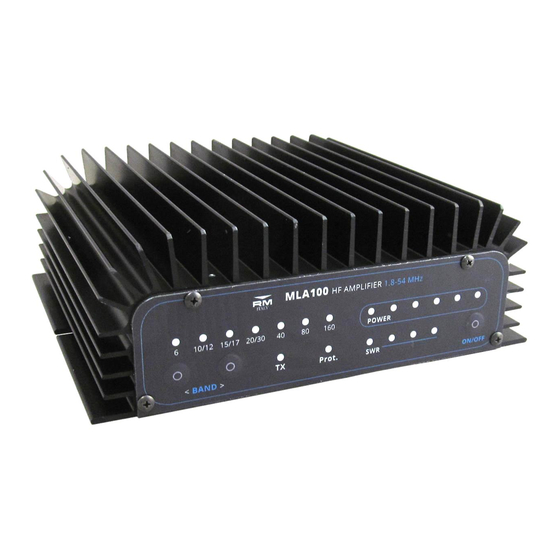
Page 2: Front / Rear Panel Description
Introduction: Front Panel The MLA100 is a wideband HF & 6m amplifier capable of 100W HF, (80W 6m), output from 5W input drive, suitable for any of today’s QRP transceivers. It features automatic / manual band selection, rapid switching between receive and transmit by PIN diode RF switching, making it suitable for all modes of narrow band modulation and QSK operation. -
Page 3: Operation
Before the amplifier is switched on, the output power of the drive radio should be adjusted cor- The MLA100 may be used for all of the common narrow band transmission modes such as rectly if it is capable of outputting a power greater than 5W. This may be done with the ampli- SSB, CW,AM,FM, SSTV and data modes etc. - Page 4 Input drive and power output: The amplifier should give full output with approximately 5W input on the HF bands and 8W on 6m band. Excessive input power should be avoided and the amplifier should always be oper- ated in a responsible manner. If excessive input power is used the amplifier will signal an er- ror ] and disable itself for a short period of time before resetting.
- Page 5 MLA100 Typical Gain vs Frequency 1,500 11,500 21,500 31,500 41,500 51,500 Frequency (MHz) Error Warning Action PIN Switch RX Cycle single flash LED Prot. Reboot Amplifier. If the roblem persists contact customer support PIN Switch TX Cycle 2 Flashes LED Prot.
-
Page 6: Warranty
Attention: The use of Linear Amplifiers are controlled by specific laws within the country of use. These laws must be known to the user and are entirely the responsibility of the user. The manufacturer declines any responsibility from unlawful use. Warranty: This product is covered by a 24 month warranty commencing from the date of purchase.
Need help?
Do you have a question about the MLA100 and is the answer not in the manual?
Questions and answers