
Related Manuals for Wohler AMP1-MADIe Series


Summary of Contents for Wohler AMP1-MADIe Series
- Page 1 AMP1-MADIe • AMP1-MADIe-SM • AMP1-MADIe-MM 1RU, 8 of 64 Channel, MADI Audio Monitor User Guide (Software Release: V3.0x) Part Number 821091, Revision F...
- Page 2 In no event will Wohler Technologies, Inc. be liable for direct, indirect, special, incidental, or consequential damages resulting from any defect in the hardware, software, or its documentation, even if advised of the possibility of such damages.
-
Page 3: Table Of Contents
Table of Contents Chapter 1. Installation ......1 Introduction ..............1 Overview..............1 Topics ..............1 Safety ................2 Instructions ..............2 Safety Symbols ............3... - Page 4 Using and Defining Presets ..........14 Default Presets............14 Selecting Any Eight Channels ........15 Adjusting Channel Select Modes and Channel Volume ..16 Adjusting the Speaker Audio Tone Controls .......17 Selecting the Optical Input..........18 Using the Balanced Analog Outputs........19 Pre Fade or Post Fade Metering........20 Saving Your Settings ............21 USB Port Functionality............22 Copying a Configuration to the AMP1-MADIe ....23...
- Page 5 Display and Metering ..........34 Level Meters ............. 34 Metering Mode ..........35 Screen Brightness..........35 Control ..............35 Channel Select ..........35 Functions Enabled..........36 Speaker Mute............36 Audio..............36 Input Selection..........36 Audio Delay ............37 Tone Controls ............37 MADI Output Reclocking ........... 37 Analog Output............
- Page 6 Meter Type and Reference Menu ........48 Meter Segment Menu .............50 Version and Ethernet Menu ..........51 Chapter 5. Features and Specifications ....53 Introduction..............53 Overview ..............53 Topics ..............53 Features...............54 Specifications..............55 Technical Functional Overview .........57...
-
Page 7: Installation
CHAPTER 1 Installation Introduction Overview The AMP1-MADIe-SM and AMP1-MADIe-MM are 1RU, 8 of 64 channel MADI audio monitors. Each contains a BNC MADI input and output plus (depending upon the model purchased) either a single- mode or a multi-mode fiber input and output. Although the AMP1- MADIe-SM (single-mode fiber) and AMP1-MADIe-MM (multi-mode fiber) are distinct models, largely their operation is identical, so they will be referred to in this manual as simply AMP1-MADIe. -
Page 8: Safety
C h a p t e r 1 In s t a l la t i on Sa f e t y Safety Instructions Read, keep, and follow all of these instructions; heed all warnings. Do not use this equipment near water. Use only a dry cloth to clean the equipment. -
Page 9: Safety Symbols
C ha p t e r 1 Installation S a f et y Safety Symbols WARNING: The symbol to the left warns of electric shock hazard inside the unit. Disconnect the power cord before removing access panels when installing upgrades. Only qualified service personnel are to operate the equipment with covers removed, and are to exercise caution to avoid personal injury. -
Page 10: Mechanical Bracing
C h a p t e r 1 In s t a l la t i on C o m p l ia n c e weather-stripping between the vibrating surfaces. Tie loose cables securely with cable ties. Mechanical Bracing The 1RU chassis is securely attached to the front panel. -
Page 11: Ices-003
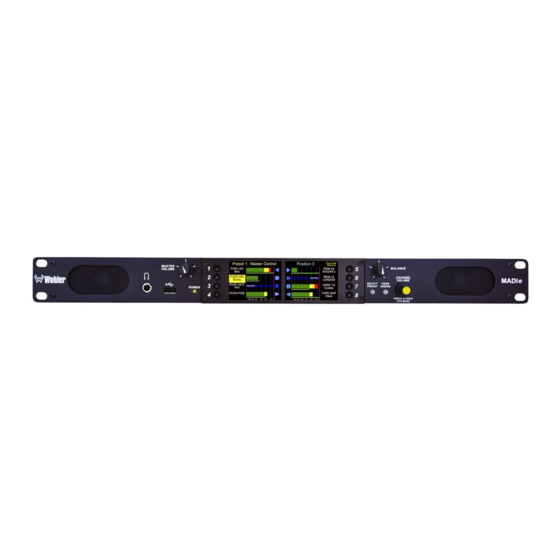
Master Volume Metering Screens Balance Preset 1: Master Control Unit Name Post Fade Metering PCR1-AD REM-24 MASTER NVG/NYJ BALANCE VOLUME PCR2-DIR REM-12 MUTED CHANNEL Wohler Wohler Bucky LONDON MADIe Wohler Wohler VOLUME SELECT CHAN PCR1-GFX ANNC-12 MUTED PRESET ASSIGN Phil Costas... - Page 12 When the LED flashes green or yellow followed by a series of red flashes, each flash sequence indicates an error code. Try restarting the unit, and if the problem persists, contact Wohler Technical Support. Steady Yellow: The system is booting. Yellow Flashing Yellow: A firmware update is in progress.
-
Page 13: Rear Panel
C ha p t e r 1 Installation R e a r P a ne l • Select Preset: Presets are complete configurations of monitoring channels, including individual channel volume levels. Pressing this button displays the Preset Selection Menu • Channel Assign: Pressing this button displays the Channel in which you can select the exact eight (of the... -
Page 14: Main Screen
C h a p t e r 1 In s t a l la t i on M a i n S cr e e n another. Lastly, it can be used to update the AMP1-MADIe software and firmware. Refer to Chapter Appendix A, and... - Page 15 C ha p t e r 1 Installation M ai n S c re e n • Channel Icons: These indicators identify the channel number and the status of the channel. Refer to Table 1–2 on page 9 for the channel legend.
-
Page 17: Operation
CHAPTER 2 Operation Introduction Overview This chapter describes how to operate the AMP1-MADIe’s Main and how to transfer configuration files to/from a flash drive. Screen Topics Topics Page Initial Operation Monitor Channel Selection Using and Defining Presets Adjusting Channel Select Modes and Channel Volume Selecting the Optical Input Using the Balanced Analog Outputs Pre Fade or Post Fade Metering... -
Page 18: Initial Operation
C h a p t e r 2 O p e r a t i on I ni t ia l O p e r a t io n Initial Operation When you first power your AMP1-MADIe, it will be ready to monitor the first eight MADI channels from the BNC input. -
Page 19: Quick Selection
C h a p t e r 2 Operation M on i t o r C h a n n el S e le c t io n Quick Selection If you need to mute and unmute channels frequently, use the Quick setting. -
Page 20: Using And Defining Presets
C h a p t e r 2 O p e r a t i on U s in g a nd D e fi n in g P r e s et s Press the buttons of the channels whose volume Channel Select you want to mute or adjust. -
Page 21: Selecting Any Eight Channels
C h a p t e r 2 Operation U s in g a n d D e f in in g Pr e s e t s Figure 2–2 Preset Selection Menu Preset Selection Select a Preset Preset 1 Preset 5 to save or Master Control... -
Page 22: Adjusting Channel Select Modes And Channel Volume
C h a p t e r 2 O p e r a t i on A d ju s t i n g C ha n n e l Se l ec t M o d e s a n d C h a n n el V o lu m e Figure 2–4 Channel Assignment Menu Channel Assignment Menu... -
Page 23: Adjusting The Speaker Audio Tone Controls
C h a p t e r 2 Operation A d j u s t i ng t h e S p e a k e r A u d io T o n e C o n t r o ls •... -
Page 24: Selecting The Optical Input
C h a p t e r 2 O p e r a t i on Se l e ct i n g t h e O p t i c a l I n p u t Figure 2–5 Audio Menu 2 Audio Menu 2 Tone Controls... -
Page 25: Using The Balanced Analog Outputs
C h a p t e r 2 Operation U s in g t h e B a la n c ed A na l o g O u t p u t s Press the button several times until the Menu Next Options... -
Page 26: Pre Fade Or Post Fade Metering
C h a p t e r 2 O p e r a t i on Pr e F a d e o r P o s t F a d e M et er i ng Figure 2–7 Audio Menu 1 Audio Menu 1 Speaker Mute Analog Outputs... -
Page 27: Saving Your Settings
C h a p t e r 2 Operation S a v in g Y o ur Se t t i n g s Press the button to change between Metering Mode Post Fade . Then press the buttons several times to exit to Pre Fade Back Next... -
Page 28: Usb Port Functionality
.wmad \Wohler 8 21 09 1 : A MP 1- MA D Ie Us e r G u id e © 2 01 3 Woh le r Te ch no lo g ie s, Inc . A ll ri g ht s re s e r v ed . -
Page 29: Copying A Configuration To The Amp1-Madie
C h a p t e r 2 Operation U S B P or t F u n ct io n a lit y Copying a Configuration to the AMP1-MADIe To load a configuration file to the AMP1-MADIe from your flash drive, press . -
Page 30: Update Menu
Press this button to proceed to the software updating menu. You can copy a software update onto a flash drive using the MADIe Manager PC GUI program available on the Wohler website (www.wohler.com). Refer to The USB Tab on page 41 for adding a software update to a flash drive. - Page 31 C h a p t e r 2 Operation M e nu Lo c k o ut O v e rr i d e pressing both the button and the Select Preset Channel ment buttons for three seconds or more to display the Assign Menu Lockout Override...
-
Page 33: Chapter 3. Amp1-Madie Graphical User Interface (Gui) Manager
CHAPTER 3 AMP1-MADIe Graphical User Interface (GUI) Manager Introduction Overview This chapter describes how to use the AMP1-MADIe Manager to the configure the AMP1-MADIe. I m p or t a n t : If you have not yet installed the AMP1-MADIe Manager setup software on your PC and connected it to the AMP1-MADIe, you must complete all the steps in Appendix A on page 59... -
Page 34: Running The Amp1-Madie Manager
C h a p t e r 3 A M P1 - M A D I e G r a p h i ca l U s e r I n t e r fa c e ( G U I ) M a na g e r Ru n n in g t h e A M P 1 - M A D I e M a n a g er Running the AMP1-MADIe Manager The AMP1-MADIe Manager allows you to customize the monitor’s... -
Page 35: The Channels Tab
29, each channel has two fields (eight characters each) that you can use for descriptive information. Channel names are shared among presets. Figure 3–2 Channels Tab Wohler AMP1-MADIe Manager v01.00 Channels Channels Preset 1 Preset 2 Preset 3 Preset 4... -
Page 36: The Preset Tabs
Since all the Preset tabs are identical we will only show the first one to explain the settings it provides for each preset. Figure 3–3 Preset 1 Tab Wohler AMP1-MADIe Manager v01.00 Channels Preset 1 Preset 2 Preset 3 Preset 4... -
Page 37: Channel Position Locks
C ha p t e r 3 AMP1-MADIe Graphical User Interface (GUI) Manager T h e C u r r e nt T a b • Channel Number: Click the drop-down menu to select the MADI channel (1 through 64) you want to monitor in this position. •... - Page 38 A M P1 - M A D I e G r a p h i ca l U s e r I n t e r fa c e ( G U I ) M a na g e r Th e C u rr e n t T a b Figure 3–4 Current Preset Tab Wohler AMP1-MADIe Manager v01.00 Channels Preset 1 Preset 2...
-
Page 39: The Facility Tab
C ha p t e r 3 AMP1-MADIe Graphical User Interface (GUI) Manager T h e F a c il it y T a b The Facility Tab Figure 3–5 Facility Tab Wohler AMP1-MADIe Manager v01.00 Channels Preset 1 Preset 2 Preset 3 Preset 4... -
Page 40: The Options Tab
A M P1 - M A D I e G r a p h i ca l U s e r I n t e r fa c e ( G U I ) M a na g e r Th e O p t i o ns Ta b The Options Tab Figure 3–6 Options Screen Wohler AMP1-MADIe Manager v01.00 Channels Preset 1 Preset 2 Preset 3... -
Page 41: Metering Mode
C ha p t e r 3 AMP1-MADIe Graphical User Interface (GUI) Manager T h e O p t io n s T a b Metering Mode Metering Mode: Click to select either Pre Fade Post Fade • Pre Fade: Meters show the levels before the channel volumes are applied to the input signals. -
Page 42: Functions Enabled
C h a p t e r 3 A M P1 - M A D I e G r a p h i ca l U s e r I n t e r fa c e ( G U I ) M a na g e r Th e O p t i o ns Ta b •... -
Page 43: Audio Delay
C ha p t e r 3 AMP1-MADIe Graphical User Interface (GUI) Manager T h e O p t io n s T a b Audio Delay This control can be used to adjust the lip sync between the MADIe and a video monitor. -
Page 44: The Ethernet Tab
Analog Output Channel Volume Controlled Master Volume Controlled The Ethernet Tab Figure 3–7 Ethernet Tab Wohler AMP1-MADIe Manager v01.00 Channels Preset 1 Preset 2 Preset 3 Preset 4 Preset 5 Preset 6 Preset 7 Preset 8 Options Ethernet Channels Preset 1... -
Page 45: File Update Options
C ha p t e r 3 AMP1-MADIe Graphical User Interface (GUI) Manager Th e Et h e r n et T a b File Update Options Before beginning any update procedure, click either Update as Needed Update All • Update as Needed should be used for most updates. -
Page 46: Documentation
You may also save the log file to a different location. Each time the application is opened, it creates a new log file in the directory. These log files are not deleted by the C:/Wohler/MADIe application, so you may refer back to them at any time. •... -
Page 47: The Usb Tab
To use the USB port from the AMP1-MADIe menu system, refer to USB Port Functionality on page Figure 3–8 AMP1-MADIe Manager USB Screen Wohler AMP1-MADIe Manager v01.00 Channels Preset 1 Preset 2 Preset 3 Preset 4 Preset 5 Preset 6 Preset 7 Preset 8 Current... -
Page 48: Programming Files
• Create Update on Flash Drive: Whether a new update was available on the Wohler website or not, this button can be used to create a software update on the attached USB flash drive. After this operation is performed, AMP1-MADIe units will recognize that an update is available on the flash drive and will offer to update themselves from it. -
Page 49: Internal Menu System
CHAPTER 4 Internal Menu System Introduction Overview This chapter provides an in-depth description of all the features, specifications, and menus and all their respective options and functions. I m p or t a n t : The AMP1-MADIe local menus cannot be used at the same time that the PC setup software is connected. -
Page 50: Menu Navigation Overview
C h a p t e r 4 In t e r n a l M e n u S y s t e m M e n u N a v ig a t io n O v e r v ie w Menu Navigation Overview You can launch the menu system by pressing and holding the Channel... -
Page 51: Audio Menu 1
C h a p t e r 4 Internal Menu System A u d io M e n u 1 • Back: Pressing this button closes this menu and opens the previous menu, one step up the menu tree. • Next: Pressing this button closes this menu and opens the next menu, one step down the menu tree. -
Page 52: Audio Menu 2
C h a p t e r 4 In t e r n a l M e n u S y s t e m A u d i o M en u 2 • Fixed: Pressing this button prevents the Master Volume controls from affecting the analog outputs. -
Page 53: Options Menu
C h a p t e r 4 Internal Menu System O p t i o ns M e n u • Bass: Pressing this button and then turning the Channel Volume knob adjusts the bass response up or down in 2 dB steps to as low as -12 dB or as high as +12 dB. -
Page 54: Meter Type And Reference Menu
C h a p t e r 4 In t e r n a l M e n u S y s t e m M e t e r T y p e a n d R e f er e n c e M e n u rotate the knob to adjust the screen brightness. - Page 55 C h a p t e r 4 Internal Menu System M e t e r T y p e a n d R e f er e n c e M e n u Figure 4–5 Meter Type and Reference Menu Meter Type &...
-
Page 56: Meter Segment Menu
C h a p t e r 4 In t e r n a l M e n u S y s t e m M e t e r S e g m en t M e n u •... -
Page 57: Version And Ethernet Menu
C h a p t e r 4 Internal Menu System V e r si o n a n d E t h e r ne t M e n u • Middle Segment: Pressing this button and then rotating the knob adjusts the division between the middle Channel Volume and lower segments. - Page 58 C h a p t e r 4 In t e r n a l M e n u S y s t e m V e rs i on a n d E t h e rn e t M e n u •...
-
Page 59: Chapter 5. Features And Specifications
CHAPTER 5 Features and Specifications Introduction Overview This chapter lists the features and specifications. Topics Topics Page Introduction Features Specifications Technical Functional Overview 82 10 91 : A MP 1- MA D I e U se r G u id e ©... -
Page 60: Features
C h a p t e r 5 F e a t u re s a nd S p e c if ic a t io n s F e a t u r es Features • Totally digital system architecture with high fidelity Class D amplifiers •... -
Page 61: Specifications
C ha p t e r 5 Features and Specifications S p e ci f ic a t io n s • Easy update and management software • Shallow chassis depth (4.25”) • IEC power input, 100 – 240 VAC +/- 10%, 50/60 Hz Specifications Table 5–1 Specifications... - Page 62 C h a p t e r 5 F e a t u re s a nd S p e c if ic a t io n s Sp e ci fi ca t io n s Table 5–1 Specifications (Continued) Specification Values/Domains •...
-
Page 63: Technical Functional Overview
C ha p t e r 5 Features and Specifications Te c h n ic a l F u nc t i on a l O v e rv ie w Table 5–1 Specifications (Continued) Specification Values/Domains Selectable: • Meter thresholds, Level Meter Characteristics •... -
Page 65: Appendix A. Connecting The Amp1-Madie To A Lan
APPENDIX A Connecting the AMP1-MADIe to a LAN Introduction Overview This chapter describes how to connect your PC to your AMP1-MADIe through a local area network (LAN) and to configure the monitor using the graphical user interface (GUI) on a PC. Topics Topics Page... -
Page 66: Requirements
Launch the web browser and navigate to the Wohler web site: www.wohler.com. Decision Point: If you already have a member user ID and password for the Wohler web site, then log in by clicking on the Member Sign In link at the top right hand corner of the home page and sign in. -
Page 67: Installing The Amp1-Madie Manager
I n s t a ll in g t he A M P 1- M A DI e M a n a g e r Once you have successfully logged into the Wohler web site, click from the home page menu bar. -
Page 68: Launching The Amp1-Madie Manager
Desktop. When the AMP1-MADIe Manager AMP1-MADIe Manager appears, it will display the Channels tab by default. Figure A–1 AMP1-MADIe Manager Channels Tab Wohler AMP1-MADIe Manager v01.00 Channels Channels Preset 1 Preset 2 Preset 3 Preset 4 Preset 5... -
Page 69: Adding Your Amp1-Madie To Your Network
A d d i n g Y o u r A M P 1 - M A D I e t o Y o ur N e t w o r k Figure A–2 AMP1-MADIe Manager Ethernet Tab Wohler AMP1-MADIe Manager v01.00 Channels Channels... - Page 70 A p p e nd ix A C o nn e c t in g t h e A M P 1 - M A D Ie t o a L A N A d d in g Y ou r A M P1 - M A D I e t o Yo u r N e t w or k Figure A–3 Configure AMP1-MADIe IP Address Dialog...
- Page 71 A p p e n d i x A Connecting the AMP1-MADIe to a LAN A d d i n g Y o u r A M P 1 - M A D I e t o Y o ur N e t w o r k Click to close the dialog.
-
Page 72: Disconnecting From An Amp1-Madie
You must see your AMP1-MADIe listed in the AMP1-MADIe Units area. If not, double-check your connections. If the monitor still does not display, call Wohler’s technical assistance. (See Wohler’s contact into on page ii.) If the monitor does not automatically show up in the area, click the button. -
Page 73: Appendix B. Software Upgrades
APPENDIX B Software Upgrades Introduction Overview This chapter describes how to download software upgrades to your PC and then transfer and install them to your AMP1-MADIe. I m p or t a n t : If you have not yet installed the AMP1-MADIe Manager setup software into your PC and connected it to the AMP1-MADIe, you must complete all the steps in Appendix A... -
Page 74: Upgrading The Software Using A Usb Flash Drive
A p p e nd ix B S of t w a r e U p g r a d e s U p g r a d i n g t h e So f t w a r e U s in g a U S B F l a s h D ri v e Upgrading the Software Using a USB Flash Drive I m p or t a n t :... - Page 75 A p p e nd ix B Software Upgrades U p g r a d i n g t h e S o f t w a r e U s in g a U S B F l a s h D ri v e (Optional) Before updating the software in the AMP1-MADIe, you may want to compare the versions already installed versus the new version in the software update.
- Page 76 A p p e nd ix B S of t w a r e U p g r a d e s U p g r a d i n g t h e So f t w a r e U s in g a U S B F l a s h D ri v e Press the button to install Update Software as Needed...
-
Page 77: Upgrading The Amp1-Madie Over Ethernet
PC’s desktop. AMP1-MADIe Manager Click the tab. Ethernet Figure B–6 AMP1-MADIe Manager SDI Ethernet Screen Wohler AMP1-MADIe Manager v01.00 Channels Preset 1 Preset 2 Preset 3 Preset 4 Preset 5 Preset 6 Preset 7 Preset 8 Options Ethernet Channels Preset 1... - Page 78 In the event the system informs you that an updated version of the AMP1-MADIe Manager is available, you must go to the Wohler web site and download the application. Refer to Downloading the Installation File on page 8 21 09 1 : A MP 1- MA D Ie Us e r G u id e ©...
-
Page 79: Performing The Upgrade
U p g r a d in g t h e A M P 1 - M A D Ie O v e r Et he r n e t Performing the Upgrade Figure B–9 AMP1-MADIe Manager SDI Ethernet Screen Wohler AMP1-MADIe Manager v01.00 Channels Preset 1 Preset 2 Preset 3 Preset 4 Preset 5 Preset 6 Preset 7 Preset 8 Options... -
Page 80: Upgrading The Amp1-Madie Via A Direct Connection
Ensure the computer has the latest MADIe manager installed by opening the application and choosing shown Check for Updates Figure B–10 below. In some cases, you may need to download a new manager from www.wohler.com. Figure B–10 USB Tab Wohler AMP1-MADIe Manager v01.00 Channels Preset 1... - Page 81 A p p e nd ix B Software Upgrades U p g r a d i ng t h e A M P 1 - M A D I e v i a a D i re c t C o nn e c t io n Turn the unit on, and set the unit for direct mode and DHCP.
- Page 82 A p p e nd ix B S of t w a r e U p g r a d e s U p g r a d i n g t h e A M P1 - M A D I e v ia a Di r e ct C o n ne c t i on Of course, if you are familiar with setting compatible static IP addresses and subnets in both your host computer and the MADIe, that option is open to you as well, and again, you can use either an Ethernet patch...
Need help?
Do you have a question about the AMP1-MADIe Series and is the answer not in the manual?
Questions and answers