Table of Contents
Advertisement
Quick Links
Download this manual
See also:
Quick Reference Manual
Advertisement
Table of Contents

Related Manuals for Carl Valentin DPM III XI


Summary of Contents for Carl Valentin DPM III XI
- Page 2 It must not be concluded from the missing labelling that it is not a registered brand or a registered trademark. Carl Valentin direct print modules comply with the following safety guidelines: EG Low-Voltage Directive (2006/95/EC)
-
Page 3: Table Of Contents
DPM III xi series Table of contents Table of contents Table of contents ................3 Introduction ................5 General Instructions ..............5 Intended Use ................5 Safety Instructions ..............6 Machine Overview ..............9 Print Mechanics ............... 9 Connector Assignment of Control Unit ........10 Connector Assignment of Control Unit IP Version .... - Page 4 Table of contents DPM III xi series Signal Diagrams ..............71 10.1 Mode 1 (single item processing) ........... 71 10.2 Mode 2 (continuous mode) ............ 72 10.3 Mode 4 (continuous mode) ............ 73 10.4 Mode 8 (single item processing) ........... 74 Error Correction ..............
-
Page 5: Introduction
DPM III xi series Introduction Introduction 1.1 General Instructions Basic information and warning references with the corresponding signal words for the danger level are as follows specified in this manual: DANGER identifies an extraordinarily great and immediate danger which could lead to serious injury or even death. -
Page 6: Safety Instructions
Introduction DPM III xi series The direct print module is solely intended to print suitable media which have been approved by the manufacturer. Any other or additional use is not intended. The manufacturer/supplier is not liable for damage resulting from misuse. Any misuse is at your own risk. - Page 7 DPM III xi series Introduction Other unauthorized work or modifications to the direct print module can endanger operational safety. Always have service work done in a qualified workshop, where the personnel have the technical knowledge and tools required to do the necessary work.
-
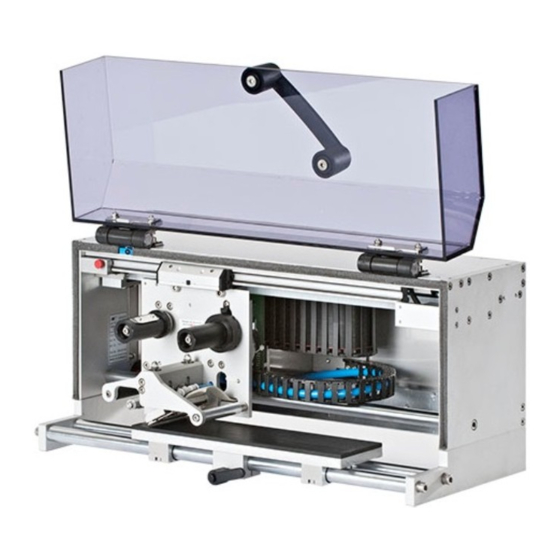
Page 9: Machine Overview
DPM III xi series Machine Overview Machine Overview The direct print module is equipped with 8 vector, 6 bitmap and 6 proportional fonts. It is possible to print inverse, in italic format or 90 degrees turned fonts. The handling of our durable print module is easy and comfortable. The settings are made with the keys of the foil keyboard. -
Page 10: Connector Assignment Of Control Unit
Machine Overview DPM III xi series 2.2 Connector Assignment of Control Unit Figure 2 External output 1-4 (Output I) External input 1-4 (Input I) External output 5-8 (Output II) Standard Option SUB-D plug 15-pin SUB-D plug 9-pin External bushing I/O-24 External input 5-8 see chapter 4.1... -
Page 11: Connector Assignment Of Control Unit Ip Version
DPM III xi series Machine Overview 2.3 Connector Assignment of Control Unit IP Version Figure 3 External output 1-4 (Output I) External input 1-4 (Input I) External output 5-8 (Output II) External bushing I/O-24 RS-232 interface Ethernet interface Centronics interface... -
Page 12: Print Principle
Machine Overview DPM III xi series 2.4 Print Principle Figure 4 After starting a print order the printhead moves against the print medium. Afterwards the printing carriage moves corresponding to the set or transferred layout length linear over the material which is to be printed. -
Page 13: Operating Conditions
DPM III xi series Operating Conditions Operating Conditions Before initial operation and during operation these operating conditions have to be observed to guarantee save and interference- free service of our direct print modules. Therefore please carefully read these operating conditions. - Page 14 Operating Conditions DPM III xi series Power line voltage and power line frequency: See type plate Technical data of power supply Allowable tolerance of power line voltage: +6% …−10% of nominal value Allowable tolerance of power line frequency: +2% …−2% of nominal value Allowable distortion factor of power line voltage: <=5%...
- Page 15 To avoid inadmissible heating, free air convection has to be ensured. DPM IIIxi: Protection according IP 20 Limit values DPM III xi IP: Protection according IP 65 Ambient temperature °C (operation): Min. +5 Max. +40 Ambient temperature °C (transport, storage): Min. −25 Max. +60 Relative air humidity % (operation): Max.
- Page 16 Operating Conditions DPM III xi series Guarantee We do not take any responsibility for damage caused by: Ignoring our operating conditions and operating manual. Incorrect electric installation of environment. Building alterations of our direct print modules. ...
-
Page 17: Technical Data
DPM III xi series Technical Data Technical Data DPM III xi53 DPM III xi107 DPM III xi128 Print width 53,3 mm 106,6 mm 128 mm Print length 60 mm, 140 mm, 240 mm, 340 mm, 447 mm, 570 mm, 630 mm... -
Page 18: Control Inputs And Outputs (Standard)
Technical Data DPM III xi series 4.1 Control Inputs and Outputs (Standard) Plug connection - back side of control unit Figure 5 A = External output 1-4 (Output I) B = External input 1-4 (Input I) C = External output 5-8 (Output II) - Page 19 DPM III xi series Technical Data Example Connection of a lamp to a 24V relay by Out 1: Figure 7 Output II PIN (bushing) Output II Figure 5, C Out 5: Print-Ready signal It is indicated if the print module is ready to process a start impulse.
- Page 20 Technical Data DPM III xi series Control inputs By means of the control inputs it is possible to control printing. The control inputs at Input I are galvanic separated and have to be provided with an external tension source. The signal level is active "HIGH".
- Page 21 DPM III xi series Technical Data External bushing I/O-24 This input is executed as 15-pole and provides user- Figure 5, D sided 24V/100mA. In case of using this bushing, exists no galvanic separation. Function 1, 6 5, 10 24 V / 100 mA...
- Page 22 Technical Data DPM III xi series Example 1 Example 2 Example 3 Operating manual 04.18...
-
Page 23: Control Inputs And Outputs (Option)
DPM III xi series Technical Data 4.2 Control Inputs and Outputs (Option) Plug connection - back side of control unit Figure 12 A = External output 1-4 (Output I) B = External input 1-4 (Input I) C = External output 5-8 (Output II) - Page 24 Technical Data DPM III xi series Example Connection of a lamp to a 24V relay by Out 1: Figure 14 Output II PIN (bushing) Output II Figure 12, C Out 5: Print-Ready signal It is indicated if the print module is ready to process a start impulse.
- Page 25 DPM III xi series Technical Data By means of the control inputs it is possible to control printing. The Control inputs control inputs at Input I are electroplated separated and have to be provided with an external tension source. The signal level is active "HIGH".
- Page 26 Technical Data DPM III xi series Input II PIN (pin) Input II Figure 12, D In 5: Not used In 6: Not used Figure 18 In 7: Not used In 8: Not used Operating manual 04.18...
-
Page 27: Installation And Initiation
DPM III xi series Installation and Initiation Installation and Initiation Unpack the direct print Lift the direct print module out of the box. module Check the direct print module for transport damages. Check delivery for completeness. ... -
Page 28: Installation Of Print Mechanics At Machines
Installation and Initiation DPM III xi series 5.1 Installation of Print Mechanics at Machines NOTICE! With the open printing unit (due to construction) the requirements of EN60950-1 regarding fire protection casing are not fulfilled. These must be ensured by the installation into the end device. -
Page 29: Connection Of Pneumatic Power Supply
DPM III xi series Installation and Initiation 5.2 Connection of Pneumatic Power Supply The pneumatic power supply for the printhead mechanics has to be made available a minimum continuous pressure of 4…6 bars in front of the pressure regulator. The maximum pressure in front of the pressure regulator is 7 bars and 4 bars after the pressure regulator. -
Page 30: Adjustment Of Pressure Power
Installation and Initiation DPM III xi series 5.3 Adjustment of Pressure Power Pressure power in dependence Pressure power in dependence Pressure power in dependence of air pressure i53 of air pressure i107 of air pressure i128 (one pressure cylinder) (two pressure cylinder) -
Page 31: Connecting The Direct Print Module
DPM III xi series Installation and Initiation 5.4 Connecting the Direct Print Module Connecting to the The direct print module is equipped with a versatile power supply unit. power supply The device may be operated with a mains voltage of 230 V / 50…60 Hz without any adjustments or modifications. -
Page 32: Print Control
Installation and Initiation DPM III xi series 5.6 Print Control Because of the fact that the print module is always in control mode it is only possible to transmit and not to start print orders by the available interfaces (serial, parallel, USB or Ethernet). The print is started by a start signal to the 'print start-control input'. -
Page 33: Loading Transfer Ribbon
DPM III xi series Installation and Initiation 5.8 Loading Transfer Ribbon NOTICE! As for the electrostatic unloading the thin coating of the thermal printhead or other electronic parts can be damaged, the transfer ribbon should be antistatic. The use of wrong materials can lead to printer malfunctions and the guarantee can expire. -
Page 35: Foil Keyboard
DPM III xi series Foil Keyboard Foil Keyboard 6.1 Keyboard Assignment (Standard) Function Back to the main menu. Start a test print. Delete a stopped print order. Change to the function menu. In function menu: one menu item back. Change to the quantity (number of pieces) menu. -
Page 36: Keyboard Assignment (Text Entry/Customized/Memory Card)
Foil Keyboard DPM III xi series 6.2 Keyboard Assignment (Text Entry/Customized/Memory Card) The control unit of the print module is equipped with an alphanumeric character block which allows the user to enter parameters and customised variables without the connection of an external keyboard. - Page 37 DPM III xi series Foil Keyboard Function Back to the main menu. Start a test print. Delete a stopped print order. Not yet in use. Delete the character at the cursor position. If the cursor is between the last character then the last character is deleted.
-
Page 39: Function Menu
DPM III xi series Function Menu Function Menu 7.1 Menu Structure Print settings Speed / contrast Transfer ribbon control On weak, On strong sensibility, Off X Offset Machine parameters Operating mode Back speed Print offset Layouts / cycle Ribbon speed... -
Page 40: Compactflash Card
Function Menu DPM III xi series Network (optional) IP address Net mask Standard gateway Speed / Duplex DHCP Printer name Remote console Port Interval Interface COM1 / Baud / Parity / Data bits / Stop Bits SOH start sign, ETB end sign... -
Page 41: Print Settings
DPM III xi series Function Menu 7.2 Print Settings Press key to access the function menu. Press key to select the menu. Speed: Indication of speed in mm/s (see Technical Data, on page 17). Contrast: Indication of contrast in %. -
Page 42: Machine Parameters
Function Menu DPM III xi series 7.3 Machine Parameters Press key to access the function menu. Press key as long as you arrive at the 'Machine Parameters' menu. Press key to select the menu. Mode: Selection of operating mode. Mode 1 = Single item processing: A print order with a defined number of pieces is transferred. - Page 43 DPM III xi series Function Menu Press key to arrive at the next menu item. Back-Speed: Indication of back speed of the print mechanics after print end in mm/s. Each cycle of the machine consists of printing and return to the zero point of machine.
- Page 44 Function Menu DPM III xi series Press key to arrive at the next menu item. Ribbon speed: Indication of ribbon speed in %. In this mode it is possible to set the ribbon speed relative to the print speed. Because of a less speed of the ribbon you can reduce the consumption of ribbon.
-
Page 45: Layout Settings
DPM III xi series Function Menu Press key to arrive at the next menu item. Head delay: With the 'head delay' parameter, the time between moving down and start of movement of printing carriage can be set. If fields are directly at the beginning of layout, the printhead is moved down before the printing carriage starts to move. -
Page 46: Ribbon Save
Function Menu DPM III xi series Press key to arrive at the next menu item. Alignment: The adjustment of layout is effected only after 'flip/rotate label', i.e. the adjustment is independent of the functions flip and rotate layout. Left: The layout is aligned at the left-most position of printhead. -
Page 47: Device Settings
DPM III xi series Function Menu 7.6 Device Settings Press key to access the function menu. Press key as long as you arrive at the 'Device Settings' menu. Press key to select the menu. Field handling: Off: The complete print memory is deleted. - Page 48 Function Menu DPM III xi series Press key to arrive at the next menu item. Keyboard layout: Selection of region for the desired keyboard layout. The following possibilities are available: Germany, England, France, Greece, Spain, Sweden and US. Press key to arrive at the next menu item.
-
Page 49: I/O Parameters
DPM III xi series Function Menu 7.7 I/O Parameters Press key to access the function menu. Press key as long as you arrive at the 'I/O Parameter' menu. Press key to select the menu. IN signal level: Indication of signal at which a print order is started. -
Page 50: Network (Dpm Iiixi Optional Only)
Function Menu DPM III xi series Press key to arrive at the next menu item. Ready while printing: Indication if the output signal 'print ready' (Out 5, Output II) remains active while printing. Off: At print start the 'print ready' signal is inactive (default setting). -
Page 51: Interface
DPM III xi series Function Menu 7.9 Interface Press key to access the function menu. Press key as long as you arrive at the 'Interface' menu. Press key to select the menu. COM1: 0 - serial interface Off. 1 - serial interface On. -
Page 52: Emulation
Function Menu DPM III xi series 7.10 Emulation Press key to access the function menu. Press key as long as you arrive at the 'Emulation' menu. Press key to select the menu. Protocol: CVPL: Carl Valentin Programming Language ® ZPL: Zebra Programming Language ®... -
Page 53: Date & Time
DPM III xi series Function Menu 7.11 Date & Time Press key to access the function menu. Press key as long as you arrive at the 'Date/Time' menu. Press key to select the menu. Set date and time: The upper line of display shows the current date, the second line the current time. -
Page 54: Service Functions
Function Menu DPM III xi series 7.12 Service Functions NOTICE! So that the distributor res. the direct print module manufacturer in case of service can offer fast support all necessary information such as selected parameters can be taken directly from the device. - Page 55 DPM III xi series Function Menu Press key to arrive at the next menu item. Print examples: Settings: Printout of all settings such as speed, and transfer ribbon material. Bar codes: Printout of all available bar code types. Fonts: Printout of all available font types.
-
Page 56: Main Menu
Function Menu DPM III xi series 7.13 Main Menu After switching on the direct print module the left indicated display shows the following: The first line of main menu indicates used device type. The second line indicates current date and time. -
Page 57: Compact Flash Card
DPM III xi series Compact Flash Card Compact Flash Card This print module series are equipped with a slot for Compact Flash card. By means of this memory card you can permanently save via interface graphics, text, layout data or information from database. - Page 58 Compact Flash Card DPM III xi series Navigation Press key to indicate the saved layouts onto the Compact Flash card. Press key to enter the Compact Flash card menu. Press key to arrive at the next menu item. Press key to return to the previous menu item.
- Page 59 DPM III xi series Compact Flash Card Loading file from Keys: Compact Flash card Press key to select the 'Load file' menu item. Select the file you want to load and confirm the selection with key The loaded layout is now in the printer internal storage and after the loading procedure the display shows the main menu.
- Page 60 Compact Flash Card DPM III xi series Changing the directory Keys: Press key to select the 'Change directory' menu item. The lower line of display shows the directory which is selected at the moment. Press key to change the directory in the upper line.
- Page 61 DPM III xi series Compact Flash Card Formatting Compact NOTICE! Flash card The formatting procedure is recommended before using the Compact Flash card for the first time in the label printer. Keys: Press key to select the 'Format' menu item.
-
Page 63: Maintenance And Cleaning
DPM III xi series Maintenance and Cleaning Maintenance and Cleaning DANGER! Risk of death by electric shock! Disconnect the direct print module from power supply before performing any maintenance work. NOTICE! When cleaning the label printer, personal protective equipment such as safety goggles and gloves are recommended. -
Page 64: Cleaning The Transfer Ribbon Drawing Roller
Maintenance and Cleaning DPM III xi series 9.2 Cleaning the Transfer Ribbon Drawing Roller A soiled print roll can lead to reduced print quality and can affect transport of material. 1. Remove cover. 2. Remove transfer ribbon from the direct print module. -
Page 65: Replacing The Printhead
DPM III xi series Maintenance and Cleaning 9.4 Replacing the Printhead CAUTION! The printhead can be damaged by static electricity discharges and impacts! Set up direct print module on a grounded, conductive surface. Ground your body, e.g. by wearing a grounded wristband. -
Page 66: Transfer Ribbon Tension
Maintenance and Cleaning DPM III xi series 9.5 Transfer Ribbon Tension Figure 23 For a regular print quality it is necessary that the transfer ribbon is to tighten even over its width. With the nuts (1) it is possible to regulate a different transfer ribbon tension by a sideways overturn of the printhead. -
Page 67: Angle Adjustment
DPM III xi series Maintenance and Cleaning 9.6 Angle Adjustment Figure 24 The installation angle of the printhead is default 26° to the print surface. However, manufacturing tolerances of printhead and mechanics can require another angle. CAUTION! Damage of printhead by unequal use! Higher wastage of ribbon by faster ripping. -
Page 68: Zero Point Adjustment
Maintenance and Cleaning DPM III xi series 9.7 Zero Point Adjustment Figure 25 By means of a slider (1) you have the possibility to change the printer zero point. In case the slider is at the end of its guiding then the maximum print length is available. -
Page 69: Print Quality Optimisation
DPM III xi series Maintenance and Cleaning 9.8 Print Quality Optimisation The following table shows some possibilities to improve the print quality. Generally you have to note: the higher the print speed the lower the print quality. Problem Possible solution ... -
Page 70: Cycle Optimisation
Maintenance and Cleaning DPM III xi series 9.9 Cycle Optimisation Taktzahl = abgeschlossener Druckzyklus pro Zeiteinheit. Figure 26 In case of 'time critical' applications you have the possibility with a good selection of different device parameters to increase the effective print speed and it this way the clock cycle. -
Page 71: Signal Diagrams
DPM III xi series Signal Diagrams 10 Signal Diagrams 10.1 Mode 1 (single item processing) 04.18 Operating manual... -
Page 72: Mode 2 (Continuous Mode)
Signal Diagrams DPM III xi series 10.2 Mode 2 (continuous mode) Operating manual 04.18... -
Page 73: Mode 4 (Continuous Mode)
DPM III xi series Signal Diagrams 10.3 Mode 4 (continuous mode) Return without 'layout printing' signal 04.18 Operating manual... -
Page 74: Mode 8 (Single Item Processing)
Signal Diagrams DPM III xi series 10.4 Mode 8 (single item processing) Return without 'layout printing' signal Operating manual 04.18... -
Page 75: Error Correction
DPM III xi series Error Correction 11 Error Correction Error message Cause Remedy Line too high Line rises up completely or Move line down partly over the upper edge of (increase Y value). label. Check rotation and font. Line too low Line rises up completely or Move line up (reduce Y value). - Page 76 Error Correction DPM III xi series Error message Cause Remedy Unknown mask Transferred mask statement is Check sent data. invalid. Check connection PC - printer. Missing ETB No end of data found. Check sent data. Check connection PC - printer.
- Page 77 DPM III xi series Error Correction Error message Cause Remedy System clock Real Time Clock function is Change battery. selected but the battery is Change RTC component. empty. Defective RTC. No CF interface Interrupted connection CPU - Check connection CPU - CF CF card.
- Page 78 Error Correction DPM III xi series Error message Cause Remedy Invalid file name File name contains invalid Correct entry of name, remove characters. special characters. Internal file error Internal file system error. Please contact your distributor. Root full The max. number (64) of main Delete at least one main directory entries is reached.
- Page 79 DPM III xi series Error Correction Error message Cause Remedy Scanner NoRead Bad print quality. Increase contrast. Printhead completely soiled or Clean printhead or exchange (if defective. necessary). Print speed too high. Reduce print speed. Scanner data Scanned data does not Exchange printhead.
- Page 80 Error Correction DPM III xi series Error message Cause Remedy Layout ID Scanned data does not Wrong label loaded from CF correspond to defined ID. card. RFID no label RFID unit cannot recognise a Displace RFID unit or use an label.
- Page 81 DPM III xi series Error Correction Error message Cause Remedy Lower position Sensor signal down is missing Check input signals / compressed-air supply. (option APL 100). Vacuum plate empty Sensor does not recognise a Check input signals / label at vacuum plate compressed-air supply.
- Page 82 Error Correction DPM III xi series Error message Cause Remedy Print position The print position is not correct. Check TOP and RIGHT final position switch for correct function and position. Check pneumatics for function XML parameter The parameters in the XML file Please contact your are not correct.
- Page 83 DPM III xi series Error Correction Error message Cause Remedy Module not found RFID module not available. Check the RFID module connection. Please contact your responsible distributor. No release signal No print release by higher-level Activate release signal at the control (customer machine).
-
Page 85: Additional Information
DPM III xi series Additional Information 12 Additional Information 12.1 Column Printing With this direct print module several columns can be printed, i.e. the information of one column can be printed several times (depending on its width) on a layout. Caused by this the use of the complete print width is possible and the generating time is enormously reduced. -
Page 86: Hotstart
Additional Information DPM III xi series 12.2 Hotstart NOTICE! The data is saved onto CF card. Therefore the CF card is a condition for the Hotstart menu item. The function hotstart contains e.g. that in case of a power failure the currently loaded layout can be further processed without any loss of data. - Page 87 DPM III xi series Additional Information Starting the print order In case at switching off the direct print module a print order was active, then a print start is released automatically and the required res. actual number of printed layouts is refreshed.
-
Page 88: Password
Additional Information DPM III xi series 12.3 Password Example 1 The supervisor programs a Compact Flash memory card directly with the direct print module. He stores 10 different layouts. As well he adjusts the printer parameters, like contrast, speed, etc. to the corresponding values. - Page 89 DPM III xi series Additional Information In case no password is defined res. the password protection is not Password definition activated, all functions can be used. In the function menu you will find the menu item "Password", where the password can be entered and the password protection activated.
-
Page 91: Environmentally-Friendly Disposal
It may only be organised, used and disposed of by the manufacturer. Valentin products accordingly labelled can therefore be returned to Carl Valentin GmbH. This way, you can be sure your old equipment will be disposed of correctly. -
Page 93: Index
DPM III xi series Index 14 Index Column printing .................. 85 Compact Flash card ............57, 58, 59, 61 Connection ..................31 Connector assignment (control unit IP version), figure ...... 11 Connector assignment (control unit), figure ........10 Delivery scope ..................27 Environmentally-friendly disposal ............ -
Page 94: Index
Index DPM IIIxi Serie Keyboard Standard ..................35 Text entry/customized entry ............. 36, 37 Machine overviews ................9 Main menu ..................56 Maintenance/cleaning Angle adjustment ................67 Cleaning printhead ................64 Cycle optimisation ................70 General cleaning ................63 Print quality optimisation ..............69 Printhead, cleaning .................
Need help?
Do you have a question about the DPM III XI and is the answer not in the manual?
Questions and answers