Pandigital NOVEL User Manual
6" epaper
Hide thumbs
Also See for NOVEL:
- User manual (146 pages) ,
- Quick start manual (25 pages) ,
- Getting started manual (15 pages)
Table of Contents
Advertisement
Quick Links
Advertisement
Table of Contents

Subscribe to Our Youtube Channel
Related Manuals for Pandigital NOVEL


Summary of Contents for Pandigital NOVEL
- Page 1 User Guide Pandigital Novel 6” ePaper v1.0...
-
Page 2: Table Of Contents
Table of Contents 6” Pandigital Novel ............4 Important Safety Precautions ........... 5 Getting Started ..............8 HOME SCREEN ..............14 Pre-loaded Applications ..........16 BARNES & NOBLE ............17 My Library ..............23 Reader................34 Adobe Digital Editions ............ 42 BROWSER ............... - Page 3 Note: The device style and features may differ from those documented in this User Guide. UG-E_R61B200_v1.0_03-11...
-
Page 4: 6" Pandigital Novel
Your Pandigital Novel is a light and stylish electronic multimedia eReader which allows you to quickly and easily download and read digital printed material (Books, Magazines, and Newspapers) anytime and anywhere. -
Page 5: Important Safety Precautions
User Guide (pre-loaded in device) Important Safety Precautions Always follow these basic safety precautions when using your Pandigital Novel. This reduces the risk of fire, electric shock, and injury. • Keep this device out of direct sunlight and heat sources such as in a closed car under sunlight or near a stove. - Page 6 • Do not attempt to disassemble or modify this device. There are no user serviceable parts inside this device, and unauthorized modifications void your warranty. • Do not insert objects other than compatible memory cards into the memory card slots of this device. The metal contacts inside the slots can easily become damaged by foreign objects.
- Page 7 Power Switch Micro USB port MicroSD card slot Page back Page back Page Up Page Up Page forward Page forward Page Down Page Down MENU Go to Home screeen Go back or Refresh exit apps screen Navigation arrows and center “Enter” button Power Switch Usage Turn On: Slide and hold the power switch for up to 5 seconds wait...
-
Page 8: Getting Started
Turn Sleep Mode On/Off (energy saver): Slide & release the power switch quickly press with highlighted. The device automatically enters Sleep mode if left idle in Screen Saver mode for 3 minutes. Note: Do not leave the device in Sleep mode for more than 2 weeks as this may cause screen burn-in that cannot be recovered. - Page 9 1. Charge the device Use one of the following methods for charging your device. USB Power Adapter: Insert the large end of the micro USB cable into the USB power adapter, plug the USB power adapter into an electrical wall outlet, and then connect the micro end of the micro USB cable to your device.
- Page 10 3. Set Date & Time IMPORTANT - In order to connect with your Barnes & Noble online account, the Date and Time must be set correctly according to your location. Settings 1. On the Home screen select Date & Time 2.
- Page 11 4. Press to save the Date settings. Time 5. To change the Time, press select icon top of screen. 6. Press again to access selected option settings. to highlight the option fields and 7. Press change values. 8. Press to save the Time settings. Time Zone 9.
- Page 12 Wi-Fi 1. On the Home screen, select The device automatically scans and lists local Wi-Fi Networks found. indicates secure networks that require login name/password to connect. 2. Select the desired network to which you want to connect. Password 3. If applicable, enter the network press highlight press...
- Page 13 Browser 2. On the Home screen, select 3. When prompted, enter the login information as required by the hotspot. 5. Set up your Barnes & Noble Account Your Barnes & Noble account must be set up on the device before you can download media into My Library.
-
Page 14: Home Screen
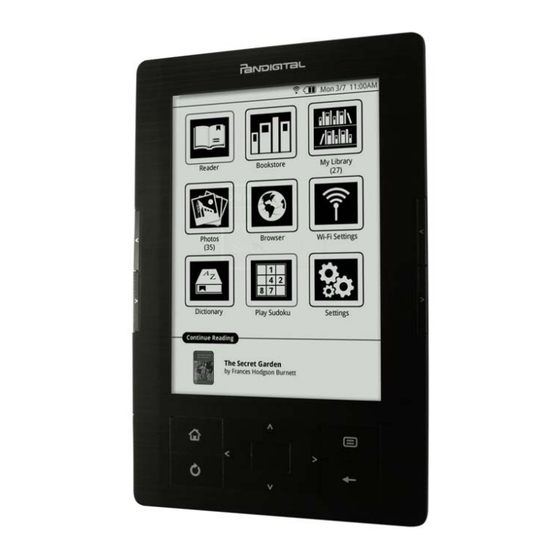
9. Press to return to previous screens. HOME SCREEN When you turn the device on, the Home screen displays the pre- loaded application icons. - Page 15 Wi-Fi connection status Battery charge level Current Date & Time Application launch icons Last read media. Press to access.
-
Page 16: Pre-Loaded Applications
Indicates additional media is available that is not visible. Simply select any application icon to launch the application. The (#) under application titles indicate the number of files associated with the application. Pre-loaded Applications The pre-loaded applications are displayed on the Home screen. Reader ~ Open your last read media file. -
Page 17: Barnes & Noble
Sudoku ~ Play the popular number-placement game . Settings ~ Manage device settings, connect, set up your Barnes & Noble account login, and perform default resets and firmware updates. BARNES & NOBLE Use the Bookstore and My Library applications to: •... - Page 18 BUY NOW Get Free Select a media cover to display the Synopsis and Sample buttons. After making desired selections, the media is added to your Barnes & Noble online Library Press to return to the Home screen. My Library Select Get Books Press select...
- Page 19 If the Wi-Fi signal is weak, the contents of the Bookstore may not be able to load in the device. Press to exit the B&N application power off the device move to a better Wi-Fi signal area. Turn the device back on, and when connected to the Wi-Fi network, launch the B&N application again.
- Page 20 2. After a successful login, the B&N Bookstore displays the current top selling B&N Books, Magazines and Newspapers. Press to display next and previous pages. Search the Bookstore You can search for a specific string of text (i.e., title, author name) within the media files in the Bookstore.
- Page 21 3. Enter a book title or author’s name press to highlight press 4. Media with matching text is listed; Refer to following instructions for purchasing media or getting free samples. Purchase Books 1. In the Bookstore screen, select a media cover to display the Buy Now Get Free Sample Synopsis and...
- Page 22 3. Your selections are added to your Barnes & Noble online Library. Instructions for using the “Get Books” feature to download the media to your device is in My Library section. 4. Press to return to the Home screen. Purchase Magazines or Newspapers 1.
-
Page 23: My Library
periodical. Buy Sample Books If desired, you can quickly and easily buy the full version of a sample book in your Barnes & Noble online Library. Lend/Return 1. In the My Library screen, press select Buy sample books 2. Select 3. - Page 24 Cover View Function Menu. Title Media is sorted by Date of download. If desired, select to sort Author to sort by author’s first name by media title, or Media that has been loaded into your device. Press to display next/previous pages. Select to view other Bookshelves (use the Bookshelves function to create other bookshelves).
- Page 25 List View Function Menu. Title Media is sorted by Date of download. If desired, select to sort Author to sort by author’s first name by media title, or Media that has been loaded into your device. Press to display next/previous pages. Select to view other Bookshelves (use the Bookshelves function to create other bookshelves).
- Page 26 Get Books Get Books to download the downloadable Books, Magazines and Newspapers from your Barnes & Noble online account into your device. You must have an online account with Barnes & Noble, and already purchased media or requested free book samples. IMPORTANT: In order to connect with your Barnes &...
- Page 27 Barnes & Noble Account Create new account select select The browser launches and displays the Barnes & Noble account setup page. Follow the prompts to register your account. 4. Wait for the list of your downloadable media to be displayed, which could take up to a minute depending on how many items are in your account.
- Page 28 Manage Books to remove media from My Library. Manage Books 1. In the My Library screen, press select The list of media you have downloaded or imported into My Library is displayed. 2. Media is sorted by Date of download; if desired, press Title Author select...
- Page 29 borrowing any books: • To lend a book, the recipient must have a Barnes & Noble account. • To download a borrowed book, you must have a credit card number assigned to your Barnes & Noble account. • To unlock and open a borrowed book, you may be required to provide the default credit card name and number that is registered with your Barnes &...
- Page 30 Once you send a loan offer, the book is no longer available in My Library until the recipient returns the book or rejects the offer. You Get Books can use to download the book when the book becomes downloadable again in the future. Check for Offers Use this function to check for book loan offers made to you.
- Page 31 4. Press to return to previous screens. Returned books: Status is changed to “Returned” but remains available for purchase later. Purchased books: The borrowed book is removed from My Library. Get Books to download your purchased book. Bookshelves Bookshelves to create and manage personalized bookshelves into which you want to save your downloaded media (i.e., Short Stories, Drama, etc.).
- Page 32 Manage Bookshelf 3. Press select Title Date Author 4. Media is sorted by ; if desired, select to re-sort your media accordingly. 5. Select the media listings you want to add to the bookshelf. Save .to confirm you 6. Press select press want to add the books.
- Page 33 to confirm your deletion. 4. Press 5. Press to return to the My Library screen. Subscriptions Subscriptions to check for newest issues of active periodicals (eMagazine or eNewspaper) subscriptions. To get non-active subscriptions and purchased single issues, use Books Subscriptions Each time you use , the device syncs with your Barnes &...
-
Page 34: Reader
Reader The Reader is used to display your digital media (eBooks, eMagazines, and eNewspapers). Methods that can be used to launch the Reader: • Select a media cover in My Library or in a Bookshelf. Reader • Select from the Home screen to open the last read media file. - Page 35 Media supported formats: EPUB and PDF If a DRM media file was copied into the device rather than downloaded from your current B&N account, you are prompted for the name and Credit Card number that was used to purchase the media.
- Page 36 Reader Function Menu at the top of the screen. IMPORTANT: When the Reader Function Menu is displayed, normal Reader functions, such as page turn and zoom are inoperable. Always press to re-hide the menu when you’re done with the menu functions. My Library 1.
- Page 37 4. If the definition is longer than the viewable area, press to view the remainder of the definition. 5. Press to close the lookup window press again to exit the Dictionary mode. Table of Contents Quickly view the Table of Contents of the media file you are viewing. The Table of Contents font size is fixed and cannot be changed using the Font Size function.
- Page 38 Remove Bookmark View Bookmark List 1. With a media file displayed in the Reader, press to display the Reader Function Menu. Bookmarks Bookmark List 2. Select . All bookmarks within the media file are listed. 3. Select a bookmarked page to jump to that page. Highlight text on a Page 1.
- Page 39 3. Select a highlight listing to jump to that page. Delete Highlights 1. With a media file displayed in the Reader, press to display the Reader Function Menu. Bookmarks Highlight List 2. Select . All highlights within the media file are listed. Management 3.
- Page 40 4. To edit the note, press with highlighted to display the keypad. 5. Enter the desired text changes press to highlight press Delete Notes 1. With a media file displayed in the Reader, press to display the Reader Function Menu. Bookmarks Notes List .
- Page 41 to select ; the selected page is displayed. 4. To jump to a specific word, press Word to select 5. Enter the desired word text press to highlight press ; the page with the first instance found is displayed with 6.
-
Page 42: Adobe Digital Editions
Media Information 1. Press to display the Reader Function Menu. Information 2. Select If available in the media file, the following data pertaining to the media file is listed: • File name • Title • Author • Subject • Publisher •... - Page 43 3. Follow the prompts to install the software. Authorize your Device with ADE 1. After registering and installing the ADE software, enter your Adobe account login information to activate your computer with the software. 2. The ADE program opens. 3. Connect your device to your computer using the USB cable. 4.
-
Page 44: Browser
displayed. 4. Select an eBook to open in the Reader. Delete Adobe eBooks from your Device 1. Launch the Adobe Digital Editions program on your computer. 2. Connect your eReader to your computer via USB cable. PD_Novel 3. Click on to display the eBooks in the Library window. - Page 45 4. Press to exit the browser press confirm exit. Browser Function Menu In an open browser window, the Browser Function Menu is displayed at the top of the screen. Return to Home website Select to bookmark web page press to close the confirmation message...
-
Page 46: Dictionary
Display previously viewed web page Return to web page viewed before selecting Back Refresh the screen by reloading the web page Stop web page from loading Zoom in on the web page Zoom web page back out Select to view list of bookmarked web pages select a bookmarked web page to jump to the page. -
Page 47: Photos
3. If the definition is longer than the viewable area, press to view the remainder of the definition. 4. To look up another word, press and repeat step 2. 5. Press to return to the Home screen. PHOTOS The following methods can be used to add photos to the device: •... - Page 48 5. When a photo is displayed in full-screen mode, press access the Photo Function Menu at the top of the screen with the following options: Zoom In Enlarges the photo view; press multiple times until desired view is achieved. Press again to return to the photo and press to pan the viewable section of the photo.
- Page 49 Slideshow Options While slideshow is playing, press to display the following slideshow options: Zoom in Enlarges the photo view; press multiple times until desired view is achieved Zoom out (appears only if photo is zoomed) Reduces the photo view back to normal size; press multiple times if necessary. Slideshow speed Set the speed at which the slideshow photos transition from one to another (default = 5 seconds).
-
Page 50: Settings
Delete to confirm deletion. select press 2. To delete multiple photos, in the Photo Gallery screen, press Multiple Select select select all photos you want to Delete delete. Press again select press confirm deletion. SETTINGS Set multiple functions that affect the normal usage of your eReader. You can also set your personal preferences for some functions. - Page 51 to scroll through screen saver time settings press to choose the desired setting. The device automatically enters Sleep mode when left in Screen Saver mode for 3 minutes; slide the power switch quickly to turn Sleep mode off. Power Saving 5.
- Page 52 Set Time Zone Time Zone 1. Press select the icon press again to access the options. Country Region 2. Select the appropriate and then for your location. Set Time Time 1. Press select the icon press again to access the options. to highlight option field and 2.
- Page 53 3. Press enter the email address that is registered with your Barnes & Noble account press to highlight press 4. Enter your password press to highlight press Login 5. Select The device logs into the Barnes & Noble server to verify your account information.
- Page 54 Settings>Network In order to connect to the Internet, you must have a Wi-Fi network set up on your Pandigital Novel. If you did not set up a network during the initial setup, do so now. Turn On 1.
- Page 55 highlight press The password is remembered for future connections. When connected, the Wi-Fi status icon appears at the top of the screen. To view or change any of the network settings, press Setup select make desired changes. Press highlight press To re-scan for local Wi-Fi networks, press Connecting to Public Wi-Fi Hotspot If you are connecting via a public Wi-Fi hotspot, it may be necessary...
- Page 56 Adobe DRM Activation records will be deleted. Application feature default settings will be factory reset. We recommend that you back up all downloaded media to your computer before updating your firmware. 1. On your computer, go to www.pandigital.net/downloads. Pandigital Novel 2. Select the category.
- Page 57 while connected. 7. In a MS Windows Explorer or Mac Finder window, locate the Firmware folder in PD_Novel drive. Firmware 8. Unzip the downloaded update file into the folder (qdutil folder & contents). 9. Disconnect the microUSB from the device and wait for the device to refresh.
-
Page 58: Wi-Fi
WARNING: This option changes all general settings back to the factory pre-set defaults AND deletes your personal settings, downloaded media, contact list, photos, etc.. Use this option only if you want the device completely returned to “out-of-box” status. Settings 1. On the Home screen, select Advanced Settings Restore to default and remove user 2. -
Page 59: Connect To Computer
Password 3. If applicable, enter the network press highlight press The password is remembered for future connections. When connected, the Wi-Fi status icon appears at the top of the screen. To view or change any of the network settings, press Setup select make desired changes. - Page 60 PC System Requirements Operating Systems: Windows XP, Windows Vista, Windows 7, Mac USB Port Supported: USB 2.0 port Connect to Windows PC 1. Connect the small end of the USB cable to the eReader micro USB port, and the larger end to an available USB port on your computer. 2.
- Page 61 Books that are only available in .pdb format are not Get Books downloadable even when you use Photo files can be copied from a Macintosh computer into your Pandigital Novel as long as they are in a supported file format.
- Page 62 1. Connect the small end of the USB cable to the eReader micro USB port, and the larger end to an available USB port on your computer. 2. Select when prompted to use the device as a mass storage. The device is recognized by your computer as a removable drive.
-
Page 63: Frequently Asked Questions
Customer Support at 1-800-715-5354. BROWSER Q: Do I need a Wi-Fi adapter to connect to the Internet? A: No. The Wi-Fi adapter is built-in to your Pandigital Novel. COMPUTER COMPATIBILITY Q: Which media cards are compatible with my Pandigital Novel? A: Only microSD Cards. - Page 64 Q: How do I purchase books from Barnes & Noble? A: Follow the instructions under the Barnes & Noble Bookstore section. Q: How do I download books to my Pandigital Novel after I purchase them from Barnes & Noble? Get Books A: Use the feature in the My Library screen.
- Page 65 F:## = failed download T:## = total to be downloaded PHOTOS Q: What type of photo files can I view on my Pandigital Novel? A: JPG and PNG Q: How do I add photo files to my Pandigital Novel? A: You can download photo files from online photo sharing websites, import them from your microSD card, or copy them from your computer via microUSB cable connection.
-
Page 66: Battery Management
Q: Can I read books stored on my microSD card? A: Yes, although we recommend that you import the book into your Pandigital Novel so it is available after you remove the microSD card. Q: Why doesn’t my Pandigital Novel read my microSD card? A: If you create a microSD card using a Macintosh computer, you must use the FAT32 option when formatting the microSD card;... -
Page 67: Technical Specifications
that you charge the battery for at least 4 hours before you start to use the device. The rechargeable battery is designed and manufactured to be used and recharged frequently. As with all batteries, the capacity of the battery reduces each time it is charged/depleted. However, you can still try to prolong the battery’s lifetime by following the suggestions below: •... -
Page 68: Limited Warranty
LABOR: For a period of one (1) year from the date of purchase, if this Device is found to be defective, Pandigital will repair or replace the Device, at its sole option, at no charge. After this one (1) year period, labor charges will be charged on a case by case basis. - Page 69 This warranty does not provide protection for the loss of data, regardless of format or cause. Pandigital reserves the right to modify and change the design of this Device without prior notice, written or otherwise.
- Page 70 Contains Reader Mobile technology by Adobe Systems Incorporated. License Agreement and Terms of Use By activating and using the Pandigital Novel (the “Device”), you hereby consent and agree to our License Agreement and Terms of Use. The Device and Related Services...
- Page 71 Definitions: The following terms apply to the Device and to (a) all software (and the media on which such software is distributed) of Pandigital or third parties that are pre-installed on the Device at time of purchase or that Pandigital provides as updates/upgrades to the pre-installed software (collectively, the “Device Software”), unless you agree to other terms as part of an update/upgrade process;...
- Page 72 © 2011 Pandigital, Inc. or its affiliates. All rights reserved. Pandigital, the Pandigital logo, Pandigital Novel, are trademarks of Pandigital Inc. Barnes & Noble and the “BN” logo are registered trademarks of Barnesandnoble.com. All rights reserved. Facebook and the “f” logo are registered trademarks of Facebook Inc.
Need help?
Do you have a question about the NOVEL and is the answer not in the manual?
Questions and answers