
Related Manuals for Reely Rocket Drone FPV


Summary of Contents for Reely Rocket Drone FPV
- Page 1 Operating Instructions Electrical quadrocopter “Rocket Drone FPV” RtF Item No. 1646409...
-
Page 2: Table Of Contents
Table of contents Page Introduction ................................4 Explanation of symbols ............................4 Intended use ................................5 Package contents ..............................5 Product description ..............................6 Safety information ..............................7 a) General information ............................7 b) Before first use ..............................8 c) During use ..............................8 Battery information ...............................9 a) General information ............................9 b) Additional information about lithium rechargeable batteries ................10 Preparations for flying ............................12 a) Inserting batteries into the remote control ....................12... - Page 3 Page 18. Image and video recordings ..........................26 a) General information .............................26 b) Inserting a microSD card ..........................26 c) Image and video recordings ........................27 19. FPV mode ................................28 a) General information .............................28 b) Downloading the app ...........................28 c) Preparing the quadcopter for take-off ......................29 d) App functions ...............................29 e) Using the app ..............................31 f) Viewing images or videos ..........................31...
-
Page 4: Introduction
1. Introduction Dear customer, Thank you for purchasing this product. This product complies with statutory national and European regulations. To ensure that the product remains in this state and to guarantee safe operation, always follow the instructions in this manual. These operating instructions are part of this product. -
Page 5: Intended Use
3. Intended use The "Rocket Drone FPV" is an electrically-powered quadcopter that is controlled wirelessly using a remote control. It is only designed for private use during permitted operating times. It is not suitable for other purposes. Using this product for any purposes other than those described above may dam- age the product and result in a short circuit, fire, electric shock or other hazards. -
Page 6: Product Description
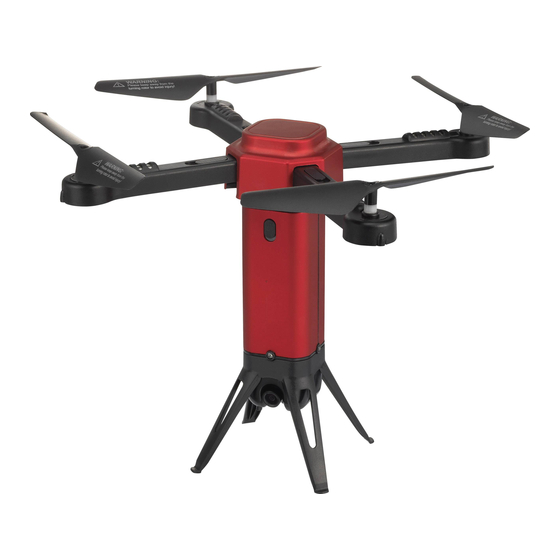
5. Product description The "Rocket Drone FPV" quadcopter is a pre-assembled quadcopter with four rotors and a built-in camera. Quadcop- ters are already used professionally to complete a wide range of tasks. The outrigger arms on the four rotors can be folded inwards. -
Page 7: Safety Information
6. Safety information Damage caused due to failure to observe these instructions will void the warranty. We shall not be liable for any consequential damages. We shall not be liable for damage to property or personal injury caused by incorrect handling or failure to observe the safety information! Such cases will void the warranty/guarantee. -
Page 8: B) Before First Use
b) Before first use • You must learn how to use and control remote-controlled quadcopters. If you have not driven such models before, proceed with caution and learn how the model reacts to remote control commands. Be patient! • Ensure that there are no other models on the same frequency (2.4 GHz) within range of the remote control. -
Page 9: Battery Information
7. Battery information Batteries present numerous safety hazards. Compared with conventional NiMH rechargeable bat- teries, LiPo/Li-ion rechargeable batteries have a high energy content. For this reason, it is essential to comply with safety regulations to prevent the risk of a fire or explosion. Always observe the following safety information when handling batteries. -
Page 10: B) Additional Information About Lithium Rechargeable Batteries
• Disconnect the quadcopter battery from the model before connecting it to the charger. Never leave the battery connected to the quadcopter when it is charging. This may damage the charger, quadcopter or the battery! Remove the battery from the quadcopter before charging. •... - Page 11 • Exercise caution when handling the damaged battery and use suitable protective gloves. Dispose of the battery in an environmentally friendly manner. • Never store damaged batteries in an apartment or in a house/garage. Damaged or swollen lithium bat- teries may catch fire. •...
-
Page 12: Preparations For Flying
8. Preparations for flying a) Inserting batteries into the remote control Remove the battery compartment cover on the back of the remote control. Remove the screw on the battery compartment cover. Slide the cover in the direction of the arrow (see mark- ing on battery compartment cover), and then remove the cover from the back of the remote control. -
Page 13: B) Charging The Quadcopter Battery
b) Charging the quadcopter battery Use a USB power adapter or USB cigarette lighter (not included) to power the USB charger. This must be able to deliver an output current of at least 1000 mA. A computer USB port or a USB hub with a its own power adapter is not recommended, as the current con- sumption (approx. -
Page 14: C) Final Assembly
c) Final assembly Attach the landing gear by sliding it onto the body (see fig- ure 4). Ensure that the slot for the microSD card is aligned with the slot on the landing gear (see right-hand image). Figure 4 The quadcopter features swivel-mounted outrigger arms. This ensures a compact design and makes the quadcop- ter easier to transport. -
Page 15: Remote Control Buttons
9. Remote control buttons Figure 7 1 On/off switch with LED indicator 2 Swivel camera upwards 3 Swivel camera downwards 4 Left-hand control lever (rise/fall and yaw) 5 Start rotors/automatic landing button 6 Flight mode button 7 Start/stop video recording 8 Headless mode button 9 Photo capture button 10 Right-hand control lever (roll and pitch) - Page 16 The smartphone holder is shown in figure 8. This allows you to attach smartphones with a width of up to 100 mm. The holder is fixed to a second battery compartment cover. Figure 8 If you fly the quadcopter (e.g. in FPV mode) and wish to attach a smartphone to the remote control, remove the normal battery compartment cover and use the battery compartment cover with a smartphone holder.
-
Page 17: Safety Features
10. Safety features The "Rocket Drone FPV" quadcopter and remote control come with a range of safety features to prevent the model from being damaged and reduce possible damage to a minimum. The LED indicator on the quadcopter indicates when a safety feature is activated and the remote control triggers an optical alarm. - Page 18 The model features an infrared object detection feature. An infrared LED is attached to each side of the model above the landing gear. The light from the infrared LEDs is invisible to the human eye. The infrared beam is reflected by obstacles/objects (e.g. a wall).
-
Page 19: Before First Use
11. Before first use This manual uses the standard terms for controlling a quadcopter. These are used in aviation terminology and are in widespread use. Directions are given from the perspective of a "virtual" pilot. The direction is indicated by the three green LEDs in the chassis (these indicate "backwards"). -
Page 20: C) Pitch Function
c) Pitch function "Pitch" refers to the movement of the quadcopter about the horizontal axis (comparable to a nodding head). This makes the quadcopter accelerate/brake forwards or backwards. Move the right-hand lever (figure 7, position 10) forwards to make the quadcopter move forwards, or pull the lever backwards to make the quadcopter move backwards. -
Page 21: Starting The Quadcopter
12. Starting the quadcopter You must learn how to use and control a remote-controlled quadcopter. If you have not driven such models before, proceed with caution and learn how the model reacts to remote control commands. Be patient! Refer to the instructions in section 11. Do not take any risks when using the product! Always use the model responsibly, otherwise you may endanger yourself and your surroundings. -
Page 22: Trimming The Quadcopter
13. Trimming the quadcopter The quadcopter is not 100% stable and may drift in a certain direction. This is caused by external factors (e.g. wind) and incorrectly calibrated sensors (gyroscopes). The drift can be largely eliminated by calibrat- ing the sensors and using the trim functions. If the quadcopter drifts in one direction, trim the quadcopter in the opposite direction using the corresponding trim on the remote control. -
Page 23: Calibrating The Sensors
14. Calibrating the sensors If the trim is not sufficient to make the quadcopter hover in a fixed position (e.g. after a crash), the sensors need to be recalibrated. Follow the steps below: Place the quadcopter on a level surface. Pull both control levers as far as they will go in the direc- tion indicated in figure 17 and hold them in place for ap- proximately 3 seconds. -
Page 24: Starting The Rotors And Automatic Landing
15. Starting the rotors and automatic landing Warning! Remove all obstacles surrounding the quadcopter before starting the rotors. The rotors must only be start- ed in large rooms/halls or outdoors. For safety reasons, people/animals and objects must be at least 2 meters from the take-off position, other- wise the quadcopter may be damaged or may cause injury or damage to property! The automatic landing feature is a preprogrammed sequence. -
Page 25: Headless Mode
17. Headless mode In headless mode, the quadcopter always moves in the direction of the remote control levers, regardless of its orienta- tion. For example, when you move the control lever to the right, the quadcopter will always move to the right (regard- less of which direction the quadcopter is facing). -
Page 26: Image And Video Recordings
18. Image and video recordings a) General information The quadcopter comes with a camera that can be rotated wirelessly by 90°. You can use the remote control or a smartphone app to take photos, record video and control the camera. When the camera is controlled with the remote control, images and videos are stored on a microSD card (not in- cluded). -
Page 27: C) Image And Video Recordings
c) Image and video recordings Move the camera to the desired position using the camera control buttons on the remote control. Use the left-hand button (figure 7, position 2) to move the camera upwards, or the right-hand button (figure 7, position 3) to move the camera downwards. -
Page 28: Fpv Mode
Depending on your operating system, scan one of the QR codes below (iOS or Android). You will be automatically directed to the download page for the current version of the app. Alternatively, search for the "Rocket Drone" app from REELY in the App Store (Apple devices) or Google Play Store (Android devices). Figure 22: iOS... -
Page 29: C) Preparing The Quadcopter For Take-Off
c) Preparing the quadcopter for take-off Prepare the quadcopter for take-off by pairing it with the remote control. The quadcopter will emit a Wi-Fi signal (similar to a Wi-Fi router). On your smartphone, go to "Settings" and enable Wi-Fi. Search for the "Foldable Drone_xxxxx" network (xxxxx = number/letter combination) from the list of available Wi-Fi networks. - Page 30 Play symbol = Start the app (3) Select "Play" (3) to access the following interface: Figure 25 These icons have the following functions: 1 Exit the current screen 2 Take a photo with the quadcopter camera 3 Record a video with the quadcopter camera 4 View saved images and videos 5 Select the flight mode (first level = beginner mode, second level = advanced mode, third mode = professional mode, see section 11.
-
Page 31: E) Using The App
When you select the cog icon (see figure 25, position 10), the following additional icons are displayed: Figure 26 11 "VR" setting for a live 3D image (requires a VR headset). 12 Calibration (calibrates the sensors in the quadcopter, see section 14) e) Using the app A live image of the quadcopter camera will be displayed when the quadcopter is ready for take-off and you have enabled the app with the "Play"... -
Page 32: G) Saving Images Or Videos To The Microsd Card
g) Saving images or videos to the microSD card Refer to the technical data at the end of these instructions for a list of supported microSD cards/technical requirements. The quadcopter features a microSD card slot under the battery compartment cover. The images and videos that you save to your smartphone can be also be saved to a microSD card (not included, must be purchased separately). -
Page 33: Controlling The Quadcopter With Your Smartphone
20. Controlling the quadcopter with your smartphone The "Rocket Drone FPV" quadcopter can be controlled with a smartphone instead of the remote control. There are two possibilities that are displayed in sequence. To prevent interference with the transmission of flight commands and video signals, ensure that there are no other remote controls within range of the quadcopter that operate on the 2.4 GHz frequency. - Page 34 To control the quadcopter with your smartphone and in-app controls, follow the steps below: • Switch the quadcopter on. The LEDs in the outrigger arms will start to flash and the quadcopter will emit a Wi-Fi signal. • Switch on your smartphone. Go to "Settings/Wi-Fi" and connect your smartphone to the quadcopter's Wi-Fi network. •...
-
Page 35: B) Other In-App Controls
b) Other in-app controls By default (see icon in figure 25, position 5), the app is set to 30% of the maximum steering range. This corresponds to beginner mode (see section 11) and restricts the impact of steering commands. An additional bar is displayed when you touch this icon again (figure 25, position 5). The steering range is now set to approximately 60 % of the maximum. -
Page 36: C) Controlling The Quadcopter With Your Smartphone's Position Sensors
Touch the "REV" icon (figure 25, position 9) to invert the video image by 180° (the image will turn upside down). Touch the cog icon (figure 25, position 10) to display additional control icons. The "VR" icon (figure 26, position 11) activates a "quasi 3D mode". The live image from the camera is split into two parts on your smartphone screen. -
Page 37: Maintenance, Servicing And Repairs
21. Maintenance, servicing and repairs a) Regular cleaning The "Rocket Drone FPV" quadcopter has a very simple design. There are no mechanical parts that require lubrication or other maintenance. However, the quadcopter should be cleaned after each use to remove any dirt (e.g. woollen threads, hairs and dust). -
Page 38: Disposal
22. Disposal a) Product Electronic devices are recyclable waste and must not be placed in household waste. Always dispose of the product according to the relevant statutory regulations. Remove any inserted batteries and dispose of them separately from the product. b) Batteries You are required by law to return all used batteries (Battery Directive). -
Page 39: Technical Data
24. Technical data a) Remote control Transmission frequency........2,402 - 2,450 GHz Transmission power..........2 dBm Range ...............Max. 50 - 70 m (with no obstructions) Operating voltage ..........6 V/DC (4 AA batteries) Dimensions (W x L x H) ........150 x 110 x 64 mm Weight ..............Approx. -
Page 40: D) Rechargeable Battery
d) Rechargeable battery Rated voltage ...........3.7 V (LiPo 1S) Capacity ............900 mAh Discharge rate ..........25C Connector system ..........BEC e) USB battery charger Operating voltage ..........5 V/DC (via USB) Required input current ........min. 1000 mA End-of-charge voltage ........4.2 V (LiPo 1S) Charging time ...........Approx. - Page 44 This is a publication by Conrad Electronic SE, Klaus-Conrad-Str. 1, D-92240 Hirschau (www.conrad.com). All rights including translation reserved. Reproduction by any method, e.g. photocopy, microfilming, or the capture in electronic data processing systems require the prior written approval by the editor. Reprinting, also in part, is prohibited. This publication represent the technical status at the time of printing.
Need help?
Do you have a question about the Rocket Drone FPV and is the answer not in the manual?
Questions and answers