Table of Contents
Advertisement
Available languages
Available languages
Advertisement
Chapters
Table of Contents

Subscribe to Our Youtube Channel
Related Manuals for DRIFT GHOST X


Summary of Contents for DRIFT GHOST X
- Page 1 GHOST X Quick Guide GHOST 4K...
- Page 2 Thank you for purchasing the Drift Ghost X CUSTOMER SUPPORT Download the full manual and check our official website for firmware updates, customer support, and info on all of our products. https://driftinnovation.com/ If you have any suggestions, comments or concerns; please contact our customer support team at: support@driftinnovation.com...
-
Page 3: Table Of Contents
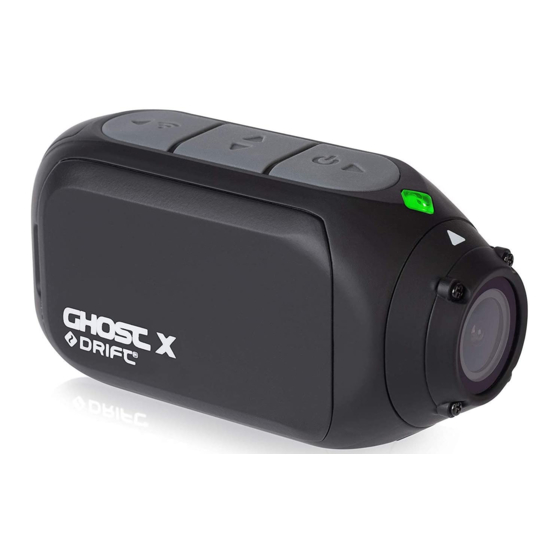
Contents About Your Camera | Package Contents Initial Setup | Getting Started Camera Modes Settings Menu 9-10 Settings Mounting the Camera 12-13 Feature Overview Accessory Guide Wi-Fi + Firmware Connecting Your Camera 17-18 Specifications 19-20 Disclosures... - Page 4 About Your Camera Rear Button Middle Button Front Button Status LED Rotating Lens Battery Module Module Latch Wi-Fi LED Rear Screen Microphone Reset Button MicroSD Card Slot 10 Pin Mini USB Port Rubber Cover...
- Page 5 Package Contents Ghost X Camera Universal Clip Flat Adhesive Mount Curved Adhesive Mount Reset Tool USB-Mic Converter MiniUSB Cable...
- Page 6 Initial Setup Uncover the microSD slot by lifting its rubber cover. Insert a Class 10 or higher microSD/HC/XC card (up to 128GB). Format before first usage! Uncover the mini USB port by lifting its rubber cover Connect the camera via a mini USB cable to a powered USB port, and charge the battery for 2.5 hours before first use.
- Page 7 Getting Started POWER ON/OFF Press and hold the button to power on. The Rear Screen will power on, showing the welcome display. The camera is now ready to record video or take photos. Current camera mode is indicated by the colour of the Status LED and Rear Screen, along with the icon in the top left of the Rear Screen.
-
Page 8: Camera Modes
Camera Modes VIDEO MODE TIMELAPSE MODE (Green LED) Press the button to start (Purple LED) Press the button to capture recording. The Status LED and LCD backlight a series of still images at a specified rate. The will flash red to indicate recording. Press the Status LED and LCD screen will flash red each button again to stop recording. -
Page 9: Settings Menu
Settings Menu SETTINGS MENU NAVIGATION On arrival to the settings menu, the highlight black box rests on the top, highlighting the Settings Menu icon as the starting position. Press the button to navigate down, this highlights the next setting. Press hold the button to scroll upwards. -
Page 10: Settings
Settings Wi-Fi OFF / ON Field of View 90° / 115° / 140° Exposure -2 / -1 / 0 / +1 / +2 Self Timer OFF / 3S / 5S / 10S Video Bit Rate HIGH / MEDIUM / LOW NORMAL / VIVID / LOW LIGHT Video Filter 100 / 200 / 400 / 800 / AUTO... - Page 11 Settings Status Indicator LED OFF / ON Instant Record OFF / ON Date YY/MM/DD HH/mm Date Stamp OFF / ON Camera Off NEVER / 2MIN / 5MIN / 10MIN / 20MIN THM Files ON / OFF Language EN / CN Reset Settings YES / NO Format SD Card...
-
Page 12: Mounting The Camera
Mounting the Camera Attach the Universal Clip to the camera in any 360° orientation as needed – first position the clip in the desired orientation, then secure by rotating the screw base by hand. Slide the Universal Clip into your chosen mount, ensuring that it ‘clicks’ into place. -
Page 13: Feature Overview
Feature Overview CAR DVR MODE This hands-off mode is ideal for insurance and security purposes. The camera records footage in a continuous loop style (DVR Intervals) recording loop after loop until it fills the MicroSD Card. Once full, the oldest loops will be deleted as the newer ones are saved. - Page 14 Feature Overview BIT RATE FILTER Users can choose to keep the normal Quickly tailor your cameras settings to compression used by the H.264 codec, the recording conditions with filters. or if they prefer, allow a higher flow of Choose between Normal / Vivid / data for preserving more of the original Low Light .
-
Page 15: Accessory Guide
HANDLEBAR MOUNT SUCTION CUP MOUNT Mountable anywhere at The Drift handlebar mount The ideal accessory for nearly any angle, the Drift is the perfect accessory mounting your Ghost X Pivot Mount is your tool to for riders, whatever your to any non-porous flat capture the moment from discipline. -
Page 16: Wi-Fi + Firmware
Wi-Fi + Firmware To turn on your Ghost X Wi-Fi, simply press and hold the button. A green Wi-Fi indicator LED shows that Wi-Fi is enabled. Wi-Fi can also be turned on via the cameras settings menu. DOWNLOAD THE DRIFT LIFE APP Setup your shot, capture, playback, edit and live stream on your mobile device. -
Page 17: Connecting Your Camera
Connecting Your Camera CONNECTING TO A PC Connect the camera using the USB cable (provided); the camera screen will show a USB icon. The camera’s folder may open automatically; if not, open using My Computer. The camera should be recognised as a removable disk; double-click to open. Open the DCIM folder to access your files. -
Page 18: Specifications
Specifications Video Resolution and Frame Rates: 1080P (1920 X 1080 16:9) 25 / 30 FPS 960P (1280 x 960 4:3) 25/ 30 FPS 25 / 30 / 50 / 60 FPS 720P (1280 X 720 16:9) WVGA (854 x 480 16:9) 25 / 30 / 50 / 60 FPS File format: .MP4 (H.264 codec) - Page 19 Specifications Mini USB 10 Pin. External Microphone via USB adaptor. Inputs: Outputs: A/V and HDMI Out via USB Adapter. Connectivity: USB Plug And Play, Mini USB 10 Pin. 1500mAh internal,500mAh modular battery included. Power: Wi-Fi Frequency: 2.4GHz 43 (W) x 82.2 (L) x 31.4 (D) mm Camera Dimensions: 120g Weight:...
- Page 20 Disclosures FCC/CE Information energy and, if not installed and used in accordance with the instructions, may This device complies with Part 15 of cause harmful interference to radio the FCC Rules. communications. However, there is Operation is subject to the following no guarantee that interference will two conditions: not occur in a particular installation.
- Page 21 Disclosures EN 20 FCC RADIATION EXPOSURE Operation is subject to the following two conditions: (1) this device may not cause This equipment complies with FCC interference, and radiation exposure limits set forth for (2) this device must accept any an uncontrolled environment. interference, including interference This equipment should be installed that may cause undesired operation of...
- Page 22 Merci pour acheter le Drift Ghost X SOUTIEN A LA CLIENTELE Télécharger le manuel complet et consulter le site officiel pour les mis- à-jour de la société, le soutien à la clientèle et les informations sur tous nos produits. https://driftinnovation.com/ Si vous avez du conseil, des commentaires ou de la préoccupation,...
- Page 23 Sommaire A propos de votre caméra | Contenu de l’emballage Initial Réglages initial | Commencer Caméra Modes Menu de paramètres 9-10 Paramètres Monter la Caméra 12-13 Présentation des fonctionnalités Guide d’accessoires Wi-Fi + App Connecter votre Caméra 17-18 Spécifications 19-21 Divulgations...
- Page 24 A propos de votre caméra Bouton arrière Bouton du milieu Bouton avant L’état de LED Lentille rotative Module de batterie Module de verrouillage Wi-Fi LED Ecran arrière Microphone Bouton de réinitialisation Cran de MicroSD Carte Mini Port USB 10 broches Couvercle en caoutchouc...
- Page 25 Contenu de l’emballage initial Ghost X Caméa Clip universel Support adhésif plat Support adhésif incurvé Outil de réinitialisation Convertisseur USB-Mic MiniUSB Câble...
- Page 26 Réglages initial Découvrir le cran de microSD en soulevant son couvercle en caoutchouc. Insérer une carte microSD / HC / XC de classe 10 ou supérieure (jusqu’à 128 GB). Format avant la première utilisation! Découvrir le mini port USB en soulevant son couvercle en caoutchouc Connecter le caméra par un câble mini-USB à...
- Page 27 Commencer ALLUMER/ ETEINDRE Appuyer et maintenir le bouton pour allumer. L’écran arrière s’allume, affichant l’affichage de bienvenue. L’appareil photo est maintenant prêt à enregistrer une vidéo ou à prendre des photos. Le mode de caméra actuel est indiqué par la couleur de l’état de LED et l’écran arrière, ainsi que l’icône en haut à...
-
Page 28: Caméra Modes
Caméra Modes MODE DE VIDEO MODE DE TIMELAPSE (LED vert) Appuyer sur le bouton pour ( LED violet) Appuyer le bouton commencer à enregistrer. Le LED d’état et le pour capturer une série d’images à un rétroéclairage LCD clignotent en rouge pour taux spécifié. -
Page 29: Menu De Paramètres
Menu de Paramètres SETTINGS MENU NAVIGATION A l’arrivée au menu des paramètres, la case noire en surbrillance se trouve en haut, mettant en surbrillance l’icône du menu de paramètres comme position de départ. Appuyer sur le bouton pour naviguer vers le bas, cela met en surbrillance le réglage suivant ;... -
Page 30: Paramètres
Paramètres Wi-Fi OFF / ON Champ de vision 90° / 115° / 140° Exposition -2 / -1 / 0 / +1 / +2 Retardateur OFF / 3S / 5S / 10S Débit binaire Filtres NORMAL / VIVID / LOW LIGHT ISO Sensitivité... - Page 31 Paramètres LED Etat Indicateur OFF / ON Enregistrement instantané OFF / ON Date YY/MM/DD HH/mm Date de timbre OFF / ON Camera Off NEVER / 2MIN / 5MIN / 10MIN / 20MIN THM Files ON / OFF Language EN / CN Reset Settings YES / NO Format SD Card...
-
Page 32: Monter La Caméra
Monter la Caméra Fixer le clip universel sur la caméra dans n’importe quelle orientation à 360 ° selon les besoins - d’abord fixer le clip dans l’orientation desirée, puis fixer-le en tournant la base de la vis à la main. Faites glisser le clip universel dans le support choisi, en assurant qu’il s’enclenche en place. -
Page 33: Présentation Des Fonctionnalités
Présentation des fonctionnalités DVR MODE DE VOITURE Ce mode de transfert est idéal pour l’assurance et la sécurité. Le métrage d’enregistrement de la caméra est dans un enregistrement en boucle continue (DVR Intervals) boucle après boucle jusqu’à ce qu’elle remplisse la carte MicroSD. - Page 34 Présentation des fonctionnalités MODE DU DEMARRAGE INSTANE L’activée du mode du démarrage instané permet à la caméra de s’allumer et de démarrer l’enregistrement en appuyant simplement sur le bouton DEBIT BINAIRE FILTRE Les utilisateurs peuvent choisir à Régler adaptable rapidement les conserver la compression normale paramètres de vos caméras aux qui est utilisée par le codec H.264 , ou...
-
Page 35: Guide D'accessoires
Il peut être utilisé à Le support de guidon L’accessoire idéal pour n’importe où à presque Drift est un accessoire monter votre Ghost X n’importe quel angle, le parfait pour les pilotes de sur toute surface plate et support de pivot Drift est n’importe quelle discipline. -
Page 36: Wi-Fi + App
Wi-Fi + App Pour allumer le Wi-Fi de votre Ghost X, appuyer simplement sur le bouton vert du Wi-Fi et maintener-le jusqu’à l’indicateur de LED indique que le Wi-Fi est activé. Le Wi-Fi peut être aussi activé par le menu des paramètres de la caméra. -
Page 37: Connecter Votre Caméra
Connecter Votre Caméra CONNECTER AVEC UN ORDINATEUR Connecter la camera en utilisant le cable USB (offrit);l’écran de camera affichera une icône USB. Le fichier de camera peut s’ouvrir automatiquement; sinon utilizer Mon ordinateur. La caméra doit être reconnu comme un disque amovible. double-cliquer pour ouvrir. - Page 38 Spécifications Video Resolution and Frame Rates: 1080P (1920 X 1080 16:9) 25 / 30 FPS 960P (1280 x 960 4:3) 25/ 30 FPS 25 / 30 / 50 / 60 FPS 720P (1280 X 720 16:9) 25 / 30 /50 / 60 FPS WVGA (854 x 480 16:9) Format du dossiert: .MP4 (H.264 codec)
- Page 39 Spécifications Ports Entrées: Mini-USB 10 Pin. Microphone extérieur via adaptateur USB. Connectivité: A/V et HDMI via adaptateur USB. Puissance: USB Plug And Play, Batterie Internet 1500mAh, + batterie externe 500mAh inclus. Fréquence Wi-Fi: 2.4GHz Dimensions Caméra: 43 (W) x 82.2 (L) x 31.4 (D) mm Poids: 120g Compatibilité:...
- Page 40 Divulgations FCC/CE Information numérique de classe B,confromement à la partie 15 de FCC. Cet appareil est conforme à la partie 15 des règles FCC. Ces limites sont conçues pour assurer une protection raisonnable contre L’opération est soumise aux deux les interférences nuisibles dans conditions suivantes: l’installation résidentielle.
- Page 41 Divulgations mesures suivantes : provoquer un fonctionnement indésirable. Réorienter ou déplacer l’antenne de réception; Augmenter la distance entre l’équipement et le récepteur; Cet equipment numérique de classe B est conforme à la norme canadienne ICES-003. Son fonctionnement Connecter l’équipement à une prise est soumis aux deux conditions d’un circuit différent de celui auquel le suivantes:...
- Page 42 Divulgations FCC EXPOSITION AUX RAYONNEMENTS Cet équipement est conforme aux limites d’exposition aux rayonnements de FCC indiqués pour un environnement non-contrôlé.Cet équipement doit être installé et utilisé dans une distance minimale de 20 cm entre le radiateur et vous. Cet émetteur ne doit pas être situé ou fonctionner conjointement avec une autre antenne ou un autre émetteur.
- Page 43 Vielen Dank für Ihren Einkauf des Drift Ghost X KUNDENDIENST Laden Sie ein vollständiges Handbuch herunter und suchen Sie unsere offizielle Webseite für Aktualisierung der Firmware, Kundendienst und Informationen zu allen unseren Produkten. https://driftinnovation.com/ Wenn Sie Vorschläge, Meinungen oder Bedenken haben; Bitte wenden Sie sich unter: support@driftinnovation.com an unser...
- Page 44 Inhaltsverzeichnis Über Ihre Kamera | Verpackter Inhalt Ersteinstellung | Anfangen Kameramodi Einstellungsmenü 9-12 Einstellung Montage der Kamera 14-15 Funktionsüberblick Zubehöranleitung WLAN+ Firmware Anschließen der Kamera 19-20 Spezifikationen 21-23 Offenlegungen...
- Page 45 Über Ihre Kamera Hintere Taste Mittlere Taste Vordere Taste Status-LED Rotierendes Objektiv Batteriemodul Modulriegel LED von WLAN Heckscheibe Mikrofons Rückstelltaste Taste MicroSD Kartenschlitz 10-poliger Mini-USB-Anschluss Gummiabdeckung...
- Page 46 Verpackter Inhalt Kamara Ghost X Universaler Klipp Flache Klebehalterung Gebogene Klebehalterung Rückstellung Werkzeugs USB-Mikrofon-Konverter Mini-USB-Kabel...
- Page 47 Ersteinstellung Heben Sie den microSD-Kartenschlitz durch Anheben der Gummiabdeckung Stecken Sie eine microSD / HC / XC-Karte auf der Klasse 10 oder höher (maximal 128 GB) ein. Formatieren Sie vor dem ersten Gebrauch! Öffnen Sie den Mini-USB-Anschluss, indem Sie die Gummiabdeckung anheben Schließen Sie über ein Mini-USB-Kabel an einen mit Strom versorgten USB- Anschluss die Kamera an und laden Sie für 2,5 Stunden vor dem ersten Gebrauch den Akku auf.
- Page 48 Anfangen EIN-/AUSSCHALTEN Drücken Sie die Taste zum Einschalten an. Der hintere Bildschirm schaltet sich ein und zeigt das Anfangsbildschirm an. Die Kamera ist jetzt bereit, Videos aufzunehmen oder Fotos aufzunehmen. Der aktuelle Kameramodus wird durch die Farbe der Status-LED und des hinteren Bildschirms angezeigt, zusammen mit dem Symbol oben links auf dem hinteren Bildschirm.
-
Page 49: Kameramodi
Kameramodi VIDEOMODUS ZEITRAFFER-MODUS (Grüne LED) Drücken Sie die Taste , um Violette LED) Drücken Sie die Taste mit der Aufnahme zu beginnen. Die Status-LED , um eine Reihe von Standbildern mit einer und die LCD-Hintergrundbeleuchtung blinken bestimmten Geschwindigkeit aufzunehmen. rot, um die Aufnahme anzuzeigen. Drücken Die Status-LED und der LCD-Bildschirm Sie die Taste erneut, um die Aufnahme zu... -
Page 50: Einstellungsmenü
Einstellungsmenü NAVIGATION DES EINSTELLUNGSMENÜ Nach dem Eintreffen im Einstellungsmenü befindet sich das schwarze Markierungsfeld auf dem Bildschirm und hebt das Symbol des Einstellungsmenüs als Startposition hervor. Drücken Sie die Taste , um nach unten zu navigieren. Dadurch wird die nächste Einstellung hervorgehoben. Drücken Sie die Taste , um nach oben zu rollen. - Page 51 Einstellungen Sichtfeld 90° / 115° / 140° Belichtung -2 / -1 / 0 / +1 / +2 Selbstauslöser AUS / 3S / 5S / 10S Video-Bitrate HOCH / MITTEL / NIEDRIG NORMAL / LEBHAFT / SCHWACHLICHT Videofilter 100 / 200 / 400 / 800 / AUTO Video-Tagging JA / NEIN Video-Tagging-Intervall...
- Page 52 Einstellungen Statusanzeige-LED AUS / AN Wi-Fi AUS / AN / IMMER AN Kopplung der Fernbedienung JA / NEIN Sofortaufnahme JA / NEIN Videostandard ALLE / NTSC / PAL / KINO Datum YYYY/MM/DD HH/mm Datumsanzeige AUS / AN Standard Startmodus LETZTE SITZUNG FORTSETZEN / VIDEO / BILD / ZEITRAFFER / SERIENBILD / VIDEO + BILD Kamera aus NEIN / 2MIN / 5MIN / 10MIN / 20MIN...
- Page 53 Einstellungen WLAN AUS / EIN Sichtfeld 90° / 115° / 140° Belichtung -2 / -1 / 0 / +1 / +2 Selbstauslöser OFF / 3S / 5S / 10S Bitrate Filter HIGH / MEDIUM / LOW ISO-Empfindlichkeit NORMALES / ANSCHAULICHES / NIEDRIGES LICHT Video-Markierung 100 / 200 / 400 / 800 / AUTO Video- Markierungsintervall...
- Page 54 Einstellungen LED-Statusanzeige AUS / EIN Sofortaufnahme AUS / EIN Datum TT/MM/JJ SS/MM Datumsstempel AUS / EIN Kamera aus NIE / 2MIN / 5MIN / 10MIN / 20MIN THM-Dateien AUS / EIN Sprache EN / CN Einstellungen zurücksetzen JA / NEIN SD-Karte formatieren JA / NEIN Seriennummer...
-
Page 55: Montage Der Kamera
Montage der Kamera Befestigen Sie den Universalen Klipp in beliebiger 360 ° Richtung an der Kamera. Stellen Sie zuerst den Klipp in der gewünschten Richtung auf und sichern Sie ihn dann, indem Sie den Schraubenfuß mit einer Hand drehen. Schieben Sie den Universalen Klipp in die gewählte Halterung und achten Sie darauf, dass er einrastet. -
Page 56: Funktionsüberblick
Funktionsüberblick AUTO-DVR Dieser manuelle Modus ist ideal geeignet zu versichern und sichern. Die Kamera zeichnet sich in einem kontinuierlichen Schleifen-Stil (DVR-Intervall) auf, um Schleife-nach-Schleife aufzunehmen, bis sie die MicroSD-Karte füllt. Sobald sie voll sind, werden die ältesten Schleifen gelöscht, wenn die neueren gespeichert werden. - Page 57 Funktionsübersicht SOFORT EINSCHALTEN-MODUS Wenn der Sofort-Einschalten-Modus aktiviert ist, kann die Kamera eingeschaltet und die Aufnahme mit einer einzigen Taste gestartet werden BITRATE FILTER Benutzer können wählen, die vom Mit Filtern ist die Einstellung der H.264-Codec verwendete normale Kamara schnell anzupassen, um Komprimierung zu beibehalten, oder der Aufnahmebedingungen zu wenn sie dies bevorzugen, ist ein...
-
Page 58: Zubehöranleitung
Das ideale Accessoire kann beinahe in jedem das perfekte Accessoire für die Befestigung Ihrer Winkel und überall befestigt für Fahrer jeglicher Ghost X auf jeglicher werden und ermöglicht Disziplin. Kompatibel mit glatten, löcherfreien Ihnen die Aufnahme Lenkstangen zwischen Oberfläche. Der Saugnapf... -
Page 59: Wlan+ Firmware
Redigieren und Übertragung vor Ort ein. INSTALLIERUNG DER FIRMWARE Laden Sie die neueste Firmware von der Webseite von Drift herunter und kopieren Sie die Datei von Ghost_X.bin- in das Stammverzeichnis einer formatierten microSD- Karte. Setzen Sie die Karte von microSD in die Kamera ein und schalten Sie sie ein. -
Page 60: Anschließen Der Kamera
Anschließen der Kamera VERBINDUNG MIT EINEM PC Schließen Sie die Kamera mit dem USB-Kabel (mitgeliefert) an. Auf dem Kamerabildschirm wird ein USB-Symbol angezeigt. Der Ordner der Kamera wird möglicherweise automatisch geöffnet. Wenn nicht, öffnen Sie Meinen Computer. Die Kamera soll als Wechselplatte erkannt werden. Klicken Sie zum Öffnen doppel. -
Page 61: Spezifikationen
Spezifikationen Videoauflösung und Bildraten: 1080P (1920 X 1080 16:9) 25 / 30 FPS 960P (1280 x 960 4:3) 25/ 30 FPS 720P (1280 X 720 16:9) 25 / 30 / 50 / 60 FPS 25 / 30 /50 / 60 FPS WVGA (854 x 480 16:9) .MP4 (H.264 Kodierer) Datei:... - Page 62 Spezifikationen DE 20 Eingänge: Mini-USB 10-polig. Externes Mikrofon per USB-Adapter Ausgänge: A/V und HDMI per USB-Adapter Konnektivität: USB Plug And Play, Leistung: 1500mAh intern, 500mAh modularer Akku enthalten. WLAN-Frequenz: 2.4GHz Kameramaße: 43 (W) x 82.2 (L) x 31.4 (D) mm Gewicht: 120g Kompatibilität:...
-
Page 63: Offenlegungen
Offenlegungen Information von FCC/CE B. Diese Grenzwerte sollen einen angemessenen Schutz gegen Dieses Gerät entspricht dem Teil 15 schädliche Störungen in einer der FCC-Regeln. Wohnanlage bieten. Dieses Gerät Der Betrieb unterliegt den folgenden kann Hochfrequenzenergie erzeugen zwei Bedingungen: und verwenden und abstrahlen. (1) Dieses Gerät darf keine schädlichen Wenn es nicht in Übereinstimmung Störungen verursachen, und... - Page 64 Offenlegungen DE 22 den Abstand zwischen dem Gerät und Dieses digitale Gerät auf der Klasse dem Empfänger; [B] entspricht der kanadischen Norm ICES-003. Son fonctionnement Schließen Sie das Gerät an eine est soumis aux deux Bedingungen Steckdose an, die nicht mit dem suivantes: Empfänger verbunden ist.
- Page 65 Offenlegungen FCC-STRAHLUNGSBELICHTUNG : Dieses Gerät entspricht den FCC-Grenzwerten für Strahlenbelastung, die für unkontrollierte Umgebung gelten. Dieses Gerät soll mit einem Mindestabstand von 20 cm zwischen dem Heizkörper und Ihrem Gehäuse installiert und betrieben werden. Dieser Sender darf nicht zusammen mit einer anderen Antenne oder einem anderen Sender betrieben werden.
- Page 66 Gracias por comprar la cámara Drift Ghost X ATENCIÓN AL CLIENTE Descarga el manual completo y visita nuestro sitio web oficial para actualizaciones de firmware, atención al cliente e información acerca de todos nuestros productos. https://driftinnovation.com/ Si tienes alguna sugerencia, comentario o pregunta, ponte en contacto con nuestro equipo de atención al cliente en:...
- Page 67 Contenidos Sulla Telecamera | Contenuti della Confezione Impostazione Iniziale | Introduzione Modalità della Telecamera Menu di Impostazioni 9-10 Impostazioni Montare la Telecamera 12-13 Riepilogo sulle Funzioni Guida agli Accessori Wi-Fi + Firmware Connettere la Telecamera 17-18 Specifiche 19-21 Informative...
- Page 68 Acerca de la Cámara Botón trasero Botón Central Botón Delantero Indicador LED de Estado Lente Giratoria Módulo de la Batería Pestillo del Módulo LED del Wi-Fi Pantalla Trasera Micrófono Botón de Reinicio Ranura de Tarjeta MicroSD Puerto MINI USB 10 pines Cubierta de Goma...
- Page 69 Contenido del Paquete Drift Ghost X Clip Universal Soporte Adhesivo Plano Soporte Adhesivo Curvo Herramienta de restaura Convertidor USB-Micrófono Cable Mini-USB...
- Page 70 Configuración Inicial Destapar la ranura microSD levantando la tapa de goma. Insertar una tajeta microSD/HC/XC clase 10 o superior (hasta 128GB). ¡Formatear antes de usar por primera vez! Destapar el puerto mini USB levantando la tapa de goma. Conectar la cámara a través de un cable mini USB a un puerto USB con alimentación, y cargar la batería durante 2.5 horas antes de utilizarla por primera vez.
- Page 71 Introducción ENCENDIDO/APAGADO Presionar y mantener el botón para encender. La Pantalla Trasera se encenderá, mostrando la ventana de bienvenida. La cámara ya está lista para grabar vídeos o realizar fotografías. El modo actual de la cámara se indica con el color del indicador LED de estado y en la Pantalla Trasera, junto con el icono en la esquina superior izquierda de la Pantalla Trasera.
- Page 72 Modos de la Cámara MODO DE VÍDEO MODO DE LAPSO (LED verde) Pulsar el botón para comenzar (LED violeta) Pulsar el botón para a grabar. El indicador LED de estado y la luz LCD capturar una serie de imágenes fijas a una trasera parpadearán en rojo para indicar que se velocidad específica.
- Page 73 Menú de Configuración NAVEGAR POR EL MENÚ DE CONFIGURACIÓN Al llegar al menú de configuración, la celda negra destacada aparecerá en la zona superior, destacando el icono de Menú de Configuración en la esquina izquierda; la posición inicial. Pulsar el botón para navegar por las opciones, lo cual destacará...
- Page 74 Ajustes Wi-Fi APAGADO / ENCENDIDO Campo de visión 90° / 115° / 140° Exposición -2 / -1 / 0 / +1 / +2 Temporizador automático APAGADO / 3S / 5S / 10S Velocidad de bits de vídeo ALTO / MEDIO / BAJO NORMAL / INTENSO / POCA LUZ Filtro de vídeo 100 / 200 / 400 / 800 / AUTO...
- Page 75 Ajustes Indicador LED de estado APAGADO / ENCENDIDO Grabado instantáneo SÍ / NO Fecha YYYY/MM/DD HH/mm Sello de fecha APAGADO / ENCENDIDO Apagar cámara NO / 2MIN / 5MIN / 10MIN / 20MIN Archivos THM ENCENDIDO / APAGADO Idioma EN / CN Restablecer ajustes SÍ...
- Page 76 Montaje de la Cámara Fijar el Clip Universal a la cámara en la orientación 360° según se requiera – primero colocar el clip en la orientación deseada, y a continuación asegurarlo girando la base de rosca manualmente. Enganchar el Clip Universal en el soporte elegido, y asegurarse de que está correctamente colocado al escuchar el “clic”.
- Page 77 Resumen de las Características MODO DVR PARA VEHÍCULOS Este modo sin manos es ideal para propósitos de seguros y protección. La cámara graba secuencias en bucles continuos (intervalos DVR), grabando bucle tras bucle hasta que llena la Tarjeta MicroSD. Una vez llena, el bucle más antiguo se borrará...
- Page 78 Resumen de las Características VELOCIDAD DE BITS FILTRO Los usuarios pueden elegir mantener Personaliza rápidamente la la compresión normal empleada configuración de tu cámara a las por el códec H.26 o, si lo prefieren, condiciones de grabación con filtros. permitir un mayor flujo de datos para Elige entre Normal / Intenso / Poca luz / Agua.
- Page 79 Ajustable en cualquier lugar El Soporte de Manillar El accesorio idea para en prácticamente cualquier Drift es el mejor ajustar tu Ghost X a ángulo, el Soporte de Eje accesorio para cualquier superficie plana es la herramienta perfecta deportistas sobre ruedas, no porosa.
- Page 80 Ajuste su tiro, captura, vea, edita y transmite en vivo con su dispositivo movil. INSTALACIÓN DE FIRMWARE Descargar el firmware más reciente del sitio web de Drift y copiar el archivo Ghost_X.bin en la raíz de una tarjeta micro SD formateada. Insertar la tarjeta micro SD en la cámara y encender.
- Page 81 Conectar la Cámara CÓMO CONECTARLA A UNA PC Conecte la cámara usando el cable USB (incluido). La cámara le mostrará un ícono de USB. Es probable que la carpeta de la cámara se abra es a si automáticamente, si no abra la carpeta Mi PC. La cámara debería aparecer como una unidad extraíble.
- Page 82 Especificaciones Técnicas Resolución de Vídeo y Frecuencia de Fotogramas: 1080P (1920 X 1080 16:9) 25 / 30 FPS 960P (1280 x 960 4:3) 25/ 30 FPS 720P (1280 X 720 16:9) 25 / 30 / 50 / 60 FPS 25 / 30 / 50 / 60 FPS WVGA (854 x 480 16:9) Formato de archivo: .MP4 (H.264 codec)
- Page 83 Especificaciones Técnicas Entradas: Mini USB de 10 Pin. Micrófono externo a través de adaptador USB. Salidas: A/V y HDMI a través de adaptador USB. Conectividad: USB Plug And Play Potencia: 1500mAh interna, batería 500mAh modular incluída. Frecuencia de Wi-Fi: 2.4GHz Dimensiones de la Cámara: 43 (W) x 82.2 (L) x 31.4 (D) mm Peso:...
- Page 84 Declaración de Conformidad Información sobre normas por el responsable del de la FCC cumplimiento pueden Este dispositivo cumple con invalidar la autoridad del la sección 15 de las normas usuario para operar el equipo. de la FCC Se ha probado y comprobado El funcionamiento está...
- Page 85 Declaración de Conformidad que no haya interferencias Este equipo cumple con las en alguna instalación normas industriales exentas de determinada. Si este licencia de RSS del Canadá. equipo causa interferencias El funcionamiento está sujeto a perjudiciales a la recepción las dos siguientes condiciones: de radios o televisores, (1) que el dispositivo no que puede determinarse al...
- Page 86 Declaración de Conformidad EXPOSICIÓN A LA RADIACIÓN DE LA FCC: Este equipo cumple con los límites de exposición a la radiación de la FCC establecidos para un entorno no controlado. Este equipo debe instalarse y operarse con una distancia mínima de 20 cm entre el radiador y tu cuerpo.
- Page 87 Grazie per aver acquistato la videocamera Drift Ghost X SUPPORTO CLIENTI Scaricare il manuale completo e consultare il nostro sito ufficiale per firmware, aggiornamenti, supporto clienti e informazioni su tutti i nostri prodotti. https://driftinnovation.com/ Se hai qualsiasi suggerimenti, commenti o sollecitudini, contattare la nostra squadra di supporto clienti presso: support@driftinnovation.com...
- Page 88 Contenuti Sulla Telecamera | Contenuti della Confezione Impostazione Iniziale | Introduzione Modalità della Telecamera Menu Impostazioni 9-10 Impostazioni Montare la Telecamera 12-13 Riepilogo sulle Funzioni Guida agli Accessori Wi-Fi + Firmware Connettere la Telecamera 17-18 Specifiche 19-21 Informative...
- Page 89 Sulla Telecamera Pulsante Posteriore Pulsante Centrale Pulsante Frontale LED di Stato Lente Rotante Modulo Batteria Modulo per Aggancio LED di Wi-Fi Schermo Posteriore Microfono Pulsante di Resettaggio Slot Scheda MicroSD Porta Mini USB a 10 Pin Coperchio in Gomma...
- Page 90 Contenuti della Confezione Telecamera Ghost X Clip Universale Supporto Adesivo Plano Supporto Adesivo Curvo Strumento di Resettaggio Convertitore USB-Mic Cavo MiniUSB...
- Page 91 Impostazione Iniziale Aprire il coperchio dello slot per microSD sollevando il coperchio in gomma. Inserire una scheda microSD/HC/XC di Classe 10 o superiore (fino a128GB) Formattare prima dell’utilizzo! Aprire la porta mini USB sollevando il coperchio in gomma Connettere la telecamera attraverso un cavo mini USB a una porta alimentata, e caricare la batteria per 2,5 ore prima del primo utilizzo.
- Page 92 Introduzione ACCENDERE / SPEGNERE Tenere premuto il pulsante per accendere. Si accenderà lo Schermo Posteriore, mostrando l’immagine di benvenuto. La telecamera è ora pronta per registrare video o per scattare foto. La modalità corrente della telecamera viene indicata con il colore del LED di Stato e dallo Schermo Posteriore, insieme all’icona in alto a sinistra dello Schermo Posteriore.
-
Page 93: Modalità Della Telecamera
Modalità della Telecamera MODALITÀ TIMELAPSE MODALITÀ VIDEO (LED Viola) Premere il pulsante (LED Verde) Premere il pulsante catturare una serie di immagini fermi a iniziare la registrazione. Il LED di Stato e la una velocità specifica. Il LED di Stato e lo retroilluminazione LCD si lampeggeranno di schermo LCD lampeggeranno con luce rossa rosso per indicare la registrazione. -
Page 94: Menu Di Impostazioni
Menu di Impostazioni NAVIGARE IL MENU DI IMPOSTAZIONI 1. Una volta arrivati al menu di impostazioni, la striscia nera di selezione rimane in cima, evidenziando l’icona di Menu di Impostazioni come la posizione di partenza. 2. Premere il pulsante per navigare verso il basso, selezionando l’impostazione successiva. -
Page 95: Impostazioni
Impostazioni Wi-Fi OFF / ON Campo di Vista 90° / 115° / 140° Esposizione -2 / / -1 / 0 / +1 / +2 Timer Automatico OFF / 3S / 5S / 10S Velocità Bit ALTO / MEDIO / BASSO Filtri NORMALE / VIVIDO / LUCE BASSA Sensitività... - Page 96 Impostazioni Indicatore di Stato LED Registrazione OFF / ON Istantanea OFF / ON Data AA/MM/GG HH/mm Stampa Data OFF / ON Camera Spenta MAI / 2MIN / 5MIN / 10MIN / 20MIN Documenti THM ON / OFF Lingua EN / CN Impostazioni di Resettaggio SÌ...
-
Page 97: Montare La Telecamera
Montare la Telecamera Attaccare il Clip Universale sulla telecamera in qualsiasi direzione a 360° secondo le necessità - prima posizionare il clip nella direzione desiderata, poi fissarla ruotando la vite sulla base con la mano. Far scivolare il Clip Universale nel supporto scelto, assicurando che scatti in sede. -
Page 98: Riepilogo Sulle Funzioni
Riepilogo sulle Funzioni MODALITÀ VEICOLO DVR Questa modalità a mani libere è ideale per scopi di assicurazione e sicurezza. La telecamera registra filmati nello stile di ciclo continuo (Intervalli DVR), registrando ciclo dopo ciclo finché la Scheda MicroSD è piena. Una volta piena, i cicli più vecchi verranno cancellati mentre quelli nuovi vengono salvati. - Page 99 Riepilogo sulle Funzioni VELOCITÀ BIT FILTRO Gli utenti possono scegliere di Personalizzare velocemente le mantenere la compressione normale impostazioni della telecamera per usata da H.264 codec, oppure se registrare in condizioni con filtro. preferiscono, permettere un flusso di Scegliere tra Normale / Vivido / Luce dati più...
-
Page 100: Guida Agli Accessori
ATTACCO A VENTOSA Montabile dovunque L’attacco manubrio L’accessorio ideale per vicino a ogni angolo, Drift è l’accessorio montare il Ghost X su l’Attacco Girevole Drift è perfetto per i ciclisti, qualsiasi superficie piana il perfetto strumento per qualsiasi sia la disciplina. -
Page 101: Wi-Fi + Firmware
Imposta le riprese, registrazioni, riproduzioni, modifiche e streaming in diretta sul dispositivo mobile. INSTALLARE IL FIRMWARE Scaricare la versione più recente di firmware dal sito Drift e copiare il file Ghost_X.bin sotto una scheda microSD formattata. Inserire la scheda microSD nella telecamera e accendere. -
Page 102: Connettere La Telecamera
Connettere la Telecamera CONNETTERE A UN PC Connettere la telecamera usando il cavo USB (fornito); lo schermo della telecamera mostrerà un’icona USB. La cartella della telecamera dovrebbe aprirsi in automatico; se ciò non accade, aprire attraverso il Computer. La telecamera deve essere riconosciuta come un disco rimovibile; fare un doppio click per aprire. - Page 103 Specifiche Risoluzione del Video e Frequenza dei Fotogrammi: 1080P (1920 X 1080 16:9) 25 / 30 FPS 960P (1280 x 960 4:3) 25/ 30 FPS 720P (1280 X 720 16:9) 25 / 30 / 50 / 60 FPS 25 / 30 / 50 / 60 FPS WVGA (854 x 480 16:9) .MP4 (H.264 codec) Formato File:...
- Page 104 Specifiche Ingresso: Mini USB a 10 Pin. Microfono Esterno attraverso adattatore USB Uscita A/V con Adattatore USB Uscite: USB Collega e Usa, Mini USB a 10 Pin. Connettività: 1500mAh interna, Potenza: 500mAh inclusa batteria modulare. 2.4GHz Frequenza Wi-Fi: 43 (W) x 82.2 (L) x 31.4 (D) mm Dimensioni Videocamera: 120g Peso:...
- Page 105 Informative Informazione FCC/CE della parte 15 dei Regolamenti FCC. Questi limiti sono stati progettati per Questo dispositivo rispetta con la offrire una protezione ragionevole Parte 15 dei Regolamenti FCC. contro interferenze dannose in L’operazione è soggetta alle seguenti un’installazione due condizioni: domestica.
- Page 106 Informative IT 20 Aumentare la separazione tra normativa canadese ICES-003. Son l’attrezzatura e il ricevitore; fonctionnement est soumis aux deux conditions suivantes: (1) Cet appareil ne peut pas causer Connettere l’attrezzatura a un’uscita l’intervention, et su un circuito differente da quello il ricevitore è...
- Page 107 Informative ESPOSIZIONE A RADIAZIONI FCC Questo dispositivo è conforme ai limiti di esposizione alle radiazioni FCC definiti per un ambiente non controllato. Questo apparecchio dovrebbe essere installato e messo in funzione ad una distanza minima di 20 centimetri tra il radiatore & il corpo. Questo trasmettitore non deve essere collocato o utilizzato in congiunzione con qualsiasi altra antenna o trasmettitore.
- Page 108 感谢购买Drift Ghost X款相机 客户支持 下载完整使用手册,在我们的官方网站关注我们产品所有的固件更新、 客户支持和其他信息。 https://driftinnovation.com/ 如果您有任何建议、评价或问题,请按下列链接联系我们的客户支持团队 support@driftinnovation.com 保修 如果产品因不当使用、意外事故、火灾、冰冻、进水、疏忽或不按照操作 指南操作等造成的损坏不保修。关于保修的详细信息参见下列链接: https://driftinnovation.com/warranty...
- Page 109 目录 关于您的相机|包装明细 初始设置 | 入门教程 相机模式 设置菜单 9-10 设置 安装相机 功能纵览 12-13 配件说明 Wi-Fi +固件 连接您的相机 产品规格 17-18 信息说明 | 关注我们 18-21...
- Page 110 关于您的相机 Wi-Fi 按键 切换按键 电源键/拍摄键 状态指示灯 旋转镜头 电池模块 模块锁 Wi-Fi 指示灯 LCD 屏 麦克风 复位键 TF 卡槽 10 pin Mini USB口 橡胶盖...
- Page 111 包装明细 Ghost X 摄像机 标准万用扣 平面3M 贴 弧面3M 贴 复位工具 USB-麦克风转接器 Mini USB 线...
- Page 112 安装 向上拉橡胶盖打开SD卡槽。 插入Class 10的SD卡或更高的SD/HC/XC卡(最大128GB),使用前先格式化! 向上拉橡胶盖,露出Mini USB 口 用Mini USB线连接相机和USB口,在使用前充电2.5小时。 GHOST 4K 盖好SD卡槽和USB口的橡胶盖。可以开始使用了!...
- Page 113 开始使用 接通/关闭电源 长按 按键接通电源。 LCD 屏启动,显示欢迎界面。 相机可以录制视频或拍照。 当前相机模式通过状态指示灯和后屏的颜色表示,也可由后屏左上方的图标表示。 长按 键3秒关闭电源。 模式图标 模式导航 若想改变当前的相机拍摄模式,请按此按钮 ,自由切换视频模式,照片模 式,延时拍照模式,连拍模式,以及设置模式...
- Page 114 相机模式 视频模式 连拍模式 (绿色指示灯)按下 键开始录制。状 (青色指示灯)按下 键后,相机在 态指示灯闪动红色,表示开始录制 。 规定的时间内以规定速率拍摄一组静止 再次按下 键停止录制。 照片。为了达到最佳效果,请尽可能地 使用高速率TF卡。 视频设置 连拍设置 • 分辨率 • 帧率 • 分辨率 • 连拍时长/连拍速率 照片模式 按下 键,拍下静止图像。 设置模式 每拍摄一张照片指示灯和LCD屏闪动一次 红色。 在设置模式下按下 键,该设置高 亮。按下 键切换高亮设置选项。 拍照设置 • 分辨率 延时模式 (紫色指示灯)按下 键以规定速率拍 摄一系列静止照片。每拍下一张照片,状...
- Page 115 设置菜单 设置菜单导航 在设置菜单界面,高亮的黑色区域在上端,设置菜单高亮,为开始位置。 键一下,下移高亮光标。 按 键,高亮光标向上移动。 长按 按 键切换该设置的选项。 任何时候按下 键返回视频拍摄模式。 在本例中按下 将高亮区 域移到下一个设置,再按一 次移到‘Exposure(曝光)。 在第3步图中,按下 将 FOV(视野范围)从140°切 换到115°...
- Page 116 设置 Wi-Fi 开/关 视野范围 90° / 115° / 140° 曝光 -2 / -1 / 0 / +1 / +2 定时 关 / 3秒 / 5秒 / 10秒 比特率 高 / 中/ 低 滤镜 正常 / 生动 / 低光 ISO 敏感度 100 / 200 / 400 / 800 / 自动...
- Page 117 设置 CN 10 状态指示灯 OFF / ON 即时拍摄 OFF / ON 日期 YY/MM/DD HH/mm OFF / ON 时间水印 默认启动模式 继续上次会话 / 视频 / 照片 / 延时拍摄 / 连拍 永不 / 2分 / 5分 / 10分 / 20分 相机关闭 关 / 开 THM文件...
- Page 118 安装相机 按照您的需要,将镜头夹按任意360度方向连到相机。首先,将镜头夹放在理 想的方向,然后用手转动螺钉脚进行固定。 将镜头夹滑入您选择的支架,确保其固定到位。 *请推动镜头夹,以仔细检查 它已完全插入。 调整镜头。用手转动镜头,使用镜头标记作为“上升”参考,将它与地面垂直, 以确保方向正确。 镜头标记...
- Page 119 功能纵览 CN 12 车载记录仪模式 这种不需要人工干预的模式十分方便安全的。 相机会按照记录仪间隔设置,持续的分文件录影,直到MicroSD卡录满。 一旦录满,旧视频文件将被删除,而最新的循环将被保存。记录仪间隔可为10 秒,30秒,1分钟,2分钟,5分钟或10分钟。 视频标记 一旦激活,此功能可让相机持续录影,但只有重要的镜头被“标记”时才会保存。 当进入该模式时,按 按钮,将保存之前和未来一段时间的视频。 例如,若选择30秒的视频标记间隔,相机将保存之前的30秒,以及未来的30秒, 即共计1分的“标记”镜头。 视频标记功能要求可用空间为4GB的 Class 10 micro SD卡,才可以正常运行。 即时模式 启用即时模式可开启相机。只需在关机的时候,轻按一下开机键 , 即可立即开始拍摄。...
- Page 120 功能纵览 比特率 滤镜 用户可选择保持H.264编解码器的正常压 快速根据滤镜条件调整您的相机设置。 缩,或者按照用户喜好,可以使用更高的 可选择正常/生动/低光。 数据流量,保存更多的原始记录。这样文 件会更大。...
- Page 121 配件指南 CN 14 支点支架 吸盘支架 车把支架 几乎可按任意角度在任 无论您的要求如何,Drift 在任何无孔平面安装您 何地点安装,Drift 支架 车把支架都是骑手的完美 Ghost X相机的理想配 是您在任何可以想象出 配件。适配19mm到36mm 件。可在挡风玻璃或车体 的角度拍摄某个瞬间的 之间的车把,可旋转180 上使用,吸盘设计便于转 理想工具,该支架可以 度以上,本款车把支架几 向、倾斜或进行相机360° 和其他的任何Drift支架 乎可以让您在任何角度进 旋转。 组合使用。 行摄像。...
- Page 122 Wi-Fi+固件 只需按住 键即可打开Ghost X的 Wi-Fi,绿色的Wi-Fi 指示灯显示Wi-Fi可使用。也可使用相机设 置菜单打开Wi-Fi。 下载Drift生活应用APP 在您的移动设备上设置您的拍摄、图像捕捉、回放、编辑和实时播放等功能。 安装固件 从Drift网站下载最新的固件,复制Ghost_X.bin文件到已格式化的SD卡根目录。在相机 上插入SD卡,打开电源。 固件安装时,相机屏幕会显示“固件更新中”。安装完成后,相机会关闭电源。...
- Page 123 连接您的相机 CN 16 连接到电脑 使用USB线(已提供)连接您的相机;相机屏幕会显示USB图标。 相机的文件夹会自动弹出;如没有该文件夹,从我的电脑处打开该文件夹。 相机应被识别为可移动硬盘;双击打开。 打开DCIM文件夹可看到您的文件。 连接到苹果电脑 使用USB线(已提供)连接您的相机;相机屏幕会显示USB图标。 相机的文件夹会自动弹出;如没有该文件夹,使用发现功能打开它。 相机应被识别为可移动硬盘;双击打开。 打开DCIM文件夹可看到您的文件。...
- Page 124 规格 视频分辨率和帧速率: 1080P (1920 X 1080 16:9) 25 / 30 FPS 960P (1280 x 960 4:3) 25/ 30 FPS 25 / 30 / 50 / 60 FPS 720P (1280 X 720 16:9) 25 / 30 / 50 / 60 FPS WVGA (854 x 480 16:9) 文件格式: .MP4 (H.264 codec)
- Page 125 规格 CN 18 输入: 迷你 USB 10 针。 通过USB适配器外接麦克风 输出: USB适配器接A/V输出 连接: USB 即插即用, 迷你USB10针 电源: 内部1500mAh, 包括500mAh 外置电池。 Wi-Fi 频率: 2.4GHz 相机尺寸: 43 (W) x 82.2 (L) x 31.4 (D) mm 重量: 120g 适配范围 Windows XP 及以上 / Mac OS 10.2 及以上 观看1080P 视频需要有回放功能的显示屏。...
- Page 126 声明 摩托车免责声明 在骑摩托车时使用相机可能导致撞车,从而可能对您自己或 他人造成严重受伤或死亡。 •注意看路,铭记骑车安全; •请勿长时间看相机; •在调整相机前,请将车停在安全的地方。 关注我们 扫一扫关注我们的官方微博 官方微博 扫一扫关注我们的官方微信 微信订阅号 V1.0.0...
- Page 127 Find out more facebook.com/driftinnovation twitter.com/driftinnovation instagram.com/drift_innovation vimeo.com/driftinnovation DRIFTINNOVATION.COM...
Need help?
Do you have a question about the GHOST X and is the answer not in the manual?
Questions and answers
On playback the time/date stamp is huge ?.
The context does not explain why the time/date stamp is large during playback on the DRIFT GHOST X.
This answer is automatically generated