DRIFT HD Ghost Manual
Hide thumbs
Also See for HD Ghost:
- Quick manual (11 pages) ,
- User manual (22 pages) ,
- Quick start manual (20 pages)

Related Manuals for DRIFT HD Ghost


Summary of Contents for DRIFT HD Ghost
- Page 1 follow us facebook.com/driftinnovation vimeo.com/driftinnovation twitter.com/driftinnovation driftinnovation.com...
- Page 3 Hd Ghost CUSTOMER SUPPORT Check our official website for firmware updates, customer support, news about our products and videos from our users. If you have any suggestions, comments or concerns, please contact our customer support team at: support@driftinnovation.com...
-
Page 4: Table Of Contents
contents about your camera | initial setup 3—4 package contents | getting started 5—6 mode selection & settings 7—8 playback & camera settings 9—10 using the two-way remote | mounting the camera 11—12 wifi | connecting the camera 13—14 specifications 15—16 disclosures 17—18... -
Page 5: About Your Camera | Initial Setup
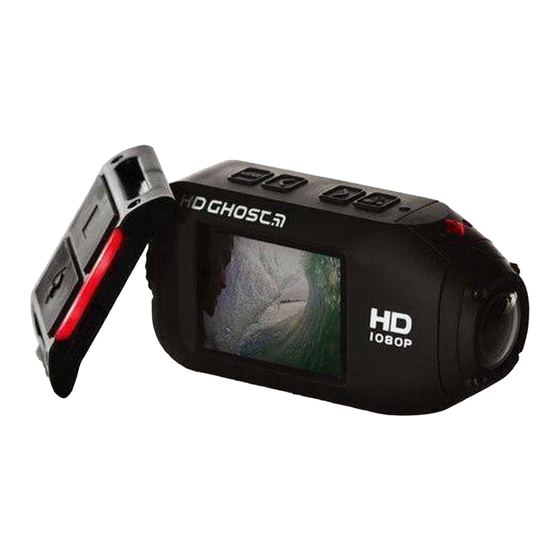
about your camera MENU / Tag / Back Button LEFT Button / Zoom Out RIGHT Button / Zoom In ACTION Button (On/Off/Rec/Stop) Status LED Rear Hatch 2.0” LCD Screen 300° Rotating Lens USB Port (Mini-B) HDMI Port (Mini-C) 3.5mm Microphone Input Micro SD Card Slot Battery Slot Cover... -
Page 6: About Your Camera | Initial Setup
initial setup 1. Unscrew and remove the 4. Connect the camera rear hatch via mini USB cable to a powered USB port and 2. Insert a Class 6 or higher charge the battery for 4 micro SD card hours before first use 3. -
Page 7: Package Contents | Getting Started
package contents Remote Control Rechargeable Battery Connector Hatch Universal Clip Mount Kit Goggle Mount... -
Page 8: Package Contents | Getting Started
getting started Wrist Strap POWER ON AND OFF MAIN MENU Press the MENU button to 1. Press and hold the enter the Main Menu. The ACTION button to power on screen will display the icons of the four menu options. 2. -
Page 9: Mode Selection & Settings
mode selection & settings Video Photo MODE SELECTION MENU VIDEO MODE The Mode Selection menu (Green LED) The camera displays the icons for the will record video when four camera modes. ACTION is pressed on the Highlight the desired mode camera or remote. - Page 10 PHOTO MODE TIMELAPSE MODE PHOTOBURST MODE (Yellow LED) The camera (Purple LED) The camera (Cyan LED) The camera will capture still images will capture a series of still will capture a burst of still when ACTION is pressed images at a specified rate images for an allotted on the camera or remote.
-
Page 11: Playback & Camera Settings
playback & camera settings PLAYBACK CAMERA SETTINGS Playback Selecting the Playback • WiFi On / Off icon will open the Mode • Mic Sensitivity Off / 1 / 2 / 3 Selection menu, and display • Speaker Volume Off / 1 / 2 / 3 the four camera mode icons. - Page 12 new features SETTING PROFILES VIDEO TAGGING The Video Tagging feature requires a micro SD card All camera settings can be When activated, this feature with 4GB of free space to saved by selecting Save allows the camera to function correctly. Settings from the Camera continuously record video, Settings menu and choosing...
-
Page 13: Using The Two-Way Remote | Mounting The Camera
using the two-way remote POWER ON AND OFF ACTION will begin recording video, capture a photo, start 1. Hold the ACTION timelapse or photoburst, button to power on depending on the camera 2. The colour of the remote mode. Pressing STOP will end control’s LED indicator video or timelapse recording. -
Page 14: Using The Two-Way Remote | Mounting The Camera
mounting the camera 1. Attach the Universal Clip 2. Slide the Universal Clip 3. Check screen alignment, to the camera in any 360° into your chosen mount, rotating the lens by hand orientation as needed— ensuring that it ‘clicks’ as necessary to realign first position the clip in into place your shot, using the... -
Page 15: Wifi | Connecting The Camera
In the Camera Settings Shot setup, record, Download the latest firmware menu, highlight the ‘WiFi’ capture & playback from the Drift website (left) option and press ACTION, on your device. and copy the .bin file to a and select P and press formatted micro SD card. -
Page 16: Wifi | Connecting The Camera
USB screen will show a USB HDMI (Type C) to full icon icon HDMI cable, available from Drift retailers. 2. The camera’s folder may 2. The camera’s folder may open automatically; if open automatically; if 2. Power on the camera... -
Page 17: Specifications
specifications Video resolution: 1080p, 720p and WVGA (16:9); 960p (4:3) File format: .MP4 / .MOV (H.264 codec) Sensor type: CMOS Frame rate:- 1080p: 25 / 30 fps 960p: 25 / 30 / 48 fps 720p: 25 / 30 / 50 / 60 fps WVGA: 25 / 30 / 50 / 60 / 100 / 120 fps Field of view:-... - Page 18 Waterproof 3m (9.84ft) Microphone: Built-in, noise reducing microphone Built-in memory: 256MB (not user accessible) Memory capacity: Micro SD memory cards up to 32GB Inputs: 3.5mm external microphone (extension included) Outputs: HDMI connector type C (cable not included) Connectivity: USB Plug and Play, mini-B USB connector Compatibility: Windows XP and up / Mac OS 10.2 and up Remote range:...
-
Page 19: Disclosures
disclosures FCC Information The equipment has been harmful interference to radio or tested and found to comply television reception, which can This device complies with Part with the limits for a Class B be determined by powering the 15 of the FCC Rules. digital device, pursuant to Part equipment on and off, the user 15 of the FCC Rules. - Page 20 This device complies with de l’intervention, y compris This transmitter must not be Industry Canada license- l’intervention qui peut causer co-located or operating in exempt RSS standard(s). l’opération non désirée de. conjunction with any other antenna or transmitter. Operation is subject to the Cet appareil numérique de la following two conditions: classe [B] est conforme à...
- Page 21 Hd Ghost SUPPORT A LA CLIENTELE Consultez notre site Web officiel pour les mises à jour du firmware, le support client, les nouveaux produits et les vidéos de nos utilisateurs. Si vous avez des suggestions, des commentaires ou des plaintes, veuillez contacter notre équipe de support client:...
- Page 22 sommaire à propos de votre caméra | installation initiale 21—22 contenu de la boîte | mise en route 23—24 sélection des modes & paramétrages 25—26 lecture & paramétrage de la caméra 27—28 utilisation de la télécommande double sens | fixation de la caméra 29—30 wifi | connecter la caméra 31—32...
-
Page 23: À Propos De Votre Caméra | Installation Initiale
à propos de votre caméra MENU / Tag / Bouton Back Bouton LEFT / Zoom Out Bouton RIGHT / Zoom In Bouton ACTION (On/Off/Rec/Stop) Statuts LED Trappe Arrière Écran LCD 2.0” Lentille rotative à 300° Port USB (Mini-B) Port HDMI (Mini-C) Prise entrée Micro 3.5mm Emplacement pour Carte Micro SD... -
Page 24: À Propos De Votre Caméra | Installation Initiale
installation initiale 1. Ouvrir et retirer la trappe 4. Connectez la caméra via arrière le mini câble USB à un port USB alimenté, et laissez 2. Insérez une micro carte SD charger la batterie pendant de Classe 6 ou plus 4 heures avant sa première 3. - Page 25 contenu de la boite Télécommande Batterie rechargeable Trappe de connexion Pince universelle Kit de fixation Fixation sur masque...
-
Page 26: Contenu De La Boîte | Mise En Route
mise en route Dragonne ALLUMER ET ÉTEINDRE L’APPAREIL MENU PRINCIPAL Appuyez sur le bouton MENU 1. Appuyez et maintenez enfoncé pour accéder au Menu Principal. le bouton ACTION pour L’écran affichera les icônes des allumer l’appareil quatre options de menu. 2. -
Page 27: Sélection Des Modes & Paramétrages
sélection de mode & paramétrages Video Photo MENU MODE SELECTION MODE VIDEO Le menu Mode Sélection (LED verte) La caméra affiche les icônes des quatre enregistrera des vidéos modes disponibles. Mettez en lorsque le bouton ACTION surbrillance le mode désiré et est actionné... - Page 28 MODE PHOTO MODE TIMELAPSE MODE PHOTOBURST (LED jaune) La caméra (LED violette) La caméra (Cyan LED) The camera will prendra des photos statiques prendra des prises de vue à capture a burst of still images en appuyant sur le bouton intervalle régulier en appuyant for an allotted duration, at a ACTION sur la caméra ou sur...
- Page 29 lecture & paramètres de la caméra LECTURE PARAMETRES CAMERA Lecture Sélectionner l’icône Lecture • WiFi On / Off ouvrira le menu Sélection de • Sensibilité Micro Off / 1 / 2 / 3 Mode, et affichera les quatre • Volume haut-parleur Off / 1 / 2 / 3 icônes de modes disponibles.
- Page 30 nouvelles fonctionnalités PARAMETRER DES PROFILS MARQUAGE VIDEO L’option Marquage Vidéo nécessite une micro carte SD Lorsqu’elle est activée, cette Tous les paramètres de avec 4GB d’espace libre pour l’appareil peuvent être fonction permet à l’appareil de fonctionner correctement. enregistrés en sélectionnant prendre des vidéos de façon l’option Enregistrer Paramètres continue, mais de sauvegarder...
- Page 31 utilisation de la télécommande 3. La télécommande s’éteindra Appuyer sur le bouton STOP automatiquement après 15s si arrêtera l’enregistrement vidéo elle ne détecte pas un appareil ou Timelapse. Appuyer sur le bouton ACTION 4. Pour la recharger, connectez la pendant un enregistrement vidéo télécommande par le biais du permettra de prendre une photo mini câble USB fourni, à...
- Page 32 fixation de l’appareil 1. Attachez la fixation 2. Faites glisser la pince 3. Vérifiez l’alignement de universelle à l’appareil universelle dans la fixation l’écran, tournez la lentille à avec l’orientation désirée. choisie en s’assurant qu’elle la main en fonction de votre Orientez d’abord la pince se clipse correctement.
-
Page 33: Wifi | Connecter La Caméra
ARRET ET ALLUMAGE TELECHARGER L’APPLICATION du firmware disponible sur le Paramétrage de Dans le menu Paramètres site Internet de Drift (gauche) de l’appareil, mettez en prise de vues, et copiez le fichier .bin sur une surbrillance l’option ‘WiFi’, d’enregistrement, de micro carte SD formatée. - Page 34 HDMI (Type C), disponible 2. Le répertoire correspondant 2. Le répertoire correspondant chez les revendeurs de à l’appareil pourra s’ouvrir à l’appareil pourra s’ouvrir produits Drift. automatiquement; dans le automatiquement; dans le cas contraire ouvrez votre cas contraire ouvrez votre 2. Allumez l’appareil explorateur de fichiers “Finder”...
-
Page 35: Caractéristiques
caractéristiques Résolution vidéo: 1080p, 720p and WVGA (16:9); 960p (4:3) Format de fichier: .MP4 / .MOV (H.264 codec) Type de capteur: CMOS Images par secondes:- 1080p: 25 / 30 ips 960p: 25 / 30 / 48 ips 720p: 25 / 30 / 50 / 60 ips WVGA: 25 / 30 / 50 / 60 / 100 / 120 ips Angles de vue:-... - Page 36 Etanchéité 3m (9.84ft) Microphone: Intégré, à réduction de nuisances sonores Mémoire embarquée: 256MB (non accessible) Mémoire complémentaire: Carte Micro SD jusqu’à 32GB Entrées: microphone externe 3.5mm (câble inclus) Sorties: connecteur HDMI type C (câble non inclus) Connectivité: USB Plug and Play, connecteur USB mini-B Systèmes d’exploitations: Windows XP et suivants / Mac OS 10.2 et suivants Portée:...
- Page 37 avertissements Informations de la FCC AVERTISSEMENT Cet équipement génère, utilise Les changements ou et peut émettre des fréquences Cet appareil est conforme à modifications apportées à cet radio et, s’il n’est pas installé la Partie 15 des règlements de et utilisé conformément aux appareil non expressément la FCC.
- Page 38 une ou plusieurs des mesures Cet appareil est en conformité suivantes: avec les licences Canadiennes relative à l’industrie, exempté les Réorienter ou déplacer standards RSS. l’antenne de réception; Son fonctionnement est Augmenter la séparation entre soumis aux deux conditions l’équipement et le récepteur; suivantes: Brancher l’appareil dans une (1) ce dispositif ne doit pas...
- Page 39 Sie sich für die drift Hd Ghost entschieden haben! KUNDENSERVICE Auf unserer offiziellen Internetseite finden Sie Firmware- Updates, Kundenservice, Neuigkeiten über unsere Produkte und Videos von unseren Benutzern. Wenn Sie Anregungen, Kommentare oder Fragen haben, wenden Sie sich bitte an unser Kundenservice-Team: support@driftinnovation.com...
-
Page 40: Wifi | Connecter La Caméra
Inhalt Über Ihre Kamera | Ersteinrichtung 39—40 Lieferinhalt | Erste Schritte 41—42 Modusauswahl & Einstellungen 43—44 Wiedergabe & Kameraeinstellungen 45—46 Benutzung der Zwei-Wege-Fernbedienung | Montage der Kamera 47—48 Wifi | Verbindung mit der Kamera herstellen 49—50 Technische Daten 51—52 Hinweise 53—54... -
Page 41: Über Ihre Kamera | Ersteinrichtung
Über Ihre Kamera MENÜ / Tag / Zurücktaste Taste LINKS / Herauszoomen Taste RECHTS / Heranzoomen AKTIONS-Taste (Ein/Aus/Rec/Stop) LED-Status Hintere Klappe 2,0” LCD-Bildschirm 300° schwenkbares Objektiv USB-Anschluss (Mini-B) HDMI-Anschluss (Mini-C) 3,5mm Mikrofoneingang Micro SD Card-Steckplatz Akku-Steckplatzabdeckung... - Page 42 Ersteinrichtung 1. Hintere Klappe lösen und 4. Kamera über Mini-USB- entfernen Kabel mit USB-Anschluss verbinden und die Batterie 2. Class 6 oder höhere Micro- 4 Stunden vor der ersten SD-Karte einlegen Inbetriebnahme aufladen 3. Akku-Steckplatzabdeckung 5. Hintere Klappe wieder anheben und Batterie wie aufsetzen und festziehen in der Abbildung (unten) dargestellt einlegen...
-
Page 43: Lieferinhalt | Erste Schritte
Lieferinhalt Wiederaufladbare Fernbedienung Verbindungsklappe Batterie Universal-Clip Montage-Kit Brillenhalterung... - Page 44 Erste Schritte Handgelenkschlaufe EIN -UND AUSSCHALTEN HAUPTMENÜ 1. Drücken und halten Sie die Drücken Sie die MENÜ-Taste, um AKTIONS-Taste gedrückt, um das Hauptmenü aufzurufen. Der das Gerät einzuschalten Bildschirm zeigt die Symbole der vier Menü-Optionen an. 2. Der Bildschirm leuchtet auf, es Verwenden Sie die LINKS/ ist eine Willkommensanzeige RECHTS-Tasten, um eine Menü-...
-
Page 45: Modusauswahl & Einstellungen
Modusauswahl & Einstellungen Video Foto MODUSAUSWAHL-MENÜ VIDEOMODUS Das Modusauswahl-Menü (Grüne LED) Die Kamera zeigt die Symbole für die vier zeichnet Videos auf, wenn die Kameramodi an. Heben Sie den AKTIONS-Taste auf der Kamera gewünschten Modus hervor und oder Fernbedienung gedrückt drücken Sie die AKTIONS-Taste. - Page 46 FOTOMODUS ZEITRAFFERMODUS PHOTOBURST-MODUS (Gelbe LED) Die Kamera nimmt (Violette LED) Die Kamera (Türkise LED) Die Kamera Bilder auf, wenn die AKTIONS- nimmt eine Serie von zeichnet eine Bildfolge für eine Taste auf der Kamera oder Bildern in einer bestimmten festgesetzte Zeitspanne in einer Fernbedienung gedrückt wird.
-
Page 47: Wiedergabe & Kameraeinstellungen
Wiedergabe & Kameraeinstellungen WIEDERGABE KAMERAEINSTELLUNGEN Wiedergabe Bei der Auswahl des • WiFi Ein / Aus Wiedergabe-Symbols öffnet • Mic Empfindlichkeit Aus / 1 / 2 / 3 sich das Modusauswahl-Menü • Lautstärke Aus / 1 / 2 / 3 und zeigt die Symbole für die •... - Page 48 Neue Funktionen VIDEO-TAGGING Ist diese Funktion aktiviert, kann die Kamera Videoaufnahmen ununterbrochen durchführen, es werden aber nur die PROFILE EINSTELLEN GLEICHZEITIGE Abschnitte gespeichert, die als FOTOAUFNAHME Alle Kameraeinstellungen wichtige Aufnahmen ‘getaggt, können gespeichert Drücken Sie während der also markiert’ werden. werden, indem Sie im Menü...
-
Page 49: Benutzung Der Zwei-Wege-Fernbedienung | Montage Der Kamera
Benutzung der Zwei-Wege-Fernbedienung 3. Die Fernbedienung schaltet STOP-Taste wird die Video -oder sich automatisch aus, wenn Zeitrafferaufnahme beendet. sie nach 15s keine Kamera Wenn Sie während der gefunden hat Videoaufnahme die AKTIONS- Taste betätigen, wird ein 4. Verbinden Sie die Foto aufgenommen oder Fernbedienung zum Video-Tagging gestartet (falls... - Page 50 Montage der Kamera 1. Befestigen Sie den 2. Schieben Sie den Universal- 3. Überprüfen Sie die Universal-Clip an der Clip in die gewählte Bildschirmausrichtung und Kamera in einer 360° Halterung, damit er hörbar drehen Sie das Objektiv mit Ausrichtung - positionieren einrastet der Hand, falls notwendig, um Ihre Einstellung...
-
Page 51: Wifi | Verbindung Mit Der Kamera Herstellen
Wifi Firmware FIRMWARE AKTUALISIEREN Laden Sie die neueste Firmware DIE DRIFT-APP HERUNTERLADEN EIN -UND AUSSCHALTEN von der Drift-Webseite herunter Aufnahmeeinstellungen, Heben Sie im Menü der (links) und kopieren Sie die .bin- Aufzeichnungen, Kameraeinstellungen die Datei auf eine formatierte Micro Aufnahmen und Wiedergabe «WiFi»-Option hervor, drücken... - Page 52 Kamerabildschirm zeigt ein Kamerabildschirm zeigt ein ein Mini-HDMI (Typ C) mit USB-Symbol an USB-Symbol an einem Full-HDMI-Kabel, die bei allen Drift-Einzelhändlern 2. Der Ordner der Kamera 2. Der Ordner der Kamera erhältlich sind. öffnet sich automatisch; öffnet sich automatisch; falls...
-
Page 53: Technische Daten
Technische Daten Videoauflösung: 1080p, 720p und WVGA (16:9); 960p (4:3) Dateiformat: .MP4 / .MOV (H.264 codec) Sensortyp: CMOS Bildrate:- 1080p: 25 / 30 fps 960p: 25 / 30 / 48 fps 720p: 25 / 30 / 50 / 60 fps WVGA: 25 / 30 / 50 / 60 / 100 / 120 fps Sichtbereich:-... - Page 54 Wasserdicht 3m (9,84ft) Mikrofon: Eingebaute Rauschunterdrückung im Mikrofon Integrierter Speicher: 256MB (nicht frei zugänglich) Speicherkapazität: Micro SD Speicherkarten bis zu 32 GB Eingänge: 3,5mm externes Mikrofon (Erweiterung enthalten) Ausgänge: HDMI Stecker Typ C (Kabel nicht enthalten) Konnektivität: USB Plug and Play, Mini-B USB-Stecker Kompatibilität: Windows XP und höher, Mac OS 10.2 und höher Reichweite der Fernbedienung:...
-
Page 55: Hinweise
Hinweise FCC-Informationen ACHTUNG kann hochfrequente Energie ausstrahlen, und, falls es nicht Dieses Gerät erfüllt Teil 15 der Änderungen oder gemäß der Anleitung installiert FCC-Bestimmungen. Modifikationen an diesem und verwendet wird, kann Gerät, die nicht ausdrücklich es schädliche Störungen des Inbetriebnahme unterliegt den von der zuständigen Behörde Funkverkehrs verursachen. - Page 56 die Empfangsantenne neu Dieses Gerät erfüllt die auszurichten oder an einem lizenzfreien RSS-Standard(s) anderen Standort aufzustellen; der Industry Canada. den Abstand zwischen dem Inbetriebnahme unterliegt den Gerät und dem Empfänger zu folgenden zwei Bedingungen: vergrößern; (1) Dieses Gerät darf keine das Gerät an eine Steckdose Störungen verursachen, eines anderen Stromkreises...
- Page 57 Gracias por comprar la drift Hd Ghost ASISTENCIA AL CLIENTE Consulte nuestro sitio oficial en línea para obtener actualizaciones de firmware, asistencia al cliente, novedades sobre nuestros productos y vídeos realizados por nuestros usuarios. Si tiene sugerencias, comentarios o inquietudes comuníquese con nuestro equipo de asistencia al cliente al...
- Page 58 tabla de contenidos acerca de su cámara | configuración inicial 57—58 contenido del paquete | primeros pasos 59—60 selección y configuración de modos 61—62 configuración del reproductor la cámara 63—64 cómo usar el mando a distancia bidireccional | montar la cámara 65—66 wifi | cómo conectar la cámara 67—68...
-
Page 59: Acerca De Su Cámara | Configuración Inicial
acerca de su cámara MENÚ / Etiqueta / Botón retroceder Botón IZQUIERDO / Zoom Out Botón DERECHO / Zoom In Botón ACTION (Prender/Apagar/Grabar/Detener) Indicador LED Tapa trasera Pantalla LCD de 2.0” Lentes rotatorias de 300° Puerto USB (Mini-B) Puerto HDMI (Mini-C) Entrada de micrófono de 3.5mm Ranura para tarjeta Micro SD Tapa del espacio de la batería... - Page 60 primeros pasos 1. Desatornille y quite la tapa 4. Conecte la cámara trasera mediante el cable mini USD a un puerto USB y cargue 2. Inserte una tarjeta micro SD la batería durante 4 horas clase 6 o mayor antes del primer uso 3.
-
Page 61: Contenido Del Paquete | Primeros Pasos
contenidos del paquete Mando a distancia Batería recargable Connector Hatch Soporte universal Kit de montaje Montaje de gafas... - Page 62 primeros pasos Correa para muñeca ENCENDER Y APAGAR MENÚ PRINCIPAL Presione el botón MENU para 1. Mantenga apretado el botón ir al menú principal. La pantalla ACTION para encender mostrará los íconos de las cuatro 2. La pantalla se encenderá, opciones del menú.
-
Page 63: Selección Y Configuración De Modos
selección y configuración de modos Video Foto MENÚ DE SELECCIÓN DE MODOS MODO VÍDEO (LED verde) La cámara grabará El menú de Selección de Modos muestra los íconos de los cuatro un vídeo al presionar el botón modos de la cámara. Resalte la ACTION de la cámara o del opción deseada y presione el mando. - Page 64 MODO FOTOGRAFÍA MODO TIMELAPSE MODO PHOTOBURST (LED turquesa) La cámara tomará (LED amarillo) La cámara (LED violeta) La cámara capturará imágenes al presionar capturará una serie de imágenes, mediante una ráfaga el botón ACTION de la cámara imágenes, según una frecuencia de disparos durante un tiempo o del mando.
-
Page 65: Configuración Del Reproductor La Cámara
configuración de reproductor y cámara CONFIGURACIONES REPRODUCTOR DE LA CÁMARA Reproductor Al seleccionar el ícono de • WiFi Encendido / Apagado reproducción se abrirá el menú para • Sensibilidad del micrófono Apagado / 1 / 2 / 3 seleccionar los modos y mostrando •... - Page 66 nuevas características PERFILES DE ETIQUETADO DE VÍDEOS La característica de etiquetado de vídeos precisa una CONFIGURACIÓN Cuando se activa esta tarjeta micro SD con 4GB de Se pueden guardar las característica, la cámara puede espacio libre para funcionar configuraciones de la cámara grabar continuamente un vídeo, correctamente.
-
Page 67: Cómo Usar El Mando A Distancia Bidireccional | Montar La Cámara
cómo usar el control remoto bidireccional 3. El mando a distancia se STOP se detendrá la grabación apagará automáticamente del vídeo o de timelapse. si no encuentra una cámara Si presiona el botón ACTION después de los15s mientras se graba un vídeo, 4. - Page 68 cómo montar la cámara 1. Ajuste el soporte universal 2. Deslice al soporte universal 3. Revise la alineación de la a la cámara en cualquier en la montura elegida pantalla rotando las lentes orientación a 360° según se asegurándose de que haga con la mano a dónde sea necesite (primero coloque los “clics”...
-
Page 69: Wifi | Cómo Conectar La Cámara
CÓMO DESCARGAR LAS CÓMO ENDENDERLO Y Descargue el último firmware APAGARLO APLICACIONES DRIFT desde el sitio web de Drift En el menú de configuración Configure, (izquierda) y copie el archivo bin a de la cámara, resalte la opción grabe, capture y una tarjeta micro SD formateada. - Page 70 HDMI que se encuentra disponible en las tiendas 2. Es probable que la carpeta 2. Es probable que la carpeta Drift. de la cámara se abra es a si de la cámara se abra automáticamente, si no abra automáticamente, si no es a 2.
-
Page 71: Especificaciones Técnicas
especificaciones Resolución de vídeo: 1080p, 720p y WVGA (16:9); 960p (4:3) Formato de archivo: .MP4 / .MOV (H.264 codec) Tipo de sensor: CMOS Velocidad de encuadre:- 1080p: 25 / 30 fps 960p: 25 / 30 / 48 fps 720p: 25 / 30 / 50 / 60 fps WVGA: 25 / 30 / 50 / 60 / 100 / 120 fps Campo de visión:-... - Page 72 Resistencia al agua 3m (9.84pies) Micrófono: Micrófono incorporado con compensación de ruidos Memoria incorporada: 256MB (no accesible para el usuario) Capacidad de memoria: Tarjetas de memoria Micro SD de hasta 32GB Dispositivos de ingreso: Micrófono externo de 3.5mm (cable prolongador incluido) Dispositivos de salida: Conector HDMI tipo C (no incluye cable) Conectividad:...
-
Page 73: Declaración De Conformidad
declaración de conformidad Información sobre normas ADVERTENCIAS puede irradiar energía de de la FCC radiofrecuencia. Si no se Los cambios o modificaciones instala y utiliza de acuerdo Este dispositivo cumple con a esta unidad que no sean con las instrucciones puede la sección 15 de las normas expresamente aprobadas causar interferencias en las... - Page 74 reorientar o relocalizar la Este equipo cumple con las antena receptora; normas industriales exentas de licencia de RSS del Canadá. aumentar la distancia entre el equipo y el receptor; El funcionamiento está sujeto a las dos siguientes condiciones: conectar el equipo a un enchufe diferente que el del (1) que el dispositivo no receptor;...
- Page 75 Grazie per aver acquistato drift Hd Ghost ASSISTENZA CLIENTI Controllate il nostro sito ufficiale per gli aggiornamenti del firmware, assistenza clienti, news sui nostri prodotti e video dei nostri utenti. Se avete suggerimenti, commenti o dubbi, si prega di contattare il nostro team di assistenza clienti a: support@driftinnovation.com...
- Page 76 contenuti informazioni sulla fotocamera | configurazione iniziale 75—76 contenuto della confezione | guida introduttiva 77—78 selezione modalità e impostazioni 79—80 impostazioni di riproduzione e della fotocamera 81—82 utilizzo del telecomando a due vie | montaggio della fotocamera 83—84 WiFi | connessione della fotocamera 85—86 specifiche 87—88...
- Page 77 informazioni sulla fotocamera MENU / Tag / Pulsante posteriore Pulsante SINISTRO / Zoom Out Pulsante DESTRO / Zoom In Pulsante ACTION (On / Off / Rec / Stop) LED di stato Portello posteriore Schermo LCD 2.0” Obiettivo rotante 300° Porta USB (Mini-B) Porta HDMI (Mini-C) Ingresso microfono 3.5mm Fessura per la scheda Micro SD...
- Page 78 configurazione iniziale 1. Svitare e rimuovere il 4. Collegare la fotocamera portello posteriore tramite mini cavo USB a una porta USB alimentata 2. Inserire una scheda micro e caricare la batteria per 4 SD di classe 6 o superiore ore prima dell’utilizzo 3.
- Page 79 contenuto della confezione Telecomando Batteria ricaricabile Portello connettore Clip universale Kit di montaggio Montatura occhiali...
- Page 80 per iniziare Cinghia da polso ACCENSIONE E SPEGNIMENTO MENU PRINCIPALE Premere il tasto MENU per 1. Premere e tenere premuto accedere al menu principale. il tasto ACTION per Lo schermo mostrerà le icone accendere delle quattro opzioni del menu. 2. Lo schermo si accenderà, Utilizzare i pulsanti a SINISTRA/ mostrerà...
- Page 81 modalità di selezione e impostazioni Video Foto MENU DI SELEZIONE MODALITÀ MODALITÀ VIDEO Il menu di selezione modalità (LED verde) La fotocamera mostra le icone per le quattro registra i video quando viene modalità della fotocamera. premuto il pulsante ACTION Selezionare la modalità...
- Page 82 MODALITÀ FOTO MODALITÀ TIMELAPSE MODALITÀ A RAFFICA (LED giallo) Per catturare (LED viola) La fotocamera (LED ciano) La fotocamera immagini fisse premere cattura una serie di immagini cattura una raffica di immagini il pulsante ACTION sulla fisse ad una frequenza fisse per la durata designata, fotocamera o sul telecomando.
- Page 83 impostazioni di riproduzione e della fotocamera RIPRODUZIONE IMPOSTAZIONI FOTOCAMERA Riproduzione Selezionando l’icona di • WiFi On / Off riproduzione si apre il menu • Sensibilità microfono Off / 1 / 2 / 3 di selezione delle modalità • Volume altoparlante Off / 1 / 2 / 3 mostrando le quattro icone di •...
- Page 84 nuove funzionalità IMPOSTAZIONE DEI PROFILI CODIFICA VIDEO La funzione di Codifica Video richiede una scheda micro SD Quando è attivata, questa Tutte le impostazioni della con 4 GB di spazio libero per fotocamera possono essere funzione consente alla funzionare correttamente. salvate selezionando Salva fotocamera di registrare video impostazioni dal menu...
- Page 85 utilizzo del telecomando bidirezionale 3. Il telecomando si spegnerà si concluderà il video o la automaticamente se non registrazione time-lapse. rileverà una fotocamera Premendo ACTION durante la entro 15s registrazione video permetterà di scattare una foto o avviare 4. Per caricare, collegare il la Codifica Video (se attivata, telecomando tramite il mini vedere p86).
- Page 86 montaggio della fotocamera 1. Fissare la clip universale 2. Far scorrere la clip 3. Controllare l’allineamento alla fotocamera in qualsiasi universale nel supporto dello schermo, ruotando orientamento a 360° a scelto, assicurandosi che l’obiettivo a mano fino a seconda delle esigenze; faccia ‘click’...
- Page 87 AGGIORNARE IL FIRMWARE Scaricare il firmware più recente ACCENSIONE E SCARICARE L’APP DRIFT dal sito web Drift (a sinistra) e SPEGNIMENTO Installazione copiare il file .bin su una scheda Nel menu Impostazioni scatto, registrare, micro SD formattata. telecamera, selezionare...
- Page 88 USB un’icona USB C) o un HDMI standard, disponibile presso i 2. La cartella della fotocamera 2. La cartella della fotocamera rivenditori Drift. potrebbe aprirsi potrebbe aprirsi automaticamente; in caso automaticamente; in caso 2. Accendere la fotocamera contrario, aprire Risorse del contrario, aprire Trova 3.
- Page 89 specifiche Risoluzione video: 1080p, 720p e WVGA (16:9); 960p (4:3) Formato file: .MP4 / .MOV (H.264 codec) Tipo di sensore: CMOS Frame rate:- 1080p: 25 / 30 fps 960p: 25 / 30 / 48 fps 720p: 25 / 30 / 50 / 60 fps WVGA: 25 / 30 / 50 / 60 / 100 / 120 fps Campo visivo:-...
- Page 90 Impermeabile 3m (9.84ft) Microfono: Built-in, noise reducing microphone Memoria interna: 256MB (non accessibile all’utente) Capacità di memoria: memory card micro SD fino a 32GB Input: 3.5mm microfono esterno (estensione inclusa) Output: HDMI connettore di tipo C (cavo non incluso) Connettività: USB Plug and Play, connettore mini-B USB Compatibilità: Windows XP e superiore/ Mac OS 10.2 e superiore...
- Page 91 informativa Informazioni FCC ATTENZIONE genera, utilizza e può irradiare energia a radiofrequenza e, Questo dispositivo è conforme Cambiamenti o modifiche se non installato e utilizzato alla Parte 15 delle norme FCC. a questa unità non in conformità alle istruzioni, espressamente approvate può...
- Page 92 Riorientare o riposizionare Questo dispositivo è conforme agli standard RSS esenti da l’antenna ricevente; licenza standard della Industry Aumentare la distanza tra Canada. l’apparecchio e il ricevitore; Il funzionamento è soggetto Collegare l’apparecchiatura alle seguenti due condizioni: ad una presa su un circuito (1) il dispositivo non deve diverso da quello cui è...
- Page 93 follow us facebook.com/driftinnovation vimeo.com/driftinnovation twitter.com/driftinnovation driftinnovation.com...
Need help?
Do you have a question about the HD Ghost and is the answer not in the manual?
Questions and answers