
Related Manuals for DRIFT Ghost-s


Summary of Contents for DRIFT Ghost-s
- Page 1 follow us facebook.com/driftinnovation quick guide vimeo.com/driftinnovation instagram.com/drift_innovation twitter.com/driftinnovation driftinnovation.com...
- Page 2 Contents Thank you for purchasing the Drift Ghost-S about your camera | initial setup 3—4 CUSTOMER SUPPORT package contents | getting started 5—6 mode selection & settings 7—8 Check our official website for firmware updates, customer support, news about our products and videos from our users.
-
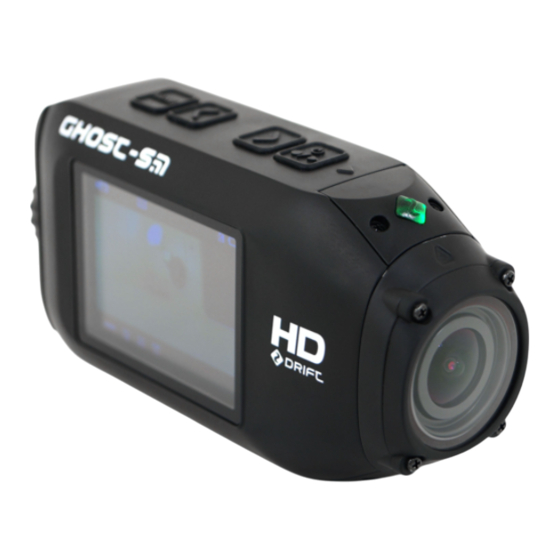
Page 3: About Your Camera
About your camera Initial setup MENU / Tag / Back Button 1. Unscrew and remove the 4. Connect the camera rear hatch via mini USB cable to a LEFT Button / Zoom Out powered USB port and 2. Insert a Class 10 or higher RIGHT Button / Zoom In charge the battery for 4 Micro SD/HC/XC card (up... -
Page 4: Package Contents
Package contents Getting started Remote Control Rechargeable Battery POWER ON AND OFF MAIN MENU Connector Hatch Wrist Strap Press the MENU button to 1. Press and hold the ACTION button to enter the Main Menu. The power on screen will display the icons of the four menu options. - Page 5 Mode selection & settings Video Photo MODE SELECTION MENU VIDEO MODE PHOTO MODE TIMELAPSE MODE PHOTOBURST MODE The Mode Selection menu (Green LED) The camera (Yellow LED) The camera (Purple LED) The camera (Cyan LED) The camera displays the icons for the will record video when will capture still images will capture a series of still...
-
Page 6: Mounting The Camera
Use the • Date YEAR / MONTH / DAY opens the Mode Selection • Wi-Fi Network Name GHOST-S [000] the desired orientation, lens marker as an ‘up’ *Double check it has been • Date / Timestamp ON / OFF menu and display the four •... -
Page 7: Feature Overview
SETTING PROFILES the Micro SD Card. Once Connect to multiple While recording video, For example, with a video The Drift Ghost-S features All camera settings can be full, the oldest loops will cameras with the new pressing the MENU button... - Page 8 (if activated, see p12). Pressing camera after 15s The mount allows you to The Drift HD Ghost waterproof The Drift Time Lapse allows STOP will end recording. 4. To charge, connect the go hands-free while still...
-
Page 9: Connecting The Camera
1. Connect the camera 1. Connect the camera 1. While the camera is menu, highlight the ‘WiFi’ capture & playback from the Drift website and using the USB cable using the USB cable powered off, connect option,press ACTION, and on your device. -
Page 10: Specifications
Specifications Video resolution: 1080p, 720p and WVGA (16:9); 960p (4:3) LCD Screen: 2.0” colour TFT File format: .MP4 (H.264 codec) LCD Screen Cover: Corning® Gorilla® Glass Sensor type: CMOS Waterproof: 3m (9.84ft) Frame rate:- Microphone: Built-in, noise reducing microphone 1080p: 25 / 30 / 50 / 60 fps Memory capacity: Micro SD, SDHC, SDXC memory cards up to 64GB... - Page 11 Disclosures FCC Information The equipment has been harmful interference to radio or This device complies with de l’intervention, y compris This transmitter must not be tested and found to comply television reception, which can Industry Canada license- l’intervention qui peut causer co-located or operating in This device complies with Part with the limits for a Class B...
Need help?
Do you have a question about the Ghost-s and is the answer not in the manual?
Questions and answers