Table of Contents
Advertisement
Quick Links
The complete owner's manual and downloadable software required for remote monitoring and alert features are available at:
www.lacrossetechnology.com/c86234
Mast holder
Right angle adaptor
1 x U-bolts
2 Washers + 2 Nuts
Plastic Reset Rod
All items, including Wind
Sensor, are Protected under
U.S. Patents: 5,978,738;
6,076,044; & 6,597,990
Wind Sensor also Protected
under U.S. Patent: 6,761,065;
RE42,057
IMPORTANT: Make sure to observe the correct polarity when inserting batteries. The "+" markings on the batteries must line up with the
diagrams inside the battery compartments. Inserting the batteries incorrectly may result in permanent damage to the units. During the
setup process, place the wireless display and the outdoor sensors on a surface with 5-10 feet between each sensor and the display. Only
use Alkaline Batteries, rechargeable batteries may not work:
STEP 1:
Complete initial setup on a table with all components within 10 feet of each other.
STEP 2:
It is important to allow sufficient light to reach the solar panel while activating the wind sensor. Make sure
the lights are on in the setup room and the solar panel is facing a 60W light bulb or brighter.
Ensure the panel is not covered, and then remove the black protective foil on the solar panel. Remove the
tape covering the reset hole.
Use the provided plastic reset rod to gently press the reset button once in the hole on the bottom of the
sensor.
STEP 3:
Insert two "AA" size batteries into the rain sensor with the correct polarity.
STEP 4:
Insert two "C" size batteries into the thermo-hygro sensor with the correct polarity. Allow all sensors to run for two minutes before inserting
batteries in the weather station.
STEP 5:
Insert three "C" size batteries into the wireless display with the correct polarity.
NOTE: Every time the wireless display receives data from the sensors, the wireless icons
last transmission was successful. A wind speed or rainfall amount that reads "0" does not mean reception failure. It means that there was
no wind or rain at the time of the last measurement. The thermo-hygro sensor syncs with the wind and rain sensors and sends all outdoor
sensor data to the display. The thermo-hygro sensor tries for 4 minutes to sync to the wind sensor and then 4 minutes for the rain sensor.
If not successful within 4 minutes, the thermo-hygro sensor will stop looking for the other sensors.
Wait 10 minutes for reception from all sensors before setting time and date or mounting sensors outside.
STEP 6:
Set Time and Date. See "Program Menu" below.
SETUP TROUBLESHOOTING: If the sensor data fails to display for any of the outdoor sensors within 10 minutes, ("- - -"are displayed),
remove the batteries from all units for 1 minute and start the Setup procedure again at Step 1.
There are 5 function keys located on the unit: SET, UP ARROW, DOWN ARROW, ALARM, and MIN/MAX. Begin by holding the SET button
until the display flashes. When you press and release the SET button after each step, you will be moved to the next step. Save changes
and exit the program menu at any point by pressing the MIN/MAX button.
CONTRAST: Press and hold the SET button. LCD and a number from 1-8 will flash. Press and release the UP ARROW or DOWN
ARROW button to adjust the Contrast of the LCD. Press and release the SET button to confirm and continue.
HOUR: The Hour will flash. Press and release the UP ARROW or DOWN ARROW button until the correct Hour is shown. Press and
release the SET button to confirm and continue.
Quick Setup Guide – C86234 Professional Weather Station
Carefully open the package and check that the following contents are complete:
Base sensor,
funnel top cover
and battery cover
(pre-assembled)
Remote Monitoring & Alerts Activation Card
IMPORTANT!! Do Not Discard
Contains the Activation Key to enable
remote monitoring and alerts
SETUP INSTRUCTIONS STEP BY STEP:
Airflow cover
Wall mount adapter
Mounting screws
Plastic anchors for screws
Program Menu:
1
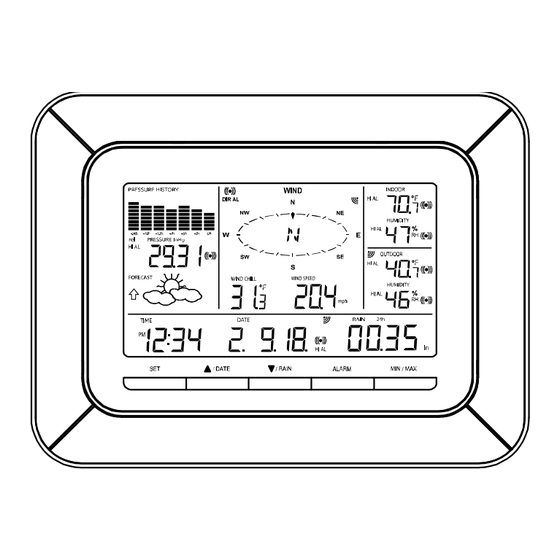
Wireless Display
USB Transceiver
Foldout stand
Heavy Weather PC Software
Enables wireless computer connection
using the USB transceiver
Press Reset Button on
Bottom of Wind Sensor
(Solar Panel Must Face
Light)
will blink once and then return to solid if the
USB wireless
interface for PC
Advertisement
Table of Contents

Subscribe to Our Youtube Channel
Related Manuals for Lacrosse C86234


Summary of Contents for Lacrosse C86234
- Page 1 Quick Setup Guide – C86234 Professional Weather Station The complete owner’s manual and downloadable software required for remote monitoring and alert features are available at: www.lacrossetechnology.com/c86234 Carefully open the package and check that the following contents are complete: Wind Sensor...
- Page 2 NOTE: When in 12h mode, there is only a 'PM' display, which appears under the word TIME. During the 'AM' hours this area will be blank. MINUTES: The Minutes will flash. Press and release the UP ARROW or DOWN ARROW button until the correct Minutes are displayed. Press and release the SET button to confirm and continue.
- Page 3 Press and release to switch between Date and Seconds displayed. Press and hold until the station beeps to resync with sensors. DOWN ARROW: Press and release to view 1-hour, 24-hour, 1-week, 1-month or Total Rainfall. Press and hold to resync the display with the software (must use usb stick). Rain Display: For all measurements, it is important time and date are set correctly on your display.
- Page 4 Heavy Weather Pro PC software (included in the package on CD-ROM). You can also download the latest version of the Heavy Weather Pro PC software at www.lacrossetechnology.com/c86234. The included Remote Monitoring and Alerts Activation Card has instructions for downloading the La Crosse Alerts software and the needed activation key to enable this feature.
Need help?
Do you have a question about the C86234 and is the answer not in the manual?
Questions and answers