Advertisement
Available languages
Available languages
Quick Links
WS8013 - BEDIENUNGSANLEITUNG
Funktionen
Uhrzeit
Funkuhrzeit (DCF77)
12/24 Stunden Zeitanzeige wählbar
Tägliche Alarmfunktion
Kalender bis zum Jahr 2099
Wochentage in 10 Sprachen wählbar
Temperatur
Innenmessbereich: -10°C ~+ 50°C
Temperatureinheit als °C / °F wählbar
Luftfeuchtigkeit
Innenmessbereich: 20% ~ 99%
Bestandteile der Station
A1
A2
A3
B4
B5
B6
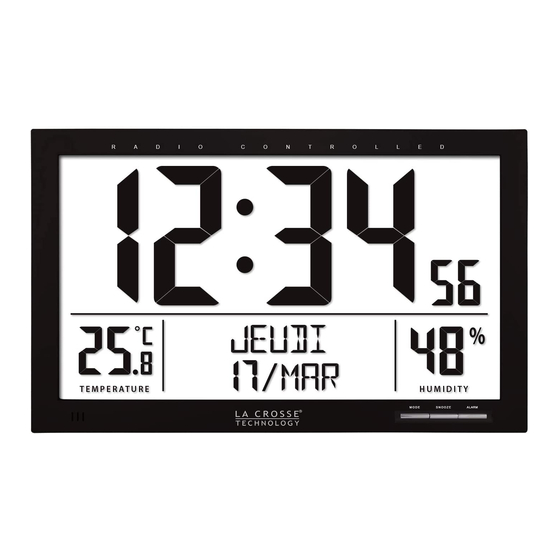
Teil A:
A1: Uhrzeit
A2: Temperatur
A3: Wochentag/Datum
B1 B2 B3
A4: Funkturm Symbol
A5: Luftfeuchtigkeit
DE01
A4
A5
C1
C2
C3
Advertisement

Subscribe to Our Youtube Channel
Related Manuals for Lacrosse WS8013


Summary of Contents for Lacrosse WS8013
- Page 1 WS8013 - BEDIENUNGSANLEITUNG Funktionen Uhrzeit Funkuhrzeit (DCF77) 12/24 Stunden Zeitanzeige wählbar Tägliche Alarmfunktion Kalender bis zum Jahr 2099 Wochentage in 10 Sprachen wählbar Temperatur Innenmessbereich: -10°C ~+ 50°C Temperatureinheit als °C / °F wählbar Luftfeuchtigkeit ...
- Page 2 Teil B: B1: “MODE” Taste B5: “-/ ” Taste B2: “SNOOZE” Taste B3: “ALARM” Taste B6: “RESET” Taste B4: “+” Taste Teil C: C1: Wandaufhängung C3: Batteriefach C2: Standfuß Inbetriebnahme: Uhr: Nehmen Sie die Abdeckung vom Batteriefach [C3]. Legen Sie 4 x AA Batterien unter Berücksichtigung der Polarität [“+” und“ –“ Markierungen] ...
- Page 3 Manuelle Zeiteinstellung: Halten Sie die “MODE” Taste (B1) im Zeitanzeigemodus für 3 Sekunden gedrückt, um in den Zeiteinstellungsmodus zu wechseln. Das Zeitformat „24 Hr” blinkt auf der Anzeige. Drücken Sie die “+” (B4) oder die “-” (B5) Taste um das Zeitformat auf 12 Stunden oder ...
- Page 4 Temperatureinheit blinkt auf der Anzeige. Drücken Sie die “+” (B4) oder die “-” (B5) Taste um die Temperatureinheit als °C oder °F einzustellen. Drücken Sie die “MODE” Taste (B1) um die Änderungen zu bestätigen und die Alarmdauer blinkt auf der Anzeige. Drücken Sie die “+”...
- Page 5 Alarm mit Schlummerfunktion (Snooze): Drücken Sie die “ALARM” Taste (B3) um den Alarm zu aktivieren oder zu deaktivieren. Das Alarmsymbol " " wird auf der Anzeige dargestellt, wenn der Alarm aktiviert ist. Drücken Sie während des Alarmtons die “SNOOZE” (B2) Taste. Der Alarmton wird ...
- Page 6 Batterie-Sicherheitshinweise Verwenden Sie nur Alkali-Batterien, keine wiederaufladbaren Batterien. Legen Sie die Batterien unter Beachtung der Polarität (+/-) richtig ein. Ersetzen Sie stets einen vollständigen Batteriesatz. Mischen Sie niemals alte und neue Batterien. Entfernen Sie erschöpfte Batterien sofort. ...
- Page 7 WS8013 - USER MANUAL Features Time Radio Controlled Time (RC-DCF) 12/24 hour time display selectable Daily Alarm function Perpetual Calendar Up to Year 2099 Day of week in 10 languages user selectable Temperature Indoor measurable range: -10°C ~+ 50°C ...
- Page 8 Part B: B1: “MODE” button B5: “-/ ” button B2: “SNOOZE” button B3: “ALARM” button B6: “RESET” button B4: “+” button Part C: C1: Wall Mount Holes C3: Battery Compartment C2: Stand Getting Started: Main Unit: Slide open battery compartment cover [C3] Insert 4 x AA size batteries observing polarity [“+”...
- Page 9 Press the “+” (B4) or the “-” (B5) button to set 12 Hour or 24 Hour time display. Press the “MODE” button (B1) to confirm the changes and RCC on is flashing. Press the “+” (B4) or the “-” (B5) button to set RCC to on to activate radio controlled time ...
- Page 10 the desired value more quickly Alarm Function: Press the “MODE” button (B1) to view alarm time, “ALARM TIME” flashes on the display While viewing the alarm time, press the “MODE” button (B1) for 3 seconds to enter alarm time setting, the alarm hour is flashing.
- Page 11 near construction site among tall buildings inside concrete buildings near electrical appliances (computers, TV’s, etc) and metallic structures inside moving vehicles Place the clock at a location with optimal signal, i.e. close to a window and away from metal surfaces or electrical appliances.
- Page 12 WS8013 - MODE D’EMPLOI Caractéristiques Heure Heure radiocommandée (RC-DCF) Affichage de l’heure au format 12/24 heures sélectionnable Fonction d’alarme quotidienne Calendrier perpétuel jusqu’à l’année 2099 Jour de la semaine en 10 langues sélectionnables par l’utilisateur Température...
- Page 13 Partie B : B1 : Touche « MODE » B5 : Touche « -/ » B2 : Touche “SNOOZE” (rappel d’alarme) B6 : Touche « RÉINITIALISATION » B3 : Touche « ALARM » B4 : Touche « + » Partie C : C1 : Trous de fixation murale C3 : Compartiment à...
- Page 14 Appuyez sur la touche « + » (B4) ou « - » (B5) pour régler l’affichage au format 12 heures ou 24 heures. Appuyez sur la touche « MODE » (B1) pour confirmer les modifications. RCC clignote à ce moment.
- Page 15 Appuyez sur la touche « MODE » (B1) pour confirmer les modifications. La durée de l’alarme sonore clignote à ce moment. Appuyez sur la touche « + » (B4) ou « - » (B5) pour régler la durée de l’alarme sonore. ...
- Page 16 Appuyez sur la touche « SNOOZE » (B2) lorsque l’alarme retentit. L’alarme s’interrompt » clignote sur l’écran LCD pendant la pendant 5 minutes avant de retentir à nouveau. « durée du rappel d’alarme. Ce processus peut être répété 7 fois. Appuyez sur n’importe quelle touche autre que «...
- Page 17 Avertissements de sécurité concernant les piles Utilisez uniquement des piles alcalines non rechargeables. Installez les piles en respectant les polarités (+/-). Remplacez toujours toutes les piles en même temps. Ne mélangez pas des piles usagées avec des piles neuves. ...
- Page 18 WS8013 – MANUAL DE USUARIO Funciones Hora Hora controlada por radio (RC-DCF) Pantalla horaria de 12/24 horas seleccionable Función de alarma diaria Calendario perpetuo hasta el año 2099 Día de la semana en 10 idiomas seleccionable por el usuario Temperatura ...
- Page 19 Parte B: B1: Botón “MODE” B5: Botón “-/ ” B2: BOTÓN “RETARDO” B6: Botón “REINICIO” B3: Botón “ALARM” B4: Botón “+” Parte C: C1: Agujeros de montaje en pared C3: Compartimento de las pilas C2: Soporte Primeros pasos: Unidad principal: ...
- Page 20 Pulse el botón “+” (B4) o el botón “-” (B5) para fijar la pantalla horaria en 12 Horas o 24 Horas. Pulse el botón“MODE” (B1) para confirmar los cambios y RCC conectado parpadea. Pulse el botón“+” (B4) o el botón “-” (B5) para fijar RCC en conectado y activar la hora ...
- Page 21 (2) Para la zona horaria: Si no recibe señal de la frecuencia RC-DCF, la zona horaria quedará establecida en 0. La zona horaria se usa en países que pueden recibir la señal de frecuencia DCF pero la zona horaria es diferente a la hora alemana (es decir, GMT+1). (3) Duración del sonido de la alarma: dispone de dos opciones, “1 minuto”...
- Page 22 Termómetro Si la temperatura se encuentra fuera del alcance medible, en la pantalla LCD aparecerá LL.L (más allá de la temperatura mínima) o HH.H (más allá de la temperatura máxima). Si la humedad es inferior al 20%, aparecerá en la pantalla LCD y muestra 99% cuando es superior al 99%.
- Page 23 Advertencias de seguridad sobre las pilas Use solamente pilas alcalinas, no use pilas recargables. Instale las pilas correctamente, haciendo coincidir las polaridades (+/-). Siempre cambie el juego completo de pilas. Nunca mezcle baterías usadas y nuevas. ...
- Page 24 WS8013 - GEBRUIKERSHANDLEIDING Eigenschappen Tijd Radiogestuurde klokindicator (RC-DCF) Keuze uit 12/24 uur tijdweergave Dagelijkse alarmfunctie Eindeloze kalender tot op jaar 2099 Dagen van de week in 10 selecteerbare talen Temperatuur Meetbereik binnenshuis: -10°C ~ +50°C ...
- Page 25 Onderdeel B: B1: “MODE”-toets B5: “-/ ” knop B2: “SLUIMER”-toets B6: “RESET”-knop B3: Toets “ALARM” B4: “+” toets Onderdeel C: C1: Muurbevestigingsgaten C3: Batterijvak C2: Steun Aan de slag: Hoofdeenheid: Schuif het klepje over het batterijvak open [C3] Plaats 4 x AA batterijen, waarbij u oplet op de polariteit [“+” en “-” markeringen]. ...
- Page 26 Druk op de “MODE” knop (B1) om de veranderingen te bevestigen en RCC aan begint te knipperen. Druk op de “+” (B4) of de “-” (B5) knop om RCC aan te zetten om de radiogestuurde tijd te activeren of RCC uit te zetten om de radiogestuurde tijd te deactiveren. Druk op de “MODE”...
- Page 27 Druk op de “MODE” knop (B1) om deze instellingen te bevestigen en terug te gaan naar de tijdweergave modus. Opmerking: (1) De klok zal automatisch de instellingsmodus verlaten als u 15 seconden geen enkele aanpassing uitvoert (2) Voor de tijdzone: Als u geen RC-DCF-frequentiesignaal ontvangt, dient de tijdzone te worden ingesteld tijdzone...
- Page 28 Druk op een willekeurige knop afgezien van de “SNOOZE” knop om het sluimeralarm te stoppen. Anders zal op basis van de eerder ingestelde alarm geluidsduur, het alarm 2 minuten of 1 minuut afgaan en vervolgens automatisch stoppen. Thermometer Als de temperatuur buiten het meetbare bereik valt, zal LL.L (lager dan de minimale temperatuur) of HH.H (hoger dan de maximale temperatuur) op de LCD worden weergegeven.
- Page 29 Gebruik nooit nieuwe en gebruikte batterijen door elkaar. Verwijder lege batterijen onmiddellijk. Verwijder de batterijen als het toestel niet wordt gebruikt. Herlaad de batterijen niet en gooi ze niet in vuur, omdat de batterijen zouden kunnen ontploffen. ...
- Page 30 WS8013 - MANUALE UTENTE Caratteristiche Orologio radiocontrollato (RC-DCF) Visualizzazione orario nei formati 12/24 h Funzione sveglia giornaliera Calendario perpetuo fino al 2099 Giorno della settimana visualizzabile in 10 lingue Temperatura Campo di misurazione ambienti interni: -10°C ~ +50°C ...
- Page 31 Parte B: B1: Pulsante “MODE” B5: Pulsante “-/ ” B2: Pulsante “SNOOZE” B6: Pulsante “RESET” B3: Pulsante “ALARM” B4: Tasto “+” Parte C: C1: Fori montaggio a parete C3: Vano batterie C2: Supporto Introduzione: Dispositivo principale: Far scorrere il coperchio del vano batterie per aprirlo [C3] Inserite 4 batterie di tipo AA rispettando le polarità...
- Page 32 Premere il pulsante “+” (B4) o “-” (B5) per impostare la visualizzazione dell'orario 12 ore o 24 ore. Premere il pulsante “MODE” (B1) per confermare le modifiche e RCC lampeggia. Premere “+” (B4) o “-” (B5) per impostare RCC su On per attivare l'orario radiocontrollato o ...
- Page 33 (2) Per il fuso orario: Se non ricevete il segnale RC-DCF, impostate il fuso orario su 0. Il fuso orario è utilizzato nei Paesi in cui è possibile ricevere il segnale radio DCF ma che hanno un fuso orario diverso da quello tedesco (cioè GMT+1). (3) Durata del suono della sveglia: ci sono due opzioni disponibili, “1 minuto”...
- Page 34 Se l'umidità è inferiore a 20%, apparirà sull'LCD e mostrerà 99% quando è superiore a 99%. Effetti della ricezione ambientale L’orologio offre un orario accurato grazie alla tecnologia wireless. Come per tutti i dispositivi wireless, la ricezione può essere influenzata dalle seguenti circostanze: ...
- Page 35 Tenere tutte le batterie fuori dalla portata dei bambini. perché potrebbero causare il rischio di soffocamento. Utilizzare il prodotto solo per lo scopo previsto. Obblighi in base alla normativa sulle batterie Le batterie vecchie non appartengono ai rifiuti domestici in quanto possono causare danni alla salute e all'ambiente.
- Page 36 WS8013 - UŽIVATELSKÁ PŘÍRUČKA Funkce Čas Rádiově řízený budík (RC-DCF) Volitelný 12/24 hodinový časový displej Funkce denního budíku Kalendář až do roku 2099 Dny v týdnu v 10 jazycích dle volby uživatele Teplota Rozsah měření ve vnitřních prostorech: -10 °C ~+ 50 °C ...
- Page 37 Část B: B1: Tlačítko „MODE” B5: Tlačítko „-/ “ B2: Tlačítko „ZDŘÍMNOUT SI” B6: Tlačítko „RESET” B3: Tlačítko „ALARM“ B4: Tlačítko „+“ Část C: C1: Otvory pro montáž na zeď C3: Prostor pro baterie C2: Stojan Začínáme: Hlavní jednotka: Otevřete kryt prostoru pro baterie [C3] ...
- Page 38 Stisknutím tlačítka „+“ (B4) nebo „-“ (B5) nastavte RCC (rádiem kontrolovaný čas) na hodnotu on pro zapnutí rádiem kontrolovaného času nebo na hodnotu RCC off pro vypnutí rádiem kontrolovaného času. Stiskněte tlačítko „MODE“ (B1) pro potvrzení změn a bliká položka časové pásmo 00 ...
- Page 39 (4) Sekunda může být nastavena pouze na hodnotu 0. (5) Tím, že stisknete a budete držet tlačítko „+“ (B4) nebo „-“ (B5), urychlíte proces a rychleji dosáhnete požadované hodnoty. Funkce denního budíku: Stiskněte tlačítko „MODE“ (B1) pro zobrazení času budíku, na displeji bliká text „ALARM ...
- Page 40 Dlouhá přenosová vzdálenost Blízkost hor a údolí Blízkost dálnic, železnic, letišť, vedení vysokého napětí apod. Blízkost staveniště Umístění mezi vysokými stavbami Umístění uvnitř betonových staveb Blízkost elektrických zařízení (počítačů, televizorů apod.) a kovových předmětů Umístění...
- Page 41 Povinnosti dle zákona o elektrických zařízeních Tento symbol znamená, že elektrická zařízení na konci jejich životnosti je třeba likvidovat odděleně od běžného domácího odpadu. Zařízení vraťte do místního sběrného místa nebo centra pro recyklaci. To platí pro všechny země Evropské unie a ostatní evropské země se samostatným systémem shromažďování...
- Page 42 WS8013 – INSTRUKCJA UŻYTKOWNIKA Funkcje Godzina Czas ze sterowaniem radiowym (RC-DCF) Wyświetlacz czasu z wyborem 12/24 godz. Funkcja alarmu dziennego Wieczny kalendarz do roku 2099 Użytkownik może wybrać dzień tygodnia w 10 językach Temperatura ...
- Page 43 Część B: B1: Przycisk „TRYB” B5: Przycisk „-/ ” B2: Przycisk „DRZEMKA” B6: Przycisk „RESET” B3: Przycisk „ALARM” B4: Przycisk „+” Część C: C1: Otwory do montażu ściennego C3: Komora baterii C2: Podstawka Uruchamianie: Główna jednostka: Otworzyć pokrywę komory baterii [C3] ...
- Page 44 Nacisnąć przycisk „MODE” (B1), aby potwierdzić zmiany i miga RCC wł. Nacisnąć przycisk „+” (B4) lub „-” (B5), aby ustawić RCC wł. celem włączenia czasu sterowanego sygnałem radiowym lub RCC wył. celem wyłączenia czasu sterowanego sygnałem radiowym. Nacisnąć przycisk „MODE” (B1), aby potwierdzić zmiany i miga strefa czasowa 00 (CET). ...
- Page 45 (3) Czas trwania alarmu dźwiękowego: dostępne są dwie opcje „1 minuta” i „2 minuty”. (4) Drugi można ustawić jedynie na 0. (5) Przytrzymanie wciśniętego przycisku „+” (B4) lub „-” (B5) przyspieszy proces, dzięki czemu szybciej osiągnie się żądaną wartość Funkcja alarmu dziennego: Nacisnąć...
- Page 46 Wpływ środowiska na odbiór Zegar pobiera dane na temat bieżącego czasu za pośrednictwem technologii bezprzewodowej. Podobnie jak w przypadku wszystkich urządzeń bezprzewodowych, odbiór może być zakłócony następującymi czynnikami: duża odległość przekazu góry i doliny znajdujące się w pobliżu ...
- Page 47 Produkt należy używać tylko zgodnie z przeznaczeniem! Zobowiązania według przepisów prawa dotyczących baterii Stare baterie nie należą do odpadów domowych, ponieważ mogą szkodzić zdrowiu i środowisku. Zużyte baterie można oddać bezpłatnie u swojego sprzedawcy lub w punktach zbiórek. Użytkownik końcowy jest zobowiązany prawem do zwrotu odpowiednich baterii sprzedawcom lub w innych punktach zbiórek! Zobowiązania według przepisów prawa dotyczących urządzeń...
Need help?
Do you have a question about the WS8013 and is the answer not in the manual?
Questions and answers