Belkin Wireless G Travel Router F5D7233 User Manual
Belkin wireless g travel router user manual
Hide thumbs
Also See for Wireless G Travel Router F5D7233:
- Quick installation manual (2 pages) ,
- User manual (17 pages)

Related Manuals for Belkin Wireless G Travel Router F5D7233


Summary of Contents for Belkin Wireless G Travel Router F5D7233
-
Page 1: Internet Connection
Share your hotel broadband Internet connection User Manual Wireless G Travel Router �������������� ����� �������� ������� F5D7233... -
Page 2: Table Of Contents
Table of Contents 1. Introduction ..........1 Advantages of a Wireless Network . -
Page 3: Thank You For Purchasing The Belkin Wireless G Travel Router (The
Introduction Thank you for purchasing the Belkin Wireless G Travel Router (the Router). Please be sure to read through this User Manual completely, and pay special attention to the section entitled “Placement of your Router for Optimal Performance” on page 2. -
Page 4: Placement Of Your Router For Optimal Performance
To achieve the best wireless network coverage for your “wireless clients” (i.e., computers enabled by Belkin Wireless Notebook Network Cards, Wireless Desktop Network Cards, and Wireless USB Adapters): •... - Page 5 Introduction Avoid Obstacles and Interference Avoid placing your Router near devices that may emit radio “noise,” such as microwave ovens. Dense objects that can inhibit wireless communication include: • Refrigerators • Washers and/or dryers • Metal cabinets • Large aquariums •...
- Page 6 • For Belkin wireless networking products, use the detailed Site Survey and wireless channel information included with your Wireless Network Card. See your Network Card’s user guide for more information.
- Page 7 Introduction For more information regarding our networking products, visit our website at www.belkin.com/networking or call Belkin Technical Support at: Europe: Australia: New Zealand: Singapore: 877-736-5771 310-898-1100 ext. 2263 00 800 223 55 460 1800 235 546 0800 235 546 800 616 1790...
-
Page 8: Product Overview
In minutes you will be able to share your Internet connection and network your computers. The following is a list of features that make your new Belkin Wireless G Travel Router an ideal solution for your home or small office network. - Page 9 Product Overview Integrated 10/100 4-Port Switch The Router has a built-in, 4-port network switch to allow your wired computers to share printers, data and MP3 files, digital photos, and much more. The switch features automatic detection so it will adjust to the speed of connected devices. The switch will transfer data between computers and the Internet simultaneously without interrupting or consuming resources.
- Page 10 Product Overview MAC Address Filtering For added security, you can set up a list of MAC addresses (unique client identifiers) that are allowed access to your network. Every computer has its own MAC address. Simply enter these MAC addresses into a list using the Web-Based Advanced User Interface and you can control access to your network.
-
Page 11: Knowing Your Router
Knowing your Router Package Contents • Wireless G Travel Router • Quick Installation Guide • Installation Software CD • Power Supply • USB Power Cable • Ethernet Cable System Requirements • PC-compatible laptop • Windows 98, Me, 2000, or XP... -
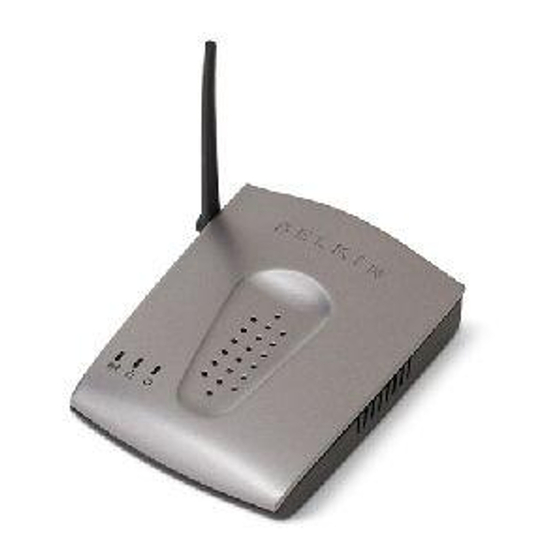
Page 12: Product Diagrams
Knowing your Router Knowing your Router Product Diagrams Wireless LED Ethernet LED Power LED Rear Panel Power Cable Port Ethernet Cable Port Mode Switch... - Page 13 Knowing your Router Bottom Reset Button...
-
Page 14: Connecting And Configuring Your Router
Connecting and Configuring your Router The Belkin Wireless G Travel Router is a 3-in-1 solution providing the busy traveler the versatility to meet his or her connection needs. The three installation modes are: Installation Modes Router Mode – create a wireless network in a hotel, home, or office Adapter Mode –... -
Page 15: Router Mode Installation
Connecting and Configuring your Router Router Mode Installation 1. Install 1. Install Run the Easy Install Wizard first! Run the Easy Install Wizard first! DO NOT CONNECT THE ROUTER AT THIS TIME. Important for Hotel Users: Do not connect to the hotel’s high-speed Internet connection at this time (to avoid being charged more than once). - Page 16 Router using your PC’s built-in wireless card or external wireless adapter. The network name (SSID) of the Router is “Belkin Traveler”. Once you have connected wirelessly, click “Next”. Select one of the following: Hotel Connection – Select “Hotel Connection”...
- Page 17 Connecting and Configuring your Router 3. Configure . Configure Hotel Users - Configuration for Hotel Connections Hotel Users - Configuration for Hotel Connections 4. Configure . Configure Cable/DSL Users - Configuration for Cable/DSL Connections Click the “Hotel Home Page” button to open up a web browser and set up the hotel’s connection.
-
Page 18: Adapter Mode Installation
Connecting and Configuring your Router Connecting and Configuring your Router Adapter Mode Installation 1. Mode 1. Mode Selecting Adapter Mode Selecting Adapter Mode 2. Connect . Connect Connecting the Cables Select “Adapter Mode”, then click “Next”. Move the center of the switch on the back panel to align with the word “Adapter”. - Page 19 Connecting and Configuring your Router 3. Configure . Configure Configuration for Adapter Mode Check to make sure that the Ethernet and Power LEDs on the front of the Router are on. Click “Next” to go to the Router’s home page on the Web. Wirelessly connect to a network from the “Available Networks”...
-
Page 20: Access Point Mode Installation
Connecting and Configuring your Router Connecting and Configuring your Router Access Point Mode Installation 1. Mode 1. Mode Selecting the Access Point Mode Selecting the Access Point Mode 2. Connect . Connect Connecting the Cables Select “Access Point Mode”. Click “Next”. Move the center of the switch on the back panel to align with the word “AP”. - Page 21 Router using your PC’s built-in wireless card or external wireless adapter. The network name (SSID) of the Router is “Belkin Traveler”. Once you have wirelessly connected, click “Next”. Once you have established a connection with the Router, your installation is complete.
-
Page 22: Using The Web-Based Advanced User Interface
Using the Web-Based Advanced User Interface The Web-Based Advanced User Interface is a web-based tool that you can use to set up the Router if you don’t want to use the Easy Install Wizard. You can also use it to manage advanced Router functions. From the Web-Based Advanced User Interface window, you can perform the following tasks: •... -
Page 23: Logging Out Of The Router
Using the Web-Based Advanced User Interface will take you to the login screen. The Router ships with no password. In the login screen, leave the password field blank and click “Submit” to log in. Logging out of the Router One computer at a time can log into the Router to make changes to Router settings. - Page 24 Using the Web-Based Advanced User Interface Using the Web-Based Advanced User Interface Using the Web-Based Advanced User Interface The home page is the first page you will see when you access the Web-Based Advanced User Interface (UI). The home page provides a quick view of the Router’s status and settings.
- Page 25 Using the Web-Based Advanced User Interface Login/Logout Button This button enables you to log in and out of the Router with the press of one button. When you are logged into the Router, this button will change to read “Logout”. Logging into the Router will take you to a separate login page where you will need to enter a password.
-
Page 26: Setting Your Connection Type
Using the Web-Based Advanced User Interface Using the Web-Based Advanced User Interface Setting your Connection Type Setting your Internet Service Provider (ISP) Connection Type to Dynamic IP A dynamic connection is the most common connection type used with cable modems. Setting the connection type to “dynamic” in many cases is enough to complete the connection to your ISP. - Page 27 Using the Web-Based Advanced User Interface Setting your Internet Service Provider (ISP) Connection Type to Static IP A static IP connection is less common than other connection types. If your ISP uses static IP addressing, you will need your IP address, subnet mask, and ISP gateway address.
- Page 28 Using the Web-Based Advanced User Interface Using the Web-Based Advanced User Interface Setting your ISP Connection Type to PPPoE Most DSL providers use PPPoE as the connection type. If you use a DSL modem to connect to the Internet, your ISP may use PPPoE to log you into the service.
- Page 29 Using the Web-Based Advanced User Interface User Name This space is provided to type in your user name that was assigned by your ISP. Password Type in your password and re-type it into the “Retype Password” box to confirm it. Service Name A service name is rarely required by an ISP.
- Page 30 Using the Web-Based Advanced User Interface Using the Web-Based Advanced User Interface Setting your Internet Service Provider (ISP) Connection Type to Point-to-Point Tunneling Protocol (PPTP) [European Countries Only]. Some ISPs require a connection using PPTP protocol, a type of connection most common in European countries.
- Page 31 Using the Web-Based Advanced User Interface Password Type your password here. Then retype it into the “Retype Password” box. PPTP Default Gateway Provided by your ISP. Enter your service IP address here. Idle Time Out The “Maximum Idle Time” feature is used to automatically disconnect the Router from your ISP when there is no activity for a specified period of time.
-
Page 32: Setting Custom Domain Name Server (Dns) Settings
Internet service. When you install the Router, its own MAC address will be “seen” by the ISP and may cause the connection not to work. Belkin has provided the ability to clone (copy) the MAC address of the computer into the Router. - Page 33 Using the Web-Based Advanced User Interface system as the original MAC address and will allow the connection to work. If you are not sure whether your ISP needs to see the original MAC address, simply clone the MAC address of the computer that was originally connected to the modem.
-
Page 34: Viewing Lan Settings
Using the Web-Based Advanced User Interface Using the Web-Based Advanced User Interface Viewing LAN Settings Clicking on the header of the “LAN Setup” tab header page. A quick description of the functions can be found here. To view the settings or make changes to any of the LAN settings, click on “LAN Settings”... -
Page 35: Changing Lan Settings
Subnet Mask There is no need to change the subnet mask. This is a unique, advanced feature of your Belkin Router. It is possible to change the subnet mask if necessary; however, do NOT make changes to the subnet mask unless you have a specific reason to do so. The... - Page 36 IP address to change. Local Domain Name The default setting is “Belkin”. You can set a local domain name (network name) for your network. There is no need to change this setting unless you have a specific advanced need to do so. You can...
-
Page 37: Viewing The Dhcp Client List Page
Using the Web-Based Advanced User Interface Viewing the DHCP Client List Page You can view a list of the computers (known as clients), which are connected to your network. You are able to view the IP address the computer, the host name one), and the MAC address card (NIC). -
Page 38: Configuring The Wireless Network Settings
Changing the Wireless Network Name (SSID) To identify your wireless network, a name called the SSID (Service Set Identifier) is used. The default SSID of the Router is “Belkin Traveler”. You can change this to a name of your choice or leave it unchanged. -
Page 39: Securing Your Wi-Fi Network
Using the Web-Based Advanced User Interface Securing your Wi-Fi Network ® Here are a few different ways you can maximize the security of your wireless network and protect your data from prying eyes and ears. This section is intended for the home, home office, and small office user. - Page 40 Most of the new wireless equipment in the market today supports both 64-bit and 128-bit WEP encryption, but you might have older equipment that only supports 64-bit WEP. All Belkin wireless products will support both 64-bit and 128-bit WEP. Encryption Keys After selecting either the 64-bit or 128-bit WEP encryption mode, it is critical that you generate an encryption key.
- Page 41 Typically, this is the mode that will be used in a home environment. For a list of Belkin wireless products that support WPA, please visit our website at www.belkin.com/networking. uses what is known as a pre-shared key...
- Page 42 Using the Web-Based Advanced User Interface Using the Web-Based Advanced User Interface Sharing the Same Network Keys Most Wi-Fi products ship with security turned off. So once you have your network working, you need to activate WEP or WPA and make sure your wireless networking devices are sharing the same network key.
- Page 43 Using the Web-Based Advanced User Interface Using a Hexadecimal Key A hexadecimal key is a combination of numbers and letters from A–F and 0–9. 64-bit keys are five two-digit numbers. 128-bit keys are 13 two-digit numbers. For instance: AF 0F 4B C3 D4 = 64-bit key C3 03 0F AF 0F 4B B2 C3 D4 4B C3 D4 E7 = 128-bit key In the boxes below, make up your key by writing in two characters between A–F and 0–9 in each box.
-
Page 44: Wep Setup
Using the Web-Based Advanced User Interface Using the Web-Based Advanced User Interface WEP Setup 64-Bit WEP Encryption Select “64-bit WEP” from the drop-down menu. After selecting your WEP encryption mode, you can enter your key by typing in the hex key manually, or you can type a passphrase in the “Passphrase”... - Page 45 Using the Web-Based Advanced User Interface 128-Bit WEP Encryption After selecting your WEP encryption mode, you can enter your key by typing in the hex key manually, or you can type a passphrase in the “Passphrase” field and click “Generate” to create a key.
-
Page 46: Changing The Wireless Security Settings
Microsoft. This patch works only with the Windows XP operating system. You also need to download the latest driver for your Belkin Wireless G Desktop or Notebook Network Card from the Belkin support site. -
Page 47: Wpa/Wpa2 Setup
Using the Web-Based Advanced User Interface WPA/WPA2 Setup Select “WPA/WPA2” or “WPA2 only” from the “Allowed Client Type”. Select “Pre-shared key” as the authentication type. Enter your pre-shared key. This can be from eight to 63 characters and can be letters, numbers, or symbols. This same key must be used on all of the clients that you set up. - Page 48 PSK might be something like: “Smith family network key”. Click “Apply Changes”. You must now configure all clients to match these settings. Configuring your Belkin Wireless G Cards to Use Security Features Please Note: This section will provide you with information on how to configure your Belkin Wireless G Cards to use security features.
- Page 49 Type your WEP key in the network key box (designated as “Key” in Belkin’s wireless configuration utility). Important: A WEP key is a combination of numbers and letters from A–F and 0–9.
- Page 50 “Available networks” list and click “Configure”. Under “Network Authentication”, select “WPA-PSK (No Server)”. Type your WPA key in the network key box, designated as “Key” on Belkin’s wireless configuration utility. Important: WPA-PSK is a combination of numbers and letters from A–Z and 0–9.
- Page 51 Setting Up WPA for Wireless Desktop and Wireless Notebook Cards that are NOT Manufactured by Belkin If you do NOT have a Belkin WPA Wireless Desktop or Wireless Notebook Card and your computer is not equipped with WPA-enabled software, download Microsoft’s “Windows XP Support Patch for Wireless Protected Access”, which is available for free download.
- Page 52 Using the Web-Based Advanced User Interface Using the Web-Based Advanced User Interface Clicking on the “Wireless Networks” tab will display the following screen. Ensure the “Use Windows to configure my wireless network settings” box is checked. Under the “Wireless Networks” tab, click the “Configure” button and you will see the following screen.
- Page 53 Using the Web-Based Advanced User Interface For a home or small business user, select “WPA-PSK” under “Network Authentication”. Note: Select “WPA” if you are using this computer to connect to a corporate network that supports an authentication server such as a radius server. Please consult your network administrator for further information.
-
Page 54: Utilities Tab
Using the Web-Based Advanced User Interface Using the Web-Based Advanced User Interface Utilities Tab This screen lets you manage different parameters of the Router and perform certain administrative functions. -
Page 55: Restarting The Router
Using the Web-Based Advanced User Interface Restarting the Router Sometimes it may be necessary to restart or reboot the Router if it begins working improperly. Restarting or rebooting the Router will NOT delete any of your configuration settings. Restarting the Router to Restore Normal Operation Click the “Restart Router”... - Page 56 Using the Web-Based Advanced User Interface Using the Web-Based Advanced User Interface Restoring Factory Default Settings Using this option will restore all of the settings in the Router to the factory (default) settings. It is recommended that you back up your settings before you restore all of the defaults.
- Page 57 Using the Web-Based Advanced User Interface Saving a Current Configuration You can save your current configuration by using this feature. Saving your configuration will allow you to restore it later if your settings are lost or changed. It is recommended that you back up your current configuration before performing a firmware update.
- Page 58 Using the Web-Based Advanced User Interface Using the Web-Based Advanced User Interface When the save is complete, you will see the following window. Click “Close”. The configuration is now saved. Restoring a Previous Configuration This option will allow you to restore a previously saved configuration. Click “Browse”.
- Page 59 Using the Web-Based Advanced User Interface You will be asked if you want to continue. Click “OK”. A reminder window will appear. It will take up to 35 seconds for the configuration restoration to complete. Click “OK”. A 35-second countdown will appear on the screen. When the countdown reaches zero, the Router’s configuration will be restored.
-
Page 60: Updating The Firmware
Using the Web-Based Advanced User Interface Using the Web-Based Advanced User Interface Updating the Firmware From time to time, Belkin may release new versions of the Router’s firmware. Firmware updates contain feature improvements and fixes to problems that may exist. When Belkin releases new firmware, you can download the firmware from the Belkin update website and update your Router’s firmware to the latest version. - Page 61 Using the Web-Based Advanced User Interface Downloading a New Version of Firmware You will now be taken to the download page of “F5D7233 Firmware update - North America”. To download the new version of firmware, click the download logo ( A window will open that allows you to select the location where you want to save the firmware file.
- Page 62 Using the Web-Based Advanced User Interface Using the Web-Based Advanced User Interface When the save is complete, you will see the following window. Click “Close”. The download of the firmware is complete. To update the firmware, follow the next steps in “Updating the Router’s Firmware”. Updating the Router’s Firmware In the “Firmware Update”...
- Page 63 Using the Web-Based Advanced User Interface The “Update Firmware” box will now display the location and name of the firmware file you just selected. Click “Update”. You will be asked if you are sure you want to continue. Click “OK”. You will see one more message.
-
Page 64: Manually Configuring Network Settings
Manually Configuring Network Settings In order for your computer to properly communicate with your Router, you will need to change your PC’s TCP/IP settings to DHCP. Manually Configuring Network Adapters in Windows 2000, NT, or XP Click “Start”, “Settings”, then “Control Panel”. Double-click on the “Network and dial-up connections”... - Page 65 Manually Configuring Network Settings Manually Configuring Network Adapters in Windows 98SE or Me Right-click on “My Network Neighborhood” and select “Properties” from the drop-down menu. Select “TCP/IP -> settings” for your installed network adapter. You will see the following window. If “Specify an IP address”...
-
Page 66: Recommended Web Browser Settings
Recommended Web Browser Settings In most cases, you will not need to make any changes to your web browser’s settings. If you are having trouble accessing the Internet or the Web-Based Advanced User Interface, then change your browser’s settings to the recommended settings in this section. Internet Explorer 4.0 or Higher Start your web browser. - Page 67 Recommended Web Browser Settings Make sure there are no check marks next to any of the displayed options: “Automatically detect settings”, “Use automatic configuration script”, and “Use a proxy server”. Click “OK”. Then click “OK” again in the “Internet Options” page. Netscape Navigator ®...
-
Page 68: Using The Access Point Mode
Using the Adapter Mode Using the Access Point Mode Using the Access Point Mode Using the Access Point Mode Note: This advanced feature should be employed by advanced users only. The Router can be configured to work as a wireless-network access point. -
Page 69: Using The Adapter Mode
Using the Adapter Mode Setting Up your Computer to Use the Web-Based Advanced User Interface The default IP address of the Router (while functioning in Adapter Mode) is 192.168.2.225. You will need to set your computer’s IP address to the same subnet (e.g., 192.168.2.224) before you can access the Web-Based Advanced User Interface. - Page 70 Using the Adapter Mode Using the Adapter Mode Enter an IP address in the same subnet as the access point (for example, 192.168.2.224). Enter the following subnet mask: 255.255.255.0. Click “OK”. Warning: Once you have configured your Router, you must repeat steps 1 through 3 and select “Obtain an IP automatically”...
- Page 71 Using the Adapter Mode Logging Out of the Web-Based Advanced User Interface One computer at a time can log into the Router to make changes to the Router’s settings. Once a user has logged in to make changes, there are two ways that the computer can be logged out. The first is to click the “Logout”...
- Page 72 Using the Adapter Mode Using the Adapter Mode Understanding the Web-Based Advanced User Interface The home page is the first page you will see when you access the Web-Based Advanced User Interface (UI). The home page provides a quick view of the Router’s status and settings. All setup pages can be reached from this page.
- Page 73 Using the Adapter Mode Connect to a Wireless Network Click “Networks Available” from the quick-navigation links. Site Survey List Scan Clicking the “Scan” button will give you the most up-to-date data list of available networks. SSID The SSID is the wireless network name. BSSID/MAC Address This gives the MAC address of the available network.
-
Page 74: Troubleshooting
This option will allow you to restore a previously saved configuration. Firmware Update From time to time, Belkin may release new versions of the Router’s firmware. Updates contain improvements and fixes to known problems. For the latest firmware, go to the support section of www.belkin.com/networking. - Page 75 Troubleshooting Problem: Installation CD does not automatically start. Solution: If the CD-ROM does not start the Easy Install Wizard automatically, it could be that the computer is running other applications that are interfering with the CD drive. If the Easy Install Wizard screen does not appear within 15—20 seconds, open up your CD-ROM drive by double-clicking on the “My Computer”...
- Page 76 Troubleshooting Troubleshooting Problem: The Easy Install Wizard cannot find my Router. Solution: If the Easy Install Wizard is not able to find the Router during the installation process, please check the following items: Check to see if the switch on the back of the Router has been set to “Router Mode.”...
- Page 77 Solution: If you are unable to connect to the Internet from a wireless computer, please do the following: Look at the lights on your Router. Your Belkin Router’s lights should be as follows: • The “Power” light should be on.
- Page 78 Open your wireless utility software by clicking on the icon in the system tray at the bottom, right-hand corner of the screen. If you are also using a Belkin Wireless Card or Adapter with this Router, the tray icon should look like this (the icon may be red or green): The exact window that opens will vary depending on the model of wireless card you have;...
- Page 79 SSID” is enabled. This setting is found on the Router’s wireless “Channel and SSID” configuration page. If you are still unable to access the Internet after completing these steps, please contact Belkin Technical Support. Problem: My wireless network performance is inconsistent.
- Page 80 Troubleshooting Troubleshooting In order to determine if wireless issues are related to range, we suggest temporarily moving the computer, if possible, five to 10 feet away from the Router. Changing the Wireless Channel traffic and interference, switching the wireless channel of your network can improve performance and reliability.
- Page 81 Troubleshooting Technical Support You can find technical support information at: http://www.belkin.com/networking tech support area. If you want to contact technical support by phone, please call: 877-736-5771 or 310-898-1100 ext. 2263 Europe: 00 800 223 55 460 Australia: 1800 235 546...
-
Page 82: Information
Information FCC Statement DECLARATION OF CONFORMITY WITH FCC RULES FOR ELECTROMAGNETIC COMPATIBILITY We, Belkin Corporation, of 501 West Walnut Street, Compton, CA 90220, declare under our sole responsibility that the product, to which this declaration relates, complies with Part 15 of the FCC Rules. Operation is... - Page 83 Modifications The FCC requires the user to be notified that any changes or modifications to this device that are not expressly approved by Belkin Corporation may void the user’s authority to operate the equipment. Canada-Industry Canada (IC) The wireless radio of this device complies with RSS 139 &...
- Page 84 Belkin Corporation Limited Lifetime Product Warranty Belkin Corporation warrants this product against defects in materials and workmanship for its lifetime. If a defect is discovered, Belkin will, at its option, repair or replace the product at no charge provided it is returned during the warranty period, with transportation charges prepaid, to the authorized Belkin dealer from whom you purchased the product.
- Page 85 +44 (0) 1933 35 2000 +44 (0) 1933 31 2000 fax © 2005 Belkin Corporation. All rights reserved. All trade names are registered trademarks of respective manufacturers listed. The mark Wi-Fi is a registered mark of the Wi-Fi Alliance. Wireless G Travel Router Belkin Ltd.
Need help?
Do you have a question about the Wireless G Travel Router F5D7233 and is the answer not in the manual?
Questions and answers