Belkin 802.11g User Manual
Belkin wireless ethernet bridge user manual
Hide thumbs
Also See for 802.11g:
- User manual (94 pages) ,
- Specifications (2 pages) ,
- User manual (62 pages)
Table of Contents
Advertisement
Quick Links
Download this manual
See also:
User Manual
Express Business Park • Shipton Way
Rushden • NN10 6GL • United Kingdom
Starparc Building • Boeing Avenue 333
1119 PH Schiphol-Rijk • The Netherlands
© 2003 Belkin Corporation. All rights reserved. All trade names are registered trademarks of respective manufacturers
listed. Mac and AppleTalk are trademarks of Apple Computer, Inc., registered in the U.S. and other countries. 54g and
the 54g logo are trademarks of Broadcom Corporation in the United States and other countries.
belkin.com
Belkin Tech Support
US: 877.736.5771
310.898.1100 ext. 2263
Europe: 00 800 223 55 460
Australia: 1800 666 040
Belkin Corporation
501 West Walnut Street
Compton • CA • 90220 • USA
Tel: 310.898.1100
Fax: 310.898.1111
Belkin Components, Ltd.
Tel: +44 (0) 1933 35 2000
Fax: +44 (0) 1933 31 2000
Belkin Components B.V.
Tel: +31 (0) 20 654 7300
Fax: +31 (0) 20 654 7349
Belkin, Ltd.
7 Bowen Crescent • West Gosford
NSW 2250 • Australia
Tel: +61 (0) 2 4372 8600
Fax: +61 (0) 2 4372 8603
P74397
Advertisement
Table of Contents

Related Manuals for Belkin 802.11g


Summary of Contents for Belkin 802.11g
- Page 1 Fax: +61 (0) 2 4372 8603 © 2003 Belkin Corporation. All rights reserved. All trade names are registered trademarks of respective manufacturers listed. Mac and AppleTalk are trademarks of Apple Computer, Inc., registered in the U.S. and other countries. 54g and the 54g logo are trademarks of Broadcom Corporation in the United States and other countries.
- Page 2 802. 1 1g Wireless Ethernet Bridge Connect your gaming console or Ethernet-equipped PC to a wireless network User Manual F5D7330...
-
Page 3: Table Of Contents
Introduction ..........1 System Requirements . -
Page 4: Introduction
Thank you for purchasing the Belkin 802.11g Wireless Ethernet Bridge (the Bridge). Now you can take advantage of this great new technology and gain the freedom you need around the home or office without using cables. The 802.11g Wireless Ethernet Bridge works like a conventional network card, but without the wires. -
Page 5: Overview
The Bridge complies with the IEEE 802.11g standard in order to communicate with other 802.11b- and 802.11g-compliant wireless devices at 11Mbps and 54Mbps. 802.11g products run at speeds of up to 54Mbps and operate on the same 2.4GHz frequency band as 802.11b Wi-Fi products. -
Page 6: Product Specifications
802.11b: CCK, DQPSK, DBPSK 802.11g: OFDM 2.412-2.497GHz ISM band 802.11b: 11 for North America, 14 for Japan, 13 for Europe 802.11g: 11 for North America, 13 for Japan, 13 for Europe 64-/128-bit WEP TCP/IP Software & Browser-based 1 10/100Base-T RJ45 port... -
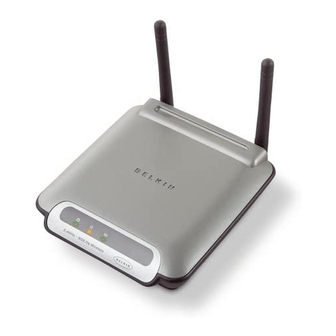
Page 7: Knowing Your Wireless Ethernet Bridge
Knowing your Wireless Ethernet Bridge a. Power Link LED Solid: Bridge is ON Blinking: Bridge is OFF b. Ethernet Link LED Solid: Connected to Ethernet Off: Ethernet disconnected Blinking: Transferring data Green: 10Mbps device connected Amber: 100Mbps device connected c. WLAN Link LED Solid: Bridge is ON Blinking:... -
Page 8: Connecting The Hardware
1. Connect the included Ethernet network cable into the LAN port on the back of the 802.11g Wireless Ethernet Bridge and plug the other end of the cable to the back of your computer or any other Ethernet-enabled device. 2. Turn on your Bridge by connecting the power supply cable to your Bridge. -
Page 9: Connecting The Bridge Using The Setup Wizard
CONNECTING THE BRIDGE USING THE SETUP WIZARD Attention: Your Bridge should work out-of-the-box. You only need to run the Wizard for special settings such as encryption or head-to-head gaming play. 1. Insert the CD into your CD-ROM drive. 2. The “Wireless Setup Wizard” screen should automatically appear. Note: If the Easy Setup Wizard does not start up automatically, select your CD-ROM drive from “My Computer”... - Page 10 CONNECTING THE BRIDGE USING THE SETUP WIZARD 5. Select the Bridge you wish to set up and click “Next”. 6. Leave the password blank and click “Next” to continue for initial setup. Note: If this is not your first time setting up this Bridge and you already were assigned a password, enter your password and click “Next”.
- Page 11 CONNECTING THE BRIDGE USING THE SETUP WIZARD 7. Your Bridge ships with no password entered. You can set the password now or make no changes to the password field to keep your password blank. Click “Next” to continue. 8. Select “Access point” or “Ad-Hoc” and click “Next” to continue. a.
- Page 12 CONNECTING THE BRIDGE USING THE SETUP WIZARD 9. Enter the settings for the wireless network that you will be connecting to. The default SSID of “ANY” will connect your Bridge to the closest network automatically. After you finish entering the settings, click “Next” to continue. a.
- Page 13 CONNECTING THE BRIDGE USING THE SETUP WIZARD 10. Enter the IP address settings for your Bridge. The current settings will usually work. Click “Next” to continue. Warning: It is recommended that you only make changes to this page if you have a specific reason to do so.
- Page 14 CONNECTING THE BRIDGE USING THE SETUP WIZARD 11. From the Encryption drop-down menu, select “Disabled”, “64-bit”, or “128-bit” according to your wireless network’s setting. Select “Disabled” if you have not configured your wireless network to use encryption. All wireless devices on your network must share the same network key.
- Page 15 CONNECTING THE BRIDGE USING THE SETUP WIZARD 12. Confirm all your settings are correct then click “Finish”. 13. Setup is complete. You can now connect the Bridge to any Ethernet-equipped device on your wireless network.
-
Page 16: Setting Up Your Computer To Use Web-Based Setup Interface
SETTING UP YOUR COMPUTER TO USE THE WEB-BASED INTERFACE The default IP address of the Bridge is 192.168.2.225. You will need to set your computer’s IP address to the same subnet such as 192.168.2.224 before you can access the Web-Based Setup Interface. Perform the following steps from the PC you wish to configure your Bridge from: Note: You must undo these steps once you have completed configuring your Bridge. -
Page 17: Connecting The Bridge Using Web-Based Setup Interface
CONNECTING THE BRIDGE USING THE WEB-BASED INTERFACE Using your Internet browser, you can access the web-based user interface. In your browser, type “192.168.2.225” (do not type in anything else such as “http://” or “www”). Then press the “Enter” key. Logging into the Web-Based Setup You will see the Web-Based Setup home page in your browser window. -
Page 18: Status
CONNECTING THE BRIDGE USING THE WEB-BASED INTERFACE Status a. Quick Navigation Links You can go directly to any of the pages by clicking directly on these links. The links are divided into logical categories and grouped by tabs to make finding a particular setting easier to find. -
Page 19: Bridge Settings
CONNECTING THE BRIDGE USING THE WEB-BASED INTERFACE Bridge Settings a. Bridge Name Enter the name of your Wireless Ethernet Bridge here. b. IP Configuration: • Manually set the Bridge’s IP address - The default IP address of your Bridge is 192.168.2.225. You can modify it to match your network subnet if needed. For example, if your network subnet is under 192.168.1.xxx, then you can configure the Bridge to use 192.168.1.225. - Page 20 CONNECTING THE BRIDGE USING THE WEB-BASED INTERFACE e. Gateway IP Adress: Enter the IP address of your network’s gateway (also known as router). f. SSID: The SSID is the wireless network name. This field lets you type in the network name (SSID) you want this Bridge to connect to.
- Page 21 CONNECTING THE BRIDGE USING THE WEB-BASED INTERFACE k. Key ID: Select the network key (1-4) that will be used to authenticate. l. Network Key: Enter a network key only if you have encryption enabled in your wireless network. Type your WEP key in the Network Key box using passphrase or hex key format.
-
Page 22: Site Survey
CONNECTING THE BRIDGE USING THE WEB-BASED INTERFACE Site Survey a. SSID: The SSID is the wireless network name. b. Refresh: Clicking the Refresh button will give you the most up-to-date data. c. Join: You can connect to a specific wireless network by selecting the check box and click “Apply Changes”. -
Page 23: Restore Factory Default
CONNECTING THE BRIDGE USING THE WEB-BASED INTERFACE Restore Factory Default Clicking “Restore Defaults” will erase all your current settings. Save Current Settings You can save your current configuration by using this feature. Saving your configuration will allow you to restore it later if your settings are lost or changed. -
Page 24: Firmware Update
CONNECTING THE BRIDGE USING THE WEB-BASED INTERFACE Firmware Update From time to time, Belkin may release new versions of the Bridge’s firmware. Updates contain improvements and fixes to problems that may have existed. a. Browse: Clicking on “Browse” will open a window that allows you to select the location of the firmware update file. -
Page 25: Password
CONNECTING THE BRIDGE USING THE WEB-BASED INTERFACE Password The Bridge ships with NO password entered. If you wish to add a password for greater security, you can set a password here. Write down your password and keep it in a safe place, as you will need it if you need to log into the Bridge in the future. -
Page 26: Troubleshooting
TROUBLESHOOTING Cannot connect to the network. If your Bridge appears to be functioning properly but you cannot connect to the network, the problem may be that there is a mismatch between the “Network name (SSID)” and “Wireless network key (WEP)” settings in your wireless network properties and the name and WEP key of the network you are trying to connect to. - Page 27 TROUBLESHOOTING In the “This connection uses the following items” list, verify that the “File and Printer Sharing for Microsoft Networks” check box is selected. If the check box is cleared, select it. If this item is not present, click “Install”. In the “Select Network Component Type”...
- Page 28 TROUBLESHOOTING Technical Support You can find technical support information at www.belkin.com/networking or www.belkin.com through the tech support area. If you want to contact technical support by phone, please call 877-736-5771.
-
Page 29: Information
FCC Statement DECLARATION OF CONFORMITY WITH FCC RULES FOR ELECTROMAGNETIC COMPATIBILITY We, Belkin Corporation, of 501 West Walnut Street, Compton, CA 90220, declare under our sole responsibility that the product, to which this declaration relates, complies with Part 15 of the FCC Rules. Operation is subject to the following two conditions: (1) this device may not cause harmful interference, and (2) this device must accept any interference received, including interference that may cause undesired operation. -
Page 30: Canada-Industry Canada (Ic)
• EN 300 328 Technical requirement for radio equipment • ETS 300 826 General EMC requirements for radio equipment. To determine the type of transmitter, check the identification label on your Belkin product. Products with the CE marking comply with the EMC Directive (89/336/EEC) and the Low Voltage Directive (72/23/EEC) issued by the Commission of the European Community. - Page 31 Belkin Corporation warrants this product against defects in materials and workmanship for its lifetime. If a defect is discovered, Belkin will, at its option, repair or replace the product at no charge provided it is returned during the warranty period, with transportation charges prepaid, to the authorized Belkin dealer from whom you purchased the product.
Need help?
Do you have a question about the 802.11g and is the answer not in the manual?
Questions and answers