
Related Manuals for Westinghouse WGen12000


Summary of Contents for Westinghouse WGen12000
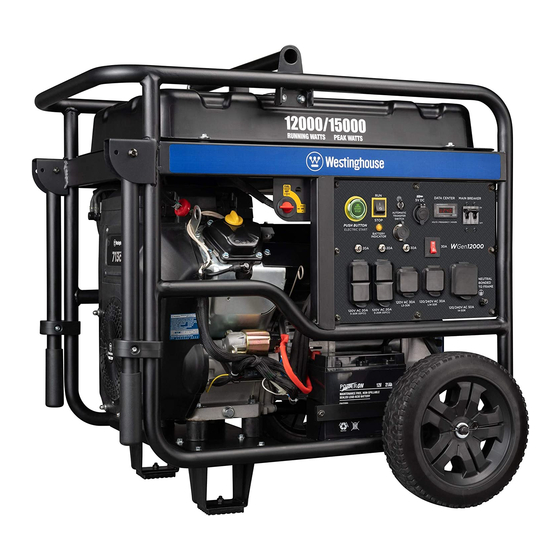
- Page 1 USER MANUAL Gen12000 Portable Generator 12,000 Running Watts | 15,000 Peak Watts...
-
Page 2: Wgen Technical Specifications
3.5% for each 300 meter (1,000 foot) increase in altitude. The effect of altitude on horsepower will be greater if no carburetor modification is made. A decrease in engine horsepower will decrease the power output of the generator. Contact our service team to order altitude kits. HAVE QUESTIONS? Email us at service@wpowereq.com or call 1-855-944-3571 2 | Westinghouse Outdoor Power Equipment... -
Page 3: Product Registration
IMPORTANT: KEEP YOUR PURCHASE RECEIPT TO ENSURE TROUBLE-FREE WARRANTY COVERAGE. PRODUCT REGISTRATION To ensure trouble-free warranty coverage, it is important you register your Westinghouse generator. You can register your generator by either: 1. Filling in the product registration form below and mailing to:... -
Page 4: Table Of Contents
How to Ground Generator ....13 WGen12000 Schematic ..... . 33 Connecting the Generator to Building Electrical . -
Page 5: Safety
NOTE: Indicates a procedure, practice or condition that should be followed in order for the generator to function in the manner intended. Read Manufacturer’s Instructions Read Safety Messages Before Proceeding Wear Personal Protective Equipment (PPE) Westinghouse Outdoor Power Equipment | 5... -
Page 6: General Safety Rules
Never use the generator to power medical support equipment. engine misfires often. Always disconnect tools or Always remove any tools or other service equipment used during appliances from the maintenance from the generator before operating. generator before starting. 6 | Westinghouse Outdoor Power Equipment... -
Page 7: Unpacking
The generator is heavy; lifting it could cause bodily harm. Avoid cutting on or near staples to prevent personal injury. WHAT COMES IN THE BOX (WGEN12000) Owners Manual Quick Start Guide/Maintenance Schedule Wireless Remote Starter (1) 1.6 Liter Bottle of SAE 10W30 Oil (1) -
Page 8: Assembly
Figure 1 - Install Wheels 2. Install the axle bolt and wheel through another washer and then through the axle bracket on the frame. 8 | Westinghouse Outdoor Power Equipment... -
Page 9: Installing The Battery
(+) battery post. Make sure boot is over battery post. 3. Locate negative (-) cable (black boot) and connect to the negative (-) battery post. Make sure the boot is over the battery post. Westinghouse Outdoor Power Equipment | 9... -
Page 10: Features
Fuel Shut off Valve: Controls the flow of fuel to the engine. Lifting Bracket: Bracket to lift generator at using a crane. Fuel Gauge: Indicates fuel level. Spark Plug Boot (Wire): Must be removed when servicing the engine or the spark plug. 10 | Westinghouse Outdoor Power Equipment... -
Page 11: Control Panel Features
The run timer resets to 00:00 when the Smart Switch Outlet: Connects the Westinghouse generator is shut off. Built into this run timer is a ST Switch (sold separately) to the control panel. -
Page 12: Operation
• Block cooling vents • Block air intake system 12 | Westinghouse Outdoor Power Equipment... -
Page 13: High Altitude Operation
Contact our service team 1-855-944-3571 for altitude part kits. High Altitude Carburetor Kit Part Number: 140574 HOW TO FLOAT THE NEUTRAL The Westinghouse generator is wired with the neutral HOW TO GROUND THE GENERATOR bonded to ground. If you are connecting your generator... -
Page 14: Power Cords
Using Extension Cords Westinghouse Portable Power assumes no responsibility for the content within this table. The use of this table is the responsibility of the user only. This table is intended for reference only. The results produced by using this table are not guaranteed to be correct or applicable in all situations as the type and construction of cords are highly variable. -
Page 15: Engine Fluids And Fuel
Avoid prolonged skin contact with operation of the generator. Failure to maintain the gasoline. Avoid prolonged breathing of proper oil level can result in engine damage. gasoline vapors. Westinghouse Outdoor Power Equipment | 15... -
Page 16: Power Output And Demand
This total must not be greater than the generator’s specified starting power output. 3. The total running power demand of all the devices that will be connected to any one of the generator’s outlets must not exceed the generator’s specified running power output. 16 | Westinghouse Outdoor Power Equipment... - Page 17 • All loads are disconnected from the generator. See No choke or any other carburetor adjustments. Tampering Connected Loads. with the automatic choke system may void your warranty. See an authorized Westinghouse service center for more • The generator is properly grounded the Generator. See Grounding the Generator. information.
-
Page 18: Starting The Generator
7. Plug in electric devices. Figure 7 - Fuel Shut Off - ON 5. Push the engine control switch into the RUN position (see Figure 8). Figure 8 - Engine Control Switch - RUN 18 | Westinghouse Outdoor Power Equipment... -
Page 19: Stopping The Generator
Always perform maintenance in a well- Allow hot components to cool to ventilated area. Gasoline fuel and fuel the touch prior to performing any vapors are extremely flammable and maintenance procedure. can ignite under certain conditions. Westinghouse Outdoor Power Equipment | 19... -
Page 20: Maintenance
Spark Arrestor Check/Clean Spark Plug Check/Clean Replace *Service more frequently if operating in dry and dusty conditions TABLE 2: MAINTENANCE SCHEDULE - AUTHORIZED WESTINGHOUSE SERVICE DEALER PERFORMED After First 20 After 50 Hours After 100 Hour Before Every Hours or First... -
Page 21: Engine Oil Maintenance
7. Using the supplied funnel, slowly add engine oil to the engine. Stop frequently to check the level to avoid overfilling. 8. Continue to add oil until the oil is at the correct level. See Figure 14. Figure 13 - Oil Dipstick Westinghouse Outdoor Power Equipment | 21... -
Page 22: Changing Engine Oil
Cleaning the Air Filter The air filter must be cleaned after every 50 hours of use or 3 months (frequency should be increased if generator is operated in a dusty environment). 22 | Westinghouse Outdoor Power Equipment... -
Page 23: Spark Plug Maintenance
P100: It is time change/clean the fuel filter, clean the air filter, and change the oil. NOTICE Use only recommended spark plugs when servicing. The manufacturer is not responsible for engine damage when using spark plugs not recommended by the manufacturer. Westinghouse Outdoor Power Equipment | 23... -
Page 24: Checking And Adjusting Valve Lash
6. If an adjustment is required, hold the adjusting nut 7. Connect the red positive (+) battery cable to the and loosen the jam nut. battery first. 7. Turn the adjusting nut to obtain the correct valve 24 | Westinghouse Outdoor Power Equipment... -
Page 25: Cleaning The Generator
8. Replace the spark plug (see Spark Plug Maintenance). spark arrestor screen. NOTE: Only use Westinghouse 9. Move the generator to a clean, dry place for storage. spark arrestors as replacements. -
Page 26: Troubleshooting
9. Drain fuel and replace with fresh fuel. 10. If trying 1-9 above does not solve 10. Take the generator to your nearest the problem, the cause might be the authorized service dealer. generator has a fault. 26 | Westinghouse Outdoor Power Equipment... -
Page 27: Troubleshooting
3. If trying 1-2 above does not solve 3. Take the generator to your nearest steady RPM. the problem, the cause might be a authorized service dealer. fault in the generator Westinghouse Outdoor Power Equipment | 27... -
Page 28: Exploded And Engine Views
WGen12000 EXPLODED VIEW WESTINGHOUSE GENERATOR ACCESSORIES (CALL TO ORDER) 210003 WGC25 25’ POWER CORD 210052 30A 6 BREAKER TRANSFER SWITCH KIT - MODEL WHMTS30 210075 25’ CORD 30AMP TRANSFER SWITCH 210076 50A 6 BREAKER TRANSFER SWITCH KIT - MODEL WHMTS50... -
Page 29: Wgen12000 Exploded View Part Numbers
WGen12000 EXPLODED VIEW PART NO. PART. DESCRIPTION PART. DESCRIPTION 180784 ENGINE 38.5 130566 BATTERY CHARGING PORT 2.5MM 120560 FRONT COVER, ALTERNATOR 38.6 130569 DOUBLE USB SOCKET 120561 BOLT M10×1.25 38.7 130503 VFT METER 120562 ALTERNATOR ASSEMBLY 38.8 300673 THE CIRCUIT BREAKER... -
Page 30: Wgen12000 Engine View
WGen12000 ENGINE VIEW 30 | Westinghouse Outdoor Power Equipment... -
Page 31: Wgen12000 Engine View Part Numbers
WGen12000 ENGINE VIEW PART NO. PART. DESCRIPTION PART. DESCRIPTION 180661 NUT M6 180702 CRANKCASE 180662 HARNESS, FUEL CUT SOLENOID 180703 PIN DOWEL Φ8X12 180663 BOLT M6X35 180704 SUPPORTING SEAT ASSY, ROCKER 180664 RECOIL STARTER ASSEMBLY 180567 BOLT M6X20 180665 FUEL TUBE... - Page 32 WGen12000 ENGINE VIEW PART NO. PART. DESCRIPTION PART. DESCRIPTION 180740 BOLT M8X50 180779 LONG OIL TUBE 180741 STRAINER, OIL 180780 VALVE EXHAUST 180742 CRANKCASE DOWEL PIN 180775 PHILLIPS SCREW M8X50 180743 VALVE, IN 180774 SPACER, CARBURETOR 180744 LOCKING FLAPS 180773...
-
Page 33: Wgen12000 Schematic
WGen12000 SCHEMATIC Westinghouse Outdoor Power Equipment | 33... - Page 34 Version 10.22.18KD 34 | Westinghouse Outdoor Power Equipment...
Need help?
Do you have a question about the WGen12000 and is the answer not in the manual?
Questions and answers