Table of Contents
Advertisement
Advertisement
Table of Contents

Subscribe to Our Youtube Channel
Related Manuals for Jumbuck Moda


Summary of Contents for Jumbuck Moda
-
Page 2: Outdoor Use Only
ASSEMBLY & ASSEMBLY & OPERATION INSTRUCTIONS OPERATION INSTRUCTIONS OPERATION INSTRUCTIONS OPERATION INSTRUCTIONS OPERATION INSTRUCTIONS OPERATION INSTRUCTIONS OPERATION INSTRUCTIONS OPERATION INSTRUCTIONS JUMBUCK MODA JUMBUCK MODA JUMBUCK MODA JUMBUCK MODA JUMBUCK MODA JUMBUCK MODA JUMBUCK MODA JUMBUCK MODA OUTDOOR GAS PIZZA OVEN (HS... -
Page 3: Important Safety Instructions
SAFETY INSTRUCTIONS SAFETY INSTRUCTIONS SAFETY INSTRUCTIONS SAFETY INSTRUCTIONS IMPORTANT: READ THE ASSEMBLY INSTRUCTIONS IN THIS BOOKLET BEFORE REMOVING THE CONTENTS OF THIS CARTON IMPORTANT SAFETY INSTRUCTIONS IMPORTANT SAFETY INSTRUCTIONS IMPORTANT SAFETY INSTRUCTIONS IMPORTANT SAFETY INSTRUCTIONS • This gas oven should not be located under This appliance must This appliance must This appliance must... -
Page 4: Other Consideration
WARNING WARNING WARNING WARNING OTHER CONSIDERATION OTHER CONSIDERATION OTHER CONSIDERATION OTHER CONSIDERATIONS S S S A strong gas smell or the hissing sound of gas Strong winds and low temperatures can • indicates a serious problem with your gas oven or affect the heating and performance of your the gas cylinder. - Page 5 PLACEMENT OF GAS OVEN A A A A NY ENCLOSURE IN WHICH THE APPLIANCE IS USED NY ENCLOSURE IN WHICH THE APPLIANCE IS USED NY ENCLOSURE IN WHICH THE APPLIANCE IS USED NY ENCLOSURE IN WHICH THE APPLIANCE IS USED PLACEMENT PLACEMENT OF GAS OVEN OF GAS OVEN...
-
Page 6: Gas Connection
GAS CYLINDER CYLINDER SAFETY INFORMATION SAFETY INFORMATION CYLINDER CYLINDER SAFETY INFORMATION SAFETY INFORMATION GAS TYPE GAS TYPE HOSE AND REGULATOR REPLACEMENT HOSE AND REGULATOR REPLACEMENT GAS TYPE GAS TYPE HOSE AND REGULATOR REPLACEMENT HOSE AND REGULATOR REPLACEMENT Note the labeling of appropriate gases listed on In the case of a problem arising with the hose and your gas oven and ascertain that the gas you have regulator please contact your gas oven supplier for... -
Page 7: Leak Testing
LEAK TESTING LEAK TESTING LEAK TESTING LEAK TESTING Please check for gas leakage the first time you are connecting the gas oven to the gas cylinder, and also each time you are replacing the gas cylinder or disconnecting/reconnecting any fittings. Inspect 1. -
Page 8: Lighting Procedure
CONTROLLING THE FLAMES CONTROLLING THE FLAMES CONTROLLING THE FLAMES CONTROLLING THE FLAMES LIGHTING PROCEDURE LIGHTING PROCEDURE LIGHTING PROCEDURE LIGHTING PROCEDURE The knobs have three basic positions. You can achieve • Lighting the gas oven is easy, but must be done any flame height between low and high by rotating the with due care. - Page 9 CARING FOR THE GAS OVEN CARING FOR THE GAS OVEN WHILE COOKING WHILE COOKING WHILE COOKING WHILE COOKING CARING FOR THE GAS OVEN CARING FOR THE GAS OVEN Your gas oven should be kept clean to prevent Flames caused by fat dripping from the food could deterioration and it will look better and last longer if damage the food, causing the food to burn easily.
- Page 10 GAS OVEN GAS OVEN GAS OVEN GAS OVEN MAINTENANCE MAINTENANCE MAINTENANCE MAINTENANCE IMPORTANT INFORMATION IMPORTANT INFORMATION IMPORTANT INFORMATION IMPORTANT INFORMATION Apart from cleaning, your gas oven is a fairly low • This product is for outdoor use only. maintenance appliance. Below are a couple of •...
-
Page 11: Burner Maintenance
BURNER MAINTENANCE BURNER MAINTENANCE BURNER MAINTENANCE BURNER MAINTENANCE You should check the burner periodically for any sort Use a bottle brush with a flexible handle. Run the brush of blockage. To do this, remove and inspect them. If through the burner tube and inside the burner several any of the holes are clogged, gently tap the burner times, removing any debris. -
Page 12: Exploded View
EXPLODED VIEW... - Page 13 PARTS CODE Part Numbers Parts Name Parts Code Chimney PZ00101 Body PZ00102 Door PZ00103 Door Handle PZ00104 Temperature Gauge PZ00105 Grill PZ00106 Ceramic Plate PZ00107 Oven Rack PZ00108 Firing Pin PZ00109 Burner PZ00110 Gas Control Valve PZ00111 Front Fascia PZ00112 Knob PZ00113 Pulse Igniter...
-
Page 14: Carton Contents
CARTON CONTENTS 1.Leg L - 2pc 2. Leg Plug - 2pcs 3. Cart Bottom Plate- 1pcs 4. Leg R - 2pcs 5. Cart Support - 1pc 6 . Wheel - 2pcs 7.Wheel Axle - 1pc 8.Spacer - 4pc 9. Chimney - 1pcs 10. -
Page 15: Hardware Pack Contents
HARDWARE PACK CONTENTS Bolt Nut M6 M6 x 12 mm 34 pcs 34 pcs Flat washer Spring washer 28 pcs 28 pcs Bolt Bolt M6 x 35mm 8pcs M4X10mm 3pcs Nut M10 Flat washer M4 3pcs 2PCS Flat washer M10 2PCS... -
Page 16: Assembly Instructions
ASSEMBLY INSTRUCTIONS Remove all contents from packaging, and make sure all Remove all contents from packaging, and make sure all the the parts are present before attempting to parts are present before attempting to Remove all contents from packaging, and make sure all Remove all contents from packaging, and make sure all parts are present before attempting to parts are present before attempting to... - Page 17 STEP 3 Assemble the Cart Front Plate (Part 12) as shown. Step 4 Assemble the Wheel (Part 6) and Wheel Axle (Part 7) as shown. Step 5...
- Page 18 Assemble the Body (Part 16) and Spacer (Part 8) as shown. Step 6 Assemble the Chimney (Part 9) as shown.
- Page 19 STEP 7 Insert the Knob(Part 10) as shown. STEP 8 Assemble the Body to the Cart as shown and use bolts to tighten. STEP 9...
- Page 20 Place the Grill (part 13), Oven Rack (Part 15) and Ceramic Plate (Part 14) as shown. Step 10 Assemble the Handle(Part 16) as shown.
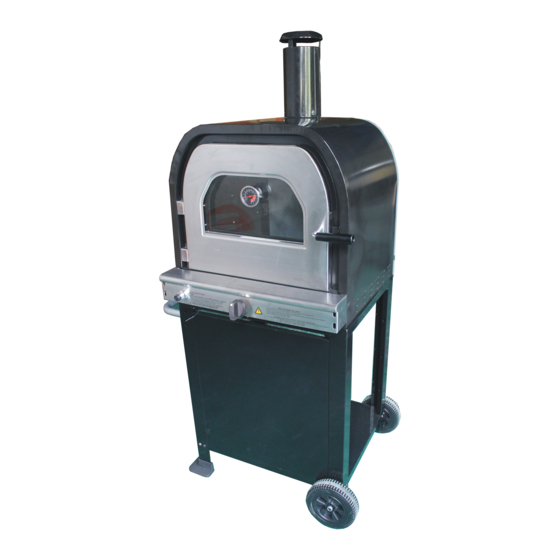
- Page 21 Fully Fully Fully Fully- - - - Assembled Assembled Assembled Assembled Your gas oven Your gas oven is now ready for use. is now ready for use. Your gas oven Your gas oven is now ready for use. is now ready for use. Please take ca Please take care when lighting your gas oven re when lighting your gas oven.
-
Page 22: Specification
SPECIFICATION SPECIFICATION SPECIFICATION SPECIFICATION BRAND NAMES: BRAND NAMES: BRAND NAMES: BRAND NAMES: JUMBUCK APPLIANCE: APPLIANCE: APPLIANCE: APPLIANCE: 1 BURNER OUTDOOR PIZZA OVEN (GAS OVEN) CERTIFICATE CERTIFICATE CERTIFICATE CERTIFICATE HOLDER: HOLDER: HOLDER: HOLDER: Genesis Australia Corporation Pty Ltd 2/26 Industry Street Malaga 6090 Western... -
Page 23: Warranty
The warranty for New Zealand is given by : the operating manual. Bunnings NZ Limited • Any repair does not extend the warranty period. PO Box 14436, • Any parts other than original Jumbuck parts will Panmure, Auckland, 1471 void this warranty. NEW ZEALAND (09) 978 2200... - Page 24 WARRANTY WARRANTY WARRANTY WARRANTY For New Zealand Customer For New Zealand Customer For New Zealand Customer For New Zealand Customer For Australia For Australian n n n Customers For Australia For Australia Customers Customers Customers Any claim under this warranty must be made To make a claim under the warranty, please within 12 months of the date of purchase of the contact Genesis Australia at...
- Page 25 For Australia customers For Australia customers not cover costs for transit, nor in home service technical issues with your JUMBUCK GAS OVEN, in • Liability will only be accepted for loss or damage the first instance review the instructions manual or...
Need help?
Do you have a question about the Moda and is the answer not in the manual?
Questions and answers