Table of Contents
Advertisement
Quick Links
Advertisement
Table of Contents

Related Manuals for Jumbuck NOVO SMALL HS-FP005


Summary of Contents for Jumbuck NOVO SMALL HS-FP005
-
Page 2: Safety Instructions
JUMBUCK JUMBUCK JUMBUCK JUMBUCK NOVO NOVO SMALL SMALL JUMBUCK JUMBUCK JUMBUCK JUMBUCK NOVO NOVO SMALL SMALL CHARCOAL CHARCOAL CHARCOAL CHARCOAL SPIT ROASTER CHARCOAL CHARCOAL CHARCOAL CHARCOAL SPIT ROASTER SPIT ROASTER (HS SPIT ROASTER (HS- - - - FP005 FP005 FP005... - Page 3 SPIT ROASTER OPERATING GUIDELINES Lighting the spit roaster Lighting the spit roaster Cleaning Cleaning Cleaning Cleaning Lighting the spit roaster Lighting the spit roaster • once finish cooking, remove left over solid fuel • solid fuel is to be used for this product (fire from the spit roaster wood, charcoal etc.) •...
- Page 4 EXPLODED VIEW AND PARTS CODE Part Number Part Number Part Number Part Number Part Name Part Name Part Name Part Name Supplier Code Supplier Code Supplier Code Supplier Code Rotisserie Spike Fp00501 Handle Fp00502 Weight Fp00503 Rotisserie Pole Fp00504 Rotisserie Arm Fp00505 Rotisserie Support Fp00506...
-
Page 5: Carton Contents
CARTON CONTENTS Description Description Q’ty Q’ty Description Description Q’ty Q’ty Description Description Q’ty Q’ty Description Description Q’ty Q’ty Body 1 Pc 4 Pcs Motor Support Rotisserie Support 1 Pc Rotisserie Arm Rotisserie Spike 2pcs Air Vent Weight 2pcs Handle Motor... -
Page 6: Hardware Pack Contents
Rotisserie Pole Cooking Grid HARDWARE PACK CONTENTS Bolt: M6x12 Nut M6 4 Pcs 12 Pcs Lock Washer M6 Flat Washer M6 8 Pcs 8 Pcs Wing Nut M5 Bolt: M6x40 2 Pcs 8 Pcs Bolt: M5x10 Lock Washer M5 2 Pcs 2 Pcs... -
Page 7: Assembly Instructions
ASSEMBLY INSTRUCTIONS Remove all contents from packaging, and make sure all Remove all contents from packaging, and make sure all Remove all contents from packaging, and make sure all Remove all contents from packaging, and make sure all the the parts parts parts parts are present before attempting to... - Page 8 STEP 3 STEP 3 STEP 3 STEP 3 Assemble Motor Support (Part 3) and Rotisserie Support(Part 4) to the body as per illustration. Use Bolt A and Nut B to tighten. STEP 4 STEP 4 STEP 4 STEP 4 Place the Cooking Grid (Part 12) onto the body as per illustration.
- Page 9 STEP 5 STEP 5 STEP 5 STEP 5 Insert Motor (Part 10) onto the Motor Support, as per illustration. STEP 6 STEP 6 STEP 6 STEP 6 Assemble the rotisserie parts as per illustration.
- Page 10 STEP 7 STEP 7 STEP 7 STEP 7 Insert Spit Pole into the Motor as per illustration. Height Adjustments Height Adjustments Height Adjustments Height Adjustments When using another height, adjust Motor to desired height and use plug pin to affix. Insert Spit Pole into the motor, as per illustration.
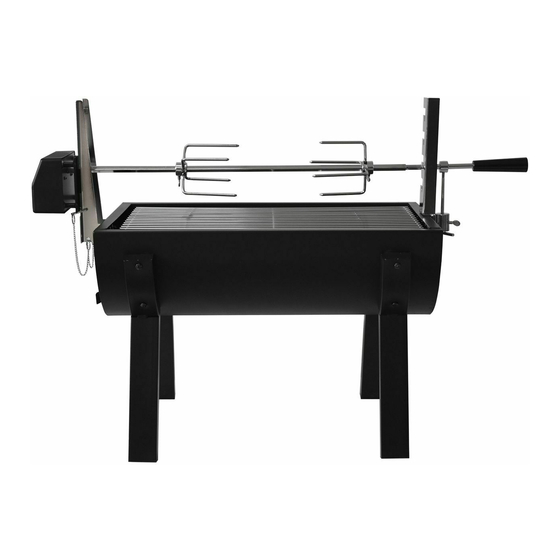
- Page 11 Fully Fully Fully Fully- - - - Assembled Assembled Assembled Assembled Your spit roaster Your spit roaster is now ready for use. is now ready for use. Your Your spit roaster spit roaster is now ready for use. is now ready for use. Pleas Pleas Pleas...
-
Page 12: Warranty
Bunnings NZ Limited the operating manual. PO Box 14436, • Any repair does not extend the warranty period. Panmure, Auckland, 1471 • Any parts other than original Jumbuck parts will NEW ZEALAND void this warranty. (09) 978 2200 marketing@bunnings.co.nz Proof of purchase must be presented. - Page 13 WARRANTY WARRANTY WARRANTY WARRANTY For New Zealand Customer For New Zealand Customer For New Zealand Customer For New Zealand Customer For Australia For Australian n n n Customers For Australia For Australia Customers Customers Customers Any claim under this warranty must be made To make a claim under the warranty, please within 12 months of the date of purchase of the contact Genesis Australia at...
- Page 14 For Australia customers For Australia customers not cover costs for transit, nor in home service technical issues with your JUMBUCK SPIT ROASTER, • Liability will only be accepted for loss or damage in the first instance review the instructions manual...
Need help?
Do you have a question about the NOVO SMALL HS-FP005 and is the answer not in the manual?
Questions and answers