Advertisement
Quick Links
Advertisement

Subscribe to Our Youtube Channel
Related Manuals for Jumbuck HS-PZ002


Summary of Contents for Jumbuck HS-PZ002
- Page 2 ASSEMBLY & OPERATION INSTRUCTIONS (HS-PZ002) Outdoor Charcoal Pizza Oven OUTDOOR USE ONLY...
-
Page 3: Part List
PART LIST Part Number Part Name Supplier Code smoke pipe PZ00201 smoke pipe handle PZ00202 body PZ00203 body back plate PZ00204 charcoal collect box PZ00205 thermometer PZ00206 door handle PZ00207 door PZ00208 charcoal ash grid PZ00209 firebrick PZ00210 control plate PZ00211 cart handle PZ00212... - Page 4 4.cart handle…1pc cart leg L……2pcs cartleg R…..2pcs cartbodysupport plate ..1pc 5.cart bottom grid 6.body ..……1pc 7.smoke pipe……1pc smoke pipe handle ..1pc ..1pc 9.door ...…..1pc 10.charcoalcollectbox 11.spade…….1pc 12.wheel axle…..2pcs ..1pc 13. wheel……2pcs 14.charcoal ash grid..1pc 15. firebrick……16pcs Warning • For outdoor use only. •...
- Page 5 Hardware Pack Bolt: M6x15 Bolt: M6x45 22 pcs 4 pcs Bolt: M6x30 Flat washer M10 8 pcs 2 pcs Bolt: M6x40 Flat washer M6 8 pcs 4 pcs skid resistance nut M6 Lock nut M10 2 pcs 34pc screwdriver Spanner...
-
Page 6: Assembly Instructions
Assembly Instructions Remove all contents from packaging, and make sure all parts are present before attempting to assemble! Tighten all bolt connections by hand first. When the OVEN is fully assembled, go back and tighten. STEP 1 Assemble thecart leg L(Part 1), cart leg R(Part 2)andcarthandle (Part4)to thecart body support plate(Part3)as shown.Use the Bolt A, Bolt C, H tighten. - Page 7 STEP 3 Assemble the cart bottom grid (part 5) to the cart leg as shown. Use Bolt E ,Nut H tighten. STEP 4 Assemble the body(part 6)to the cart as shown. Use Bolt A tighten.
- Page 8 STEP 5 Assemblethe smoke pipe handle (part 8) to smoke pipe (part 7) ,then assemblethe smoke pipe body as shown. Use Bolt B ,flat washer F tighten. STEP 6 Place thecharcoal ashgrid (part 14), firebrick (part 15) into body as shown.
- Page 9 STEP 7 Place thedoor(part 9) into body as shown. STEP 8 Place the charcoalcollect box(part 10) into body as shown.
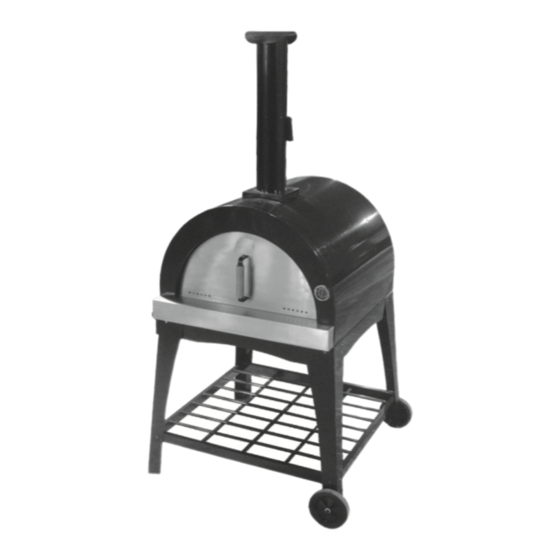
- Page 10 Fully-Assembled...
- Page 11 Oven Operating Guidelines Lighting the oven • solid fuel is to be used for this product (fire wood, charcoal etc.) • place solid fuel onto the fire bricks and light using fire starters • close oven door and let the solid fuel burn (check occasionally to ensure fire is lit) Cooking •...
- Page 12 . Any parts other than original Jumbuck parts major failure. will Void this warranty.
-
Page 13: For Technical Assistance
For New Zealand customers if you experience was being transported by Bunnings or a any technical issues with your JUMBUCK Outdoor Bunnings approved contractor. Charcoal Pizza Oven, in the first instance review...
Need help?
Do you have a question about the HS-PZ002 and is the answer not in the manual?
Questions and answers