Table of Contents
Advertisement
Advertisement
Table of Contents

Related Manuals for TC Electronic Konnekt Live


Summary of Contents for TC Electronic Konnekt Live
- Page 1 Konnekt Live User’s Manual English Version...
- Page 3 IMPORTANT SAFETY INSTRUCTIONS The lightning flash with an arrowhead symbol within The exclamation point within an equilateral triangle is an equilateral triangle is intended to alert the user to intended to alert the user to the presence of important the presence of uninsulated “dangerous voltage” operating and maintenance (servicing) instructions in within the product's enclosure that may be of sufficient the literature accompanying the product.
-
Page 4: Emc/Emi & Certificate Of Conformity
15 of the FCC rules. Certificate of Conformity These limits are designed to provide reasonable TC Electronic A/S, Sindalsvej 34, 8240 protection against harmful interference in residential Risskov, Denmark, hereby declares on own installations. This equipment generates, uses and can... -
Page 5: Table Of Contents
FAQ ....... .57 Konnekt LIVE features ....5 Shortcut keys . -
Page 6: Introduction
Typically, real-time, high quality output processing puts heavy demands on your CPU. Not so with Konnekt Live. Since all DSP processing takes place inside Konnekt Live, all you have to worry about is being creative - your computer is left with plenty of headroom for other tasks. -
Page 7: Konnekt Live Features
Versatility If you crave that old school touch, stay tuned: Konnekt Live comes with a turntable cable and an on-board RIAA plug-in. The selection of RIAA filters gives you studio-quality vinyl ripping to mix in with your own music or mash-ups. Konnekt Live’s MIDI I/O allows you to plug an external MIDI controller right into the loop without a USB MIDI interface. -
Page 8: Quick Setup Guide
Konnekt audio interface • Power supply On Windows computers: • FireWire cable Press: Start/Programs/TC Electronic/TC Near • XLR to RCA jacks for connecting a turntable The TC Near can also be accessed via the Windows • CD with software etc. -
Page 9: Konnekt Live & And Ableton Live
For instructions on using Ableton Live please refer • Konnekt Live is now setup as the default audio device to the reference manual for Ableton Live integrated within the program. for Ableton Live and Ableton Live is setup to use Fabrik C Live, Fabrik R Live, ResFilter and Assimilator •... -
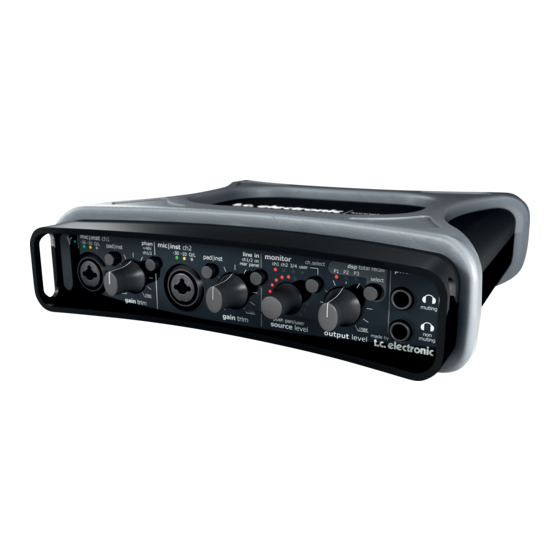
Page 10: Front Panel Overview
FRONT PANEL OVERVIEW phones mic|inst ch1 mic|inst ch2 monitor phan line in dsp total recall ch.select +48V ch1/2 on ch1 ch2 3/4 user pad|inst pad|inst P1 P2 P3 rear panel select ch1/2 muting muting push pan/user push pan/user push pan/user made by gain trim source level... - Page 11 FRONT PANEL OVERVIEW Both RIAA 1964 and RIAA 1987 formats are supported. at absolute peaks. Then reduce the Gain Trim slightly Select between the two RIAA formats via the mixer page. so the 0 dB LED is never lit. 5 Gain/Trim Use this control to set the appropriate input level.
- Page 12 FRONT PANEL OVERVIEW Connect a TV, a radio tuner or any secondary It is also possible to assign a level control of a channel to device that you don’t use in music production to the LED lightring via the Mixer page on the TC Near Line inputs 1/2 on the rear panel.
-
Page 13: Rear Panel Overview
REAR PANEL OVERVIEW power MIDI s/pdif line outputs line inputs ch3(L) ch1|main L ch3(L) ch1(L) ch4(R) ch2|main R ch4(R) ch2(R) bus powered firewire adat|optical 1 Power Switch 5 Digital in/out - Coaxial S/PDIF On/off switch for the unit. 24 bit digital in/out on S/PDIF. In addition to standard I/O it is possible to insert e.g. -
Page 14: Setup Examples - Live
SETUP EXAMPLES - “LIVE” mic|inst ch1 phan mic|inst ch2 line in monitor phones ch.select dsp total recall +48V ch1/2 on pad|inst pad|inst ch1 ch2 3/4 user P1 P2 P3 rear panel select ch1/2 muting muting push pan/user push pan/user push pan/user made by gain trim gain trim... -
Page 15: Setup Examples - Turntable
Output 3/4 This example illustrates how a turntable can be connected to • Outputs 3/4 are used as main outs to amp and Konnekt Live using the supplied XLR to RCA cable. speakers. Elements in this setup: • Turntable for vinyl. -
Page 16: Mixer Page
CONTROL PANEL - MIXER PAGE... - Page 17 CONTROL PANEL - MIXER PAGE 1 The Konnekt select tabs Ch3/Ch4 Use the select tabs to switch between the Konnekts in Connections for line channels 3/4 are located on the your setup and the System Settings page. rear panel. Channels1/2 & 3/4 All Channels 2 Channels 1/2 - mono/stereo 4 Input Meters...
- Page 18 THE CONTROL PANEL - MIXER PAGE 11 Digital Channels 13 Effect Return level - Fabrik R Live The configuration of the digital channels is set via the The reverb plug-in Fabrik R Live is set up on a bus Setup page. Please refer to the description on the that you can send to from each channel.
-
Page 19: Preset Management
PRESET MANAGEMENT The comprehensive file-based preset architecture makes storing presets a simple process. Presets are saved as The A/B function allows you to set up two different discrete files on your hard drive. Once a preset is saved parameter settings and A/B test between them. into the default location, it automatically appears in the Example: “File”... -
Page 20: Setup Page
SETUP PAGE... - Page 21 SETUP PAGE Input Section - Analog Input Section - Digital 1 Ch1/Ch2 auto-sensing input To process an external digital signal it is imperative that Channel 1/2 connections on the front panel are auto- Konnekt is able to lock to this signal. The lock status is sensing.
- Page 22 SETUP PAGE Adat 1+2 / optical s/pdif 6 Mixer View - (digital) The Mixer View function gives you a few options Adat 3+4 regarding the appearance of the digital channels on Adat 5+6 the Mixer page. Adat 7+8 / coaxial s/pdif DAW main Stereo Link: Press Stereo Link Fabrik R Live Level / Decay...
- Page 23 SETUP PAGE 9 Mixer View Show Determines whether the link channels should appear on the mixer page. Stereo Link Press to stereo-link the link channels on the mixer page. Output In this section of the Setup page you set up signal routing to the Konnekt outputs.
- Page 24 SETUP PAGE Mic/Inst/Line This is the option to use if you want to route the signal present on the Mic/Inst/Line connections on the Konnekt front panel to the outputs. Konnekt Mixer When Konnekt mixer is selected the main out signal from the Konnekt mixer page is routed to the outputs.
- Page 25 SETUP PAGE 176.4 kHz Fabrik R Live and Fabrik C Live not Stand Alone Clock Settings available. 192 kHz Fabrik R Live and Fabrik C Live not available. RIAA filters are not available. These settings handle the clock settings when Konnekt operates as a stand-alone unit.
-
Page 26: Routing Modes
ROUTING MODES Which routing modes should I choose? The Fabrik plug-ins can be set to run in either internal or plug-in mode. Recording and mixing scenarios call for considerations regarding which routings to use. Recording In the typical recording situation you wish to: Monitor the source with no latency. -
Page 27: Konnekt Wdm Driver
KONNEKT WDM DRIVER Sound recording. WDM handling (Windows only) WDM is Windows' audio driver system, and is used for Konnekt is able to handle both WDM and ASIO at the Windows sounds, media player and other applications same time. If you wish, you can listen to background that don't support ASIO. -
Page 28: System Settings
SYSTEM SETTINGS Access the System Settings page by pressing:... - Page 29 SYSTEM SETTINGS Buffer Size Example 1 - Konnekt as Clock Master: Setting Clock Master and Sync Source. 1 The buffer size can be set from 64 to 8192 samples. The higher buffer setting, the longer latency through Konnekt. The default buffer size is set to 256 samples.
- Page 30 176.4 kHz 192 kHz Thanks to the DICE II FireWire chip with integrated JetPLL jitter rejection technology, Konnekt Live provides a The sample rate is typically set by your host very high clock quality. Not only does Konnekt provide a application (e.g.
-
Page 31: Firmware Update
SYSTEM SETTINGS & FIRMWARE UPDATE & RESET TO DEFAULT • Press UPDATE FIRMWARE and you will be directed to Versions the folder where the firmware is located. This section gives information on Control panel versions and FireWire driver. Example Check for updates •... -
Page 32: Fabrik C Live
FABRIK C LIVE Introduction Fabrik C Live is based on the innovative Meta Intuitive Navigation Technology (MINT™) that redefines the way you use professional audio plug-ins for professional results. We have integrated a simple yet highly effective and intuitive approach to working with audio, and the result is a user-interface with few handles that are effective but simple to use. - Page 33 FABRIK C LIVE Overview Full-band or 3-band compression? Fabrik C Live includes both a 3-band and a Full-band compression mode. As Fabrik C Live is a plug-in that is designed to be used on single sources and not as a dedicated mastering tool you might wonder how the 3-band mode applies. An overall “rule of thumb”...
- Page 34 FABRIK C LIVE 3-band compression on grouped sources If you have grouped several sources and want to do a “global” compression on this section, the 3-band mode can be very effective. It will give you more transparency in your overall mix as you can apply independent compression to each of the three frequency bands.
- Page 35 FABRIK C LIVE Signal Flow - 3-band mode Comp/ Comp Make-up De-Esser In Level Gain 3 band Parametric Split Limiter Filter This is a schematic overview of the signals flow through the algorithm in 3-band mode. As illustrated - the signal first passes the 4-band parametric EQ.
- Page 36 FABRIK C LIVE EQ section The Fabrik C Live EQ section is a 4-band parametric EQ with four selectable filter types: Notch, Parametric, Shelving and Cut. If you’re looking for a razor sharp filter, use the Notch filter that has a lower limit as low as 0.01 octaves. For a more gentle approach the shelving filter with a variable slope is a better choice.
- Page 37 FABRIK C LIVE Notch Filter - Narrow type Filter types For Lo and Hi filters select between filter types: Parametric, Notch, Shelve and Cut. For Mid 1 and Mid 2, select between filter types: Parametric and Notch. Parametric Filter - Broad type Cut Filter - Bessel type Shelving Filter Cut Filter - Butterworth type...
- Page 38 FABRIK C LIVE Freq Type Range for the Notch filter: Range - Lo band : 20 Hz to 20 kHz Lo Gain : -inf; -97 dB to 0 dB Range - Mid1 band : 20 Hz to 20 kHz Mid1 Gain : -inf;...
- Page 39 FABRIK C LIVE Source selection Compression - via the drop down menu 3-band and Full-band modes Gain page Gain Control The Gain settings are very important. The higher set In Gain the harder the signal meets the Compressor Threshold. • Grab the “G”...
- Page 40 FABRIK C LIVE Compression Compression 3-band mode only 3-band mode only Compressor Control page Level page Compressor control Level Control The Low, Mid and High parameters indicate the set Depending on the amount of applied compression you compression amount for the three bands. may need to level compensate the three individual bands.
- Page 41 FABRIK C LIVE In 3-band mode the Compression Control “C” and the Compression Level Control “L” handle the distribution of compression - Full-band mode and level between the 3 bands. In Full-band mode these controls are redundant and not available. The Compressor is in Full-band mode when “3-band”...
- Page 42 FABRIK C LIVE The Limiter Fabrik C Live also holds a Limiter. The Limiter is used to prevent overloads occurring at extreme and occasional peaks in the source material - peaks that may not be caught and attenuated sufficiently by the Compressor. With the Limiter can be used to limit the extremes, the Compressor can be used to apply a much more “musical”...
- Page 43 FABRIK C LIVE Routing modes Two routing modes can be selected via the Routing mode drop-down menu. Plug-In mode - must be selected when Fabrik C is used as VST plug-in. Internal mode - Use internal mode when Fabrik C is used without a host program with VST facilities and when monitoring a source signal with no latency.
-
Page 44: Fabrik R Live
FABRIK R LIVE Introduction Fabrik R Live is based on the innovative Meta Intuitive Navigation Technology (MINT™) that redefines the way you use professional audio plug-ins for professional results. Fabrik R Live combines nine TC Reverb algorithms in one single plug-in. Thanks to MINT™, it is a breeze to find the sound you are looking for. - Page 45 “in your face”-feeling of a 100% dry recording is too different material and you’ll be surprised with the results. much, try this eminent reverb to create just a bit of Two Konnekt Live comes with two variations of this distance. algorithm. Experiment and listen to the differences.
- Page 46 FABRIK R LIVE Tweak section Meters In this section, all parameter adjustments are made. The list below shows the exact distribution of value Parameters are organized in 4 different layers/pages. readings on the meter segments on both IN and OUT meters.
- Page 47 FABRIK R LIVE Reverb page Modulation page Decay The algorithm designers have adjusted the diffuse field Range: 10 ms to 20 sec part of the reverb to be as smooth and natural sounding The Decay parameter determines the length of the Reverb as possible.
- Page 48 FABRIK R LIVE Color page Level page The Color parameter controls are advanced controls The relation between Dry, Early and Reverb levels defines handling the sonic spectrum of the Reverb diffuse field. the perceived distance of a source. The less dry the signal Try adding a bit of HiColor if you feel the level of reverb is compared to Early and Reverb levels, the greater the correct, but still doesn’t stand out as intended.
- Page 49 FABRIK R LIVE Routing modes Additional parameters Two routing modes can be selected via the Routing mode Bypass drop-down menu. Bypass function for the entire plug-in. In/Out In level Range : -24 to 0 dB Out level Range : -24 to +12 dB Sets the Input/Output levels for the algorithm.
-
Page 50: Resonance Filter
RESONANCE FILTER Konnekt Live comes with ResFilter, a plug-in that offers state-of-the-art filtering effects. Throw in resonance, 6, 12 and 24 dB slopes for even more stunning sounds. Its inter-communication-bus facilitates controlling and tweaking multiple plug-ins and parameters from one plug-in, cross-fading between two instances of the plug-ins etc. - Page 51 RESONANCE FILTER Instance name Type & Slope Select between Lo or Hi-Cut filter types. The steepness of the curve is set by the “Slope” parameter. Select between 6, 12 or 24 dB slope. The higher the dB the steeper the slope: As several instances of the ResFilter can be opened at the same time you may find it useful to name each...
- Page 52 RESONANCE FILTER Communication Target Parameter Using the communication section, it is possible to send and receive parameter movements between instances of the plug-in. In other words, a parameter on one instance of the plug-in can control an unlimited amount of parameters in other instances of the plug-in.
- Page 53 RESONANCE FILTER Example: Cross fade between two tracks. • Insert a ResFilter plug-in on each of two tracks A and B • Send the Cutoff parameter from the instance on track A to the one on track B • Select a cross fade filter curve •...
-
Page 54: The Konnekt Tuner
THE KONNEKT LIVE TUNER Konnekt Live holds an excellent tuner with various modes for stringed instruments. The Tuner page holds all relevant parameters as well as the tuner display. It is also possible to have Tuner indication via the lightring on the Konnekt unit. - Page 55 ...out of tune (Chromatic scale-mode selected) ...in tune (C major scale-mode selected) 4 Assign to lightring Assign to lightring. If you would like the lightring on the Konnekt Live front panel to act as tuner display. E.g. for stand- alone applications. 5 Play tone Press PLAY TONE if you want to tune acoustically to a reference tone.
-
Page 56: Bus Power Notes
APPENDIX - BUS POWER NOTES Bus Power Konnekt LIVE is able to work with FireWire bus-power. With FireWire bus-power the device is powered directly from the FireWire connection and you do therefore not need to use the external power supply (included with Konnekt). -
Page 57: Asio Channel Names
APPENDIX - ASIO CHANNEL NAMES This page describe how the Konnekt ASIO channels distribute according to the selected sample rate. Konnekt LIVE 44.1 - 48 kHz 88.2 - 96 kHz 176.4 - 192 kHz Inputs Inputs Inputs 1 Mic inst / line 1... -
Page 58: Signal Flow
KONNEKT LIVE - SIGNAL FLOW computer monitor phantom line in output from mixer rear panel level tuner ch1 output impact preamp mixL daw1 ch1 input plug-in mic/inst daw2 zone gain ch2 output mixR trim /inst ch2 input phones send mic/inst... -
Page 59: Faq
APPENDIX - FAQ APPENDIX - DICE BACKGROUND The Konnekts use the brand new TC developed DICE II TC Near prevents computer standby mode Before setting your computer in standby mode the TC digital interface chip from TC Applied Technologies. The Near control panel must be shut down. -
Page 60: Technical Specifications
APPENDIX - TECHNICAL SPECIFICATIONS Digital Inputs and Outputs Monitor/Line Outputs Ch. 1,2,3,4 *5) Connector (S/PDIF): RCA Phono, 75 Ohm Connectors: 1/4” Phone Jack. Ground sensing design. Formats (S/PDIF and TosLink) *1) : S/PDIF (24 bit), IEC 958, Pro-status bits Impedance: 100 Ohm Connector (ADAT®...
Need help?
Do you have a question about the Konnekt Live and is the answer not in the manual?
Questions and answers