Table of Contents
Advertisement
Advertisement
Table of Contents

Related Manuals for TC Electronic Konnekt 8


Summarization of Contents
IMPORTANT SAFETY INSTRUCTIONS
Read and Keep Instructions
User is instructed to read and keep safety instructions.
Installation and Usage Precautions
Instructions cover water, ventilation, heat, plugs, cords, accessories, carts, storms, and servicing.
Warning: Fire or Electrical Shock Risk
Do not expose equipment to liquids; ensure proper grounding and voltage use.
Caution: Modifications
Modifications not approved could void authority to operate.
Service Requirements
No user-serviceable parts; service must be performed by qualified personnel.
EMC / EMI & CERTIFICATE OF CONFORMITY
EMC/EMI Compliance
Equipment tested to comply with FCC limits for Class B digital devices, preventing harmful interference.
Canadian Compliance
Apparatus complies with Canadian ICES-003 standards for Class B digital devices.
Certificate of Conformity Details
Declares product conformance with safety and emission standards, listing relevant directives.
Introduction to Konnekt 24D and Konnekt 8
Product Overview and Features
Introduces the Konnekt 24D and Konnekt 8, highlighting their capabilities.
Manual Scope and Coverage
This manual covers both Konnekt 24D and Konnekt 8, noting differences.
Accessing TC Support Services
Information on accessing TC Support service via website for questions and updates.
Feature Comparison: Konnekt 24D vs Konnekt 8
Konnekt 24D Key Features
Lists key features of the Konnekt 24D, including IMPACT pre-amps, DSP, and I/O.
Konnekt 8 Key Features
Lists key features of the Konnekt 8, noting differences from the Konnekt 24D.
Quick Setup Guide
Getting Started in 10 Minutes
Guide to quickly set up the Konnekt in a typical application.
Unpacking and Contents Check
Instructions for unpacking, inspecting for damage, and checking package contents.
Computer System Requirements
Specifies minimum hardware and OS requirements for Mac and Windows.
Software Installation Process
Recommends installing software before connection and provides installation steps.
Accessing the TC Near Control Panel
Details how to open the TC Near control panel on Windows and Mac systems.
Konnekt Setup with Cubase LE
Guidance on setting up Konnekt with Cubase LE, noting TC Electronic does not support Cubase.
Cubase Installation Steps
Steps for installing Cubase LE, including serial number entry for Windows.
Selecting Konnekt as Audio Interface in Cubase
Instructions on configuring Cubase's Device Setup to use Konnekt's ASIO driver.
Cubase Project Configuration
Steps to create a new Cubase project and configure VST Inputs.
ASIO Channel Names and Port Labeling
Explains physical input ports and how to label them in Cubase for convenience.
Setting Input/Output for Cubase Tracks
Guides on selecting inputs and outputs for audio tracks in Cubase.
Fabrik R as VST Send Effect Setup
Step-by-step guide to set up Fabrik R as a send effect in Cubase LE.
Fabrik C as VST Insert Effect Setup
Step-by-step guide to set up Fabrik C as an insert effect in Cubase LE.
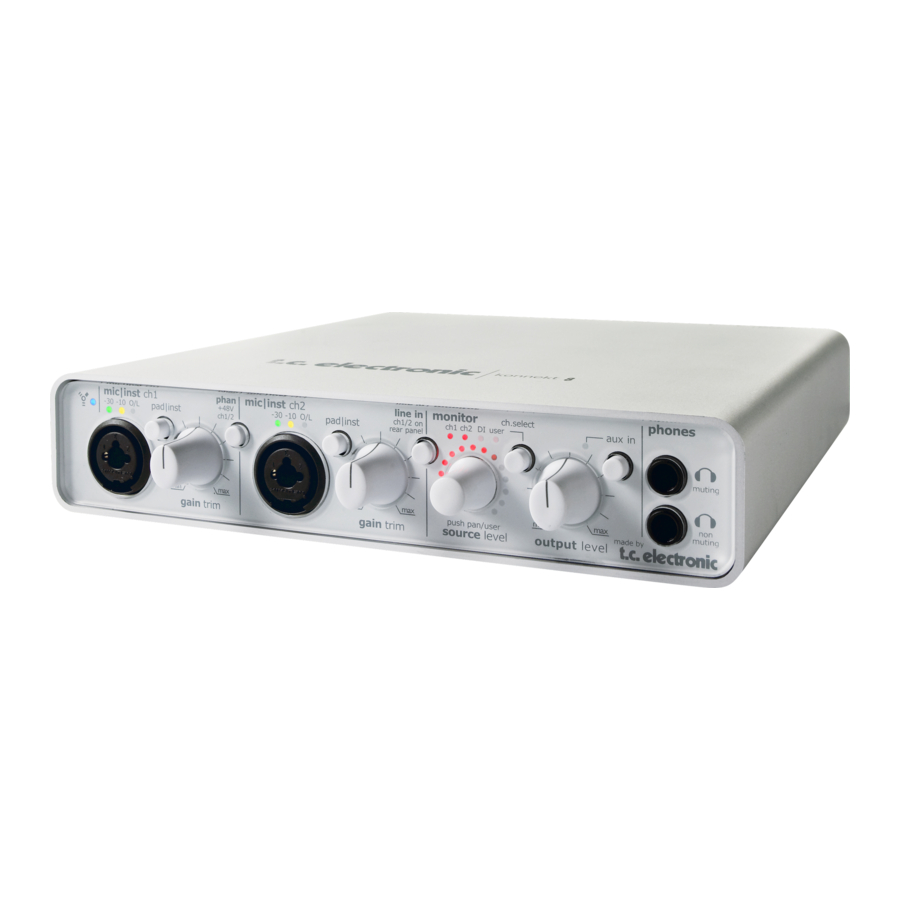
Front Panel Overview - Konnekt 24D
FireWire/Power LED Indicator Status
Explains the status of the FireWire/Power LED (steady, flashing, off).
Mic/Inst Ch1/Ch2 Combo Inputs
Describes the dual-purpose XLR and 1/4" jack inputs for microphones and instruments.
XLR Connection Details
Details using the XLR connection for microphones, including phantom power and input level LEDs.
1/4 Jack Connection for Instruments
Explains the 1/4" jack input for Hi-Z instruments like guitars, noting PAD/INST activation.
Pad/Inst Selector Function
Describes the PAD/INSTRUMENT selector for attenuating input sensitivity by 20dB.
Input Level LED Indicators
Explains the three input level indicators (-30dB, -10dB, 0dB) and setting Gain Trim.
Gain/Trim Control Usage
Details using the Gain/Trim knob to set the appropriate input level.
Phantom Power +48v Operation
Explains phantom power for condenser microphones and types of microphones.
Line In Switch (Front/Rear Input Selection)
Describes switching between front and rear panel inputs for channels 1/2.
Source Level Knob Functionality
Explains the Source Level knob for controlling channel level or pan position.
Monitor LED Indicators
Indicates which channel is monitored, selected via the Ch. Select button.
Channel Select Button Function
Describes selecting channels for monitoring using the light-ring around the Source Level knob.
Channels 3/4 Linking (Konnekt 24D)
Notes that channels 3/4 are always linked on Konnekt 24D.
DI Input Functionality (Konnekt 8)
Monitors signal on S/PDIF Digital In for Konnekt 8.
User Monitor Channel Selection
Allows setup of monitored channels when "User" is selected, varying by connected devices.
Output Level Control
Sets the output level for analog outputs 1-2 and headphone outputs.
DSP Total Recall (Konnekt 24D Only)
Stores and recalls three program settings, including mixer, setup, and plug-in settings.
AUX Input Monitoring (Konnekt 8 Only)
Replaces DSP recall on Konnekt 8, allowing monitoring of AUX inputs.
Headphones Muting Function
Connects headphones and mutes main outputs.
Headphones Non-Muting Function
Connects headphones without muting main outputs.
Front & Rear Panel Overview - Konnekt 8
Front Panel Variations for Konnekt 8
Describes front panel differences, like AUX In replacing DSP recall.
Rear Panel Variations for Konnekt 8
Lists features omitted on Konnekt 8 rear panel compared to Konnekt 24D.
Setup Example: Studio Configuration
Studio Setup Connection Diagram
Illustrates a typical studio connection diagram with speakers, keyboard, and headphones.
Connecting Active Speakers
Using active monitors in the studio setup.
Connecting a Keyboard
Connecting a keyboard to Line In 3/4 for monitoring/recording.
Connecting Multiple Headphones
Connecting multiple headphones via an amp or front panel non-muting output.
Computer FireWire Connectivity
Requirements for connecting the computer via FireWire.
ADAT Interface Connectivity
Extending digital I/O with an ADAT interface.
Front Panel Instrument Connections
Shows front panel connections for microphone and electric guitar.
FireWire Connection to Computer
Using a standard FireWire cable to connect the computer and Konnekt.
Power Supply Options for Studio Setup
Discusses bus power vs. external power supply options.
Setup Example: Mobile Studio
Mobile Studio Connection Diagram
Illustrates a mobile setup with guitar, microphone, and laptop.
Connecting Guitar and Microphone
Connecting guitar to Ch1 and microphone to Ch2, including PAD/INST and phantom power.
Connecting Laptop Computer
Connecting the laptop using a standard FireWire cable.
Headphone Connection in Mobile Setup
Connecting headphones to one of the outputs.
Bus Power for Mobile Recording
Using bus power for mobile recording and battery considerations.
Setup Example: Live Performance
Live Setup Connection Diagram
Illustrates a live setup integrating Konnekt with a PA system and keyboard.
Using DAW/Laptop as Audio Source
Using the DAW/laptop for playing audio files in a live setup.
Headphones for Live Monitoring
Using headphones for monitoring with the OUTPUT level control.
Microphone and Vocal Processing
Using IMPACT pre-amps and Fabrik C for vocals in live performance.
MIDI Keyboard Integration for Live Use
Using MIDI keys for additional keyboards and program changes.
Outputting Audio to PA System
Distributing audio to PA speakers using the SOURCE level control.
Benefits of Live Setup Routing
Benefits of routing signals to headphones and PA via DAW for cue monitoring.
Setup Example: Stand-Alone Operation
Stand-Alone Connection Diagram
Illustrates stand-alone use with CD player, keyboard, and speakers.
Stand-Alone Unit Capabilities
Using Konnekt 24D stand-alone for mic pre-amps, Hi-Z inputs, and Fabrik effects.
Program/Preset Switching
Alternating between three programs/presets using the "TOTAL RECALL" button.
Connecting Instruments for Stand-Alone
Connecting instruments to front panel inputs and activating phantom power.
CD Player Connection Options
Connecting a CD player via analog or optical S/PDIF.
Using Speakers as Monitors
Connecting active speakers as monitors via Main Out L/R.
Setup Example: Multiple Konnekt Units
Multiple Konnekt Daisy-Chain Diagram
Shows how to hook up 4 Konnekt 24D units via FireWire for expanded I/O.
Powering Multiple Konnekt Units
Explains power requirements for multiple units on a FireWire bus.
Connecting Multiple Units to Computer
Connecting multiple units using FireWire cables and to the computer.
Stand-Alone Mode with Multiple Units
Notes that stand-alone mode is not possible with multiple devices attached.
Control Panel - Mixer Page Overview
Konnekt Select Tabs
Tabs for selecting Konnekt 24D or Konnekt 8, and system settings.
Channels 1/2 Mono/Stereo Configuration
Explains channel linking for stereo operation and appearance changes.
Ch1/Ch2 Auto-Sensing Input Functionality
Automatic detection of XLR or 1/4" jack inputs and graphical indication.
Input Level Meter Indicators
Meters indicating signal level on input channels, with optimal peaking at "0".
Clip LED Indicator
Indicates when signal is too hot, requiring level reduction.
Fabrik C Symbols for Channels 1/2
Activating/deactivating the Fabrik C channel strip plug-in for channels 1/2.
Send Knobs for Reverb Routing
Using SEND knobs to send signal to Fabrik R (reverb).
Pan Control Operation
Panning left/right using the mouse and centering with Ctrl+Shift.
Out Level Master Control
Master output level control.
Light Ring Assignment Function
Assigning faders to the "source" controller for front panel light-ring indication.
Digital Channels Configuration
Configuration of digital channels set via the Setup page.
DAW Main Meters and Fader
Mixing DAW channels with the DAW signal on the Mixer page.
Effect Return Level for Fabrik R
Sets the return level for the Fabrik R reverb plug-in.
Monitor Mixer Main Out Level
Sets output level for the monitor mixer, specifying Konnekt 8 limitation.
Preset Management Features
File-based preset management for loading and saving settings.
P1, P2 & P3 Presets (Konnekt 24D)
Three preset locations for total recall of settings on the TC Near control panel.
Preset File Menu Options
Options within the File menu for loading and saving presets.
Channel Muting Functionality
Instantly muting a channel by holding Ctrl+Shift and clicking the fader.
Setup Page Configuration
Analog Input Section
Describes Ch1/Ch2 auto-sensing input and PAD/INST selector.
Digital Input Section
Explains digital signal locking status and options for digital input formats.
Stereo Link Functionality
Linking channels for stereo operation when monitoring stereo sources.
Digital Input Options Setup
Options for ADAT and S/PDIF digital input configurations.
Mixer View Settings for Digital Channels
Options for displaying digital channels on the mixer page (Show, Hide, Autoshow).
Light Ring Assignment Functionality
Assigning faders to the SOURCE level knob for front panel light-ring indication.
Linked Devices Configuration
Connecting multiple Konnekt units and monitoring inputs from any unit.
Mixer View Output Routing
Options to show linked channels or stereo link on the mixer page.
Output Routing Configuration
Setting up signal routing to Konnekt outputs, including DAW and Mic/Inst sources.
OPTICAL Outputs Configuration (Konnekt 24D)
Configuring ADAT and OPTICAL S/PDIF output signals.
Source Selection for Outputs
Selecting DAW or Mic/Inst/Line as sources for outputs.
Stand Alone Clock Settings
Handling clock settings for stand-alone operation (Sync Source, Sample Rate).
Sync Source Options Explained
Configuring sync source (Internal, S/PDIF, Optical) for clock synchronization.
Sample Rate Settings for Stand-Alone
Setting the sample rate for stand-alone mode, noting Fabrik availability.
Sync Source and Sample Rate Details
Detailed explanation of Sync Source and Sample Rate settings.
Routing Modes Explained
Recording Mode: Internal Mode
Setting up internal mode for latency-free monitoring and recording with Fabrik C/R.
Fabrik R Routing as Send Effect
Using Fabrik R as a send effect from the host application in Cubase LE.
Fabrik C Routing for Recording
Selecting input for recording and routing Fabrik C for processing.
Konnekt WDM Driver Configuration
WDM Driver Handling (Windows Only)
Using WDM driver for Windows sounds and applications without ASIO support.
Setting Up the WDM Driver
Steps to configure Windows sound settings to use the TCNear WDM Audio driver.
System Settings Configuration
Buffer Size Adjustment
Setting buffer size to manage latency and prevent audio issues.
Clock Master Selection
Selecting the Clock Master device for digital setups to ensure sample rate synchronization.
Sync Source Selection
Determining which device the Clock Master syncs to, utilizing DICE II technology.
Sample Rate Configuration
Setting the sample rate, typically by the host application.
Lock Status Indicators Explained
Understanding Internal Lock, External Lock, and No Reference status indications.
Example: Konnekt as Clock Master
Demonstrates setting Clock Master and Sync Source for multi-unit setups.
Example: Konnekt Jitter Rejection
Demonstrates using Konnekt for jitter rejection with external sources like CD players.
Sample Rate and Host Application Interaction
How sample rate is set by the host application and Konnekt provides the clock.
System Settings, Firmware, and Reset
Checking for Software Updates
Instructions to check for and download the latest TC Near control panel and firmware.
Updating Konnekt Firmware
Steps to update the firmware for each Konnekt unit in a setup.
Reset to Default Functionality
Resets the Konnekt unit to factory default settings without degrading software or presets.
Fabrik C Channel Strip Plug-in
Introduction to Fabrik C
Introduces Fabrik C as a channel strip plug-in based on MINT™ technology.
Main Features of Fabrik C
Lists key features including EQ, De-Esser, Compressor, Limiter, and 48-bit precision.
Fabrik C Routing Modes
Explains the two routing modes: Plug-in and Internal.
Fabrik C Overview and Compression Modes
Provides an overview of the Fabrik C interface and its compression modes.
Full-band vs. 3-band Compression
Compares full-band and 3-band compression modes and their applications.
3-band Compression Example: Bass
Example of using 3-band compression for bass guitar to improve control and sustain.
3-band Compression on Grouped Sources
Using 3-band compression for global mix transparency on multiple sources.
Full-band Compression for Vocals
Achieving an "in-your-face" vocal sound using full-band compression.
Full-band Compression for Guitar
Using full-band compression on rhythm guitar for a sharp, percussive sound.
Limiter Functionality in Fabrik C
How the Limiter prevents overloads and complements the Compressor.
EQ Section Details
Describes the 4-band parametric EQ with filter types and adjustments.
De-Esser Functionality in Fabrik C
Reducing sibilant frequencies in vocals using the De-Esser control.
Headroom and Precision
Internal processing in 48-bit domain for avoiding clipping and maintaining precision.
Signal Flow in 3-band Mode
Schematic overview of the signal path in Fabrik C's 3-band mode.
Signal Flow in Full-band Mode
Schematic overview of the signal path in Fabrik C's full-band mode.
Adjusting EQ Frequency and Gain
How to adjust frequency and gain for EQ bands using the mouse.
Adjusting EQ Bandwidth/Type
How to change filter type and bandwidth for EQ bands.
EQ Bypass Function
How to bypass the entire EQ section.
Fabrik C Filter Types Explained
Explains filter types like Notch, Parametric, Shelving, and Cut with graphical examples.
Compressor Parameters: Source Page
Selecting material type (Vocals, Instruments, Percussion) for compression.
Compressor Parameters: Gain Page
Adjusting In Gain and Make Up Gain for compressor threshold and level compensation.
Compressor Control (3-band mode)
Adjusting compression amount for Low, Mid, and High bands using the 'C' icon.
Level Control (3-band mode)
Compensating level for individual bands using the 'L' handle.
Compression in Full-band Mode
Explains full-band mode where 'C' and 'L' controls are redundant.
Adjusting Compressor Parameters via Grid
Using handles ('S', 'G', 'C', 'L') and grid features for parameter adjustment.
The Limiter Functionality
Using the Limiter to prevent overloads and complement the compressor.
De-Esser Functionality
Reducing sibilant frequencies in vocals using the De-Esser control.
Fabrik C Routing Modes
Selecting routing modes (Internal, Plug-in) for Fabrik C.
Fabrik R Reverb Plug-in
Introduction to Fabrik R
Introduces Fabrik R as a reverb plug-in combining four TC Reverb algorithms.
Main Features of Fabrik R
Lists key features including MINT™ technology and four reverb types.
Fabrik R Routing Modes
Explains the two routing modes: Plug-in and Internal for Fabrik R.
Fabrik R Overview and Tweak Parameters
Overview of the Fabrik R interface, showing reverb types and tweak parameters.
Live Reverb Type
Describes the Live reverb for bright, grainy sound and vocals/instruments.
Hall Reverb Type
Describes the Hall reverb for preserving natural characteristics and adding large hall effect.
Plate Reverb Type
Describes the Plate reverb emulating reverberating springs or metallic plates.
Club Reverb Type
Describes the Club reverb for a medium-sized club feel, ideal for guitars and vocals.
Parameter Adjustment Methods
Explains parameter adjustment methods (cursor drag, value field drag, numerical entry).
Meters and Overload Indication
Explains IN/OUT meters and Overload (O/L) indicators.
Reverb Decay and PreDelay Controls
Details the Decay parameter for reverb length and PreDelay for clarity.
Modulation Parameters for Reverb
Explains Modulation Rate and Depth for enhancing reverb integration and flavor.
Color Page Controls
Advanced controls for the sonic spectrum of the Reverb diffuse field (LoColor, HiColor, HiFactor).
Distance/Level Page Controls
Controls for Dry, Early, and Reverb levels to define perceived distance and room definition.
Additional Parameters: Bypass and In/Out
Bypass function and In/Out level settings for the plug-in.
Kill Dry - Kill Wet Functionality
Using Kill Dry for send effects or insert effects, and its default setting.
Fabrik R Routing Options
Routing options for Fabrik R set via Setup page or Fabrik R page.
Integrator Plug-in for External Hardware
Integrator Plug-in Functionality
Seamless integration of external hardware via plug-in audio routing.
Integrator Parameters: Device and Channel
Selecting Konnekt units and audio channels for external effect integration.
Calibrate Functionality for Latency
Measuring and compensating for latency introduced by external digital devices.
Test & Auto Signal Functionality
Verifying cable connections with pink noise test signals.
Konnekt Tuner Functionality
Tuner Page Overview
Overview of the tuner page in the TC Near Control panel.
Tuner Indication Modes
Explains Strobe and Normal mode tuner indications via LEDs.
Note Indication
Displays notes based on the selected scale mode.
Mode Selector: Strobe vs. Normal
Switching between Strobe and normal tuning modes.
Assign Tuner Display to Lightring
Using the front panel lightring as a tuner display for stand-alone applications.
Play Tone for Acoustic Tuning
Playing a reference tone for acoustic tuning.
Pitch Reference Frequency Setting
Setting the reference frequency for tuning.
Mute Output Functionality
Muting the tuner output for visual tuning.
Scale Modes Selection
Choosing from various scale modes for different instruments.
Appendix: Frequently Asked Questions (FAQ)
TC Near and Computer Standby Mode
How to shut down TC Near control panel before computer standby to prevent instability.
Shortcut Keys for Control Panel Navigation
Shortcut keys for accessing main pages like Mixer, Setup, Fabrik C/R, and About.
Appendix: DICE II Background Information
DICE II Chip Functionality
Explains the DICE II chip for stable digital clock, jitter-free signal flow, and alignment.
JET™™ Jitter Elimination Technology
Details JET™ technology for jitter elimination and sync handling.
DICE II Hardware Features
Describes DICE II's digital interfaces (S/PDIF, ADAT, 1394) and FireWire streaming engine.
Appendix: Technical Specifications
Digital Inputs and Outputs Specifications
Specifies connector types, formats, and digital I/O engine details.
Clock and Jitter Specifications
Details sample rates, jitter rejection engine, and jitter filter performance.
Line Inputs Ch. 1,2,3,4 Specifications
Impedance, input levels, THD+N, SNR, and frequency response for line inputs.
Mic Inputs Ch. 1,2 Specifications
Connector types, sensitivity, gain range, impedance, and noise specs for mic inputs.
Inst Inputs Ch. 1,2 Specifications
Connector types, sensitivity, gain range, impedance, and noise specs for instrument inputs.
Monitor/Line Outputs Ch. 1,2,3,4 Specifications
Connector types, impedance, output levels, and noise specs for monitor outputs.
DAC Conversion Specifications
Details D to A conversion delay and bitstream specifications.
Headphones Output Specifications
Impedance, gain range, THD+N, SNR, and power output for headphone jacks.
EMC Compliance Standards
Compliance with EMC standards like EN 55103-1, EN 55103-2, and FCC Part 15.
Safety Certification Details
Details safety certifications including IEC, UL, and CSA standards.
Environmental Specifications
Operating and storage temperature, and humidity limits.
Control Interface Specifications
MIDI and FireWire interface specifications.
General Specifications: Dimensions and Weight
Dimensions, weight, finish, and PPM meter details.
Power Supply and Consumption
Details on power supply, FireWire bus power, and consumption.
Warranty Information
Warranty period for parts and labor.
Need help?
Do you have a question about the Konnekt 8 and is the answer not in the manual?
Questions and answers