Hubsan X4 Pro User Manual
Hide thumbs
Also See for X4 Pro:
- Instruction manual (28 pages) ,
- User manual (28 pages) ,
- Manual (28 pages)

Related Manuals for Hubsan X4 Pro


Summary of Contents for Hubsan X4 Pro
- Page 1 ® Read the User Manual and its instructions carefully before use! THE HUBSAN X4 PRO Real-time video transmission <H109S Medium Edition User Manual> Version 1.0...
-
Page 2: Reading Tips
Please fly the Hubsan X4 Pro in accordance with the directions given in this <User Manual>. Important safety information Maintenance: Do not try to open or repair the units by yourself. Please contact Hubsan or Hubsan authorized dealers for service. For more information, please visit the official website at www.hubsan.com. -
Page 3: Table Of Contents
Symbol Explanation (Mode 1 and Mode 2 throttle settings) Usage Advice Table of Contents 5.6 Antennas The Hubsan X4 Pro (H109S Advanced) Profile 5.7 How to set or change the 1 What’s Included 5.8 GHz video frequency 2 Aircraft Overview 5.8 Binding the transmitter and aircraft... -
Page 4: The Hubsan X4 Pro (H109S Advanced) Profile
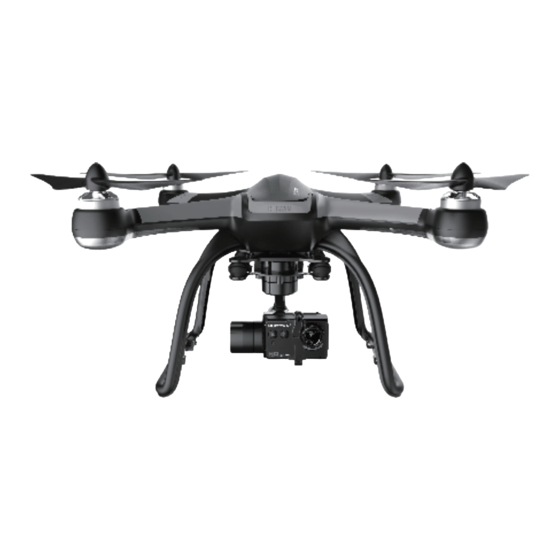
The Hubsan X4 Pro (H109S Advanced) Profile The Hubsan X4 Pro is a four-rotor quadcopter made for aerial photography and filmography. It comes equipped with a high precision 3-axis gimbal, 1080P HD camera and an advanced flight control system. The FPV remote control is capable of long-range flight while supplying real-time video transmission FPV. -
Page 5: Aircraft Overview 0
2 Aircraft Overview The Hubsan X4 Pro comprises the aircraft, its camera, gimbal, propeller guards, power system, flight control system and transmission system (remote control). The flight control system is built into the aircraft itself. Transmission system features... -
Page 6: Pre-Flight Checklist
● power off the transmitter. Incorrect operations preflight and inflight may cause flight malfunction, failure and damage. 1 The Aircraft Battery Before using the Hubsan X4 Pro, please verify that the battery is sufficiently charged. Device Power supply Transmitter 8 AA Batteries or a LiPo (2 or 3 cell) Camera 3.7V 650mAh rechargeable LiPo battery (included) -
Page 7: Battery Installation
1.2 Battery installation and use Power on/power off Power on: Push the battery into its compartment and connect the bullet adapters as shown in the below figure. Note the positive negative polarities. aircraft’s LEDs should light up. Power off: Disconnect the battery Power on adapters to power off the aircraft. - Page 8 If you do not plan to fly the quad for a long time, store the battery ~50% charged to maintain battery ● performance and life. Please use Hubsan chargers for battery charging. ● Discharge the battery at 5C current or below. To avoid discharge related battery damage, do not prolong ●...
-
Page 9: Preparing The Aircraft
(slippage prevention) [11] 2.1.1 Flight control system overview The Hubsan X4 Pro is an aircraft with nimble handling and excellent stability. Its flight system features multiple GPS features, two fail safes, low power warnings and other functions. Flight control system components... - Page 10 Micro-SD card into the card slot (as shown on the right) when the camera is turned off. ● A Micro-SD is not provided with the Hubsan X4 Pro. Users must provide or purchase a Micro-SD that is class 4 or above (recommended class 6) and possesses no more than 32GB of memory.
- Page 11 Connects to the gimbal and camera interface on the belly of the aircraft (please see section 2.3.1 for more details) The X4 Pro is compatible with the GoPro 3 and 4 generations. Connect the GoPro to the aircraft and gimbal with the above directions.
- Page 12 2.3 The 3-axis gimbal After the gimbal and camera are installed and the aircraft powered on, the gimbal will also power on and test itself for issues. The gimbal’s movement (pitch) may be controlled by the H906A transmitter/remote control. Gimbal features Precision of control ±0.03°...
- Page 13 2.3.3 Calibrating the 3-axis gimbal After both the H906A and aircraft have properly paired, please check the gimbal’s status and condition. If the gimbal is not horizontally aligned, please calibrate it with the steps listed below. Calibration steps: 1. After completing gimbal and camera installation, disconnect the gimbal’s transmission line from the gimbal.
- Page 14 3 The Propellers The X4 aircraft uses 9-inch propellers. Each is marked with either an A or a B. Please replace damaged propellers. Before installing the propellers for the first time, please check whether the propeller and motor arm read "A" or "B”. The two letters should match.
- Page 15 ● Please use genuine Hubsan propellers to ensure optimum flight performance. 3.4 Installing the Propeller Guards It is recommended that beginners use the Hubsan X4 Pro propeller guards for flight safety while flying. Spare guards are accessories that must be bought separately from the Pro.
- Page 16 4 Installing the Aircraft’s 5.8GHz transmission antenna Remove the antenna from its wrappings and locate the gold SMA connector at the side of the unit. Attach the antenna to the connector by screwing it on clockwise. After securely tightening the antenna, bend it at the joint to point it downwards.
- Page 17 5.2 Getting to know the H906A 2.4G Antenna 5.8G Antenna 13 GPS Hold Mode switch 12 Headless Mode switch 14 Return to Home Mode switch 15 Follow Me Mode switch 11 T1 11 T2 LCD Screen 19 Neck strap hook 1 Throttle and Rudder 2 Elevator and Aileron 7 Exit...
- Page 18 5.3 H906A key functions Function Key/Switch Push the stick forward or backward and the quadcopter will ascend or descend (respectively). Push the stick left or right and the quadcopter will rotate Throttle/Rudder stick counterclockwise or clockwise (respectively). Push the stick forward or backward and the quadcopter will fly forwards or backwards (respectively).
- Page 19 5.4 Battery installation Open the compartment hatch Insert 8 AA batteries into the slots of the Plug the battery pack back into the battery pack. Take note to make sure compartment. Close the and remove the battery pack. the polarities are correctly matched. compartment hatch and screw it shut.
- Page 20 5.6 Antennas To keep video transmission clear and avoid interference, make sure the H906A’s 5.8Ghz antenna logo faces the aircraft. During flight, the antenna and its signal path must be unobstructed to maximize the video and control range. Bend the antenna so that its logo is as directly pointed towards the aircraft as possible. Failure to keep the antenna’s logo unobstructed and pointing towards the aircraft may lead to poor video transmission.
- Page 21 (4) To avoid remote control signal interference, do not fly in complex electromagnetic environments (such as venues with radio stations, power plants and towers). (5) The Hubsan X4 Pro cannot be used in or near the Arctic circle or Antarctica. (6) Do not fly in restricted areas or no-fly zones.
- Page 22 6 Aircraft Calibrations 6.1 Compass Calibration Every time the aircraft is powered on, its compass will automatically test for deviations in the local magnetic field. If deviations are detected, the aircraft will automatically enter compass calibration mode. The remote control screen will first read "Calib compass 1" and the LEDs should be red, flashing clockwise. Slowly rotate the aircraft on the horizontal plane until the aircraft LEDs change color.
- Page 23 6.2 Horizontal calibration (also known as Gyro calibration) Horizontal calibration is required when the quadcopter drifts on the horizontal plane during flight. When this happens, land the aircraft and disarm its motors. Place the aircraft on a completely flat surface and then follow the below calibration procedure. Hold the left stick to the right side of its socket.
- Page 24 7 Arming/Disarming the Motors Arming/starting motors ① Simultaneously pull the transmitter joysticks diagonally down-out to arm the motors (as shown in the side figure). Disarming/stopping motors ① Pull the throttle joystick all the way down until the copter has completed its descent to the ground. Simultaneously pull the transmitter joysticks diagonally down-out to disarm the motors (as shown in the side figure).
- Page 25 The elevator controls the aircraft’s forward and backward movement. Push the joystick forward and the aircraft will tilt and fly forward. Pull the joystick back and the aircraft will tilt and fly backwards. When the joystick is centered (unmoving), the aircraft will hold its altitude in the air.
- Page 26 9 Advanced performance set up ①Reverse channel setup If you would like to reverse any of the stick functions, please follow the instructions below. Be aware that this will reverse the control commands. Pull the throttle stick down to the lowest position and long press the ‘Enter’ key to open the ‘Main Menu’ interface.
- Page 27 ④ Follow Me mode ● The transmitter has a built-in GPS module. Follow Me mode functions only when both the aircraft and the transmitter have 6 or more GPS satellites. Flip the B switch up to enter Follow Me mode; flip the B switch down to exit Follow Me mode. When the switch is up, the screen will say "Follow Mode"...
- Page 28 10 The Fail Safes 10.1 Low power failsafe When the aircraft battery is low, there is likely insufficient power to support the return of the aircraft. Please land the aircraft immediately, otherwise the aircraft will fall and cause damage to the aircraft and surrounding objects.
- Page 29 Frequently Asked Questions (FAQ) 1. Cannot arm motors Try calibrating the transmitter sticks as shown below. Afterwards, check that all channels are properly moving and centered. Mode 1: Push the left stick to the upper left corner and the right stick to the upper right corner. Power the transmitter on while holding both sticks in their respective positions;...
- Page 30 3. Uneven takeoff/unstable takeoff or flight (1) Please keep the aircraft on a completely flat and stable surface after connecting it to power. Allow it to sit still for at least 10 seconds before taking off (as to allow the gyro sensor to properly initialize). (2) Place the aircraft on a completely flat and stable surface.
- Page 31 Content subject to change without notice. Users may download the User Manual from the official HUBSAN website. WWW.HUBSAN.COM...
Need help?
Do you have a question about the X4 Pro and is the answer not in the manual?
Questions and answers