
Related Manuals for Leica SM2000 R


Summary of Contents for Leica SM2000 R
- Page 1 Leica SM2000 R Sliding Microtome Instruction Manual Leica SM2000 R – V2.1 English – 03/2004 Always keep this manual near the instrument! Read carefully prior to operating the instrument!
-
Page 3: Important Information
These are determined only by the contract provisions agreed between our- selves and our customers. Leica reserves the right to change technical specifi- cations as well as manufacturing processes without prior notice. Only in this way is it possible to continu- ously improve the technology and manufacturing tech- niques used in our products. -
Page 4: Table Of Contents
Table of contents ..........................4 Safety instructions for handling the instrument ................5 Safety devices ............................5 Technical data............................. 7 General description..........................8 Leica SM2000R - Overview ..........................8 General description ............................10 Standard delivery ..........................10 Unpacking and Setup ........................11 Unpacking ................................11 Site requirements .............................. -
Page 5: Safety Instructions For Handling The Instrument
To prevent the sledge from moving acciden- tally, pull it to the front limit of the slideway, where it is held in position by the magnetic knife sledge immobilizer (24), before remov- ing the section. Fig. 5.2 Leica SM2000 R – Sliding Microtome... - Page 6 Safety instructions for handling the instrument Transport and setup Cleaning • The instrument must be transported in an • Before cleaning, remove the knife or dis- upright position! posable blade! • Before transporting the instrument, the • Do not use solvents that contain acetone knife sledge must be locked with the lock- or xylene! ing screw (23, Fig.
-
Page 7: Technical Data
10-20 μm in 2 μm increments 20-60 μm in 5 μm increments Automatic specimen advance: 0-30 μm Overall feed: 40 mm Dimensions and weight Width: 300 mm Depth: 440 mm Height: 330 mm Weight (incl. knife holder): 25.5 kg Leica SM2000 R – Sliding Microtome... -
Page 8: General Description
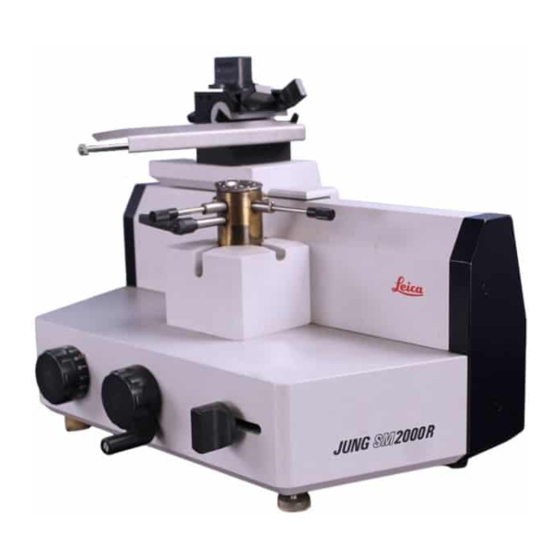
General description Leica SM2000 R - Overview Parts list 1 Section thickness adjusting knob 2 Coarse feed wheel 3 Manual feed 4 Mount for specimen clamp 5 Specimen cylinder 6 Universal cassette clamp 6a 2 attachment screws (universal cassette clamp) - see Fig. 13.1 7 Standard specimen clamp 7a 4 attachment screws (standard specimen clamp) - see Fig. - Page 9 General description Fig. 9.1 Fig. 9.2 Leica SM2000 R – Sliding Microtome...
-
Page 10: General Description
The microtome can be fitted with a standard specimen clamp for paraffin blocks or a universal cassette clamp. The Leica SM2000R was designed to conform with the directives of the European Union and manufactured using most up-to-date quality control procedures certified under DIN EN ISO 9001. -
Page 11: Unpacking And Setup
Unpacking and Setup Unpacking First check the shipment for external damages upon arrival. If it is evident that the shipment was damaged during transport, please make a claim to the carrier immediately. • Open the cardboard box. • Remove all foam material. •... -
Page 12: Setup
Unpacking and setup Setup Loosening the knife sledge locking screw Screw (23) secures the knife sledge during transport. In daily operation it is also used lock the knife sledge in place. • Loosen the screw (23) at the rear of the instrument to move the knife sledge (11). -
Page 13: Mounting The Accessories
Oblique positioning of the knife holder • Loosen the clamping lever (17) and position the knife holder (13) as required. • Retighten the clamping lever (17) to fix the knife holder in position. Fig. 13.2 Leica SM2000 R – Sliding Microtome... -
Page 14: Operating The Instrument
Operating the instrument Mounting and orienting the specimen Prior to manipulating the knife or specimen, or changing the specimen or knife, and dur- ing breaks, always cover the cutting edge with knife guard and lock the knife sledge with the locking knob! •... -
Page 15: Trimming
(24), before remov- ing the section. • Carefully remove the section with a small brush. Leica SM2000 R – Sliding Microtome... -
Page 16: Trouble Shooting
Trouble shooting Problem Possible cause Correction Thick/thin sections Insufficient knife/blade inclination; Systematically try several clearance The section thickness varies from one consequently the clearance angle is angle adjustments, until the optimum section to another. In extreme cases, too small. angle is found. sections are skipped meaning that a section is not obtained. -
Page 17: Cleaning And Maintenance
Leica. • Enter into a service contract at the end of the warranty period. For further information, please contact your local Leica service center. • Clean the instrument every day. • Lubricate the object cylinder (5, Fig. 7.1), and knife holder (13) with the oil No. 405 from time to time. -
Page 18: Accessories
Accessories 10.1 Disposable blade holder Instead of a conventional microtome knife, a dispos- able blade holder (15) can be inserted in the knife holder. • To clamp the disposable blade, loosen the three screws (15a), carefully insert the blade, and re- tighten the screws evenly. -
Page 19: Ordering Information
SM2000 R sliding microtome - Basic instrument ..................... 14 0453 25122 SM2000 R sliding microtome - Basic instrument with universal cassette clamp ........14 0453 25120 SM2000 R sliding microtome - Basic instrument with standard specimen clamp ........14 0453 25121 Accessories Universal cassette clamp ............................ -
Page 20: Warranty And Service
Warranty Leica Biosystems Nussloch GmbH guarantees that the contractual product delivered has been subjected to a comprehensive quality control procedure based on the Leica in-house testing standards, and that the product is faultless and complies with all technical specifications and/or agreed characteristics warranted. - Page 21 ........D-69226 Nussloch Anne De Greef-Safft President Biosystems Devision May 14, 2008 Leica SM2000 R – Sliding Microtome...
- Page 22 Instruction manual V2.1 – 03/2004...
Need help?
Do you have a question about the SM2000 R and is the answer not in the manual?
Questions and answers