Table of Contents
Advertisement
Quick Links
Berwick
®
Boulevard
®
Pressure Balancing
Bath and Shower Trim Kit
Thank you for selecting American Standard...
the benchmark of fine quality for over 140 years.
To ensure that your installation proceeds smoothly-please
read these instructions carefully before you begin.
For use with shower heads rated at 4.9 L/min (1.3 gpm) or higher.
RECOMMENDED TOOLS
Plumbers' Putty
or Caulking
ROUGHING-IN DIMENSIONS
• To assure proper positioning in relation to wall.
Note roughing-in dimensions.
FINISHED WALL
2-3/8" D.
(60 mm)
5-5/8" REF.
(143 mm)
4-3/4"
(120 mm)
74" FOR HEAD
CLEARANCE
8-3/8" REF.
(1880 mm)
(213 mm)
18" OPTIONAL
(457 mm)
1-3/4"
(44 mm)
4-7/8" REF.
(124 mm)
TOP OF TUB RIM
BOTTOM OF TUB
Product names listed herein are trademarks of AS America, Inc.
© AS America, Inc. 2018
INSTALLATION
INSTRUCTIONS
Phillips Screwdriver
Teflon Tape
Flat Blade Screwdriver
1-5/8" to 3-1/4"
(41 to 83 mm)
1/2" NPT
(13 mm)
1-5/8" to 3-1/4"
(41 to 83 mm)
OPTIONAL TO FINISHED
FLOOR USUALLY
BETWEEN 65'' AND 80''
(1651 and 2032 mm)'
7-1/4" DIA.
(184mm)
2-3/4" MAX. (69 mm)
1-3/4" MIN. (45 mm)
4" (102 mm)
1/2" COPPER
TU430507
TU430508
TU431507
TU431508
Adjustable Wrench
1
CARTRIDGE INSTALLATION
• Remove PLASTER GUARD (6)
(Keep it installed for thin wall Installation).
• Remove BONNET NUT (1) by unthreading it
Counter clockwise. Remove test CAP (2).
• Remove PROTECTIVE HOUSING (3) from
CARTRIDGE (4). Install with "UP" text on top.
• Reinstall BONNET NUT (1) onto VALVE BODY (5)
and tighten firmly with 12 Nm or 9 lbs/ft.
5
2
NOTE: Specified tightening torque
of BONNET NUT (1) is critical to
assure sealing function.
- 1 -
Channel Locks
1
3
4
M965940 Rev. 1.0 (12/18)
6
Advertisement
Table of Contents

Related Manuals for American Standard Berwick


Summary of Contents for American Standard Berwick
- Page 1 TU431507 Pressure Balancing TU431508 Bath and Shower Trim Kit Thank you for selecting American Standard... the benchmark of fine quality for over 140 years. To ensure that your installation proceeds smoothly-please read these instructions carefully before you begin. For use with shower heads rated at 4.9 L/min (1.3 gpm) or higher.
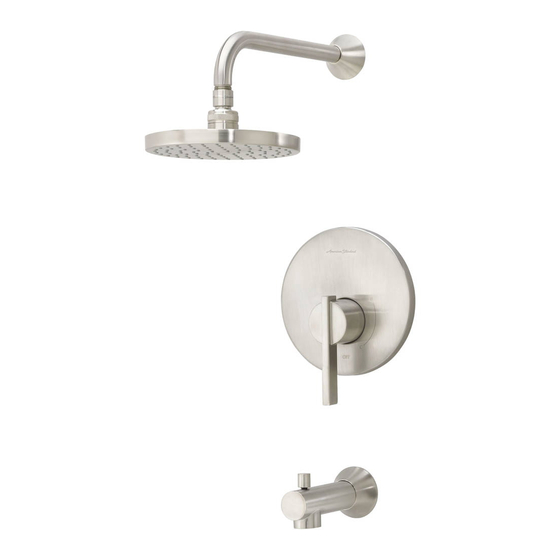
- Page 2 INSTALL VALVE TRIM (STANDARD WALL INSTALLATION) • Figure 1. Push CAP (1) over VALVE CARTRIDGE (2) until seated against stop. PLASTER GUARD • Figure 2. Make sure O-RING (6) is secure within ESCUTCHEON HOLDER (3). Push ESCUTCHEON HOLDER (3) onto CAP (1) and attach with LONG SCREWS (4). Mount ESCUTCHEON SUPPORT (5) to ESCUTCHEON HOLDER (3) with 4 SHORT SCREWS (8).
- Page 3 INSTALL, TUB SPOUT, SHOWER HEAD, SHOWER ARM WITH FLANGE O-RING Protect finish on SHOWER HEAD CAUTION and TUB SPOUT when installing. Note: Apply sealant or Teflon Tape to shower arm. • Remove PIPE PLUG and CAP (1, 2) from shower pipe and tub filler pipe.
- Page 4 SERVICE TO GAIN ACCESS TO VALVE FOR SERVICING Turn off hot and cold water CAUTION supplies before beginning. • Remove HANDLE (see step 3 and reverse). • Remove ESCUTCHEON and CARTRIDGE CAP (see step 1 and reverse). VALVE LEAKS WHEN SHUT OFF •...
- Page 5 Berwick / Boulevard ® ® Pressure Balancing Bath and Shower Trim Kit MODEL NUMBERS TU430507 / TU430508 TU431507 / TU431508 PURCHASE SEPARATELY Replace the “YYY” with appropriate finish code POLISHED CHROME BRUSHED NICKEL M962493-YYY0A SHOWER ARM & FLANGE M970640-0070A A912632-0070A...
Need help?
Do you have a question about the Berwick and is the answer not in the manual?
Questions and answers