
Related Manuals for AJA KONA Series


Summary of Contents for AJA KONA Series
- Page 1 KONA Series Capture, Display, Convert Installation and Operation Manual Version 15.2 Published June 3, 2019...
-
Page 2: Notices
AJA® and Because it matters.® are registered trademarks of AJA Video Systems, Inc. for use with most AJA products. AJA™ is a trademark of AJA Video Systems, Inc. for use with recorder, router, software and camera products. Because it matters.™ is a trademark of AJA Video Systems, Inc. -
Page 3: Table Of Contents
Copyright ..........2 Contacting AJA Support ........2 Chapter 1 –... - Page 4 Index........88 KONA Capture, Display, Convert v15.2 www.aja.com...
-
Page 5: Chapter 1 - Introduction
• KONA 4 • KONA 1 NOTE: The KONA LHe Plus and KONA LHi cards share a separate AJA manual, and the KONA IP and KONA HDMI cards each have a separate AJA manual. KONA cards have varying capabilities, depending on the KONA model and installed firmware version, and are suited for various real-world applications. -
Page 6: Capture Formats
HD/SD video in a selectable matte or the contents of the card’s framebuffer from a software application (including AJA TV). Key a bug or text over picture and avoid what might normally be a lengthy software render. -
Page 7: Kona 5 Card Only
KONA 5 is AJA’s blazingly fast, 8-lane PCIe 3.0 I/O card, designed for today’s most demanding video and audio workflows. Whether you are working with HFR 4K/ UltraHD, 2K/HD, SD, Deep Color and/or HDR, experience the quality and peace of mind that KONA 5 brings to your world. Supporting 10-bit 4:2:2 and 4:4:4, or even 12-bit* color spaces for pristine imagery, KONA 5 allows the flexibility to ingest and output with 12G/6G/3G-SDI and monitor with a full-size HDMI 2.0... -
Page 8: Kona 5 Card With Breakout Cable
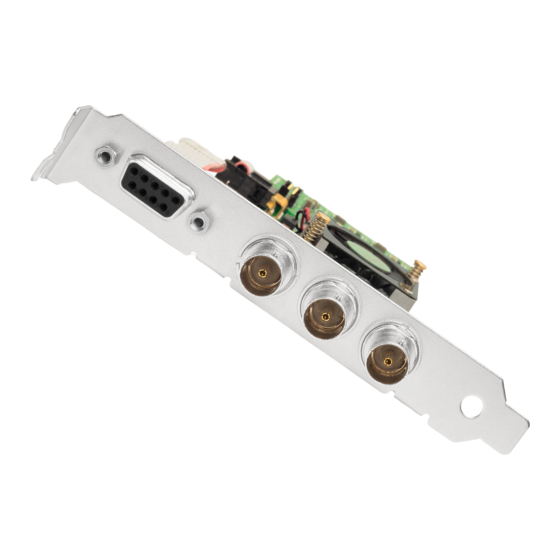
SDI I/O 2 SDI I/O 1 HDMI Output (1) RS-422 Machine Control 9-pin D-sub (male) LTC Input BNC LTC Output BNC Digital AES Audio Output BNCs Channels 1-8 Digital AES Audio Input BNCs Channels 1-8 KONA Capture, Display, Convert v15.2 www.aja.com... -
Page 9: Aja Control Panel User Interface For Kona 5
AJA Control Panel User Interface For KONA 5 Figure 4. KONA 5 AJA Control Panel Screen Example The AJA Control Panel application provides an easy to use graphical user interface for configuration control. See "AJA Control Panel User Interface" on page 25 detailed information. -
Page 10: Kona 4 Breakout Cable Connections
• LTC (longitudinal timecode) input/output KONA 4 Breakout Cable Connections Figure 6. KONA 4 Breakout Cable NOTE: KONA 4 breakout cables cannot be used with KONA 5 cards, and vice versa. KONA Capture, Display, Convert v15.2 www.aja.com... -
Page 11: K3G-Box For Kona 4
Breakout boxes can be easily rack mounted or placed on top of a broadcast monitor or editing desk. See "K3G-Box for KONA 4" on page 21 for K3G-Box connections and capabilities. KONA Capture, Display, Convert v15.2 www.aja.com... -
Page 12: Aja Control Panel User Interface For Kona 4
AJA Control Panel User Interface For KONA 4 Figure 8. KONA 4 AJA Control Panel Screen Example The AJA Control Panel application provides an easy to use graphical user interface for configuration control. See "AJA Control Panel User Interface" on page 25 detailed information. -
Page 13: Aja Control Panel User Interface For Kona 1
AJA Control Panel User Interface For KONA 1 Figure 10. KONA 1 AJA Control Panel Screen Example The AJA Control Panel application provides an easy to use graphical user interface for configuration control. See "AJA Control Panel User Interface" on page 25 detailed information. -
Page 14: Mac, Windows And Linux Packages
NOTE: Support for the Linux OS retail drivers is based on the Linux application used and comes from the application’s vendor. To download AJA software, go to the AJA website: https://www.aja.com/support/downloads For a complete software compatibility list, see the AJA website link https://www.aja.com/compatibility/kona Mac, Windows and Linux Packages These packages include: Drivers AJA device drivers for tightly integrated hardware/software operation. -
Page 15: System Requirements
System Requirements AJA Video recommends that your system meet minimum hardware and software requirements to achieve a satisfactory level of performance. Updates to system requirements are subject to change. NOTE: See Software Vendor system requirements for GPU recommendations and additional hardware requirements and recommendations. -
Page 16: Chapter 2 - Installation
AJA will repair or replace damaged items. If you find shipping damage, contact your AJA dealer or distributor for details on how to have your KONA card repaired or replaced. -
Page 17: Shipping Box Contents
IMPORTANT: The KONA 5 card requires ATX power. For customers who wish to use a Thunderbolt 3 expansion chassis, the chassis must provide ATX connectivity and adequate power. 1. Turn off power to the host chassis. KONA Capture, Display, Convert v15.2 www.aja.com... - Page 18 11. Secure the card in the chassis. 12. Close the chassis. 13. Power up the chassis. NOTE: Always put a RAID controller and KONA on separate PCIe buses. This improves performance by reducing bus contention. KONA Capture, Display, Convert v15.2 www.aja.com...
-
Page 19: Cabling The System
This will provide a downconverted camera signal to the recorder. 7. Connect an HDMI or SDI monitor directly to an output of the digital video recorder. Eight or sixteen channnels of embedded audio are supported, so the VTR must be configured accordingly. KONA Capture, Display, Convert v15.2 www.aja.com... -
Page 20: Kona 4 Example Cable Connections
In the KONA 5 system example above operating in 8K Mode, an 8K ProRes video file is played back with the AJA Control Room application, and sent to a cinema projector using four 12G-SDI signals. Eight channels of AES embedded audio from that file are also routed to the facility PA system. -
Page 21: K3G-Box For Kona 4
• Four full size 3G-SDI BNC connectors on the K3-Box rear panel connect to the KONA 4 card's four SDI connectors with the provided DIN to BNC adapter cable. These signals are routed to the K3-Box's four front panel SDI- KONA Capture, Display, Convert v15.2 www.aja.com... -
Page 22: Kona 1 Example Cable Connections
Installing KONA Software NOTE: Always uninstall previous versions of KONA software before updating your software. Download Go to the AJA website and download the latest KONA driver software containing the AJA Control Panel application: KONA Capture, Display, Convert v15.2 www.aja.com... -
Page 23: Software Package Installation And Re-Installation
1. Open the AJA Control Panel application. 2. If more than one AJA device is connected, choose the device you want to update by selecting its name from the drop-down menu at the top of the screen. -
Page 24: Firmware Versions
Shut Down to power down the computer. 7. Restart the computer. 8. Open AJA Control Panel. The AJA hardware with the updated firmware should be recognized by the Control Panel application. Firmware Versions KONA 5 supports two different versions of firmware that have different capabilities. -
Page 25: Chapter 3 - Operation
KONA card from an external source to create video files on the computer using AJA Control Room or an NLE, or just for display on the KONA outputs. This mode is also used for stand-alone video display or conversion when Control Panel is being used without an external controlling application. - Page 26 Figure 20. AJA Control Panel, Block Diagram and Controls Framebu er Format (Primary) Currently Controlling Selected Application Function Screen Outputs Inputs Operating Mode Parameter Controls Some controlling applications can switch the card's mode from Playback to Capture, and vice-versa. When Control Panel is not being controlled by an external application, you can change the operating mode in the Control Panel Control Screen using the Default Output settings.
- Page 27 Color Meanings All items in the AJA Control Panel block diagram are color-coded to show what is happening in real time. This applies to both icons and text. These colors indicate: Blue Video is same format as the Primary Format (framebuffer)
-
Page 28: Controlling Application
It is important to understand that your computer may contain many applications that can use the AJA device (as you switch from window to window) and it may not always be obvious which currently controls it. In the top right corner, the Control Panel displays the name of the application controlling the unit. -
Page 29: Presets
This file exists to immediately, automatically, store preference changes made by a user on a particular AJA device. When any control is changed in the Control Panel, that change is recorded in the preferences file stored in a unique user preferences location dedicated to that particular device and serial number. -
Page 30: Function Screens
(manually or by pushing it out across the network). All users on the network will then open to the House Defaults when they launch the AJA control panel for the first time. -
Page 31: Using Multiple Aja Products
Panel application, you will see a board name, such as KONA 4-0 and the pane heading will read “AJA Control Panel” if you have more than one product and the associated drivers installed (if only one product is installed, you’ll see no product or pulldown and the product name will appear in the header). -
Page 32: General Control Panel Operation
Io Express as the “targeted” product. Launch the AJA TV application. AJA TV will now use the Io Express for its output. If you switch back to the Adobe application, you will see that it is still using the KONA card for its input/ output. -
Page 33: Control Screen
NOTE: Selecting Input Passthrough on a KONA 4 card in UFC Mode essentially makes the KONA card a converter. No applications other than the AJA Control Panel need be open to convert audio and video from one format to another. For example, if you... - Page 34 Inputs Screen for sync NOTE: For best results when capturing using Avid Media Composer or AJA Control Room, set Ref In to Video In with AJA KONA, AJA Io products and Avid DNxIV, DNxIP. Timing (Horiz and Vert):...
-
Page 35: Format Screen
Use this pulldown menu to choose: YUV-10, YUV-8, RGB-10, or ARGB-8 or RGB-12. RGB Range The RGB Range pulldown menu allows you to select either Full-range (0-1023) or SMPTE range (typically 64-940) for RGB color output. KONA Capture, Display, Convert v15.2 www.aja.com... - Page 36 NOTE: The AJA Control Panel software uses the abbreviation “sf” instead of “PsF” when referring to “progressive segmented frame” formats. In the manual and in other literature you may see either of these acronyms used interchangeably. Visually, it is easier to recognize: •...
- Page 37 KONA 4 will perform a cross-conversion where necessary (input or output) for “like frame rate” formats. For example, 720P 59.94 may be converted to 1080i 29.97. Converting from disparate frame rates is not supported on the KONA 4 for cross-conversions. KONA Capture, Display, Convert v15.2 www.aja.com...
-
Page 38: Input Select Screen
Sets the color space. Select from Auto, YUV, or RGB. NOTE: RGB is not available on KONA 5 in 8K mode. SDI RGB Rng Sets the RGB range. Select from Auto, SMPTE, or Full. KONA Capture, Display, Convert v15.2 www.aja.com... - Page 39 • 9-10 to 1-2 • 11-12 to 1-2 • 13-14 to 1-2 • 15-16 to 1-2 NOTE: This setting does not affect the embedded audio being sent to the KONA's BNC or HDMI output connectors. KONA Capture, Display, Convert v15.2 www.aja.com...
-
Page 40: Sdi Output Screen
• Auto - Auto selection based on input or selected format • 3Gb - Single link HD output using one BNC. The Level B-DS format is the dual- stream carriage of two independent HD-SDI/SMPTE 292M signals (720p up KONA Capture, Display, Convert v15.2 www.aja.com... -
Page 41: Sdi Output Screen, Kona 4 In Ufc Mode
• Secondary - When selected, this indicates that the SDI output is set to a format different from the framebuffer (Primary Format). That secondary format value will be listed in green. This shows that active processing of the video is taking place (format change and possibly up- or down-conversion). KONA Capture, Display, Convert v15.2 www.aja.com... -
Page 42: Hdmi Screen
NOTE: The 4K Transport setting on the SDI Out screen also affects the KONA HDMI output signal, even if the SDI inputs are not being used. A SMPTE 2Si setting is required for UltraHD/4K HDMI output. Other 4K Transport settings will downconvert HDMI output to HD or 2K. KONA Capture, Display, Convert v15.2 www.aja.com... - Page 43 • Auto Set – (best quality) The AJA device will attempt to automatically set the output monitor into the best color space and bit depth that matches the user's application needs regardless of EDID of the output monitor.
-
Page 44: Analog Out Screen
• 4K Quarter (KONA 4 in 4K mode) - Sets a downconversion to 2K x 1080 in 4K or 1920 x 1080 for UltraHD. Format Select the video format from the Format pulldown. • Composite + Y/C • Component (SMPTE) • Component (Beta) • Component (RGB) KONA Capture, Display, Convert v15.2 www.aja.com... -
Page 45: Video Setup Screen
Sets the video color space. Select from: • Auto • Rec 601 • Rec 709 Gamma Sets the video gamma. Intended for use with legacy Apple displays. Select from: • Auto • Gamma 1.8 KONA Capture, Display, Convert v15.2 www.aja.com... -
Page 46: Audio Setup Screen
Different screens are displayed depending on the KONA product. Audio Monitor Monitor Channels Use the drop-down menu to select which two audio channels to monitor. Select from Ch 1-2 through Ch 15-16. KONA Capture, Display, Convert v15.2 www.aja.com... -
Page 47: Audio Mixer Screens
The Audio Mixer screen has two tabs; Capture Monitor and Playback Monitor. These tabs display what sources are available for monitoring / mixing via the AJA hardware when in either of those two modes (if applicable). The controls on this screen are dedicated only to monitoring adjustments, and do not affect the level at which inbound audio signals are captured to storage. - Page 48 Each source has a confidence meter, which enables you to tell immediately if you have a source arriving correctly at the AJA hardware (without having to launch any other software). The level sliders allow a simple plus or minus adjustment to the Source level being monitored.
-
Page 49: Audio Mixer Capture Monitor Mode Screen
Capture tab only. This way when you exit NLE Capture and return to regular editing, the Playback tab settings will be applied and your host system audio monitoring will resume. KONA Capture, Display, Convert v15.2 www.aja.com... -
Page 50: Audio Mixer Playback Monitor Mode Screen
AJA Input Selects for monitoring the audio being input to KONA. NOTE: The AJA Input Item Select dropdown selection is linked to the Input Select screen's Audio Input Select dropdown. Changing the setting on one screen will also change the setting on the other screen. -
Page 51: Downstream Keyer Screen
NLE file. Any actual recording level adjustments to Capture or Audio Punch In / Voice Over to Timeline operations will either need to be made upstream of the AJA input, or else via adjustments within the main NLE application (e.g. via a pass through mix tool). - Page 52 • Audio In - Select audio out to be routed from KONA’s currently selected input(s). Opacity (slider) This slider controls the transparency of the keyed video (over the background) from translucent to completely opaque. KONA Capture, Display, Convert v15.2 www.aja.com...
-
Page 53: Lut Screen
1920x1080. Figure 34. Graphic Selection and Matte Color Selection Click the Matte Color button to bring up color selection dialog Click and select Load File to open browser for loading graphic le. LUT Screen KONA Capture, Display, Convert v15.2 www.aja.com... - Page 54 "look" on a specific display. Users can also specify their own custom LUTs by creating a LUT file and uploading it to an AJA Video Device using the LUT (lookup table) screen in the Control Panel. Custom LUT Controls The LUT Transfer Function screen displays an approximate representation of the effect of the current LUT settings.
- Page 55 Once the LUT file is created, you can upload it with the following steps: 1. Before loading a LUT, make sure you are using an RGB/RGBA framebuffer format, and that you have a AJA Video Device that supports LUTs. 2. Open AJA Control Panel and select the “LUT” pane.
-
Page 56: Timecode Screen
The Timecode Screen selects the timecode stream read for applications that use it (for example, when the timecode source is set to “Use control panel setting,” AJA Control Room will read the selected stream). It is also used for monitoring the RP-188 timecode embedded in the digital data stream. -
Page 57: Presets Screen
Presets Screen After configuring the AJA Control Panel screens, you can then save all your settings as a snapshot for later recall—called a preset. In this way, you can organize presets for all your typical tasks, eliminating time-robbing manual reconfiguration each time. -
Page 58: Firmware Screen
• c:\Users\<username>\AppData\Local\AJA\Control Panel\<device name> Presets\ [Windows 8] Reset to Default When you click the ‘Reset to default’ button the control panel will delete the User’s preference file and do one of the following: • If “Shared” preferences exist, they are reloaded and the device is set to this state. -
Page 59: Info Screen
Info Screen This screen shows the KONA software files that have been installed on your system. This information may be needed if you talk to an AJA Customer Service representative to determine if files are missing or need updating. Control Panel 4K/UltraHD Operation This section describes the AJA Control Panel operations specific to KONA 4 and KONA 5 in 4K Mode and KONA 5. - Page 60 SDI signal, not both at the same time. In this situation, you can use the HDMI output or a down-converted Analog output to monitor the input signal. KONA Capture, Display, Convert v15.2 www.aja.com...
-
Page 61: Control Panel Block Diagram Area In 4K Mode
If a 4K 29.97 two link input is connected and a UltraHD/4K 24-wire Source is selected on the Input Select menu, two BNC connectors are used for input, allowing the other two to be used for SD output. 4K signals report their links as KONA Capture, Display, Convert v15.2 www.aja.com... - Page 62 On KONA 5, when a single link UltraHD/4K input is being received, specifying a single link output will route the UltraHD/4K signal out SDI 3, and will simultaneously output a downconverted HD signal on SDI 4. KONA Capture, Display, Convert v15.2 www.aja.com...
- Page 63 Figure 40. Control Screen with UltraHD and HD Output (KONA 5) 4K Controlled Mode Alternatively, if you launch an appropriate control application (such as AJA Control Room), the SDI input and output ports will be mapped automatically. If you connect a UltraHD or 4K input signal higher than 30 fps, all four BNCs may be required for SDI input or output.
-
Page 64: Sdi Output Screen In 4K Mode
NOTE: The 4K Transport setting also affects the HDMI output of the KONA card, even if the SDI inputs are not being used. A SMPTE 2Si setting is required for UltraHD/4K HDMI output. Other 4K Transport settings will downconvert HDMI output to HD or 2K. KONA Capture, Display, Convert v15.2 www.aja.com... -
Page 65: Hdmi Hdr Screen In 4K Mode
EOTF to use. Most TV’s will require this to be set to ST 2084 for their HDR modes. • Trad Gamma SD • Trad Gamma HD • ST 2084 (HDR-10) • HLG (Hybrid Log Gamma) - No meta-data for Digital Primaries. KONA Capture, Display, Convert v15.2 www.aja.com... - Page 66 Maximum Frame Average Light Level (FALL) Represents the maximum of frame-based average light levels taken over an entire scene, and can be determined in the post environment. • Range: 1 cd/m2 to 65535 cd/m2. • Step size: 1 cd/m2. KONA Capture, Display, Convert v15.2 www.aja.com...
-
Page 67: Video Setup Screen In 4K Mode
Video Setup Screen in 4K Mode Figure 43. AJA Control Panel, Video Setup Screen 4K Mode adds Quad Swap controls to the Video Setup Screen. SDI Input Quad Swap • When checked (default setting is Off), changes the input Quad to SDI quadrant mapping from 1 to 1 to: •... -
Page 68: Audio Mixer Screens (Kona 4 In 4K Mode)
KONA 4 in 4K mode supports the Control Panel Audio Mixer Screens. NOTE: These screens are not available on KONA 4 in UFC Mode or KONA 5 in 8K Mode. "Audio Mixer Screens" on page 47 for detailed information. KONA Capture, Display, Convert v15.2 www.aja.com... -
Page 69: Downstream Keyer Screen In 4K Mode
Control Panel 8K Operation (KONA 5 only) This section describes the AJA Control Panel operations specific to KONA 5 in 8K Mode. This mode supports the capture or playback of 8K material, using four input or output 12G-SDI signals. Note that in 8K Mode, you can still capture and playback single link SD, HD, and 2K formats. -
Page 70: Format Screen In 8K Mode (Kona 5 Only)
Format Screen in 8K Mode (KONA 5 only) Figure 45. AJA Control Panel, KONA 5 Format Screen in 8K Mode KONA 5 operating in 8K Mode adds the following UHD2 and 8K formats: • UHD2 p23.98, 24, 25, 29.97, 30, 50, 59.94, 60 •... -
Page 71: About 12-Bit Video
Although RGB is used less in today’s video systems, KONA supports it for A/V Monitor output. However, because the KONA (and SMPTE SDI’s) native format is YPbPr, AJA recommends using YPbPr when the monitor supports it. The YPbPr format provides headroom for “superwhite” and "superblack”, and these video levels will be clipped when transcoding to RGB. -
Page 72: Appendix A - Specifications
• 4K, UltraHD, 2K, HD and SD with HFR support up to 60p (4:2:2), 10-bit and 8-bit • HDR10 Support** - HDR Infoframe metadata, compatible with HDMI 2.0a/CTA- 861.3 • HLG Support** - compatible with HDMI 2.0b/CTA-861-G *Bit depth support is application dependent. Check with your software manufacturer for compatibility. KONA Capture, Display, Convert v15.2 www.aja.com... - Page 73 • LTC timecode input and output (via 2x BNC on breakout cable) • LTC timecode input (via 2-pin header on PCIe card) • LTC timecode input (via HD-BNC at PCIe bracket) Electrical Interface • 8-lane PCIe 3.0 KONA Capture, Display, Convert v15.2 www.aja.com...
-
Page 74: Kona 4 Tech Specs
• (HD) 1080PsF 23.98, 24, 25, 29.97, 30 • (HD) 1080p 23.98, 24, 25, 29.97, 30, 50, 59.94, 60 • (HD) 720p 23.98*, 24*, 25*, 29.97*, 30*, 50, 59.94, 60 • (SD) 625i 50 • (SD) 525i 23.98*, 59.94 KONA Capture, Display, Convert v15.2 www.aja.com... - Page 75 • 16-Channel, 16- and 24-bit AES/EBU audio, 48 kHz sample rate, synchronous (via 8 x BNC on optional K3G-Box) • 8-Channel, 16- and 24-bit AES/EBU audio, 48 kHz sample rate, synchronous or nonsynchronous, internal sample rate conversion (via 4x BNC on breakout cable) KONA Capture, Display, Convert v15.2 www.aja.com...
- Page 76 5 No Connection 6 GND 7 RX+ 8 TX- 9 GND Shell GND Size (w x d x h) • .75" x 6.9" x 5.0" (19.05mm x 175.26mm x 127mm) Weight • 0.7 lb (0.4 kg) KONA Capture, Display, Convert v15.2 www.aja.com...
-
Page 77: Kona 1 Tech Specs
• 16-Channel 24-bit SDI embedded, 48 kHz synchronous Audio Output Digital • 16-Channel 24-bit SDI embedded, 48 kHz synchronous Reference / LTC Input • Analog Color Black or HD Tri-level sync • LTC Electrical Interface • 2-lane PCIe 2.0 KONA Capture, Display, Convert v15.2 www.aja.com... - Page 78 • Safe Operating Temperature: 0 to 40 C (32 to 104 F) • Safe Storage Temperature (Power OFF): -40 to 60 C (-40 to 140 F) • Operating Relative Humidity: 10-90% noncondensing • Operating Altitude: <3,000 meters (<10,000 feet) KONA Capture, Display, Convert v15.2 www.aja.com...
-
Page 79: Appendix B - Safety & Compliance
Community throughout this document: AUSTRIA, BELGIUM, BULGARIA, CYPRUS, CZECH REPUBLIC, DENMARK, ESTONIA, FINLAND, FRANCE, GERMANY, GREECE, HUNGARY, IRELAND, ITALY, LATVIA, LITHUANIA, LUXEMBOURG, MALTA, NETHERLANDS, POLAND, PORTUGAL, ROMANIA, SLOVAKIA, SLOVENIA, SPAIN, SWEDEN, UNITED KINGDOM, ICELAND, LICHTENSTEIN, NORWAY, SWITZERLAND KONA Capture, Display, Convert v15.2 www.aja.com... - Page 80 Class B As an electromagnetic wave equipment for home use (Class B), (Broadcasting Communication this equipment is intended to use mainly for home use and may Equipment for Home Use) be used in all areas. KONA Capture, Display, Convert v15.2 www.aja.com...
- Page 81 Aviso! Leia e siga todos os avisos e instruções assinalados no produto ou incluídos na documentação. Avviso! Leggere e seguire tutti gli avvisi e le istruzioni presenti sul prodotto o inclusi nella documentazione. KONA Capture, Display, Convert v15.2 www.aja.com...
- Page 82 Aviso! Desconecte este dispositivo da tomada durante trovoadas ou quando não é utilizado durante longos períodos de tempo. Avviso! Utilizzare soltanto i collegamenti e gli accessori specificati e/o venduti dal produttore, quali il treppiedi e l'esoscheletro. KONA Capture, Display, Convert v15.2 www.aja.com...
- Page 83 è stato rovesciato del liquido è stato rovesciato o qualche oggetto è caduto nel dispositivo, il dispositivo è stato esposto a pioggia o umidità, non funziona correttamente o è caduto KONA Capture, Display, Convert v15.2 www.aja.com...
- Page 84 Aviso! Dado que a ficha principal é utilizada como a desconexão para o dispositivo, esta deve manter-se prontamente acessível e funcional. Avviso! Poiché il cavo di alimentazione viene usato come dispositivo di sconnessione, deve rimane prontamente accessibile e operabile. KONA Capture, Display, Convert v15.2 www.aja.com...
- Page 85 ¡Advertencia! Cuando mueva la unidad desenchufe de la red eléctrica el/los cable(s) de la fuente de alimentación CA tipo brick. Advertência! Remova os cabos CA de alimentação brick da rede elétrica ao mover a unidade. Avvertenza! Scollegare il cavo dell’alimentatore quando si sposta l’unità. KONA Capture, Display, Convert v15.2 www.aja.com...
-
Page 86: Warranty And Liability Information
AJA Video, with shipping charges prepaid. AJA Video shall pay to return the product to Customer but only if to a location within the country in which the AJA Video service center is located. -
Page 87: Limitation Of Liability
No amendment to or modification of this warranty will be binding unless in writing and signed by AJA Video. The laws of the State of California, USA will govern this warranty and any dispute arising from it. Any translation of this... -
Page 88: Index
AJA Control Panel 14 Control Screen 33 AJA Control Room 14 Conversion Icon 28 AJA Input 50 Cross-Conversion 37 AJA Software & Utilities 13 Info Screen 59 Custom LUT Controls 54 AJA Support 2 Input/Output Icon 27 AJA System Test 14, 16... - Page 89 Quadrant 4-Wire 59 User Bits 56 Quadrant Mode 60 User Preference 29 Quad Swap File Location 30 SDI Input 67 Using Multiple AJA Products 31 SDI Output 67 Utilities 13 QuickTime Format 6 VANC Checkbox 46 Reference Video 22 Video+Key 40...
Need help?
Do you have a question about the KONA Series and is the answer not in the manual?
Questions and answers