Advertisement
Quick Links
R R
AIN
AIN
IMPACT SPRINKLER TROUBLESHOOTING GUIDE
USE AND OPERATION
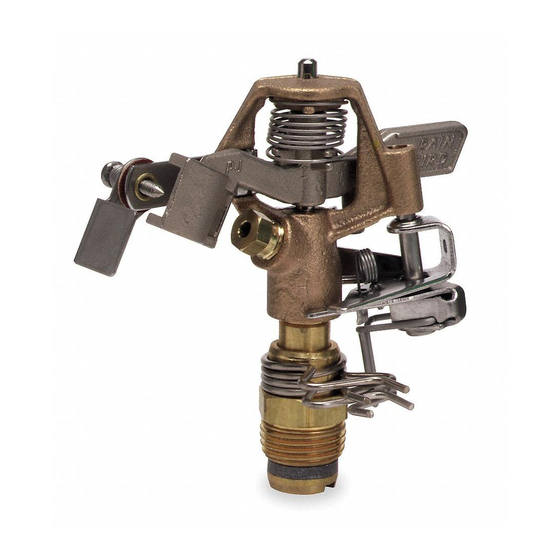
The diagrams below depict typical Rain Bird sprinklers with all available controls. Your particular
model may have only some of these features.
Diffuser screw:
Distance
control flap:
Distance
control dial:
Arc Adjusters
(Trip collar):
Trip Pin:
25PJDA
B B
IRD
IRD
®
Breaks up the stream of water for more close-in watering. Shortens dis-
tance of the stream (throw) up to 25% of total throw. Screw clockwise
into the stream to produce misting and shorten throw. Turn counterclock-
wise until totally out of stream for maximum distance (unadjusted throw).
Reduces length of the stream and redistributes water. Tilt downward into
stream to deflect water. May be used in conjunction with diffuser screw
for maximum throw reduction.
Some plastic models have a dial on top marked for minimum and maxi-
mum distance. Turning the dial will cause modification of the stream of
water and distance of throw as indicated on the dial. This feature serves
the same purpose as the distance control flap found on other models.
Used to adjust degree of arc sprinkler will rotate. Position one arc ad-
juster for each side of the desired arc. Several types of arc adjusters are
available depending on the model of your sprinkler. Generally, plastic
models move by just a push of the thumb. To adjust the metal models,
pinch the ends of each metal adjuster together before sliding into posi-
tion.
Used to determine part or full circle operation. Flip or bend the trip pin
upward so it does not hit the trip collar for full circle operation. Pin should
be downward for part circle operation (then slide arc adjusters into posi-
tion to set degree of arc).
Diffuser Control Dial
Diffuser Control Flap
Diffuser Screw
Nozzle
Arc Adjusters
Trip Pin
Customer Support Center
6991 E. Southpoint Rd., Bldg. #1
Tucson, AZ 85706 1-800-RAIN-BIRD
1
P5-PJ
Advertisement

Related Manuals for Rain Bird 25PJDA


Summary of Contents for Rain Bird 25PJDA
- Page 1 IMPACT SPRINKLER TROUBLESHOOTING GUIDE USE AND OPERATION The diagrams below depict typical Rain Bird sprinklers with all available controls. Your particular model may have only some of these features. Breaks up the stream of water for more close-in watering. Shortens dis- Diffuser screw: tance of the stream (throw) up to 25% of total throw.
- Page 2 IMPACT SPRINKLER TROUBLESHOOTING Through many years of experience, we have found that conditions which most often interfere with the proper operation of impact sprinklers are the use of any lubricants (other than water), low water pressure, foreign materials in the irrigation water, and excessive damage or wear to sprinkler parts. Any one or a combination of these factors can cause the sprinkler to stop rotating completely or ro- tate to one side and fail to return.
- Page 3 Impact Sprinkler Troubleshooting Guide Continued Problem Cause Remedy 3. Worn or a. If arm or body of sprinkler is bent or damaged, replace sprinkler or part if damaged parts. available. b. Arm spring tension may need increasing. Metal models: Unhook spring from arm with needle-nosed pliers.
- Page 4 Consult your local Rain Bird contractor about sprinklers which contain a off. built-in check valve to prevent water in the pipe from draining out of the sprinkler head.
- Page 5 IMPACT SPRINKLER DISASSEMBLY 15111A Cover Assembly Internal Assembly: 1511A/B Case (Metal Sprinkler) Arm Spring Drain Holes Diffuser Screw Body Trip Spring Nozzle Vane Guide Seal Nozzle Trip Collar Guide Nut Trip Head Retract Spring Assembly Trip Guide Sleeve Mechanism Assembly Swivel Bearing Bearing Assembly...
- Page 6 POP UP UNITS IN A CASE For Metal or Plastic sprinklers, remove unit from case using special Rain Bird wrench for your unit. Wrenches are available where Rain Bird underground sprinklers arc sold. Sprinkler portion of unit is detachable from pop-up stem using a 1/2" hex wrench with a 6" extension.
- Page 7 DISASSEMBLY OF METAL SPRINKLER HEAD To replace the trip collar and bearing washers, lock the body of sprinkler in a vise, making sure the sprinkler arm is not touching the vise. Insert a file into nipple slot (figure A) or use a bearing wrench. Rotate file counterclockwise to unscrew nipple.
-
Page 8: Parts And Repair Services
A variety of parts and parts assemblies are available for Rain Bird metal and plastic sprinklers. If your local Rain Bird dealer does not carry the part you need, ask if it can be ordered, or call our toll free Technical Services hotline at 1-800-RAIN-BIRD for dealer referral or factory direct ordering in- formation. -
Page 9: Master Parts List
(C) Included in Bearing Washer Kit # 202190. NOTE: Part numbers enclosed in brackets ( ) are not available individually, but may be sold in assem- blies or kits. INSURE QUALITY - USE ONLY GENUINE RAIN BIRD PARTS © COPYRIGHT 1991 RAIN BIRD SPRINKLER MFG. CORP.
Need help?
Do you have a question about the 25PJDA and is the answer not in the manual?
Questions and answers