
Related Manuals for FIMI FMWRJ01A3


Summary of Contents for FIMI FMWRJ01A3
- Page 1 FIMI A3 Drone User Manual Please read the user manual carefully before using and keep the manual for future reference.
- Page 2 V1.0...
- Page 3 Services & Support Product Introduction FIMI provides A3 users with instructional video A3 is a small multi-functional quadrotor aircraft with integrated aerodynamics, intelligent control, wireless communication and and the following information: other advanced technologies, which can realize the functions of analog photo transmission, remote controller, HD aerial photography, 1.
-
Page 4: Package List
Charging transfer cable Aircraft x 1 Remote controller x 1 USB cable FIMI A3 Drone Quick Start Manual Please read the quick start manual carefully before using and keep the quick start manual for future reference Positive propellers Battery Balance charge... -
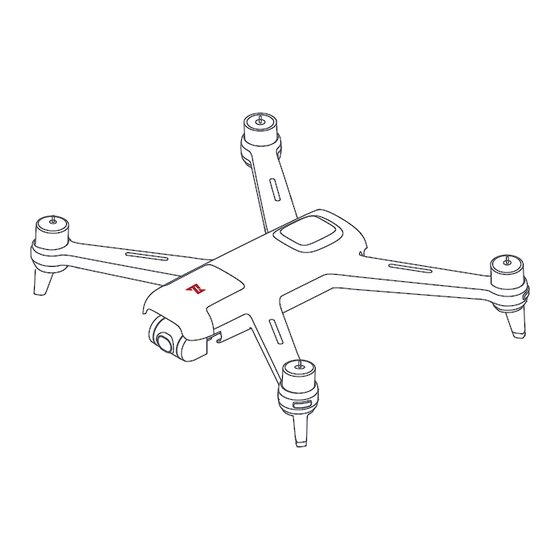
Page 5: Product Introduction
Product Introduction 1 Aircraft Bottom shell Reverse propeller DIY port Upper shell Landing gear Power button Positive propeller DIY screw hole Charging protective cover Battery buckle Integrated gimbal camera Motor Battery... -
Page 6: Remote Controller
2.1 Remote controller 2.4G flight control antenna Shoot/Record button Left dial 5.8G transmission antenna Left stick Right stick I/O switch LCD screen Power button Sunshade fixing screw hole Mode switch key Interface protection cover Five-directional button Right dial Return button... - Page 7 2.2 Buttons function introduction of RC Buttons Function description Right Push stick upward, the aircraft goes up; pull stick downward, the aircraft goes down; toggle stick to Backward Left stick left, the aircraft rotates counter-clockwise; toggle stick to right, the aircraft rotates clockwise Push stick upward, the aircraft flies forward;...
- Page 8 2.3 Main menu of RC TF card status Capacity/Record time GPS stars number Transmission signal Flight mode Interface status RC signal Aircraft voltage Aircraft battery level 11.1V 00:10:21 RC battery level Horizontal velocity H .S:16 mp h V.S:0 4 mp h D:18 0 2 f t H:18 0 2 f t Flight altitude Vertical velocity...
- Page 9 Aircraft The switching logic is as follows: Flying mode Mode State SPORT mode (sport) SPORT mode Open ATTI GPS module is used to achieve precise hovering, and intelligent flight function is Open ATTI mode supported in SPORT mode. The maximum flight speed is 18m/s, the maximum SPORT mode Open SPORT...
-
Page 10: Safety Protection
Safety protection Intelligent flying Lost return One-key return Lost return is only supported in GPS and SPORT mode. When the GPS signal When the aircraft is flying in the air, the user can long press the "Return" button for is good, the compass is working normally and the aircraft records the return more than 3 seconds to make the aircraft enter the automatic return. - Page 11 Self-timer flying Around-point flying Before self-timer flying, please adjust the posture of the aircraft so that the target is The user can select around-point flying on the remote controller menu. Before the in the middle of the picture. After adjusting the pitch angle of the cradle head , select around-point flying, please select the interest point first.
- Page 12 Fixed-wing mode Installation and disassembly of aircraft TF card When the aircraft is flying in the air, the user clicks the fixed wing mode on the remote controller menu, and the aircraft will fly forward at a constant speed and cannot fly backward. Press the return key and exit the fixed wing mode. Users can freely control the speed and route of the aircraft through the stick, When installing SD card to the aircraft, and the specific functions are as follows.
- Page 13 Turning on and off the aircraft Assembly & disassembly of propeller Attach propellers according to color mark on the motor axis. Short press + long press the power button until the aircraft indicator lights are on, meaning turned on. Align the propeller against the clamp of the motor shaft and ensure that the propeller is pressed to the root of the motor shaft.
-
Page 14: Installation
Battery Charge aircraft battery Safety tips: Please remove the battery from the aircraft and recharge it. Be sure to read carefully and strictly follow the instructions and disclaimers before charging. The user shall bear the consequences caused by the failure to Connect the battery, the balance charge and power adapter as shown use the product as required. - Page 15 With an built-in LCD display, simple menu for operation and Turning on and off the RC ergonomic design, it can be operated and controlled easily and precisely. When the aircraft is started up, it can fly without tedious operation. The maximum remote operation time is about 4.5 hours. 1 Charging Long press the power button to turn on / off the RC.
- Page 16 5 Shooting and Recording AV - OUT interface Users can connect the FPV glasses through the AV-OUT Short press the shoot / record button to take a picture. interface to experience the flight of the first perspective, or Long press the shoot / record button to start recording. Long press again to stop recording.
- Page 17 6 Quick action keys on the remote controller When ATTI mode is turned on, the aircraft can be quickly switched to ATTI mode by switching the key to the left. When ATTI mode is turned off, the aircraft can be quickly switched to SPORT mode by switching the key to the left.
- Page 18 8 Remote controller code-matching 7 RC settings When a new remote controller or aircraft is replaced, the code- Push the five-dimensional button to the right to access the media library. matching operation between the remote controller and the aircraft Toggle the five-dimensional button to the left to the settings menu. shall be performed again as follows:...
- Page 19 Flying 1 Inspection before flying 2 Confirm the aircraft heading Make sure that the battery of the aircraft and remote controller The installation position of the aircraft battery is the tail is sufficient. direction. Make sure that the propeller is properly installed and free from Once the aircraft is turned on, the heading can be told by damage and aging.
-
Page 20: Take Off
5 Automatic take-off/landing Take off When taking off/landing automatically, the location with good Keep both sticks to the bottom inner still over 1 second, the propellers start GPS signal should be selected and kept away from people, spinning. animals, tall buildings and trees. Please land on a appropriate Release both sticks once propellers have been spinning, and firmly push and safe place. -
Page 21: Flight Safety
6 Emergency stop of propeller 7 Flight safety When motors can't properly turn off, please toggle the left stick The aircraft is suitable for people above 18 years who have to the bottom inner in maximum range, and tap return button of full civil capacity. -
Page 22: Remote Controller Calibration
Calibration 1 Remote controller calibration 2 Gimbal calibration Select "RC Calibration" in the remote controller setup menu. Click Gimbal Calibration and enter the calibration page in the remote controller setup menu. Click [OK] to start remote calibration. After the aircraft is placed smoothly, click to start calibration. Don't move Push the two sticks to the maximum extent in the four directions the aircraft during the calibration process. -
Page 23: Compass Calibration
3 Compass calibration If the magnetic field changes, the compass needs to be recalibrated to ensure flight safety. If the aircraft's compass needs to be calibrated, the remote controller will give a prompt. After entering the remote controller menu, please select compass calibration, and then calibrate based on prompts on the screen. -
Page 24: Battery Maintenance
Propeller maintenance Please check the firmware version number regularly and visit www.a3.fimi.com to download the new firmware. The propeller is a wear part. When the propeller wears out, it needs to be replaced in time; otherwise, the aircraft cannot be operated normally. -
Page 25: Basic Specification
The 25 minutes flight time refer to the constant speed flight time when sigle battery cell voltage at 4.35v and with gentle breeze. Please use charger supported 4.35V.Remote control distance reach to 1km (FCC) in open and no electro-magnetic interference area. All above testing and data are come from FIMI laboratory, errors may occur in actual use according to operating environmental changes.
Need help?
Do you have a question about the FMWRJ01A3 and is the answer not in the manual?
Questions and answers