
Related Manuals for Mirrorstone Classic series


Summary of Contents for Mirrorstone Classic series
- Page 1 IR PANEL HEATER MANUAL ON/OFF LOCK MODE TIME Classic Frameless NXT Gen Image Glass & Mirror Ranges *Remote control only available with certain models...
-
Page 3: Table Of Contents
CONTENTS 1. INCLUDED IN THE BOX 2. FEATURES 3. MODEL SPECIFICATIONS 4. WARNINGS & PRECAUTIONS 5. DEVICE STRUCTURE 6. MOUNTING & INSTALLATION 7. SUSPENSION KIT INSTALLATION 8. PANEL STAND INSTALLATION 9. NXTGEN PANEL HEATERS 10. OPERATION OF REMOTE & RECEIVER 11. -
Page 4: Included In The Box
INCLUDED IN THE BOX a. – Infrared Heater b. – Screws c. – Wall Plugs d. – Mounting Template FEATURES This infrared panel heater is designed to provide an efficient, comfortable and healthy heating system for all domestic users and homeowners. This infrared panel heater can reduce air circulation and help create and maintain a clean, silent and dust free environment. -
Page 5: Model Specifications
MODEL SPECIFICATIONS Available Sizes Rated Power Amps Heated Area 295mm x 595mm 180W 0.75A 2 - 3m 595mm x 595mm 350W 1.4A 5 - 6m 595mm x 995mm 580W 9 - 10m 2.5A 595mm x 1195mm 700W 11 - 12m 795mm x 1195mm 900W 3.9A... -
Page 6: Warnings & Precautions
WARNINGS & PRECAUTIONS No Covering Do Not Touch Do Not Spray To prevent burns or injuries related to prolonged contact with the heating panel, children, those who suffer from sensitive skin, the elderly, the sick or those who are taking any medication that causes drowsiness should take extra care around the appliance. -
Page 7: Device Structure
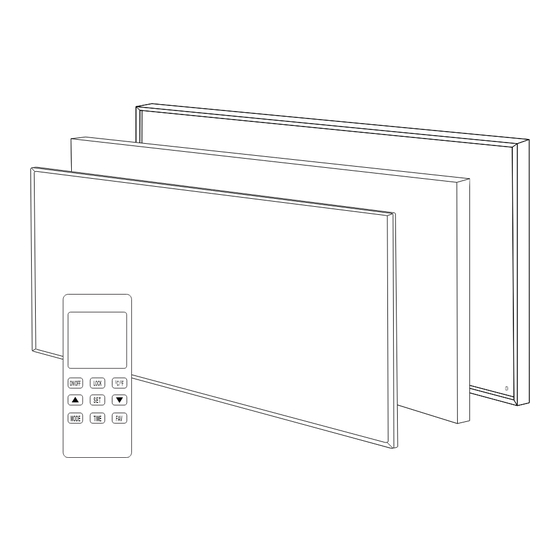
DEVICE STRUCTURE Device Structure (Structure will vary depending on the model purchased) Aluminium or Toughened Glass Heating Element Aluminium Frame Aluminium Alloy Hanging Bracket MOUNTING & INSTALLATION IR Panel Heater Manual... -
Page 8: Suspension Kit Installation
1. Use the supplied paper to cover the back of the panel, and use a pencil to mark the locations of the holes. 2. Use some adhesive tape to fix the paper onto the wall or ceiling. Use the template to drill the holes. 3. - Page 9 6. Feed the remaining Suspension Cable (A) through the top of the Long Latch Cylinder Base, and out through the small hole in its side. You can adjust the length of the cable by pressing down on the Long Latch Lock (C1) and feeding the Suspension Cable (A) through.
-
Page 10: Panel Stand Installation
PANEL STAND INSTALLATION The Panel Stand (sold separately) allows you to have your heater free-standing on the floor, and can also be moved from room to room too. 1. Remove the two screws along the bottom of the frame at the back of the panel. -
Page 11: Nxtgen Panel Heaters
NXT GEN HEATING PANELS *NXT Gen features only available with NXT Gen, Image and Custom Image ranges. REMOTE CONTROL Battery powered: DC 3V (2 x 1.5V AAA Batteries, not included). Power consumption: 3V, 0.1mA. Dimensions: 135mm length x 56mm width x 18mm depth. Weight: 86g. -
Page 12: Operation Of Remote & Receiver
OPERATION OF REMOTE & INTEGRATED RECEIVER Lock symbol Learn symbol Heater on Indicator Battery capacity indicator Current room temperature ROOM 188.0 Target room temperature 188.0 Date SUN MON TUE WED THU FRI SAT M O D E 2088 18 28 Mode settings SMART ON OFF... -
Page 13: Getting Started
GETTING STARTED Included with each panel is a remote controller with an LCD digital display. This features an integrated room temperature sensor located at the top of the remote. At the back of the panel itself is the integrated receiver that com- municates with the remote controller. -
Page 14: Electronic Temperature Control
Hold down the ‘Lock button’ for 3 seconds to lock the remote, and hold it again for 3 seconds to unlock the remote. Set the year, month and day by holding down the ‘Time’ button. Use the ‘Up’ and ‘Down’ button to change the year, and then press the ‘Time’... -
Page 15: Timer & Temperature Settings
TIMER & TEMPERATURE SETTINGS Hold down the ‘Set button’ for 3 seconds, this will let you set the timer and temperature settings. Initially, you will be able to set the time you would like the heater to switch on for Monday to Friday (indicated by the flashing ‘1-5’... -
Page 16: Open Window Mode
and calculating how long it will take the room to warm up. So for example, if you have set your heater to switch on at 8:00am at a temperature of 21 C using the Smart Start, it will monitor the room temperature at 5:00am. Let’s say your room temperature at 5:00am is 14 C, it will calcu- late the time it takes to get your room from 14... -
Page 17: Maintenance & Servicing
MAINTENANCE & SERVICING 1. This infrared heating panel requires no servicing, and very little maintenance. 2. When cleaning any Classic, Frameless, NXT Gen, Glass or Mirror IR Panel, you can use a damp cloth and gently wipe the surface of the panel. - Page 19 enquire@mirrorstoneheating.co.uk www.mirrorstoneheating.co.uk Unit 1A, 20 Devonshire Road Leicester, LE4 0BF +44 (0) 116 436 2250...
Need help?
Do you have a question about the Classic series and is the answer not in the manual?
Questions and answers