Table of Contents
Advertisement
Quick Links
Direct Supply
®
ATLAS
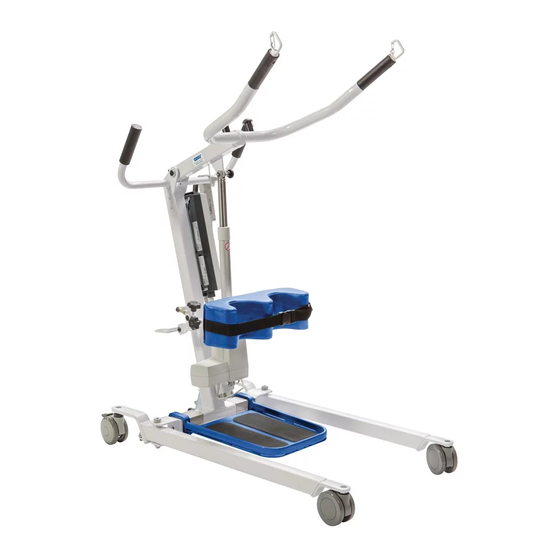
SIT-TO-STAND
LIFT
Owner's Manual
Please keep and refer to this Owner's Manual.
Thank you for purchasing a Direct Supply
Atlas Sit-to-Stand Lift from Direct Supply Equipment & Furnishings
. Please read
®
®
this entire guide carefully and keep it for future reference. This guide will provide you with instructions, warnings, warranty
information and other important information about your lift. Share this information with your housekeeping, nursing and
maintenance staff to help ensure the lift is cared for properly.
1-800-634-7328 DirectSupply.com
Advertisement
Table of Contents

Related Manuals for Direct Supply ATLAS


Summary of Contents for Direct Supply ATLAS
- Page 1 LIFT Owner’s Manual Please keep and refer to this Owner’s Manual. Thank you for purchasing a Direct Supply Atlas Sit-to-Stand Lift from Direct Supply Equipment & Furnishings . Please read ® ® this entire guide carefully and keep it for future reference. This guide will provide you with instructions, warnings, warranty information and other important information about your lift.
-
Page 2: Table Of Contents
Hand Control Buttons ....................... 14 YOU and YOUR: The facility, community or other entity that has purchased the device. Raising/Lowering the Boom ..................... 14 WE, US and OUR: Direct Supply Manufacturing, Inc. Opening/Closing the Legs ....................14 Activating a Mechanical Emergency Release ..............15 Attention. -
Page 3: Safety
WARNING: DO NOT modify slings in any way. Before each use, check sling attachments to ensure proper connection. These instructions are a basic guide for how to use the Atlas Sit-to-Stand Lift and is not a substitute for having the lift being operated by a trained professional. Residents using this lift must be able to WARNING: If the resident is in a wheelchair, activate wheel locks to prevent the chair from support at least 60% of their own weight and have head and neck control. -
Page 4: Lifting The Resident
Safety (cont.) Lifting the Resident Electrical & Grounding WARNING: Before lifting the resident, ensure legs on adjustable base lift are in the full Grounding Instructions open/locked position. WARNING: The included battery charger should always be properly grounded to ensure resident WARNING: After elevating the resident a few inches above a stationary object, ensure the sling and assistant safety. -
Page 5: Product Labeling
Product Labeling Assembly WARNING: Use only Direct Supply parts in the assembly of this resident lift. Unpacking the Resident Lift Remove all the parts from the carton and place on the fl oor, taking care to protect the painted fi nish from damage. - Page 6 Assembly (cont.) c) Install top actuator pin chain through lift and actuator. f) Install battery on top of control box. d) Install control box onto mounting bracket located on the mast. g) Plug the hand control into the socket located on the bottom left side of control box. e) Tighten control box mounting screws.
-
Page 7: Mounting The Battery Charger
Assembly (cont.) i) Install the base width adjusting handle. Mounting the Battery Charger CAUTION: Refer to your local regulations concerning proper mounting procedures. a) Place the battery charger with mounting bracket on the wall at the desired position. b) Mark the middle hole position with a pencil. c) Measure down 6½... -
Page 8: Operation
Operation WARNING: Do not attempt to transfer a resident without prior approval from a medical professional. Do not install, assemble or operate this equipment without fi rst reading and understanding the instruction manual and observing trained specialists perform a lift. WARNING: When lifting a resident, the legs of the lift must be in the maximum open position for stability and safety. -
Page 9: Performing An Emergency Stop
Operation (cont.) Performing an Emergency Stop Handle (a, b, d & e) WARNING: A resident lift is a transfer device that allows attendants to transfer residents from a bed to a wheelchair, commode or similar device. It must not be used to transport residents. a) Before lifting a resident, make sure the base legs are in the most widely opened position and the rear caster brakes are engaged. -
Page 10: Lifting The Resident
Damage may occur. Adjustments for safety and comfort should be made before moving the resident. Direct Supply resident slings are made specifi cally for use with Direct Supply resident lifts. For the resident safety, Positioning the Sit-to-Stand Resident Lift DO NOT intermix resident slings and resident lifts of other manufacturers. - Page 11 Lifting the Resident (cont.) Ensure the following: WARNING: If transferring a resident from a wheelchair, wheel locks MUST be in the locked position before lowering the resident into the wheelchair. Otherwise, injury may occur. • The resident’s knees are secure against the knee pad. WARNING: If transferring from a wheelchair, lock the wheel locks on the wheelchair.
-
Page 12: Transferring The Resident
The resident should be elevated just high enough to clear the bed with his or WARNING: Direct Supply recommends locking the rear swivel casters of the lift only when her weight fully supported by the lift. -
Page 13: Troubleshooting
Any defect should be noted and reported to Direct Supply immediately, and do not use the lift. The casters MUST swivel and roll smoothly. Light grease may be applied to the ball-bearing swivel of the casters once a year. -
Page 14: Detecting Wear & Damage
Maintenance (cont.) Detecting Wear & Damage Replacing Boom/Lift Arm Inspect slings, cradle/hanger bar and any pivot for slings frequently for signs of deterioration prior to WARNING: After the fi rst year of use, the hooks of the boom/lift arm and mounting brackets of each use, such as cracking or fraying. -
Page 15: Base Adjustment
Maintenance Technical Data (cont.) Base Adjustment Sit-to-Stand Resident Lift Linkage Rod a) When in the closed position, check that the legs are square. Electric Sit-to-Stand Resident Lift, 400 lb. weight capacity (to be validated by QC/Engineering) b) To determine 90-degree alignment, place a square on the Height at Sling Hookup –... -
Page 16: Limited Warranty
Limited Warranty Customer Service We offer to you, as the original purchaser, a warranty for the Atlas Sit-to-Stand Lift. Our warranty Our promise to you is that you will have a convenient and easy ordering experience, receive a applies for the limited warranty period stated below. If any device or device part listed below is quality Atlas Sit-to-Stand Lift, and enjoy outstanding customer service. - Page 17 Distributed by Direct Supply Manufacturing, Inc. 6635 N Industrial Road, Milwaukee, WI 53223. © 2017 Direct Supply Manufacturing, Inc. All Rights Reserved. Direct Supply , and all associated logos are the registered trademarks of ® Direct Supply, Inc., used under license.
Need help?
Do you have a question about the ATLAS and is the answer not in the manual?
Questions and answers
how you use the sling?