oticon Opn S 1 miniRITE R Instructions For Use Manual
Hide thumbs
Also See for Oticon Opn S 1 miniRITE R:
- Instructions for use manual (106 pages) ,
- Instructions for use manual (45 pages) ,
- Instructions for use manual (100 pages)
Table of Contents
Advertisement
Advertisement
Table of Contents

Related Manuals for oticon Oticon Opn S 1 miniRITE R


Summary of Contents for oticon Oticon Opn S 1 miniRITE R
- Page 1 Instructions for use miniRITE R Oticon Opn S™ Oticon Opn Play™...
- Page 2 Model overview Introduction to this booklet This booklet is valid for the Oticon Opn S™ and Oticon Opn Play™ This booklet gives you guidance on how to use and maintain your families in the following hearing aid models: new hearing aid. Please read the booklet carefully, including the Warnings section.
- Page 3 Intended use In short The hearing aid is intended to amplify and transmit sound to the Charging ear, and thereby compensate for impaired hearing within mild to Charge the hearing aid every night. severe-to-profound hearing loss. This hearing aid is intended for use by adults and children older than 36 months.
-
Page 4: Table Of Contents
Table of contents About Your hearing aid, speaker and earpiece Hearing aid Charger Start-up Prepare charger Charge the hearing aids Charging time Battery performance Turn hearing aid ON/OFF using charger Turn hearing aid ON/OFF using push button Battery low indication Identify left and right hearing aid Put on hearing aid Continues on next page... - Page 5 Table of contents Handling Tinnitus Cleaning Tinnitus SoundSupport™ (optional) Replace standard earpieces Sound and volume adjustments ProWax miniFit filter Limitation on use time Clean customised earpieces Warnings Replace ProWax filter Tinnitus SoundSupport warnings Storage of the hearing aid General warnings Flight mode More info Options...
-
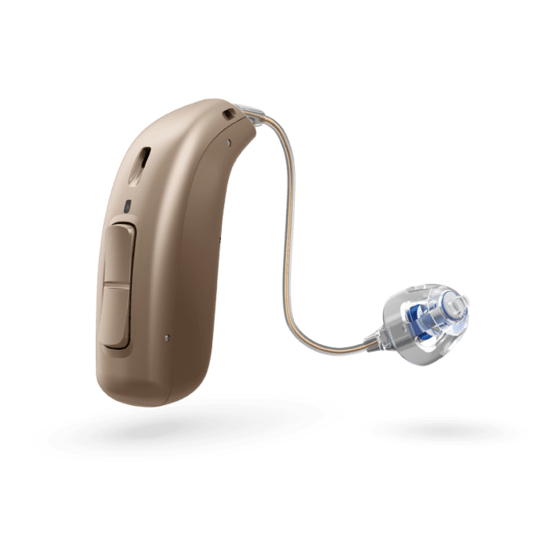
Page 6: Your Hearing Aid, Speaker And Earpiece
Your hearing aid, speaker and earpiece The standard speakers use one of the following earpieces: Standard earpieces: Customised earpieces: Ear grip (optional) Open dome Micro mould Bass dome, single vent LiteTip Bass dome, double vent VarioTherm® micro mould Power dome VarioTherm®... -
Page 7: Hearing Aid
Hearing aid Charger What it is and does What it is and does Ear grip Holds the speaker Microphones USB plug in place (optional) Sound in Insert in power plug or Charging ports other power sources For hearing aids when LED light charging Wax filter... -
Page 8: Prepare Charger
Prepare charger Charge the hearing aids Connect to power source Charger is on Place hearing aids in charger Charging When the charger is connected to The hearing aids LEDs will 1. Insert the USB plug into the Place the hearing aids in the power plug. -
Page 9: Charging Time
Charging time Battery performance Fully charge your hearing aid before first time use. The daily battery performance varies depending on your individual use and hearing aid settings. Charge your hearing aid every night. That ensures you start your day with a fully charged hearing aid. Streaming sound from e.g. -
Page 10: Turn Hearing Aid On/Off Using Charger
Turn hearing aid ON/OFF using charger Turn hearing aid ON/OFF using push button Your hearing aid automatically turns ON when removed from the The hearing aid can be turned ON and OFF using the push button. charger. The hearing aid LED turns GREEN after 6 seconds, confirming that it is ready for use. -
Page 11: Battery Low Indication
Battery low indication Identify left and right hearing aid When the battery is running low, you will hear three short beeps. It is important to distinguish between the left and the right hearing This will leave you approximately two hours before the hearing aid aid, as they may be programmed differently. -
Page 12: Put On Hearing Aid
Put on hearing aid Step 1 Step 2 Step 3 Ear grip (optional) Place the hearing Hold the bend of Gently push the aid behind your ear. the speaker wire earpiece into your ear between your canal until the The speaker should thumb and index speaker wire sits always be used... -
Page 13: Cleaning
Cleaning The MultiTool contains a brush and wire loop for cleaning and When handling your hearing aid, hold removing earwax. If you need a new MultiTool, please contact your it over a soft surface to avoid damage hearing care professional. if you drop it. -
Page 14: Replace Standard Earpieces
Replace standard earpieces The standard earpiece (dome and Grip Tip) should not be cleaned. If the earpiece is filled with wax, replace it with a new one. Grip Tip needs to be replaced at least once a month. Step 1 Step 2 Step 3 Hold on to the... -
Page 15: Prowax Minifit Filter
ProWax miniFit filter Replace ProWax miniFit filter The speaker has a white wax filter 1. Tool 2. Remove 3. Insert attached to the end where the earpiece is attached. The wax filter keeps wax filter and debris from damaging the speaker. filter Replace the filter when clogged, or if Final... -
Page 16: Clean Customised Earpieces
Clean customised earpieces Replace ProWax filter The earpiece should be cleaned 1. Tool 2. Remove 3. Insert regularly. Clean the vent by pressing the brush through the hole, The earpiece has a white wax twisting it slightly. filter filter*. The filter keeps wax and debris from damaging the speaker. -
Page 17: Storage Of The Hearing Aid
Storage of the hearing aid Long term storage (weeks, months) Before storing the hearing aid for a longer period (more than 14 The charger is the best storage for the hearing aid. Anytime your days) fully charge the hearing aid. Then turn the hearing aid off. hearing aid is not in use, place it in the charger for charging. -
Page 18: Flight Mode
Flight mode Pressing the button on one hearing aid will activate flight mode on To activate and deactivate flight mode press and hold the push both hearing aids. button (lower part) for 7 seconds. When flight mode is activated, Bluetooth® is turned off. The hearing aid will still be working. -
Page 19: Optional Features And Accessories
Optional features and accessories Change volume The features and accessories described in the following pages are The push button allows you to adjust the volume. optional. Please contact your hearing care professional to find out You will hear a beep when you turn the volume up or down. how your hearing aid is programmed. -
Page 20: Change Program
Change program To be filled out by the hearing care professional Your hearing aid can have up to 4 different programs. Program Activation sound When to use These are programmed by your hearing care professional. “1 beep” “2 beeps” “3 beeps” Press up or down between programs. -
Page 21: Mute
For assistance in using these products with your hearing aid, please contact your hearing care professional or visit: Oticon ON App www.oticon.global/connectivity ConnectClip Remote Control 3.0 How to unmute your hearing aid... - Page 22 1. Settings 2. General 3. Accessibility within 3 minutes after the hearing William’s Hearing Aids ✓ Oticon Opn S or Oticon Opn Play aid is turned on. Bluetooth Pairing Bluetooth Restart the hearing Request “William’s Hearing Aids” would aid: Place it in the...
-
Page 23: Wireless Accessories And Other Options
Oticon ON App TV Adapter 3.0 Offers an intuitive and discreet Wireless transmitter of sound way to control your hearing aid. -
Page 24: Sound And Led Indications
Sound and LED indications Program status LED comments Sound Different sound and LED light indications help to show the hearing Program 1 1 beep aid status. The different setting options are listed on the following Program 2 2 beeps pages. Program 3 3 beeps Your hearing care professional can set sound and LED indications to... - Page 25 On/Off Sound Warnings Sound comments comments Battery low Continuously Start-up jingle 3 beeps indication repeated Shown one time 4 descending tones Battery shut 4 descending down tones Volume Sound Microphone Repeated Preferred volume 2 beeps 8 beeps service check 4 times with repated needed small pauses...
-
Page 26: Tinnitus Soundsupport™ (Optional)
Tinnitus SoundSupport™ (optional) Guidelines for tinnitus sound generator users Intended use of Tinnitus SoundSupport These instructions contain information about Tinnitus Tinnitus SoundSupport is a tool intended to generate sounds to SoundSupport, which may have been enabled in your hearing aids provide temporary relief for patients suffering from tinnitus as part by your hearing care professional. -
Page 27: Sound And Volume Adjustments
Sound and volume adjustments Volume adjustments with Tinnitus SoundSupport When you select a hearing aid program for which Tinnitus Tinnitus SoundSupport is programmed by your hearing care SoundSupport is activated, your hearing care professional can only professional to match your hearing loss and preferences for set the push button on your hearing aid to work as a volume control tinnitus relief. -
Page 28: Limitation On Use Time
Limitation on use time miniRITE R A) How to change Tinnitus SoundSupport volume in each ear Daily use separately To increase volume (on one hearing aid only), use a short press on The volume levels of Tinnitus SoundSupport can be set to a level the upper part of the push button repeatedly until desired level is which could lead to permanent hearing damage when used for reached. - Page 29 Important information for hearing care If the volume control is activated A warning may be displayed if you activate the tinnitus volume professionals about Tinnitus SoundSupport control in the “Buttons & Indicators” screen. This occurs if the relief Device description sound can be listened to at levels that may cause hearing damage.
-
Page 30: Tinnitus Soundsupport Warnings
Tinnitus SoundSupport warnings If your hearing care professional has As with any device, misuse of the sound activated the sound generator Tinnitus generator feature may cause potentially SoundSupport, please pay attention to harmful effects. Care should be taken to the following warnings. prevent unauthorised use and to keep the device out of reach of children and There are some potential concerns... -
Page 31: General Warnings
Hearing aids and their parts should be Only charge the HI with an Oticon ear or nose, seek emergency medical kept out of reach of children and anyone benefit from it. - Page 32 General warnings Rechargeable battery Dysfunction The exposure values are well below X-ray, CT, MR, PET scanning, and Do not attempt to open the hearing aid, Be aware of the possibility that your internationally accepted safety limits electrotherapy as it may damage the battery. hearing aid may stop working without for SAR, Induced electromagnetic power Remove your hearing aid before X-ray,...
- Page 33 General warnings Heat and chemicals Power instrument Interference Connection to external equipment The hearing aid must never be exposed Special care should be exercised in The hearing aid has been thoroughly The safety of the hearing aid when to extreme heat, e.g. left inside a parked selecting, fitting and using a hearing tested for interference, in accordance connected to external equipment (via...
-
Page 34: Troubleshooting Guide
Troubleshooting guide Troubleshooting for Charger, see Charger Instructions for use Symptom Possible causes Solutions Hearing aid is out of power Charge the hearing aid Dead battery Contact your hearing care professional No sound Clean mould Clogged earpieces (dome, Grip Tip, or mould) Replace wax filter, dome, or Grip Tip Clogged sound outlet Clean mould or replace wax filter, dome, or Grip Tip... - Page 35 Troubleshooting guide See the Charger Instructions for Use for trouble related to the charger Symptom Possible causes Solutions The charger is not switched on Verify that the charger power supply is connected correctly The hearing aid or charger is either too warm or too cold Move the charger and hearing aid to a location with a temperature between +5 °C to +40 °C Hearing aid LED remains off when the hearing aid...
-
Page 36: Water & Dust Resistant (Ip68)
Water & dust resistant (IP68) Hearing aid: Conditions of use Your hearing aid is dust tight and Should your hearing aid come into Operating conditions Temperature: +5°C to +40°C protected against ingress of water, contact with water and stop working, Relative humidity: 5% to 93%, non-condensing which means it is designed to be gently wipe off any water and let the... -
Page 37: Warranty
Warranty International warranty Certificate Your hearing aid is covered by an any legal rights that you might have international limited warranty issued under applicable national legislation by the manufacturer for a period of governing sale of consumer goods. Name of owner: __________________________________________________ 12 months from the date of deliv- Your hearing care professional may ery. -
Page 38: Technical Information
-40 dBμA/m at a 10 metre distance. in the “Technical Data sheets” on Canada’s licence-exempt RSSs. Changes or modifications not www.oticon.global expressly approved by the party The hearing aid also contains a radio responsible for compliance could void transceiver using Bluetooth Low the user’s authority to operate the... - Page 39 This Class B digital apparatus by turning the equipment off and on, The manufacturer declares that this Declaration of Conformity is complies with Canadian ICES-003. the user is encouraged to try to hearing aid is in compliance with the available from the manufacturer. correct the interference by one or essential requirements and other Note: This equipment has been...
- Page 40 Bluetooth logo Description of symbols used in this booklet Registered trademark of Bluetooth SIG, Inc. where any use of such requires a Warnings license. Text marked with a warning symbol must be read before using the device. TwinLink Manufacturer The device contains two radio technologies, Near-Field Magnetic Induction (NFMI) The device is produced by the manufacturer whose name and address are stated which is binaural communication between two hearing aids and Bluetooth Low next to the symbol.
-
Page 41: Your Individual Hearing Aid Settings
Your individual hearing aid settings Settings overview for your hearing aid To be filled out by your hearing care professional. Left Right Tinnitus SoundSupport: Limitation on use Volume control No limitation on use Program shift Program Start-up volume (Tinnitus) Max volume (Tinnitus) Tinnitus SoundSupport Max _______ hours per day Max _______ hours per day... - Page 42 0000191061000001...
Need help?
Do you have a question about the Oticon Opn S 1 miniRITE R and is the answer not in the manual?
Questions and answers
Need replacement batteries and replacement instructions for the Oticon OPN S 1 miniRITE-R. What supplier do you recommend?