Table of Contents
Advertisement
Advertisement
Table of Contents

Related Manuals for Datacolor AHIBA IR Pro


Summary of Contents for Datacolor AHIBA IR Pro
- Page 3 Support Questions? If you need help with a Datacolor product, please contact one of our top-rated technical support teams located around the world for your convenience. You can find contact information below for the Datacolor office in your area.
-
Page 5: Table Of Contents
Touch Screen Display Care ..............21 Program Controls ................. 23 Overview ...................... 23 Controller and User Interface ............... 24 “Operator” ....................24 System Idle Screen ................24 Run Program Screen ................25 Process Running Screen ..............25 Contents • i Ahiba IR Pro User's Guide... - Page 6 Minimum Beaker Load ................44 Maximum Beaker Load ................. 44 Maintenance List ..................45 Glossary of Icons ..................46 Accessories ....................50 Beaker Preparation Basket ..............50 Beaker Prep Basket ................50 Dosing Accessories ................51 ii • Contents Ahiba IR Pro User's Guide...
-
Page 7: Ahiba Ir Pro
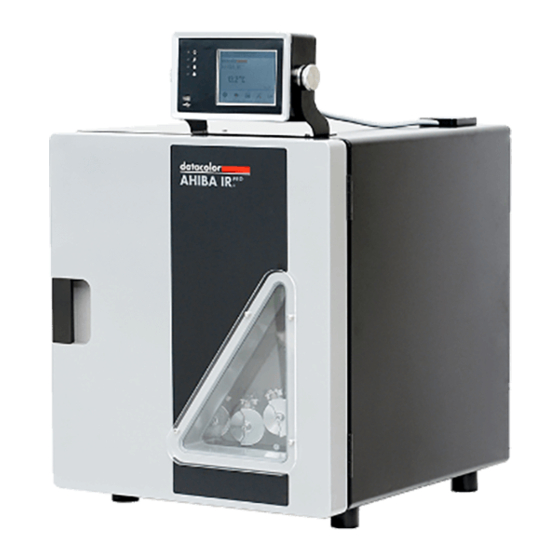
Ahiba IR Pro Overview Ahiba IR Pro is an infrared dyeing machine that handles a wide variety of processes in exhaust dyeing laboratories. It can be used as an atmospheric or high-temperature dyer. The unit can also be used to simulate wash fastness testing. - Page 8 The Ahiba IR Pro controller includes firmware that is used to program customized temperature/time sequences. Microprocessor technology ensures that the controller accurately follows the pre-defined dyeing curves. The user interface employs an icon-driven interface that helps eliminate all operator obstacles that exist with text-driven interface designs. A touch screen completes the data entry tools.
-
Page 9: Features
Wash Fastness Testing. Unit can also be used to simulate wash fastness testing. • User Interface: Icon and menu-driven user interface. Maximum number of custom programs stored locally is 99, each containing a maximum of 15 steps. Ahiba IR Pro • 3 Ahiba IR Pro User's Guide... -
Page 10: Accessories
See also Appendix, Accessories List for details to order these accessories. About the Beakers The Ahiba IR Pro can work with several different beaker sizes. A standard unit includes a single set of beakers, and the beaker size is defined when the order is placed. -
Page 11: Safety Labels And Precautions
Stop. Warning that a specific action is prohibited. CAUTION. When this appears in the documentation, it indicates that the step to be performed requires precautions. INFORMATION. Indicates there is additional information relevant to the topic.. Ahiba IR Pro • 5 Ahiba IR Pro User's Guide... -
Page 12: General Precautions
Maintenance Precautions • Unit should be operated, maintained and repaired only by authorized, trained personnel. • Careful cleaning of the unit enhances the reliability and extends the life of the equipment. 6 • Ahiba IR Pro Ahiba IR Pro User's Guide... -
Page 13: Chemical Handling Precautions
Datacolor assumes no responsibility for the handling of chemicals. Operating Principles Ahiba IR Pro consists of a rotating wheel that accommodates a maximum of 20 beakers. The unit employs a radiant infra-red heating technology to heat the liquor in the beakers, and uses a cold water heat exchanger-cooling system. The design reduces energy consumption while providing temperature control and accuracy. -
Page 14: Beaker Rotation
Beaker Rotation • Rotation Speed: 5 – 50 rpm (selectable) • Beaker Movement: Programmed reverse function reverses wheel direction in accordance with parameter set in dyeing program (0-9 min). 8 • Ahiba IR Pro Ahiba IR Pro User's Guide... -
Page 15: Equipment Controls And Indicators
Equipment Controls and Indicators Overview This section itemizes all of the controls and indicators included on the Ahiba IR Pro. Front of Unit Controller Insulated Cabinet Door Latch Transparent glass panel with protective shield Index • 9 Ahiba IR Pro User's Guide... -
Page 16: Inside Of Unit
Lamps (3) Dyeing Beaker Reference Beaker Door Closed Sensor Beaker Wheel Back of Unit Over-Temperature Reset Switch IR Lamp Water Inlet and Circuit Breaker Drain connections Main System Power Switch 10 • Equipment Controls and Indicators Ahiba IR Pro User's Guide... -
Page 17: Controller
Connect to cold water supply and gravity drain • Beaker installation System Location The Ahiba IR Pro should be placed on a stable, level table. The table should have sufficient height to allow for easy opening and closing of the door, and easy viewing of the controller. -
Page 18: Power Connections
The power connection should be made by a certified electrician. INFORMATION Prior to connecting the Ahiba IR Pro unit, ensure that the local line voltage agrees with the line voltage specified on the name plate. See also Main Power Supply Connection below for schematics. -
Page 19: Controller Grounding Connection
In order to protect the electronics in the controller box a grounding wire must be installed between the controller and the base unit. This wire is provided for you. Ensure the connections are tight. See illustration below: Grounding Points Index • 13 Ahiba IR Pro User's Guide... -
Page 20: Controller Power Supply
230V AC, 2/PE, 50/60 Hz, 3850 W; Fuse: 15 A Controller Power Supply The Ahiba IR Pro controller is powered separately from the machine. Before turning the controller on, check that the power connection from the main power cord is completed and checked for correct voltage levels. When you have verified the connection: Turn on the main power switch located on the lower back of unit. -
Page 21: Beaker Preparation, Cleaning And Maintenance
Before the beakers are attached to the wheel, the lids must be secured using the hex screwdriver supplied with the unit. To secure the lids: Ensure beaker lid and beaker flange are a smooth and even seal. Index • 15 Ahiba IR Pro User's Guide... - Page 22 • The Ahiba IR Pro uses custom designed pressure-tested beakers. The seal between the beaker and the lid is accomplished with an O-ring seal. This O-ring is a maintenance part and additional O-rings are supplied with the unit.
- Page 23 The sensor lead is connected and locked to the beaker by the rotating collar of the sensor. Continue turning the collar until the connection is locked. To insure that the cable is locked to the beaker lid, pull on it slightly. Sensor Index • 17 Ahiba IR Pro User's Guide...
- Page 24 The reference beaker lid can be heated to a maximum of 140°C (284°F) • Do not connect the temperature sensor cable to the reference beaker lid until the lid is completely dry. 18 • Equipment Controls and Indicators Ahiba IR Pro User's Guide...
-
Page 25: Beaker Dosing
Beaker Dosing The Ahiba IR Pro can be ordered with custom beaker lids that allow you to inject liquid or powder chemicals into the beakers during the dyeing process. Dosing is done using a self-refilling, manual dosing syringe, or a pre-filled dosing capsule mounted on the lid, an optional accessory available with the unit. -
Page 26: Beaker Preparation Basket
QUICKDOSE QUICKDOSE is a patented dosing system for AHIBA IR PRO that allows for powder or liquid to be used for addition of chemicals to the beaker. Each lid (300cc, 500cc, or 1000cc) has 3 independently operated dosing capsules mounted on the lid. At the time of dosing a capsule actuating tool is used to activate the capsule and open it to the dyebath. -
Page 27: Touch Screen Display Care
• Don't clean the display while it is on. When the display is dark, it is much easier to see dirt and fingerprints that need to be removed. Index • 21 Ahiba IR Pro User's Guide... -
Page 29: Program Controls
The Ahiba IR Pro employs a powerful user interface that communicates programming and system information, using internationally-recognized symbols, translatable text and icons. Because of this design, Ahiba IR Pro allows for maximum flexibility and delivers a very easy to follow and understand interface. -
Page 30: Controller And User Interface
The following sections will describe operations as an “operator” and later as an “administrator”. 35.0°C “Operator” By default for an operator the Ahiba IR Pro will allow access to 3 main screens: • Run Program Screen • Run “Manual Mode” Screen •... -
Page 31: Run Program Screen
The Process Running Screen will display as below: all the parameters for a program. Program name, number and status area Visual-Process Icon Actual Temperature & remaining run time Graph Area Program step information “END” Process Graph advance & “home” button “HOLD” Process Index • 25 Ahiba IR Pro User's Guide... - Page 32 All steps programmed in the process will be displayed. As the program progresses the graph area will shade in full. Maximum displayed graph area is 120min. Pressing left and right arrows will advance the graph. 26 • Program Controls Ahiba IR Pro User's Guide...
-
Page 33: Delayed Program Run Screen
5rpm during the delayed run to help agitate the beakers. Run “Manual Mode” Screen The Ahiba IR Pro offers a unique ability to input a quick single step program called “Manual Mode”. All features operate exactly the same as program mode with the exception of multiple steps. -
Page 34: Program Maintenance Screen
LED indicators are located on the left side of the controller. These are used to communicate specific information to the operator. They are bright and visible from a distance, making it easy to monitor the system status from across a room. 28 • Program Controls Ahiba IR Pro User's Guide... -
Page 35: Numeric Keypad
Process Hold. When a programmed hold or manually-set hold is applied, this indicator is flashing yellow. Numeric Keypad On Ahiba IR Pro at times when areas of the controller are pressed where numerical data is needed a keypad will be displayed. USB Host Interface The Ahiba IR Pro controller has onboard a USB host interface. -
Page 36: Program Directory Screen
In the external memory you can: • Delete an existing program from the external memory • Delete ALL external flash drive memory • Load a program from the external flash drive to the local memory. 30 • Program Controls Ahiba IR Pro User's Guide... -
Page 37: User Setup Screen
• Operator Access – is an icon that opens a screen that allows you to assign operator access to certain functions. These function include: Program Maintenance User Setup USB Host Interface Index • 31 Ahiba IR Pro User's Guide... -
Page 39: Programs
+77°F +284°F (Processing temperature 0 – 180 min TIME (minutes) GRADIENT -4.0°C +4.0°C/min -7.2°F +7.2°F “MAX” – uncontrolled (optional input) 5 – 50 rpm SPEED REVERSE 0-9 min HOLD 0 or 1 Index • 33 Ahiba IR Pro User's Guide... -
Page 40: Creating A Program
(you may enter up to 15). Data from the previous step is automatically written into the new step so you only need to edit the area that needs changing. After all steps are entered press to save your program. 34 • Programs Ahiba IR Pro User's Guide... -
Page 41: Editing A Program
To Delete a step - use the icons to get to the step you want to delete and press delete step icon and the step will be deleted and all future steps are reduced by 1 step. Index • 35 Ahiba IR Pro User's Guide... -
Page 42: Deleting A Program
A confirmation menu will appear. If you try to save to an existing “full” location you will have the ability to over-write. 36 • Programs Ahiba IR Pro User's Guide... -
Page 43: Load From External Memory
“full” location slot you will have the ability to over-write. Running a Program The Ahiba IR Pro does not contain any programs stored at the factory. You must store a program, before you can operate the Ahiba IR Pro. INFORMATION The program can be manually stopped at any time by pressing the STOP button. -
Page 44: Program Hold
• Press the continue icon to resume the program. Alarms and Status Messages The Ahiba IR Pro uses a combination of visual and auditory alerts to communicate process and system information to the user. These include: • Audible alert system •... -
Page 45: Audible Alerts
Audible Alerts The Ahiba IR Pro has three distinct audible alerts: • Continuous tone. This is a general alarm. • Long Beep/Short Beep. This indicates the current step is a program hold. • Series of Short Beeps. This indicates the end of the program. -
Page 46: Troubleshooting Alerts And Alarms
When temperature is above 350° C, cooling system is activated. Alarm will automatically reset when correct temperature is measured. • PT-100 Short Circuit- Temperature displays 0° System will not operate until problem is fixed. 40 • Programs Ahiba IR Pro User's Guide... - Page 47 Press Alarm Reset button on • Red Alarm LED keypad to reset this alarm. Icon will lights. disappear from the display. • Message is displayed in the Status Area Index • 41 Ahiba IR Pro User's Guide...
- Page 48 Some of these messages include: “Program Saved Successful” “Program Deleted” “Copy Program Successful” “Operator Access Changed Successfully” “Pass code Changed Successfully” Many others 42 • Ahiba IR Pro User's Guide...
-
Page 49: Appendix
Fuse: N / L1 20A Operating 5°C to 40°C (Environmental) 80% max. relative humidity up to 31°C Temperature 50% relative humidity up to 40° C. Approvals TUV, CE * Specifications subject to change without notice. Index • 43 Ahiba IR Pro User's Guide... -
Page 50: Minimum/Maximum Beaker Loads
Ideal Sample Size 150 ml 20 beakers 5 grams 300 ml 15 beakers 10 grams 500 ml 8 beakers 25 grams 1000 ml 8 beakers 50 grams 5 liter 1 beaker 250 grams 44 • Appendix Ahiba IR Pro User's Guide... -
Page 51: Maintenance List
Tolerance ±1°C NOTE: Contact Datacolor Service personnel to complete this check. Gradient Test Datacolor Service personnel Test and ensure maximum achievable gradient is within tolerance. Make repairs as needed. Index • 45 Ahiba IR Pro User's Guide... -
Page 52: Glossary Of Icons
Glossary of Icons Below are a listing of the screens on the Ahiba IR Pro controllers and the active icons on each screen. Screen Icon Use Icon Main menu, “System Idle” Run Menu Manual mode Directory menu Tool menu Login... - Page 53 Save External Copy Program Run Program Previous screen Home Screen Login Logout View Ext. menu screen Load ext. Memory Delete Program Delete All Programs Previous screen Home Screen View history local Previous Screen Index • 47 Ahiba IR Pro User's Guide...
- Page 54 Enter Edit program screen New Step Insert Step Delete Step Save Changes Previous step Next step Temperature Gradient Isotherm time CW/CCW Hold Previous Screen Home Screen Tool Screen Configuration menu user setup 48 • Appendix Ahiba IR Pro User's Guide...
- Page 55 Home Screen Temp time setup Save Changes Previous Screen Home Screen Passcode Save Changes Previous Screen Home Screen Language Save Changes Previous Screen Home Screen Operator access Save Changes Previous Screen Home Screen Index • 49 Ahiba IR Pro User's Guide...
-
Page 56: Accessories
A beaker preparation basket is available with the unit. You must assemble it. Below is an assembly diagram: Below is a picture of a fully loaded beaker prep basket. Beaker Prep Basket 50 • Appendix Ahiba IR Pro User's Guide... -
Page 57: Dosing Accessories
Glass cylinder 10cc 474080 Seal to injector 474082 Valve Ball 474081 Valve Spring 474007 Dosing Adapter Teflon Seal 474083 5cc Dosing Injector Glass cylinder 5cc 474087 Membrane Dosing Needle (pack of 12) 842016 Index • 51 Ahiba IR Pro User's Guide... - Page 58 Thoroughly rinse the dosing capsules with warm water following each use. This cleans the interior of the parts, extends the life of the seals and prevents clogging due to dried chemicals. Below is information for ordering replacement parts from Datacolor for the dosing capsules: Description...
- Page 59 Cooling Source, 3 Power Connections, 12 Precautions, 5, 6 Dosing Accessories, 49 chemical handling, 7 Dyeing Positions, 3 electrical, 6 environmental, 6 maintenance, 6 use, 6 Equipment, 9 Program editing, 33 hold, 36 Index • 53 Ahiba IR Pro User's Guide...
- Page 60 Type of Fibers, 3 Types of Substrates, 3 Safety Labels, 5 Specifications, 41 Status Messages, 37 User Interface, 3, 22 System Idle, 22 System Location, 11 System Setup, 11 Wash fastness Testing, 3 54 • Index Ahiba IR Pro User's Guide...
Need help?
Do you have a question about the AHIBA IR Pro and is the answer not in the manual?
Questions and answers