
Related Manuals for Datacolor Ahiba IR


Summary of Contents for Datacolor Ahiba IR
- Page 1 Committed to Excellence. Dedicated to Quality. CetHied to ISO 9001 :2008 in Manufacturing Centers Worldwide. @ Datacolor Inc. Oatacolor and other Oatacolor product trademarks are the property of Oatacolor Inc.
- Page 3 Support Questions? If you need help with a Datacolor product, please contact one of our top-rated technical support teams located around the world for your convenience. You can find contact information below for the Datacolor office in your area.
-
Page 5: Table Of Contents
Main Power Connection ............... 12 Controller Power Supply ............... 13 Beaker Preparation, Cleaning and Maintenance ......... 14 Beaker Installation ................14 Beaker Dosing ..................18 Beaker Preparation Basket ..............19 Beaker Cleaning and Maintenance ............19 Contents • i Ahiba IR User's Guide... - Page 6 Maximum Beaker Load ................. 38 Maintenance List..................39 Menu Flow ....................40 Accessories ....................41 Beaker Preparation Basket ..............41 Beaker Prep Basket ................41 Dosing Accessories ................42 Complete Accessories List ................43 ii • Contents Ahiba IR User's Guide...
-
Page 7: Ahiba Ir
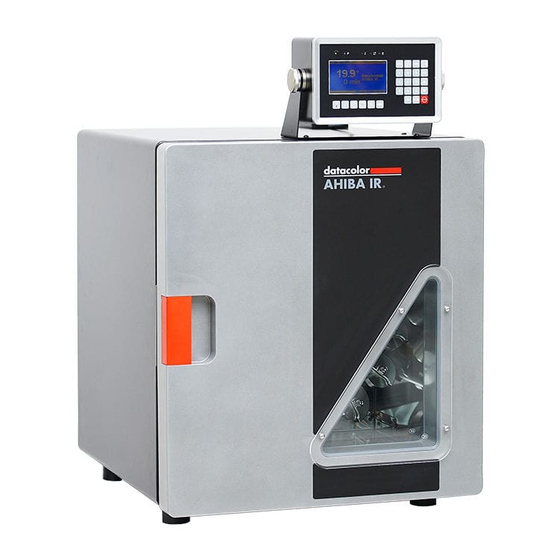
Ahiba IR Overview Ahiba IR is an infrared dyeing machine that handles a wide variety of processes in exhaust dyeing laboratories. It can be used as an atmospheric or high- temperature dyer. The unit can also be used to simulate wash fastness testing. - Page 8 The Ahiba IR controller includes software that is used to program customized temperature/time sequences. Microprocessor technology ensures that the controller accurately follows the pre-defined dyeing curves. The user interface employs a symbol-driven interface that removes all translation obstacles that exist with text-driven interface designs. A numeric keypad completes the data entry tools.
-
Page 9: Features
Wash Fastness Testing. Unit can also be used to simulate wash fastness testing. • User Interface: Symbol-driven user interface. Maximum number of custom programs stored is 99, each containing a maximum of 15 steps. Ahiba IR • 3 Ahiba IR User's Guide... -
Page 10: Accessories
See also Appendix, Accessories List for details to order these accessories. About the Beakers The Ahiba IR can work with several different beaker sizes. A standard unit includes a single set of beakers, and the beaker size is defined when the order is placed. -
Page 11: Safety Labels And Precautions
High Voltage Hot Air Exhaust Stop. Warning that a specific action is prohibited. CAUTION. When this appears in the documentation, it indicates that the step to be performed requires precautions. Ahiba IR • 5 Ahiba IR User's Guide... -
Page 12: General Precautions
Certain internal parts may reach a temperature greater than 50°C/122°F. Unit can only be operated when the door is closed. CAUTION When door is opened, internal parts should only be handled after the unit has cooled to 50° C. 6 • Ahiba IR Ahiba IR User's Guide... -
Page 13: Maintenance Precautions
Datacolor assumes no responsibility for the handling of chemicals. Operating Principles Ahiba IR consists of a rotating wheel that accommodates a maximum of 20 beakers. The unit employs a radiant infra-red heating technology to heat the liquor in the beakers, and uses an air-cooling system. This design reduces energy consumption while providing temperature control and accuracy. -
Page 14: Beaker Rotation
A multiple back-up safety system monitors the temperature and protects the equipment and samples from overheating. Beaker Rotation • Rotation Speed: 5 – 50 rpm (variable) • Beaker Movement: Automatically reverses wheel direction every minute 8 • Ahiba IR Ahiba IR User's Guide... -
Page 15: Equipment Controls And Indicators
Equipment Controls and Indicators Overview This section itemizes all of the controls and indicators included on the Ahiba IR. Front of Unit Controller Keypad Insulated Cabinet Door Latch Transparent glass panel with protective shield Equipment Controls and Indicators • 9... -
Page 16: Inside Of Unit
Inside of Unit Infrared Lamps (3) Dyeing Beaker Bayonet Sensor Beaker Wheel Door Closed Sensor Back of Unit Exhaust Fan Main Switch Power Cord Thermostat Reset 10 • Equipment Controls and Indicators Ahiba IR User's Guide... -
Page 17: Controller
Connect unit to power source • Beaker installation System Location The Ahiba IR should be placed on a stable, level table. The table should have sufficient height to allow for easy opening and closing of the door, and easy viewing of the controller. -
Page 18: Power Connections
The power connection should be made by a certified electrician. INFORMATION Prior to connecting the Ahiba IR unit, ensure that the local line voltage agrees with the line voltage specified on the name plate. See also Main Power Supply Connection below for schematics. -
Page 19: Controller Power Supply
230V AC, 2/PE, 50/60 Hz, 3850 W; Fuse: 15 A Controller Power Supply The Ahiba IR controller is powered separately from the machine. Before turning the controller on, check that the power connection from the main power cord is completed and checked for correct voltage levels. When you have verified the connection: Turn on the main power switch located on the back of unit. -
Page 20: Beaker Preparation, Cleaning And Maintenance
Before the beakers are attached to the wheel, the lids must be secured using the hex screwdriver supplied with the unit. To secure the lids: Ensure beaker lid and beaker flange are a smooth and even seal. 14 • Equipment Controls and Indicators Ahiba IR User's Guide... - Page 21 Do not mix beaker sizes in a single process. All beakers loaded on the wheel must be the same size. • The Ahiba IR uses custom designed pressure-tested beakers. The seal between the beaker and the lid is accomplished with an o-ring seal. This o-ring is a maintenance part and additional o-rings are supplied with the unit.
- Page 22 − Continue turning the collar until the connection is locked. − To insure that the cable is locked to the beaker lid, pull on it slightly. Sensor 16 • Equipment Controls and Indicators Ahiba IR User's Guide...
- Page 23 The reference beaker lid can be heated to a maximum of 140°C (284°F) • Do not connect the temperature sensor cable to the reference beaker lid until the lid is completely dry. Equipment Controls and Indicators • 17 Ahiba IR User's Guide...
-
Page 24: Beaker Dosing
Beaker Dosing The Ahiba IR can be ordered with custom beaker lids that allow you to inject liquid chemicals into the beakers during the dyeing process. Dosing is done using a self-refilling, manual dosing syringe, an optional accessory available with the unit. -
Page 25: Beaker Preparation Basket
All beaker lid o-rings should be inspected prior to use and replaced if any sign of wear such as flattening, tears or cuts are observed. See also Appendix, Maintenance Schedule for maintenance information. Equipment Controls and Indicators • 19 Ahiba IR User's Guide... - Page 26 N O T E S 20 • Equipment Controls and Indicators Ahiba IR User's Guide...
-
Page 27: Program Controls
The Ahiba IR employs a simple user interface that communicates programming and system information, using internationally-recognized symbols and icons. Because of this design, Ahiba IR employs a limited number of screens which reduces the amount of user training required to operate the equipment. -
Page 28: Controller And User Interface
Controller and User Interface The Ahiba IR interface is separated into four main groups. These are the display screen, the command button group, the process indicators group and the numeric keypad. The following sections will describe each. Numeric Keypad Process... -
Page 29: Program Maintenance Screen
Data Entry Screen The Data Entry screen will display all the editable parameters for a given step in a program. The program number and the current step are displayed in the upper left corner. Program Controls • 23 Ahiba IR User's Guide... -
Page 30: Program Directory Screen
Motor Speed Detection Error. When controller detects no motor movement, this indicator is solid red. Process Hold. When a programmed hold or manually-set hold is applied, this indicator is flashing yellow. 24 • Program Controls Ahiba IR User's Guide... -
Page 31: Numeric Keypad
Numeric Keypad The Ahiba IR numeric keypad is a membrane keypad that contains 19 keys. Function Escape. Press to exit from current screen. Alarm Reset. Press to silence buzzer or reset alarms. Delete. Press to delete data entry value, or to delete an entire program. -
Page 32: Command Buttons
Command Buttons Ahiba IR uses the command buttons shown below to access data input. These buttons are used to create new programs and include functions to enter, update and delete data. They are also used to edit existing programs. Button Function Temperature control key. - Page 33 (0/1=No/Yes) Units equipped with a 5L drum should limit the heating gradient input to 2.5°C/min, this due to the mass of the beaker and to prevent “Temperature out of Range” errors. Program Controls • 27 Ahiba IR User's Guide...
- Page 34 N O T E S 28 • Program Controls Ahiba IR User's Guide...
-
Page 35: Programs
5 – 50 rpm SPEED HOLD Units equipped with a 5L drum should limit the heating gradient input to 2.5°C/min, this due to the mass of the beaker and to prevent “Temperature out of Range” errors. Programs • 29 Ahiba IR User's Guide... -
Page 36: Storing A Program
When all edits are completed, press the ENTER key. All data will be saved and the display will switch to the Program Maintenance screen. You can now run this program, edit the program information, or delete the entire program. 30 • Programs Ahiba IR User's Guide... -
Page 37: Deleting A Program
Press Enter to delete the program, or Esc to cancel the delete command. Running a Program The Ahiba IR does not contain any programs stored at the factory. You must store a program, before you can operate the Ahiba IR. -
Page 38: Program Hold
Manual Program Hold The operator can manually place a hold on the program. To do this: • Press the HAND command button. The program will hold. • Press the RUN key to resume the program. 32 • Programs Ahiba IR User's Guide... -
Page 39: Alarms And Status Messages
Alarms and Status Messages The Ahiba IR uses a combination of visual and auditory alerts to communicate process and system information to the user. These include: • Audible alert system • LED status panel • Display icons Specific combinations of these alerts are used to communicate specific problems. -
Page 40: Troubleshooting Alerts And Alarms
#1 after the problem is corrected. Door Open Alarm Door has been opened while Defect in door process is running closed sensor. • Continuous buzzer tone • Door Open icon appears on display 34 • Programs Ahiba IR User's Guide... - Page 41 Program interface card • must be restarted from step #1. Roll-O-Matic Alarm LED lights Alarm will reset and alarm icon when disappear when the wheel starts turning again. Programs • 35 Ahiba IR User's Guide...
- Page 42 Power interruption icon displays on Press Alarm Reset button on screen. keypad to reset this alarm. Icon will disappear from the display. • Roll-O-Matic Alarm icon displays on screen. • Continuous alarm sounds. 36 • Programs Ahiba IR User's Guide...
-
Page 43: Appendix
Total Power 3850 W 5°C to 40°C Operating 80% max. relative humidity up to 31°C Temperature 50% relative humidity up to 40° C. UL, CSA, CE Approvals * Specifications subject to change without notice. Appendix • 37 Ahiba IR User's Guide... -
Page 44: Minimum/Maximum Beaker Loads
Ideal Sample Size 150 ml 20 beakers 5 grams 300 ml 15 beakers 10 grams 500 ml 8 beakers 25 grams 1000 ml 8 beakers 50 grams 5 liter 1 beaker 200 grams 38 • Appendix Ahiba IR User's Guide... -
Page 45: Maintenance List
Tolerance ±1°C NOTE: Contact Datacolor Service personnel to complete this check. Datacolor Service Gradient Test personnel Test and ensure maximum achievable gradient is within tolerance. Make repairs as needed. Appendix • 39 Ahiba IR User's Guide... -
Page 46: Menu Flow
Menu Flow Below is a schematic of the program flow, provided for reference purposes: 40 • Appendix Ahiba IR User's Guide... -
Page 47: Accessories
An optional beaker preparation basket is available with the unit. If this is included with your unit, you must assemble it. Below is an assembly diagram: Below is a picture of a fully loaded beaker prep basket. Beaker Prep Basket Appendix • 41 Ahiba IR User's Guide... -
Page 48: Dosing Accessories
Thoroughly rinse the dosing syringe with warm water following each use. This cleans the interior of the parts, extends the life of the seals and prevents clogging due to dried chemicals. Below is information for ordering replacement parts from Datacolor for the dosing syringe: Drawing Position... -
Page 49: Complete Accessories List
Complete Accessories List For a complete accessory list, refer to the pages included after the Index. Appendix • 43 Ahiba IR User's Guide... - Page 50 N O T ES 44 • Appendix Ahiba IR User's Guide...
- Page 51 Cooling Source, 3 Operating Principles, 7 Data Entry, 23 Display, 22 Power Connections, 12 Display Icons, 33 Precautions, 5, 6 Dosing Accessories, 42 chemical handling, 7 Dyeing Positions, 3 electrical, 6 environmental, 6 Appendix • 45 Ahiba IR User's Guide...
- Page 52 Type of Fibers, 3 Program Directory, 24 Types of Substrates, 3 Program Maintenance, 23 Programs, 29 User Interface, 3, 22 Safety Labels, 5 Specifications, 37 Status Messages, 33 Wash fastness Testing, 3 System Idle, 22 46 • Index Ahiba IR User's Guide...
Need help?
Do you have a question about the Ahiba IR and is the answer not in the manual?
Questions and answers