Table of Contents
Advertisement
Quick Links
Download this manual
See also:
User Manual
Advertisement
Table of Contents

Related Manuals for Globalstar GSP-2800


Summary of Contents for Globalstar GSP-2800
- Page 2 This guide is based on a version of the QUALCOMM Globalstar GSP-2800/2900 Fixed Satellite Phone. Software changes may have occurred after this printing. QUALCOMM reserves the right to make changes in technical and product specifications without prior notice. QUALCOMM Incorporated...
-
Page 3: Table Of Contents
Connect interior wiring to jacks and telephones ....28 The basics of good antenna location .........1 Connect interior wiring to the junction box ......28 Globalstar is different ............1 Selecting a telephone .............. 29 Can I mount the RAU on the side of a building? ....2 Step 9. - Page 4 List of Figures Figure 1. General RAU pole mount installation ......1 Figure 2. Roof mounted RAU ............12 Figure 3. Pole mounted RAU ............12 Figure 4. Incorrect placement of RAU ........12 Figure 5. Sighting Tool ...............13 Figure 6. Locating possible obstructions ........13 Figure 7.
- Page 5 List of Tables Table 1. Base Kit .................7 Table 2. Mounting Kit ..............8 Table 3. Enhanced Kit ..............9 Table 4. Grounding Supplies ............10 Table 5. Interior wiring ............10 Table 6. Power Supply ..............11 Table 7. Tools ................11 Table 8. Connections ..............16 Table 9.
-
Page 6: Introduction
The antenna of the RAU needs to have a direct line of sight to the supply Ground wire Telephone cable (inside line) Globalstar satellites. That means it needs to be able to see the sky (outside line) Power cable (inside line) with nothing in the way. -
Page 7: Can I Mount The Rau On The Side Of A Building
Fine points of antenna location use the sighting tool on page 13. As we said before, the Globalstar satellites are always moving. They Sometimes it won’t be possible to zip across the sky, taking from 10 to 15 minutes to go from horizon to get such a full clear view. -
Page 8: Power Lines
Television antennas If a house is surrounded by trees, you should consider putting the Globalstar RAU on a mast, extended up from the roof of the house. Many homes have tall television antennas on their roofs. It would Ideally, the mast would be tall enough so that the antenna of the often be quite difficult to put the RAU high enough to avoid having RAU can see most of the sky. -
Page 9: Seemingly Hopeless Situations
Introduction only by residential gas appliances, then installing the RAU there may be acceptable. Extend the mast a few feet above the chimney so that hot gasses from the chimney don’t damage the antenna. Seemingly hopeless situations Sometimes there are situations that you just can’t get around. -
Page 10: Step 1. Safety Considerations
Safety considerations Step 1. Safety considerations Caution Before installing the equipment, remove jewelry and other We recommend that installation, repair, and maintenance of the metallic objects from your person. These items can cause QGFSP be performed by technically qualified service personnel; that electrical shock or burns. -
Page 11: Lightning
Safety considerations Lightning W arning Even though a properly installed QGFSP includes grounding and circuitry to help minimize damage to equipment, facilities, and personnel from nearby lightning, lightning is a highly unpredictable and dangerous phenomenon. It is impossible to completely protect equipment and personnel from lightning strikes. -
Page 12: Step 2. Inventory
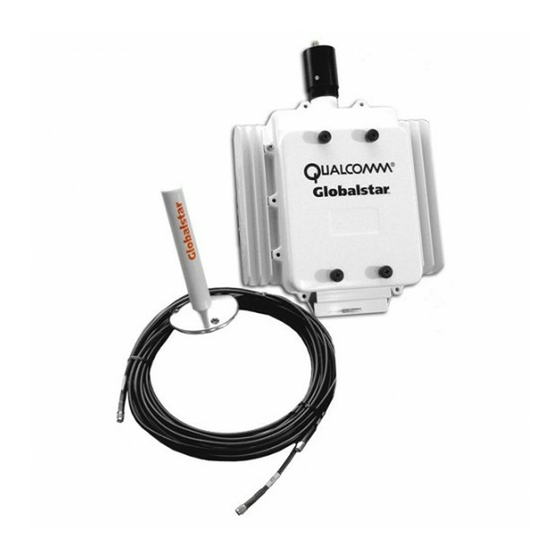
One junction box. The junction box is the interface between the outside The RAU is a QUALCOMM-manufactured aluminum housing cables and the inside telephone containing Globalstar radio electronics and an integrated mast wires. antenna protruding from the top of the housing. Two kits are available: •... -
Page 13: Table 2. Mounting Kit
Inventory Table 1. Base Kit Table 2. Mounting Kit Item Description Item Description A documentation package Two M6 x 16 mm pan head screws. containing an installation guide, a user guide, and a quick reference card. The user guide and quick 563AB_1999Q reference card should be given to the user of the QGFSP. -
Page 14: Enhanced Kit
Inventory Table 2. Mounting Kit Table 3. Enhanced Kit Item Description Item Description One mounting bracket for mounting the Backup battery for use with RAU to a wall. QUALCOMM power supply. The backup battery offers 3.5 hours talk and 24 hours of standby. -
Page 15: Make Sure You Have All Supplies And Equipment
Inventory Make sure you have all supplies and equipment Table 4. Grounding Supplies Copper clamp, #6 AWG wire to ground 1 each Check to see which QUALCOMM kit you are installing. Depending rod, screw type on the kit purchased, you may need additional items to complete the installation. -
Page 16: Table 6. Power Supply
Inventory Table 6 lists sources for power supplies. Table 6. Power Supply Item Quantity needed Power supply: 12 volt, 3 A. Possible Select one. power sources that can be used are: Solar panel producing 12 VDC with ■ optional backup battery Motor generator (2-wire terminal for ■... -
Page 17: Step 3. Plan Where To Position The Components
Plan where to position the components Step 3. Plan where to position the Determine where to position the QGFSP components and decide which mount is best suited to the current work site. Be certain that components the RAU antenna has a clear view of the sky, that you have provided adequate grounding, and that you have the correct number and lengths of cable. -
Page 18: How To Use The Sighting Tool
Plan where to position the components How to use the sighting tool Figure 5. Sighting Tool Figure 6. Locating possible obstructions In this case, there is a wall obstructing the view. The sighting tool is included in the basic kit to give you an easy method of determining 10 degrees over the horizon. -
Page 19: Materials Needed
Plan where to position the components Materials needed outdoor cabling. Mount the junction box to the dwelling at the point of entry of wiring into the building. Because each installation is different, some materials and supplies 2. Mounting hardware is not provided with the junction box. for mounting the RAU are provided by the installer. -
Page 20: Power Source
Plan where to position the components Power Source The power source is determined by the service provider or the service provider’s representative. Possible power sources are: • Power supply producing 12 VDC with backup battery such as a AC to DC converter operating at 110V to 220V AC, 50/60 Hz, with 12 VDC nominal output, capable of sourcing at least 3 A. -
Page 21: Step 4. Prepare The Rau
Prepare the RAU Step 4. Prepare the RAU 1. Remove the access cover from the RAU by unscrewing the captive thumbscrews at the top and bottom of the unit. W arning 8.5" Do not open the other part of the RAU. To do so voids the warranty. -
Page 22: Security Module
Ring terminal 2. Locate the socket for the security module and gently lift it up. Security Module 3. Take the SM, hold it Globalstar socket side up with the cropped corner P clip toward the hinge of the cover. 5X20 3 Amp... -
Page 23: Step 5. Mount The Rau On A Pole Or Wall
Mount the RAU on a pole or wall Step 5. Mount the RAU on a pole or wall The installation kit contains the appropriate connectors for mounting the RAU to a pole ranging in size from 3.8 cm (1.50 inch) OD through 4.8 cm (1.90 inch) OD. - Page 24 Mount the RAU on a pole or wall The nuts for the long M6 screws are already included as part of W arning mounting bracket A. Do not tighten the screws completely until POWER. Do not apply 12 volt power until all electrical you have mounted the RAU on the pole.
-
Page 25: Mounting The Rau To A Wall
Mount the RAU on a pole or wall Mounting the RAU to a wall Keep in mind that the entire antenna must have a clear view of the sky and the horizon in order to operate correctly. The antenna portion of the RAU must be above the building and not blocked in any way. -
Page 26: Step 6. Ground The Qgfsp
Ground the QGFSP Step 6. Ground the QGFSP Pole Mount If the RAU is mounted on a metal pole whose lower end is buried deep in the ground, run the primary grounding cable directly from the Antenna RAU and bolt it to the pole. (See Figure 15 for details.) (back view) Power supply Radio unit... -
Page 27: Figure 17. Ground The Junction Box
Ground the QGFSP 4. Connect the free end of #6 grounding wire to primary grounding cable. To accomplish this, use a C-type compression tap and crimping tool to secure primary grounding cable to #6 Junction grounding wire. The length of the detail primary grounding cable from the #6 ground wire C-type compression tap to... -
Page 28: Lightning Protection
Ground the QGFSP Lightning Protection Table 10. Grounding elements • Connect the RAU ground wire to the RAU chassis using the ground screw on the lower rear face of the RAU. The screw holds Item Name Description and Purpose the lug of the ground wire in rigid metal-to-metal contact with Ground terminal Connection point on the surface of the chassis surrounding the screw head. - Page 29 Ground the QGFSP The lightning rod is typically installed as a building lightning protection system. See Figure 27 on page 38. W arning The installation of this QGFSP must meet the local code and regulations for lightning installation. Caution The lightning rod must have its own separate grounding cable. The lightning rod should be mounted at least 3 meters (10 feet) but not more than 25 meters (85 feet) away from the RAU with the lightning rod extending the same distance vertically above...
-
Page 30: Step 7. Install The Junction Box
Install the junction box Step 7. Install the junction box Note The outside screw on the junction box cover disables the locking mechanism. If the junction box is not locked, you can open the junction box by pressing the tab located on the opposite side and lift the cover. -
Page 31: Figure 20. Service Provider Access Open
Install the junction box 1. The junction box is the interface between the outside and the inside cabling. The junction box must be located on the outside of the building immediately at the point where the indoor cables reach the outside of the building. 2. -
Page 32: Figure 21. Rau Cable
Install the junction box 3. Connect the RAU cable to the Ring (blue) junction box as shown in Figure 21 (red) and Table 11. 12 V white) (black) RAU cable 372AB_1999Q Figure 21. RAU cable Wiring from RAU to junction box Table 11. -
Page 33: Step 8. Run Indoor Wiring For The Telephone And Data
Run indoor wiring for the telephone and data Step 8. Run indoor wiring for the Connect interior wiring to the junction box telephone and data 1. Run standard telco wire (not provided) from the interior rooms where the Note telephones will be located to the junction box. -
Page 34: Selecting A Telephone
Run indoor wiring for the telephone and data Selecting a telephone QUALCOMM supplies a phone with the enhanced kit. If you are selecting a telephone, look for one that uses standard DTMF tones (industry standard tones), not pulses, for dialing. For optimal results, a telephone should have good voice quality. -
Page 35: Step 9. Connect Power Supply
Connect power supply Step 9. Connect power supply Note Solar power may be installed between the RAU and the You have some options in how you power your QGFSP: junction box. All other types of power connect only to the •... -
Page 36: Figure 25. Suggested Installation For Solar Power
Connect power supply If you are using solar power, a configuration of the type shown in Figure 25 is recommended. Note that a larger pole is used to support the extra equipment. Antenna Note If using a solar panel, run power from the solar panel directly to the RAU. -
Page 37: Step 10. Connect Power And Test
Connect power and test Step 10. Connect power and test Check cable connections In addition, be sure the following are done correctly. Make sure that all cables are connected ❑ The RAU and the junction box are properly grounded. ❑ The junction box is installed. -
Page 38: Turn On Power And Perform Power Checks
When the checklist is done and you are confident that the equipment is installed correctly, turn on the power and perform power checks. ❑ Once the RAU has powered up and acquired the Globalstar system, you will hear a dial tone from the telephone receiver. -
Page 39: Step 11. Troubleshooting
Troubleshooting Step 11. Troubleshooting — If the fuse blew twice, check to see if – The power supply is not operating correctly If one or more telephones fail to work, use the following – The RAU is broken troubleshooting procedure. These procedures should be used only by a qualified service technician. -
Page 40: Terminology
QGFSP QUALCOMM Globalstar Fixed Satellite Phone. A phone installation that uses the Globalstar system and CDMA technology. The QGFSP is fixed in place; that is, not portable Radio Antenna Unit Security module, a device that authenticates the user of the telephone on the Globalstar system. -
Page 41: Appendix A. Standard Practices For Grounding
Standard practices for grounding Appendix A. Standard practices for Note grounding IN NORTH AMERICA for further information see NFPA 70, National Electrical Code® and NFPA 780, Standard for This information is provided for added safety and should be used in Installation of Lightning Protection Systems, 1995 Edition©, conjunction with Step 6. - Page 42 Standard practices for grounding foundation or exterior footing and terminate by attaching it to a buried copper ground plate at least 0.8 mm (0.032 inch) thick and having a minimum surface area of 0.18 square meter (2 square feet). • Soil less than 0.3 meter (1 foot) deep If the soil is less than 0.3 meter (1 foot) in depth, down conductors shall be connected to a loop conductor installed in a trench or in...
-
Page 43: Figure 27. Grounding A Building With Existing Lightning Protection
Standard practices for grounding Lightning air terminal (unguyed, unless guy wires are below RAU antenna level) Ratio must hold Lightning protection system 3 m high X 3 m away 6 m high X 6 m away Lightning zone of protection (with 45 cone) 0.51m Antenna height... -
Page 44: Appendix B. Specifications For Cables
Specifications for Cables Appendix B. Specifications for Cables Environmental Requirements Requirements are listed in Table 14. Any cable used to connect the RAU and junction box must meet the following requirements. Table 14. Environmental Requirements Operating temperature -50 to +85 degrees C Conductors Storage temperature -50 to +85 degrees C... -
Page 45: Cable Construction
Specifications for Cables Cable Construction Jacket Insulation Conductor Black rubber 403AB_1999Q Table 16. Cable Construction Conductors 14 AWG (19/-404) x 1P, tinned copper wire 24 AWG (1/0.511) x 1P, tinned copper wire Insulation PVC, 14 AWG x 1P: ø2.8 ± 0.1mm Color: black and red PVC, 24 AWG x 1P: ø1.3 ±... -
Page 46: Appendix C. Operating Specifications
Operating Specifications Appendix C. Operating Specifications Antenna Table 19. Antenna Note Width 2.54 cm (1 in.) diameter Requirements for a particular installation site depend on the Height 50 cm (19.8 in.) user’s needs, location, climate, sun hours, call profile, and the length of autonomous operation desired. -
Page 47: Appendix D. Third Party Equipment
Third Party Equipment Appendix D. Third Party Equipment Note QUALCOMM has tested and approved the products mentioned in this appendix, which may be used with the QGFSP at the user’s/installer’s discretion. However, all warranties and instructions for installation are provided by the supplier of the product. - Page 48 Index grounding elements 23 Index grounding QGFSP 21 pole mount 21 about satellites 1 grounding supplies 10 AC to DC converter 11, 30 antenna location 1, 2 hex nuts 8 base kit 7 battery 5, 30 installation tools 11 backup 9 insulation 39 interior wiring 10 installing 28...
- Page 49 Index materials, wall mount 20 pole size 18 mechanical specifications 41 preparing 16 motor generator 11, 15, 30 roof mount 12 mounting bracket 9 specifications 18 mounting bracket (A) 8 supporting pole 10 mounting clamp (B) 8 wall mount 20 mounting kit 8 references 35 mounting RAU 2, 18...
Need help?
Do you have a question about the GSP-2800 and is the answer not in the manual?
Questions and answers