
Subscribe to Our Youtube Channel
Related Manuals for Stryker Hansson Pin System


Summary of Contents for Stryker Hansson Pin System
- Page 1 Hansson Pin System ™ Pediatrics Operative Technique • Slipped Capital Femoral Epiphysis...
-
Page 2: Table Of Contents
Contents Introduction and Rationale Relative Indications & Contraindications Features & Benefits Operative Technique Patient Positioning Reduction Optional Stabilization Guide Wire Insertion Determining the Incision and Insertion Points Skin Incision and Guide Wire Insertion Drilling and Measurement Instrument-to-Pin Assembly Insertion of the Hansson Pin and Activation of the Hook Instrument Removal Postoperative Regime... -
Page 3: Introduction And Rationale
Specifically developed for the treatment of slipped capital femoral epiphysis, the Hansson Pin system has been designed to minimise surgical trauma to the patient and offer secure, stable fixation with reduced risk of healing complications for all grades of fracture. -
Page 4: Relative Indications & Contraindications
Relative Indications & Contraindications Indications Slipped Capital Adult Femoral Neck Fractures Femoral Epiphysis Contraindications Due to a lack of any supportive clinical experience, the Hansson Pin is not recommended for use with paediatric hip fractures. Relative Contraindications The physician’s education, training and professional judgement must be relied upon to choose the most appropriate device and treatment. -
Page 5: Features & Benefits
By preserving the blood supply, the femoral neck and the head. the Hansson Pin System reduces the risk of unequal bone length. Lasting stable fixation Easy extraction The hook resists loosening of the fixation to the femoral head as the... -
Page 6: Operative Technique
Operative Technique Step 1 - Patient Positioning Correct positioning of the patient on the fracture table is essential for avoiding problems and complications during surgery (Fig. 1). Place the patient in supine position on the fracture table. Healthy side: Position the leg on the healthy side with the hip in flexion and slight abduction so that the C-arm can be adjusted intra-operatively for... -
Page 7: Reduction
Operative Technique Step 2 - Reduction Apply the surgical boot to the foot. Mild traction is applied for the sole purpose of maintaining the leg in the horizontal plane. Additional support under the thigh may be necessary. Rotate the foot internally by 30-60° and fix in position. -
Page 8: Optional Stabilization Guide Wire Insertion
Operative Technique Step 3 – Stabilization Guide Wire Insertion When treating unstable (acute) slips a Guide Wire may be used. Using biplanar floroscopy, it is inserted percutaneously in the trochanteric region into the femoral neck and head for intraoperative stabilization. (Fig. -
Page 9: Determining The Incision And Insertion Points
Operative Technique Step 4 – Determining the Incision Point and Implant Position Slipping of the femoral head occurs in a true posterior direction. The Hansson Pin must be positioned in the central part of the femoral head. To achieve this, the pin must be inserted anterior-laterally in the greater trochanter and then directed posteriorly (Fig. -
Page 10: Skin Incision And Guide Wire Insertion
Operative Technique Step 5 – Skin Incision and Guide Wire Insertion Make a 20mm incision at the site where the two lines on the thigh intersect. The insertion point on the anterior-lateral face of the proximal femur is identified at the level of the lesser trochanter (Fig. -
Page 11: Drilling And Measurement
Operative Technique Step 6 – Drilling and Measurement Insert the Cannulated Drill over the Drill Sleeve and the Guide Wire. The Drill Sleeve is pressed against the lateral cortex of the femur and the drill is advanced towards the centre of the femoral head (Fig. -
Page 12: Instrument-To-Pin Assembly
Operative Technique Step 7 – Instrument-to-Pin Assembly Verify that the inner pin is completely withdrawn in the window of the outer body and in correct position (Fig. 13). Pass the Inner Introducer through the Outer Introducer and screw it into the Hansson Pin (Fig. -
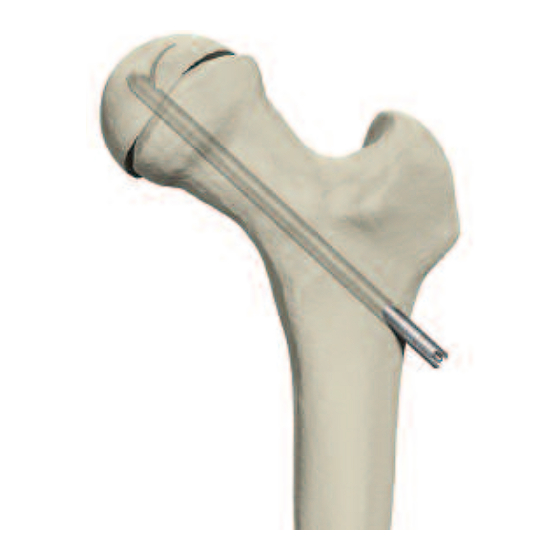
Page 13: Insertion Of The Hansson Pin And Activation Of The Hook
Operative Technique Step 8 – Insertion of the Hansson Pin and Activation of the Hook Insert the Hansson Pin with the Introducer Assembly into the femoral channel which has been pre-drilled. Ensure that the pin is fully inserted. Use fluoroscopy to verify the position of the Hansson Pin. -
Page 14: Instrument Removal
Operative Technique Step 9 – Instrument Removal Maintain the Outer Introducer in position. Unscrew and then remove the Introducer Handle followed by the Inner Introducer and the Outer Introducer (Fig.18). Close the wound. Fig.18... -
Page 15: Postoperative Regime
Postoperative Regime Bilateral Slips: Stable Slip: Unstable Slip: Periodic X-Ray images should be taken The patient is allowed to start walking The patient is allowed to start walking of both hips to facilitate early detection using crutches and partial weight using crutches and partial weight of contralateral slips. -
Page 16: Pin Removal
Operative Technique Pin Removal Step 1 The arrowed end of the Inner Extractor is engaged with the inner pin’s thread and rotated clockwise until it stops (Fig. 18). Step 2 The Outer Extractor is slid over the Inner Extractor until it is in contact with the outer pin (Fig. -
Page 17: Ordering Information Implants
Ordering Information — Implants HANSSON PINS Stainless Steel Titanium Length 394070S 70mm 694070S 394075S 75mm 694075S 394080S 80mm 694080S 394085S 85mm 694085S 394090S 90mm 694090S 394095S 95mm 694095S 394100S 100mm 694100S 394105S 105mm 694105S 394110S 110mm 694110S 394115S 115mm 694115S 394120S 120mm 694120S... -
Page 18: Instruments
Ordering Information — Instruments Description 704501 Short Cannulated Drill Ø 6.7mm x 246mm with Jacobs fitting 704510 Protective Measuring Sleeve 704511 Guide-wire Bush 704515 Outer Introducer 704516 Inner Introducer 704517 Introducer Handle 704527 Extractor Handle 704528 Outer Extractor 704529 Inner Extractor 704505S Threaded Guide-wire Ø... -
Page 19: References
References Thesis: References: 1. Physiolysis of the Hip. Epidemiology, 1. Hansson L.I. (1982): Osteosynthesis 7. Prophylactic Pinning of the natural history and long time results with the Hook-Pin in Slipped Capital Contralateral Hip in Slipped Capital after closed treatment. Femoral Epiphysis. Acta Orthop. Scand. Femoral Epiphysis Gunnar Ordeberg, 1986. - Page 20 Switzerland www.osteosynthesis.stryker.com The information presented in this brochure is intended to demonstrate a Stryker product. Always refer to the package insert, product label and/or user instructions before using any Stryker product. Surgeons must always rely on their own clinical judgment when deciding which products and techniques to use with their patients. Products may not be available in all markets.
Need help?
Do you have a question about the Hansson Pin System and is the answer not in the manual?
Questions and answers