
Subscribe to Our Youtube Channel
Related Manuals for TypeS AC56789


Summary of Contents for TypeS AC56789
- Page 1 JUMP STARTER & PORTABLE POWER BANK ITM. / ART. # 263084 WP ITM. AC56789 AC56789UK-60 User Manual...
-
Page 2: Battery Disposal
INSTRUCTIONS PERTAINING TO RISK OF FIRE, ELECTRIC SHOCK, OR INJURY TO PERSONS WARNING: • Always wear safety glasses when jump starting a battery (to protect your eyes), and gloves when handling a battery (to protect your hands). • When jump starting a vehicle please ensure that the blue plug is securely fitted into the jump start socket on the jump starter. -
Page 3: Important Safety Instructions
WARNING CONT.: IMPORTANT SAFETY INSTRUCTIONS WARNING - When using this product, basic precautions should always be followed, including the following: a) Read all the instructions before using the product. b) To reduce the risk of injury, close supervision is necessary when the product is used near children. -
Page 4: Personal Precautions
WARNING CONT.: n) PERSONAL PRECAUTIONS 1) Consider having someone close enough by to come to your aid when you work near a lead-acid battery. 2) Have plenty of fresh water and soap nearby in case battery acid contacts skin, clothing, or eyes. 3) Wear complete eye protection and clothing protection. -
Page 5: Package Contents
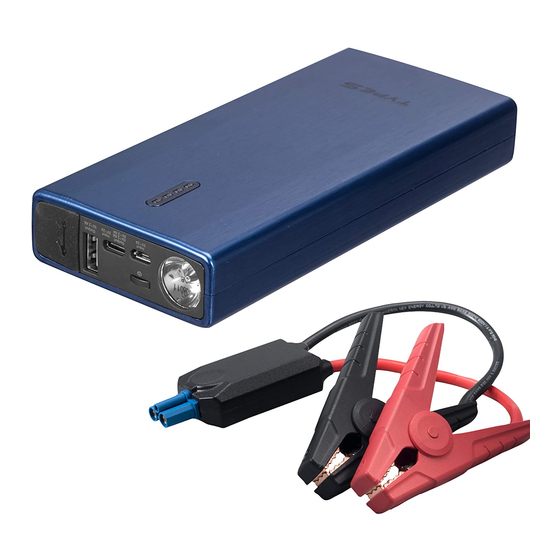
PACKAGE CONTENTS: Power Bank Storage Case USB Cable and Car Adaptor User Manual Jumper Cable with Smart & Safe Protection... -
Page 6: Technical Specifications
TECHNICAL SPECIFICATIONS: Product Dimensions: 168 x 77 x 27 mm (6.61 x 3.03 x 1.06 in) Product Weight: 0.97 lbs (440 g) Internal Battery: Lithium-Ion Capacity: Up to 10000 mAh (3.7V) Watt Hours: 37.2 Wh Input Voltage: DC 5V 2A USB-A Output Voltage: DC 5V 2.4A USB-C Output Voltage: DC 9V 2A / DC 5V 2.6A Jump Start Current: 200A - 400A... -
Page 7: Charging The Jump Starter
POWER LEVEL INDICATOR LIGHTS: Press the power button to check the capacity of the Jump Starter. Indicator Lights: 1 Flashing 1 Solid 2 Solid 3 Solid 4 Solid Battery Capacity: Below 5% 5-25% 26-50% 51-76% 76% - Full When charging, the indicator lights will flash one by one. The number of solid lights indicates the battery capacity. -
Page 8: Jump Starting
CHARGING YOUR USB DEVICES: Use the original manufacturer’s USB cable that came with your device and plug into one of the USB output ports. You can charge two devices at the same time. One of the ports is a Type-C socket, which has a maximum output of 2A at 9V and 2.6A at 5V. - Page 9 JUMP STARTING CONT.: Press the power button on the Jump Starter once and check that the power level indicator is 3 solid lights (51%) or higher. Take the BLUE end of the jumper cable and plug it into the power bank jump start socket which is located underneath the black cover.
- Page 10 JUMP STARTING CONT.: Connect the BLACK clamp to the NEGATIVE (-) post on the car battery. The NEGATIVE will be marked with a MINUS (-) sign. There may also be a BLACK plastic protective cover over the negative battery post. NOTE: Do not connect the clamp (+) and the BLACK clamp (-) at the same time.
- Page 11 JUMP STARTING CONT.: As soon as the engine starts, the indicator box on the BLACK clamp will blink red and beep to let you know it is ok to disconnect. Please disconnect the jumper cables from your car within 30 seconds.
-
Page 12: Led Light
JUMP STARTING CONT.: Polarity Protection Circuit Status Status Meaning: Status (Light & Sound Indicator) Red Light Green Light Sound None The car battery is ready for jump start. None The Jump Starter needs to be charged. None The car battery is ready for jump start. If the indicator doesn’t turn solid Green, the car battery voltage is higher than the jump starter. -
Page 13: Warranty
WARRANTY: WINPLUS EUROPE Limited Warranty Winplus warrants, to the original purchaser, that its products are free from defects in material and workmanship for 12 months from the date of original purchase. Where permitted by law, Winplus liability shall be limited to that set forth in this limited express warranty. - Page 14 WARRANTY CONT.: WARNING: This Jump Start has a maximum capacity of 400A and is only intended to jump start 12V cars, trucks, boats, or motorcycles with single lead-acid battery systems. Do not use this device to jump start other vehicles or battery systems; doing so may cause a fire or serious injury.
- Page 15 COMPONENT LABEL:...
-
Page 16: Troubleshooting
TROUBLESHOOTING: Issue Cause Remedy Cannot jump start Wrong clamp Be sure to clamp the RED jumper cable to connection the POSITIVE (+) post on the car battery. And BLACK jumper cable to NEGATIVE (-) post or car interior. Refer to Page 9 for details. 30-Second timer Jump starter timed out. - Page 17 DÉMARREUR DE BATTERIE ET CHARGEUR PORTABLE ITM. / ART. # 263084 WP ITM. AC56789 AC56789UK-60 Mode d’emploi...
-
Page 18: Élimination De La Batterie
INSTRUCTIONS CONCERNANT LES RISQUES D’INCENDIE, DE CHOC ÉLECTRIQUE OU DE BLESSURES CORPORELLES AVERTISSEMENT : • Portez systématiquement des lunettes de sécurité lorsque vous démarrez une batterie (pour protéger vos yeux), et des gants lorsque vous en manipulez une (pour protéger vos mains). •... -
Page 19: Consignes De Sécurité Importantes
AVERTISSEMENT (SUITE) : CONSIGNES DE SÉCURITÉ IMPORTANTES AVERTISSEMENT - L’utilisation de cet appareil exige de respecter systématiquement un certain nombre de précautions élémentaires, en particulier : a) Lisez toutes les instructions avant d’utiliser l’appareil. b) Si l’appareil est utilisé à proximité d’enfants, une supervision particulière sera nécessaire pour minimiser les risques de blessure. -
Page 20: Protection Personnelle
AVERTISSEMENT (SUITE) : m) En cours d’utilisation, des mesures doivent être prises pour minimiser les risques d’exposition à la pluie, aux giboulées, à la neige et aux autres éléments. n) PROTECTION PERSONNELLE : Lorsque vous travaillez à proximité d’une batterie au plomb, il sera souhaitable d’avoir quelqu’un qui soit suffisamment près de vous pour vous venir en aide en cas de besoin. -
Page 21: Contenu De L'emballage
AVERTISSEMENT (SUITE) : s) Branchez les câbles de sortie sur une batterie et le châssis en vous référant aux consignes ci-dessous. Ne laissez jamais les pinces de sortie entrer en contact l’une avec l’autre. t) Des chutes, coups et autres chocs excessifs subis par le démarreur seraient susceptibles d’endommager l’appareil (à... -
Page 22: Caractéristiques Techniques
CARACTÉRISTIQUES TECHNIQUES: Dimensions du produit : 168 x 77 x 27 mm (6.61 x 3.03 x 1.06 in) Poids du produit : 0.97 lbs (440 g) Batterie interne : Lithium-Ion Capacité : Jusqu’à 10 000 mAh (3,7 V) Watts-heure : 37.2 Wh Tension d’entrée : DC 5V 2A... - Page 23 TÉMOINS DE NIVEAU DE PUISSANCE : Appuyez sur le bouton d’alimentation pour vérifier la capacité du démarreur Témoins 1 clignotant 1 solide 2 solide 3 solide 4 solide lumineux : Capacité de la Below 5% 5-25% 26-50% 51-76% 76% - Full batterie : Lors du chargement, les témoins clignotent un par un.
-
Page 24: Aide Au Démarrage
CHARGE DE VOS APPAREILS USB : Utilisez le câble USB fourni par le fabricant de votre appareil et branchez-le sur l’un des ports de sortie USB. Vous pouvez charger deux appareils en même temps. L’un des ports est une prise de type C, qui a une sortie maximale de 2 A à 9 V et 2,6 A à 5 V. - Page 25 AIDE AU DÉMARRAGE (SUITE) : Prenez l’extrémité BLEUE du câble de démarrage et branchez-la sur la prise de démarrage du chargeur, située sous le cache noir. Rouge Noir Branchez la pince ROUGE sur la borne POSITIVE (+) de la batterie de la voiture. La borne de batterie POSITIVE sera légèrement plus grande que la borne NÉGATIVE et sera marquée d’un signe PLUS (+).
- Page 26 AIDE AU DÉMARRAGE (SUITE) : Vérifiez l’état des témoins LED sur le boîtier indicateur situé sur le câble de démarrage. Passez à l’étape suivante, sauf si le témoin clignote en rouge et Boîtier émet un BIP sonore. indicateur Veuillez vous reporter au tableau d’état des témoins LED à...
- Page 27 AIDE AU DÉMARRAGE (SUITE) : avec une partie métallique du véhicule. Débranchez ensuite l’extrémité BLEUE du câble de démarrage. Cela réinitialisera le câble de démarrage. Le démarreur s’éteindra alors automatiquement au bout de 10 secondes. 10. Laissez le moteur tourner pendant 20 à 30 minutes ou conduisez la voiture pour recharger la batterie.
- Page 28 AIDE AU DÉMARRAGE (SUITE) : État du circuit de protection de polarité Signification : État (témoin lumineux et sonore) Lumière rouge Lumière verte Aucun La batterie de la voiture est prête pour le démarrage. Aucun Le démarreur doit être chargé. Aucun La batterie de la voiture est prête pour le démarrage.
-
Page 29: Garantie
GARANTIE : WINPLUS EUROPE Garantie limitée Winplus garantit à l’acheteur initial que ses produits sont exempts de vices de matériaux et de fabrication pour une durée de 12 mois à compter de la date d’achat initiale. Dans la mesure permise par la loi, la responsabilité de Winplus est limitée à... - Page 30 équipés d’une prise 12 V, avec systèmes de batteries au plomb. N’utilisez pas cet appareil pour faire démarrer d’autres types de batterie et de véhicule ; cela risquerait autrement de provoquer un incendie ou des blessures graves. Reportez-vous au manuel de votre véhicule pour plus d’informations relatives à...
- Page 31 ÉTIQUETTES : Input = Entrée Output = Sortie Polarity Protection Circuit Status = État du circuit de protection de polarité No Sound = Pas de son Beeping = Bip OK to jump start = OK pour lancer l’aide au démarrage Charge power bank = Charger le démarreur OK / charge power bank = OK / Charger le démarreur Disconnect = Débrancher...
-
Page 32: Dépannage
DÉPANNAGE : Problème Cause Solution Impossible de lancer Branchements Vérifiez que la pince ROUGE est bien l’aide au démarrage défectueux au branchée sur la borne POSITIVE (+) de niveau des bornes la batterie du véhicule. Et que le câble de démarrage NOIR est bien branché... - Page 33 ARRANCADOR DE BATERÍA Y CARGADOR DE BATERÍA PORTÁTIL ITM. / ART. # 263084 WP ITM. AC56789 AC56789UK-60 Manual de Uso...
-
Page 34: Eliminación De La Batería
INSTRUCCIONES RELACIONADAS CON EL RIESGO DE INCENDIO, CHOQUE ELÉCTRICO O LESIONES A PERSONAS ADVERTENCIA: • Siempre use gafas de seguridad (para proteger los ojos) cuando utilice un arrancador de batería, y guantes durante la manipulación de una batería (para proteger las manos). •... -
Page 35: Instrucciones Importantes De Seguridad
ADVERTENCIA - CONT.: INSTRUCCIONES IMPORTANTES DE SEGURIDAD ADVERTENCIA: Cuando utilice este producto siempre deberá implementar precauciones básicas, incluyendo lo siguiente: a) Lea minuciosamente todas las instrucciones antes de usar este producto. b) A fin de reducir el riesgo de lesiones, es necesaria la supervisión rigurosa cuando la unidad se use cerca de niños. -
Page 36: Precauciones Personales
ADVERTENCIA - CONT.: n) PRECAUCIONES PERSONALES: Considere la posibilidad de tener a alguien cerca que pueda ayudarlo mientras trabaje cerca de una batería de plomo-ácido. Tenga a mano mucha agua fresca y jabón en caso que el ácido de la batería entre en contacto con la piel, la ropa o los ojos. -
Page 37: Contenido Del Envase
ADVERTENCIA - CONT.: Dejar caer, golpear o usar fuerza excesiva con el arrancador de batería puede dañar la unidad (de forma interna o externa), lo que podría provocar interrupciones en su funcionamiento, un incendio eléctrico, u otro daño grave. GUARDE ESTAS INSTRUCCIONES. CONTENIDO DEL ENVASE: Cargador de Batería Funda... -
Page 38: Especificaciones Técnicas
ESPECIFICACIONES TÉCNICAS: Dimensiones: 168 x 77 x 27 mm (6.61 x 3.03 x 1.06 in) Peso: 0.97 lbs (440 g) Batería Interna: Ion Litio Capacidad: Hasta 10 000 mAh (3,7 V) Horas de Vatios: 37.2 Wh Tensión de Entrada: DC 5V 2A Tensión de Salida USB-A: DC 5V 2.4A Tensión de Salida USB-C: DC 9V 2A / DC 5V 2.6A Corriente del Arrancador:... - Page 39 LUCES INDICADORAS DEL NIVEL DE CARGA: Pulse el botón de encendido para verificar la capacidad del Arrancador. Luces 1 Intermitente 1 Constante 2 Constante 3 Constante 4 Constante Indicadoras: Capacidad de 76% - Carga Menos de 5% 5-25% 26-50% 51-76% Completa la Batería: Durante la carga, las luces indicadoras se encienden intermitente...
-
Page 40: Carga De Dispositivos Usb
CARGA DE DISPOSITIVOS USB: Utilice el cable USB del fabricante original suministrado con su dispositivo y enchúfelo a uno de los puertos de salida USB. Pueden cargarse dos dispositivos simultáneamente. Uno de los puertos es un toma Tipo-C, con una salida máxima de 2A a 9V y 2,6A a 5V. - Page 41 ARRANQUE DE LA BATERÍA - CONT.: Tome el extremo AZUL del cable del arrancador y enchúfelo en el toma del arrancador, situado por debajo de la tapa negra. Roja Negra Conecte la pinza ROJA al terminal POSITIVO (+) en la batería del vehículo.
- Page 42 ARRANQUE DE LA BATERÍA - CONT.: Verifique el estado del LED en la ventana de luz indicadora en el cable del arrancador. Proceda con los pasos siguientes amenos que la luz se encienda intermitente y Ventana emita una ALARMA SONORA. Indicadora De ser necesario, consulte la tabla de los estados de LED en la página 44.
- Page 43 ARRANQUE DE LA BATERÍA - CONT.: 10. Mantenga el motor encendido durante 20 a 30 minutos o haga una recorrida con el vehículo para recargar la batería. NOTA: Si el motor falla poco después de haber arrancado con el arrancador, o en cuanto se desconecta el cable del arrancador, esto probablemente signifique que el sistema de carga del vehículo no funciona (problemas con el alternador, regulador de tensión, cableado o cables de la batería flojos o sucios).
- Page 44 ARRANQUE DE LA BATERÍA - CONT.: Estado del Circuito de Protección contra Cambios de Polaridad Significado de cada estado: Estado (Indicador Luminoso y Sonoro) Luz Roja Luz Verde Sonido Nada La batería del vehículo está lista para el uso del arrancador. Nada El arrancador debe recargarse.
-
Page 45: Responsabilidades Del Propietario
GARANTÍA: Garantía Limitada de WINPLUS EUROPE Winplus garantiza, al comprador original, que sus productos están libres de defectos de materiales y mano de obra durante un período de 12 meses a partir de la fecha de la compra original. Cuando así lo permita la ley, la responsabilidad de Winplus se limitará... - Page 46 GARANTÍA - CONT.: ADVERTENCIA: Este Arrancador tiene una capacidad máxima de 400A, y su único uso previsto es con automóviles, camiones, barcos o motocicletas de 12V con sistemas de batería única de plomo-ácido. Nunca use este dispositivo para el arranque de otros vehículos o sistemas de batería, ya que esto podría ocasionar un incendio o lesión grave.
- Page 47 ETIQUETA SOBRE COMPONENTES: Input = Entrada Output = Salida Polarity Protection Circuit Status = Estado del Circuito de Protección contra Cambios de Polaridad No Sound = Mudo Beeping = Alarma Sonora OK to jump start = Listo para iniciar procedimiento de arranque Charge power bank = Cargar cargador OK / charge power bank = OK/ Cargar cargador Disconnect = Desconectar...
- Page 48 DETECCIÓN Y RESOLUCIÓN DE FALLOS: Problema Causa Remedio No puede iniciar el Pinzas mal Asegúrese de conectar la pinza ROJA al procedimiento de conectadas terminal POSITIVO (+) de la batería del arranque vehículo y el cable NEGRO del arrancador al terminal NEGATIVO (-) o el interior del vehículo.
Need help?
Do you have a question about the AC56789 and is the answer not in the manual?
Questions and answers
ONLY ONE LIGHT EVER LIGHTS UP
Only one light lights up on the TypeS AC56789 because of the upsurge protection feature. This safety feature causes the lights to flash and prevents charging. To fix it, unplug the USB cable and plug it back in to resume charging.
This answer is automatically generated
where is the light turn on switch