SMA SUNNY WEBBOX User Manual
Device for plant monitoring
Hide thumbs
Also See for SUNNY WEBBOX:
- Technical description (100 pages) ,
- User manual (96 pages) ,
- Installation manual (64 pages)

Related Manuals for SMA SUNNY WEBBOX


Summary of Contents for SMA SUNNY WEBBOX
- Page 1 Device for Plant Monitoring SUNNY WEBBOX User Manual SWebBox-BEN111033 | 98-0002233 | Version 3.3...
-
Page 3: Table Of Contents
Nomenclature ........10 Sunny WebBox ....... . . 11 Safety . - Page 4 Logging in and out of the Sunny WebBox... . 43 Logging into the Sunny WebBox ..... . . 43 Logging out of the Sunny WebBox.
- Page 5 Setting SMA-COM ........
- Page 6 Firmware Update via SD Card ......73 11.4 Stopping the Sunny WebBox ......74 11.5 Resetting the Sunny WebBox .
- Page 7 17.1 Sunny WebBox........96 17.2...
- Page 8 SMA Solar Technology AG SWebBox-BEN111033 User Manual...
-
Page 9: Information On This Manual
This manual does not contain any detailed information about the connected devices. Detailed information about the connected devices is provided in the manuals for the devices. 1.1 Validity This manual is valid for the Sunny WebBox with hardware version E1 or higher and firmware version 1.52 or higher. 1.2 Additional Information You will find further information on the Sunny WebBox in the download area of www.SMA.de/en. -
Page 10: Symbols Used
Information on this Manual SMA Solar Technology AG 1.3 Symbols Used The following types of safety precautions and general information appear in this document: DANGER! "DANGER!" indicates a hazardous situation which, if not avoided, will result in death or serious injury. -
Page 11: Sunny Webbox
Sunny WebBox 2 Sunny WebBox As the central communication interface, the Sunny WebBox connects the PV plant and its operator. The Sunny WebBox collects and documents all data of the connected devices, thus permitting interruption-free monitoring of the PV plant. The operator can access all the data stored in the Sunny WebBox via an Internet connection or a GSM modem. - Page 12 Sunny WebBox. If the Power Reducer Box is connected, the Sunny WebBox will record the requirements of the utility operator and forward them to the inverter. The Sunny WebBox informs the operator of the requirements of the utility operator.
-
Page 13: Safety
3 Safety 3.1 Appropriate Usage The Sunny WebBox is a data logger, that records, logs and makes available the data of a PV plant. The Sunny WebBox can receive the requirements of the utility operator via the Power Reducer Box and forward them to the inverters in the PV plant. The Sunny WebBox is suitable for monitoring PV plants of any size. -
Page 14: Safety Instructions
• Install the cabling in such a way that no one can stand on or trip over it. • The Sunny WebBox is only to be operated using the supplied plug-in power supply and in the voltage range intended for this. -
Page 15: Unpacking
Screw anchors Operating manual with drilling template and Quick Start SD card — inserted into the SD card slot on the Sunny WebBox (only with the ordering option Sunny WebBox with SD card). Modem cable with RJ11 plug and RJ11 to TAE adapter (only with the ordering option Sunny WebBox with analog modem). -
Page 16: Identifying The Sunny Webbox
The type plate can be found on the back of the enclosure. Firmware Version The firmware version can be found in the user interface of the Sunny WebBox. The current firmware version is displayed on the bottom right corner of every page. -
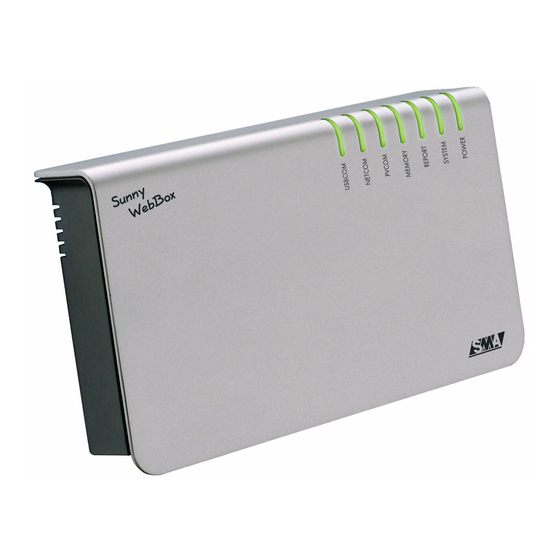
Page 17: Device Overview
NETCOM flashes green The Sunny WebBox will transmit data to the Sunny Portal. glows green The most recent data transmission to Sunny Portal/FTP push has been successful. glows red The most recent data transmission to Sunny Portal/FTP push failed. -
Page 18: Overview Of The Connection Area
LED name Status Meaning SYSTEM flashes red Sunny WebBox is starting. glows red An error has occurred in the Sunny WebBox. glows green Sunny WebBox is operational. POWER glows green Sunny WebBox has power. Sunny WebBox does not have power. -
Page 19: Overview Of The Leds On The Network Connection
5.3 Overview of the LEDs on the Network Connection Item Status Meaning Speed 100 MB connection speed 10 MB connection speed Link / Activity Connection (link) established Flashing The Sunny WebBox is currently transmitting or receiving data (activity). No connection established User Manual SWebBox-BEN111033... -
Page 20: Commissioning
• The maximum permitted telephone cable length is 200 m. • The Sunny WebBox requires an outlet with a grid voltage of 100 V ... 200 V. • Protect the Sunny WebBox from dust, wet conditions, corrosive substances and vapors. -
Page 21: Connecting The Sunny Webbox Directly To The Computer
• For a cable with no more than 50 m total length, a AWG26/7 cable may be used. 2. Connect the plug-in power supply to the Sunny WebBox and plug it into the socket (see ➁ ). ☑ As soon as the "SYSTEM" and "POWER" LEDs glow green, the Sunny WebBox has started up and is ready for operation. -
Page 22: Configuring Network Settings On The Computer
6.4.1 Information on Network Settings on the Computer Before you can use the Sunny WebBox for the first time, you need to configure your computer based on the network settings of the Sunny WebBox. The settings are described for the following operating systems: •... - Page 23 – Delete any entries in the "Default gateway", "Preferred DNS server", and "Alternate DNS server" boxes. 9. Select [OK]. 10. In the "Local Area Connection Properties" window, select [OK]. ☑ The computer is set to the network settings of the Sunny WebBox. User Manual SWebBox-BEN111033...
-
Page 24: Windows Xp, Windows 2000
– If Windows displays several LAN connections, there are probably several network connections installed in the computer. Ensure that you select the correct network connection, with which the computer is connected to the Sunny WebBox. If necessary, refer to the computer manual. -
Page 25: Logging In To The Sunny Webbox For The First Time
Commissioning 6.5 Logging in to the Sunny WebBox for the First Time The Sunny WebBox distinguishes between 2 user groups: user and installer. The two user groups are distinguished by two different passwords. If the password is the same for both user groups, you will be logged in as the installer. - Page 26 1. Start Web browser (e.g. Internet Explorer). Activating JavaScript in the Web browser The Sunny WebBox user interface needs JavaScript in order to be able to correctly configure and display the functions and content of the Sunny WebBox. Activate JavaScript in your Web browser If necessary, refer to the help section in your Web browser.
-
Page 27: Configuring Sunny Webbox For The Local Network
2. In the "Obtain IP address" field, select the value "Static". 3. In the "IP Address" field enter the static IP address, under which the Sunny WebBox is to be reachable in the local network (see section 15.1 "Allocating an IP Address in a Local Network"... - Page 28 • For a cable with no more than 50 m total length, a AWG26/7 patch cable may be used. 11. Connect the plug-in power supply to the Sunny WebBox and plug it into the socket (see ➁ ). ☑ The Sunny WebBox starts. As soon as the "SYSTEM" and "POWER" LEDs glow green, the Sunny WebBox has started up and is ready for operation.
-
Page 29: Configuring The Sunny Webbox For Modem Operation
• Mount the GSM antenna with the bracket or extension set (see page 33). 6.7.2 Connect Modem Cable or GSM Antenna Depending on the ordered version of your Sunny WebBox, carry out the steps in the corresponding section: • For a Sunny WebBox with analog modem, see section "Connecting the Sunny WebBox to the telephone network via modem cable"... - Page 30 – TAE- or TAE-N telephone socket: Attach the provided RJ11 - TAE adapter to the modem cable and insert it into the telephone socket. ☑ Check whether the Sunny WebBox is connected to the telephone network. You can now configure the modem settings in the Sunny WebBox.
- Page 31 Commissioning Connecting the GSM antenna to a Sunny WebBox 1. If you have ordered a Sunny WebBox without integrated GSM modem containing an integrated SIM card, then retrofit a SIM card as described in section 15 "Appendix" (page 85). 2. Screw the GSM antenna cable onto the antenna terminal of the Sunny WebBox.
-
Page 32: Configuring The Modem Settings For The Sunny Webbox
Enter an appropriate place holder here. For examples of GSM contracts available within Germany, see page 90. 5. In the Sunny WebBox with GSM modem, you must also enter the data contained in your documents in the "GSM SIM PIN" and "GPRS APN" fields. -
Page 33: Determining The Mounting / Installation Location For The Gsm Version
Proceed as follows to determine the optimal mounting location: 1. Select "WebBox > Settings > Modem" on the user interface. 2. Modem settings of the Sunny WebBox are configured (see section 6.7 "Configuring the Sunny WebBox for Modem Operation" (page 29)). 3. Select [Signal strength]. - Page 34 3. Attach the antenna bracket to the wall with the screws. 4. Connect the antenna cable to the Sunny WebBox. ☑ You have now successfully mounted the antenna. Mounting a GSM Antenna with the GSM Antenna Extension Set Additional accessories available for the Sunny WebBox.
- Page 35 5. Insert the antenna into the antenna bracket from above. 6. Hold the antenna to prevent the antenna cable from twisting. Tighten the antenna counternut using a wrench. 7. Connect the antenna cable to the Sunny WebBox. ☑ You have now successfully mounted the antenna. User Manual SWebBox-BEN111033...
-
Page 36: Connecting The Sunny Webbox To The Inverter
The Sunny WebBox is connected to the Sunny Central via Ethernet. Configure the Sunny WebBox for the local network and connect the Sunny WebBox directly to the receiver (e.g., router, switch or hub) of the Sunny Central via the red network cable (patch cable). -
Page 37: Connecting The Sunny Webbox To The Rs485 Communication Bus
6.8.2 Connecting the Sunny WebBox to the RS485 Communication This section describes how to connect the Sunny WebBox to the RS485 communication bus. It will be assumed that the Sunny WebBox is located at the end of the RS485 communication bus. - Page 38 Commissioning SMA Solar Technology AG 5. Connect the insulated conductors to the plug connector. Observe the configurations of the insulated conductors in the RS485 communication bus. 6. Shorten unused insulated conductors until flush with cable sleeve. 7. Place the plug on the bottom half of the cable enclosure and use the cable tie to fix the cable jacket to the bottom half of the cable enclosure.
- Page 39 8. Press the upper half of the cable enclosure to the lower half of the cable enclosure and the plug until the terminals snap together. 9. Insert the plug connector into the "SMA COM" socket of the Sunny WebBox. 10. Check whether jumpers are connected to "J1B" and "J1C"...
- Page 40 "J1A". If a jumper is not mounted, connect a jumper. – If the Sunny WebBox is not located at one of the two ends of the RS485 communication bus, no jumper may be inserted in "J1A". Remove the jumper from "J1A".
-
Page 41: Mounting The Sunny Webbox (Wall Or Top-Hat Rail)
SMA Solar Technology AG Commissioning 6.9 Mounting the Sunny WebBox (Wall or Top-Hat Rail) This section describes how to mount the Sunny WebBox in the following ways: • Mounting the Sunny WebBox onto the wall • Mounting the Sunny WebBox on the top-hat rail Mounting the Sunny WebBox onto the wall 1. - Page 42 SMA Solar Technology AG Mounting the Sunny WebBox on the top-hat rail 1. Hook the two lower brackets of the Sunny WebBox onto the lower edge of the top-hat rail. 2. Press the Sunny WebBox upwards and snap it into the upper brackets of the Sunny WebBox.
-
Page 43: Logging In And Out Of The Sunny Webbox
Password for installer user group: sma 1. Start Web browser (e.g. Internet Explorer). 2. Type the IP address of the Sunny WebBox into the address bar and press Enter. ☑ The Sunny WebBox login page opens. – If the page does not open, refer to section 14 "Troubleshooting" (page 80). -
Page 44: Logging Out Of The Sunny Webbox
7.2 Logging out of the Sunny WebBox Always log out from the Sunny WebBox when you finish your work on the Sunny WebBox. To do so, select [Logout]. If you only close the Web browser, you will not be logged out of the Sunny WebBox. -
Page 45: Operation
The navigation bar is always available. The submenu changes depending on which main menu item is selected. On the start page of the Sunny WebBox, there is an overview of the current output, the previous daily yield, and the previous total yield of all the connected inverters. -
Page 46: Explanation Of The Status Symbols
This section explains the meanings of the various status symbols in the Web interface of the Sunny WebBox. The symbol of a Sunny Boy appears in each of the following examples. The Sunny WebBox user interface shows other devices in the PV plant with corresponding symbols. -
Page 47: Overview According To Device Type
SMA Solar Technology AG Operation 8.1.3 Overview According to Device Type In the device view, the window on the right provides an overview of all devices in a group. To view all the devices of a specific type, select the device type in the device view. -
Page 48: Detecting Devices
3. Select a device in the device view or structural view. 4. Select the "Parameters" tab. ☑ The Sunny WebBox list all the parameters that can be changed on the selected device. The displayed parameters depend on the selected device The displayed parameters depend on the device you selected and can vary significantly between the product ranges (e.g. -
Page 49: Displaying The Event Report
3 in order to set the parameters for further devices. 8.4 Displaying the Event Report The event report provides a log of the various events that occur in both the Sunny WebBox and the devices connected to the Sunny WebBox. For example, information on file uploads to Sunny Portal or errors, warnings or other information regarding the connected devices can be stored in the event report by the Sunny WebBox. -
Page 50: Managing Plant Data
The Sunny WebBox transmits the data to Sunny Portal with the next data upload. If the ring buffer is full, the Sunny WebBox will overwrite the oldest data. The time the ring buffer can bridge depends on the device type and number of the detected devices. -
Page 51: Registering Sunny Webbox In The Sunny Portal
13. Select [Register] in the "Last Sunny Portal registration" field. The Sunny Portal password will be sent to the entered e-mail address. ☑ The Sunny WebBox data transmission to Sunny Portal is configured. On the "WebBox > Info" page, you can see when the Sunny WebBox last successfully transmitted data. User Manual... -
Page 52: Activating/Deactivating Data Transmission To Sunny Portal
☑ This setting activates or deactivates data transmission to Sunny Portal. 9.2.3 Adjusting the Plant ID for Sunny Portal Sunny Portal identifies your Sunny WebBox via the plant identifier. In the following cases, you must adjust the plant ID in the Sunny WebBox: •... -
Page 53: Deleting The Sunny Portal Buffer
Every time the Sunny WebBox connects with Sunny Portal, Sunny Portal saves the current address of the Sunny WebBox or your router with which the Internet connection is established. If your router is configured accordingly, you can access your Sunny WebBox via Sunny Portal. -
Page 54: Integrated Ftp Server
SMA Solar Technology AG 9.3 Integrated FTP Server The Sunny WebBox is equipped with an integrated FTP server. The FTP server allows you to access CSV files or compressed XML files. In order to use the FTP server, you must first assign the respective read and write access rights for the FTP server on the Sunny WebBox. -
Page 55: Ftp Push Function
You can also test the FTP push function using an FTP server installed locally on your computer. To learn how to install a local FTP server and use it to test the Sunny WebBox FTP push function with a local FTP server, please read the Technical Information "Setting up the local FTP server". -
Page 56: Testing The Ftp Push Function
– FTP connection test failed: check the configuration of your FTP server and the Sunny WebBox. If necessary, you must adjust settings of the FTP server and the Sunny WebBox. If you have any questions, ask your network administrator and repeat the connection test. -
Page 57: Storing Recorded Data On An Sd Card
When an SD card is inserted into the SD card slot, the Sunny WebBox copies all data from the internal memory to the external memory (SD card). The Sunny WebBox will save new data to the SD card until you remove it from the SD card slot. -
Page 58: Setting Data Compression
You can display the ring buffer capacity of the Sunny WebBox already in use as follows: 1. Log into the Sunny WebBox. 2. Select "WebBox > Info" in the user interface. ☑ The Sunny WebBox displays how full the ring buffer is in the "Sunny Portal Buffer Load" field on the user interface. SWebBox-BEN111033... -
Page 59: Settings
SMA Solar Technology AG Settings 10 Settings 10.1 System 10.1.1 Setting Date and Time 1. Select "WebBox > Settings > System" in the user interface. 2. Select [Change] in the "Time zone (UTC offset)" field. ☑ The "Date / Time / Time zone settings" window opens. -
Page 60: Setting The Communication Type Of The Pv Plant
• Sunny Central (US version only) "ETHERNET" • All Sunny Central devices (excluding US version) 3. If "SMA-COM" is selected, click [Save] and continue with section 10.2.1 "Setting SMA-COM" (page 61). If "ETHERNET" is selected, click [Save] and continue with section 10.2.2 "Setting ETHERNET"... -
Page 61: Setting Sma-Com
SMA Solar Technology AG Settings 10.2.1 Setting SMA-COM If the devices of your PV plant are to communicate with the Sunny WebBox via SMA-COM, you must configure this communication method. Data transmission protocols SMA inverters use proprietary protocols for data transmission. -
Page 62: Setting Ethernet
SMA Solar Technology AG 10.2.2 Setting ETHERNET If the devices of your PV plant are to communicate with the Sunny WebBox via Ethernet, you must configure this communication method. 1. On the "PV subnet mask" of the user interface, enter the subnet mask of the communication bus of the central inverter page. -
Page 63: Activating Dhcp
1. In the field "Public virtual HTTP port", enter the port enabled in the router for HTTP access. This port allows the web server of the Sunny WebBox to be accessed via the Internet. 2. In the "Webserver port" field, enter the port over which the Web server of the Sunny WebBox can be reached. -
Page 64: Enable Modem Dialup
Settings SMA Solar Technology AG 3. In the "Webservice port" field, enter the port which the Sunny WebBox uses to data to the Sunny Portal and which loads the Sunny WebBox firmware updates. 4. Select "yes" in the "Use Modbus" field to use the Modbus protocol for Sunny WebBox communication. -
Page 65: Testing The Connection
☑ A successful connection test means that all settings are correct. If the connection test was not successful, check the modem settings (see section 6.7 "Configuring the Sunny WebBox for Modem Operation" (page 29)). Perform the connection test once again. 10.4.2 Testing the Signal Strength of the GSM Modem 1. -
Page 66: Ensuring Access Security
• Never leave slips of paper with passwords lying around. Check the quality of your password. Choose a more secure password if necessary. On initial installation of the Sunny WebBox (no devices have been detected yet), the user interface prompts you to change the default password. -
Page 67: Setting Data Upload
"safe". 5. Select [Save]. ☑ The new password will be active the next time you log into the Sunny WebBox. 10.6 Setting Data Upload The upload frequency setting is used to define how frequently the Sunny WebBox connects to the Sunny Portal or the external FTP server each day. -
Page 68: Configuring The Csv Data Format
Settings SMA Solar Technology AG 10.7 Configuring the CSV Data Format 1. Select "WebBox > Recording" on the user interface. 2. In the "Format" field, select "CSV". 3. Select [Configure]. ☑ The page for configuring the CSV data format opens. 4. Select the desired format of the file name in the "Filename format" field. -
Page 69: Retrieving Or Requesting Data From The Device Memory
SMA inverters of the type Sunny Backup. The Sunny WebBox allows you to retrieve data from the memory of devices that are supported and have been detected by the Sunny WebBox. This data can either be retrieved automatically or requested manually. -
Page 70: Notification In Case Of Error
The Sunny WebBox can notify you by e-mail when an error event occurs. An Internet connection is required for this feature. If your Sunny WebBox comes with a GSM modem, you can also be notified via SMS. This allows you to react rapidly to failures in your PV plant and minimize downtime. -
Page 71: Enabling/Disabling Notification In Case Of Error
(see page 27), or the settings and signal strength of the GSM modem (see page 29). 8. If a GSM modem is installed on the Sunny WebBox, make a selection in the "Send error as SMS message" field. -
Page 72: Service Functions
11 Service Functions 11.1 Information on Firmware Updates You have the option of updating the Sunny WebBox firmware. The firmware can be updated with or without access to Sunny Portal. When the Sunny WebBox firmware is updated, all the settings and data will be saved. -
Page 73: Manually Updating The Firmware
5. Check whether the Sunny WebBox is available via the user interface. 6. If the Sunny WebBox can be accessed via the user interface, you can remove the SD card. If the Sunny WebBox cannot be accessed via the user interface, do not remove the SD card. -
Page 74: Stopping The Sunny Webbox
You can stop the Sunny WebBox in one of the following ways: • Stopping the Sunny WebBox via the user interface • Stopping the Sunny WebBox by removing the plug-in power supply from the socket Stopping the Sunny WebBox via the User Interface 1. -
Page 75: Resetting The Sunny Webbox
Sunny Portal. If you start the Sunny WebBox without making further settings, the Sunny WebBox creates a new plant with a new plant identifier in Sunny Portal. If the Sunny WebBox is to send the data to the existing plant in Sunny Portal, take the following steps after the reset: •... - Page 76 ☑ The Sunny WebBox will now start with the factory settings. Resetting the Sunny WebBox via the Reset Button Beginning with Sunny WebBox version E1, the hole for the Reset button is found on the rear panel of the Sunny WebBox under the upper left foot.
-
Page 77: Deleting Device Descriptions
2. Select "WebBox > Info" on the user interface. 3. Select [Delete device descriptions]. ☑ The unit descriptions of all devices will be erased. When the Sunny WebBox is restarted, all unit descriptions will be detected again automatically. User Manual... -
Page 78: Maintenance And Care
Maintenance and Care SMA Solar Technology AG 12 Maintenance and Care 12.1 Maintenance Conduct regular visual inspections of the Sunny WebBox to check for external damage or dirt. 12.2 Care NOTICE! Damage or destruction of the Sunny WebBox due to ingress of liquids. The Sunny WebBox is not waterproof. -
Page 79: Decommissioning
4. If the Sunny WebBox is connected to the telephone network via a modem connection, disconnect the telephone cable from the Sunny WebBox. 5. If the Sunny WebBox is connected directly to a computer or a local network via the Ethernet connection, disconnect the Ethernet cable from the Sunny WebBox. -
Page 80: Troubleshooting
14 Troubleshooting Problem Cause Rectification The Sunny WebBox is The network connection of the Make sure the Sunny WebBox is not available via the Sunny WebBox has been connected to the network. Check the user interface. interrupted. network cable and all the connections of the Sunny WebBox and the computer. - Page 81 Remove the SD card from the SD card repeatedly. file in the "Update" folder on the slot of the Sunny WebBox. Make sure SD card. there is only one update file in the "Update" folder on the SD card. Once...
- Page 82 RS485 cabling diagram for information on how the cables should be connected to the RS485 communication bus. Make sure the RS485 cable is properly connected to the Sunny WebBox. Check all connections (see section 6.8.2 "Connecting the Sunny WebBox to the RS485 Communication Bus"...
- Page 83 Function" (page 55)). Check whether the server port is set to the correct value (see section 9.4 "FTP Push Function" (page 55)). Test the Sunny WebBox FTP push function (see section 9.4 "FTP Push Function" (page 55)). After an FTP download, Given the way Microsoft...
- Page 84 After a Sunny WebBox A Sunny WebBox that is Assign the plant identifier of the old is replaced, Sunny supplied as a replacement system to the replacement device (see...
-
Page 85: Appendix
10.3 "Ethernet Network" (page 62)). 1. If necessary, remove the write protection of the SD card. 2. Insert the SD card into the SD card slot of the Sunny WebBox (see section 9.6 "Storing Recorded Data on an SD Card" (page 57)). ☑ "MEMORY" LED flashes orange. The Sunny WebBox saves data to a specific directory folder on the SD card The name of the data file is "WebBox_[SerialNumber]", whereby... -
Page 86: Structure Of The Config.xml File
Displays "true" when DHCP use is enabled and "false" when DHCP use is disabled. IP address The IP address of the Sunny WebBox as configured by the user or obtained from the DHCP server. SubNetMask The subnet mask of the Sunny WebBox as configured by the user or obtained from the DHCP server. -
Page 87: Structure Of The Info.xml File
Serial number Sunny WebBox serial number. MacAddress Hardware address of the Sunny WebBox. Created Time of the FTP push connection test Version The current firmware version of the Sunny WebBox OSVersion Version of the Sunny WebBox operating system User Manual SWebBox-BEN111033... -
Page 88: Structure Of An Xml Data File
Appendix SMA Solar Technology AG 15.5 Structure of an XML Data File <?xml version="1.0" encoding="utf-8"?> <WebBox> <Info> <Created>2010-02-10T01:37:04</Created> <Culture>de</Culture> </Info> <MeanPublic> <Key>WR38-006:2000333615:Ipv</Key> <First>10.360</First> <Last>20.225</Last> <Min>10.360</Min> <Max>20.225</Max> <Mean>14.425071</Mean> <Base>14</Base> <Period>900</Period> <TimeStamp>2010-06-23T16:30:38</TimeStamp> <MeanPublic> (...) </MeanPublic> <WebBox> Description of the XML tags Setting Meaning... -
Page 89: Sunny Webbox With Gsm Modem
If both outgoing and incoming data connections are necessary, a GSM device will need its own data number for CSD data services. The Sunny WebBox does not support other data services. A standard SIM card with additional data connectivity has two telephone numbers (multi-numbering). You can apply for additional data connectivity with your service provider when obtaining a contract. -
Page 90: Gsm Card Contracts In Germany
SUNNYWEBBOX-x5xx (integrated GSM modem without an integrated SIM card). NOTICE! Electrostatic discharges (ESD) may damage or destroy the Sunny WebBox. • Installation work on the Sunny WebBox may only be performed by qualified personnel. • Avoid coming into contact with components' connections and plug contacts. -
Page 91: Replacing The Sim Card
1. Using a Phillips screwdriver, unscrew the 4 screws at the rear and store them in a safe place. 2. Turn the Sunny WebBox so that the lid faces upwards. 3. Remove the lid of the Sunny WebBox and store it in a safe place. User Manual SWebBox-BEN111033... - Page 92 Appendix SMA Solar Technology AG 4. Remove the old SD card from the Sunny WebBox. 5. Insert new SIM card in the Sunny WebBox. 6. Position the lid of the Sunny WebBox on the enclosure and screw it into place.
-
Page 93: Accessing Sunny Webbox Via Integrated Analog Modem
Appendix 15.6.6 Accessing Sunny WebBox via Integrated Analog Modem This section describes how to access your Sunny WebBox from any computer with a modem via the integrated modem. The computer must be equipped with an analog modem or an ISDN modem with CAPI driver. - Page 94 9. Select [Next]. ☑ The "Internet Account Information" window opens. 10. Enter "User name" (either "User" or "Installer"). The user group selection does not affect the access rights to the Sunny WebBox. 11. Enter the password. 12. Select [Next]. ☑ A summary of the selections you made appears.
-
Page 95: Accessories
Order number: SWB-OUTANGSM 100 16.2 SD Cards As an alternative to the internal ring buffer, you can also store data from the Sunny WebBox on an SD card. Order number for SD card with 1 GB of memory: SD-Card 1 GB Order number for SD card with 2 GB of memory: SD-Card 2 GB 16.3 RS485 Communication Cable... -
Page 96: Technical Data
Technical Data SMA Solar Technology AG 17 Technical Data 17.1 Sunny WebBox Mechanical Data Width x height x depth 255 mm x 130 mm x 57 mm Weight 750 g Power Supply Typical power consumption Maximum power consumption 10 W Environmental Conditions Ambient temperature –20 °C ... -
Page 97: Plug-In Power Supply (Cincon, Trg30R 120)
SMA Solar Technology AG Technical Data 17.2 Plug-in Power Supply (CINCON, TRG30R 120) Mechanical Data Width x height x depth 107.8 mm x 57.5 mm x 33.5 mm Weight 300 g Power Supply Voltage 100 V − 240 V AC, 50 / 60 Hz Nominal current 0.8 A... -
Page 98: Contact
• Type of communication interface between Sunny WebBox and the inverters • Type and serial numbers of the inverters connected to the plant. • If you need to send in the Sunny WebBox, be sure to remove the SD card from the SD card slot of the Sunny WebBox. - Page 99 The use of supplied software produced by SMA Solar Technology AG is subject to the following conditions: • SMA Solar Technology AG rejects any liability for direct or indirect damages arising from the use of software developed by SMA Solar Technology AG. This also applies to the provision or non-provision of support activities.
Need help?
Do you have a question about the SUNNY WEBBOX and is the answer not in the manual?
Questions and answers